

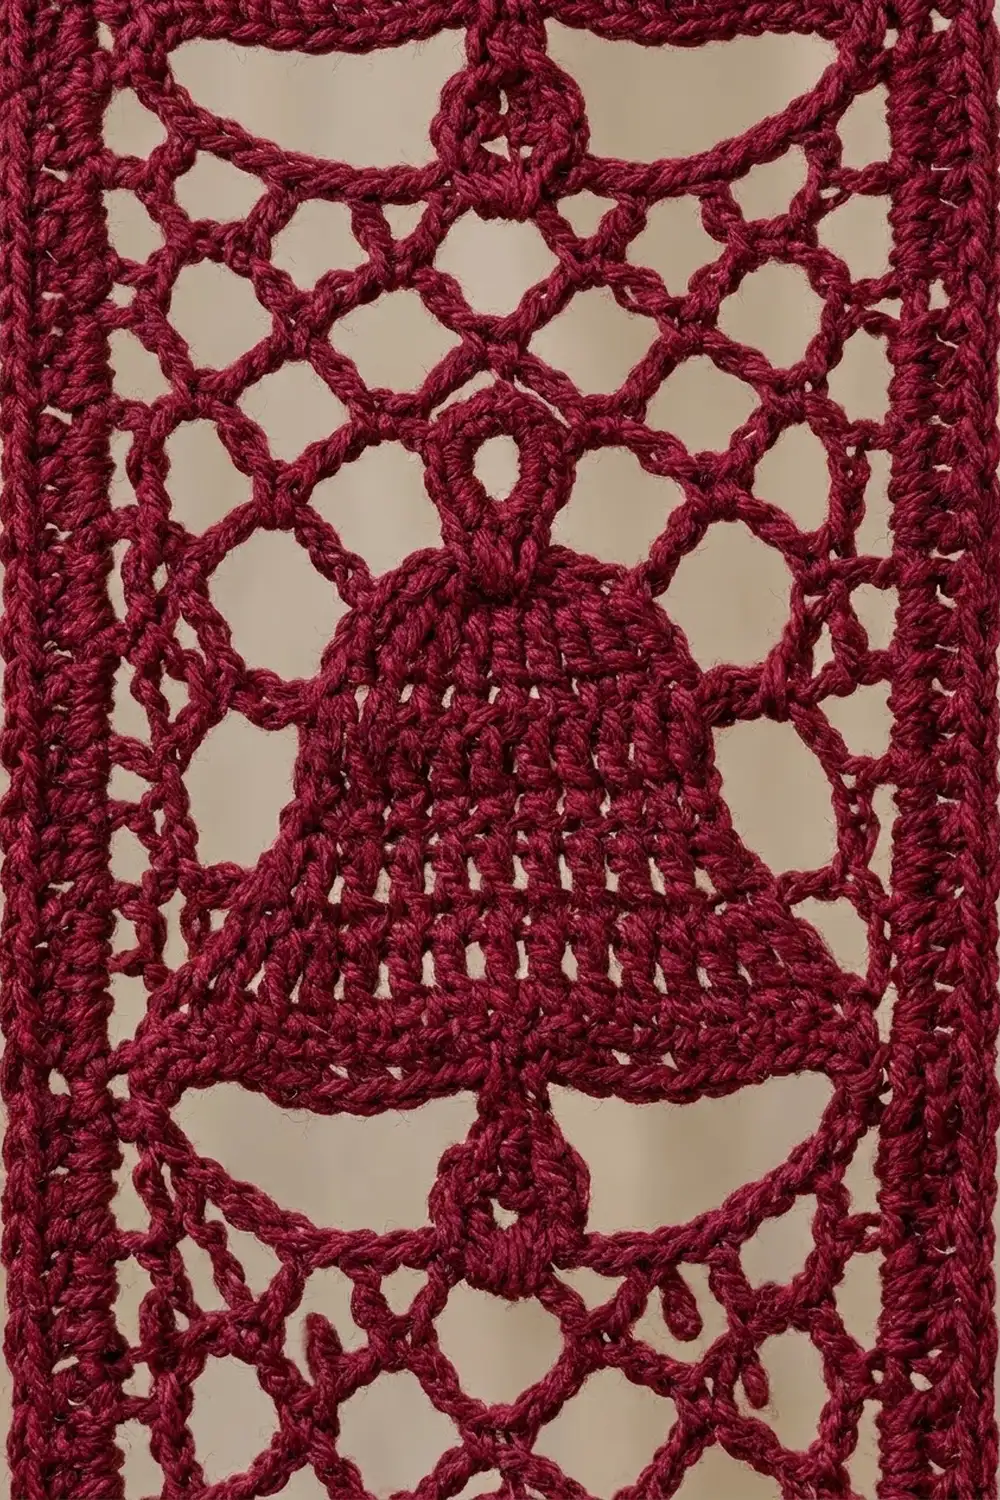
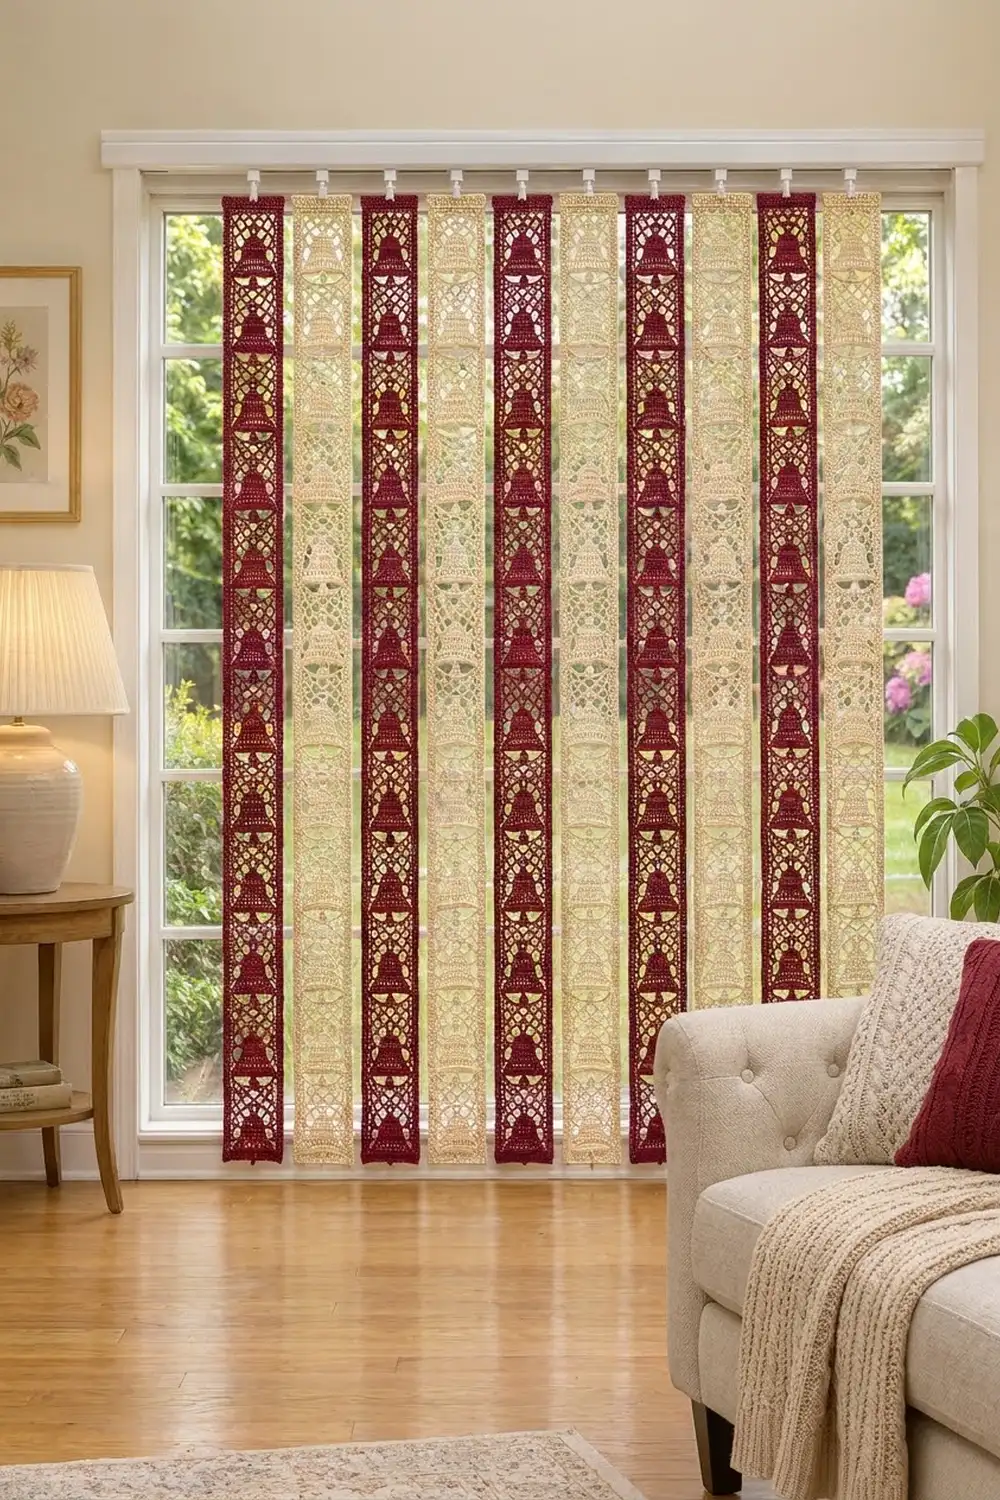
These long lace strips turn an ordinary set of vertical blinds into a holiday window. Each strip is a column of solid filet bells set into open mesh, with a crisscross lattice band between bells, all inside a neat solid frame.
The set alternates deep burgundy and soft cream. With light behind it, the burgundy reads like stained glass and the cream glows like old lace. The style is classic filet crochet: solid blocks against open squares, kept simple so the bell silhouettes stay crisp.
The pattern uses US crochet terms. Each finished strip measures 3.5 in (8.9 cm) wide by 68.3 in (173.5 cm) long. The length is easy to adjust in 4.8-in (12.2-cm) steps.
Each strip is worked flat from the bottom up, in rows of filet blocks, spaces, lacets and bars. A two-round single crochet border goes around the whole strip. You make ten separate strips and clip each one to a blind carrier. No joining is needed.
Finished Size and Construction
- Finished strip size: 3.5 in × 68.3 in (8.9 cm × 173.5 cm)
- Skill level: Intermediate (filet crochet, lacet stitch)
- Terminology: US crochet terms
- Yarn weight: Size 3 mercerized cotton crochet thread (light fingering)
- Hook: 2.0 mm
- Number of pieces: 10 separate strips (5 burgundy, 5 cream)
- Layout: Strips hang side by side in alternating colors, one per blind clip
- Piece size before border: 3.0 in × 67.8 in (7.6 cm × 172.2 cm)
- Border depth: 0.25 in (0.6 cm) on every side
- Grid: 10 filet squares wide × 226 rows tall; each square is about 0.3 in (0.8 cm)
Materials
Yarn: Use a mercerized cotton thread of about 140 m per 50 g. Mercerized cotton holds the bell shapes crisply, resists fading in a sunny window and keeps its length better than acrylic. Avoid fuzzy or very stretchy fibers, because a strip this long will grow under its own weight.
- Burgundy: 450 g (about 1,260 m) for 5 strips
- Cream: 450 g (about 1,260 m) for 5 strips
One strip uses about 80 g (224 m). The quantities above include a margin of about 10% for swatching and blocking.
Tools:
– 2.0 mm crochet hook
– Tapestry needle
– Rust-proof pins and a long blocking surface (foam mats or a carpeted floor with a towel)
– Spray bottle; optional light spray starch
– Measuring tape
– Stitch markers
Abbreviations (US Terms)
- ch – chain
- sc – single crochet
- dc – double crochet
- sk – skip
- sp – space
- st(s) – stitch(es)
- RS – right side
Filet units. Every row has 31 stitch positions, which make 10 squares: 3 positions per square plus 1 closing dc.
- Edge start (ES): Ch 3 (counts as dc), dc in next 3 dc. This is column 1, always a block.
- Edge end (EE): Dc in next 2 dc, dc in top of beg ch-3. This is column 10, always a block.
- Block (B), worked over a block: Dc in next 3 dc.
- Block (B), worked over a space: 2 dc in ch-2 sp, dc in next dc.
- Space (Sp): Ch 2, sk next 2 sts or the ch-2 sp, dc in next dc.
Special stitches (each covers 2 squares):
- Lacet (L): Ch 3, then put an sc in the middle of the 2 squares below:
- over blocks, sk 2 sts and sc in next st;
- over spaces, sc in the dc between them;
- over a bar, sc in the 3rd ch of the ch-5.
Then ch 3 and dc in the dc that closes the second square.
– Bar: Ch 5, sk the lacet below (ch-3, sc, ch-3), dc in next dc.
– Space pair over a bar: Ch 2, dc in 3rd ch of ch-5, ch 2, dc in next dc. This makes 2 spaces.
Alternating lacet rows and bar rows creates the crisscross lattice.
Gauge and Checkpoints
Gauge: 10 squares and 10 rows = 3.0 in × 3.0 in (7.6 cm × 7.6 cm) in filet pattern. One square is about 0.3 in (0.8 cm) each way.
Test one strip first. Work Row 1 and the first full 16-row repeat (17 rows total), then measure before you go on.
Checkpoints:
– After Row 1: 3.0 in (7.6 cm) wide.
– After Row 17 (one repeat): 5.1 in (13.0 cm) tall.
– After Row 113 (7 repeats): 33.9 in (86.1 cm) tall.
– After Row 226: 67.8 in (172.2 cm) tall.
– After the border: 3.5 in × 68.3 in (8.9 cm × 173.5 cm).
If your strip is too big (for example, 3.2 in / 8.1 cm wide after Row 1), change to a 1.75 mm hook. If it is too small (for example, 2.8 in / 7.1 cm), change to a 2.25 mm hook. Change hooks rather than stitch counts, because the bell chart depends on the 10-square grid.
Row height matters most on a strip this long. A 0.02-in (0.1-cm) error per row adds up to about 4.5 in (11.4 cm) over 226 rows. Measure at Row 17 and again at Row 113.
Strip Pattern
Turn at the end of every row. The fabric is reversible, so either side can face the room.
Foundation
Row 1: Ch 33. Dc in 4th ch from hook (the skipped ch count as the first dc) and in each of the remaining 30 ch. You have 31 dc (10 blocks).
Bell Repeat (Rows R1–R16)
Work the 16-row repeat below 14 times in total. The first repeat is strip Rows 2–17; the last is strip Rows 210–225.
Every row starts with ES and ends with EE. The instructions in between cover the 8 inner squares (columns 2–9). Each row totals 10 squares.
R1 (lacet row): ES, 4 L, EE.
(2 edge blocks + 4 lacets covering 8 squares = 10 squares.)
R2 (bar row): ES, 4 bars, EE.
(2 blocks + 4 bars = 10 squares.)
R3: ES, 4 L (sc into the 3rd ch of each bar), EE.
R4: ES, 4 bars, EE.
R5 (open row): ES, 4 space pairs over the bars, EE.
(2 blocks + 8 spaces.)
R6 (clapper): ES, 3 Sp, 2 B, 3 Sp, EE.
(4 blocks + 6 spaces.) The two center blocks form the clapper that hangs below the rim.
R7 (rim): ES, 8 B, EE.
(10 blocks = 31 dc, solid across.) This is the flared lip of the bell.
R8: ES, 1 Sp, 6 B, 1 Sp, EE.
(8 blocks + 2 spaces.)
R9: Repeat R8.
R10: ES, 2 Sp, 4 B, 2 Sp, EE.
(6 blocks + 4 spaces.)
R11–R12: Repeat R10. These three rows form the straight body of the bell.
R13 (crown): ES, 3 Sp, 2 B, 3 Sp, EE.
(4 blocks + 6 spaces.)
R14 (stem): ES, 3 Sp, 2 B, 3 Sp, EE.
(4 blocks + 6 spaces.)
R15: ES, 8 Sp, EE.
(2 blocks + 8 spaces.)
R16: ES, 8 Sp, EE.
The lattice band (R1–R4) sits between bells. The open rows (R5, R15, R16) surround each bell with plain mesh, so the silhouette reads clearly.
Stitch-position check: Every row has 31 positions:
– ES = 4 (ch 3 plus 3 dc)
– each B or Sp = 3
– each L or bar = 6
– EE = 3
For example, R6 = 4 + 9 + 6 + 9 + 3 = 31.
Top Band
Row 226: ES, 8 B (each made as 2 dc in ch-2 sp, dc in next dc), EE. You have 31 dc (10 blocks). Do not fasten off.
Body check: 1 + (14 × 16) + 1 = 226 rows. 226 × 0.3 in = 67.8 in (172.2 cm).
Adjusting length: Each repeat adds or removes 16 rows, which is 4.8 in (12.2 cm). Always keep Row 1 and the final solid row. If you change the row count, recalculate the border side counts as 2 × the number of rows.
Make All Pieces
Make 10 strips, all identical in stitch count:
- Burgundy (A): 5 strips
- Cream (B): 5 strips
Hanging layout, left to right, one strip per blind clip:
A | B | A | B | A | B | A | B | A | B
Lay each finished strip next to the first one before blocking to check that the bells line up row for row. Matching bells across the window are what make the display look planned.
Joining
The strips are not joined. Each one hangs independently from its own blind carrier, so it can turn with the blind’s tilt control.
- Method: Slide the solid top band into the blind clip. The top band is Row 226 plus the border, about 0.55 in (1.4 cm) deep, which gives the clip a firm grip.
- Stitch-to-stitch logic: There are no seams. Each strip keeps its own 31-stitch width and its own border.
- Tension advice: Do not stretch a strip as you clip it. Hang it, let it settle for an hour, then adjust its height so that all ten bottom edges line up.
- Size checkpoint: Every hanging strip should measure 68.3 in (173.5 cm). If they touch edge to edge, ten strips cover about 35.0 in (88.9 cm) of track.
Border
Use the same color as the strip. The border is solid single crochet, so it frames the lace and stops the edges from rolling.
Border gauge:
– Across the top and bottom: 1 sc per stitch.
– Along the long sides: 2 sc per dc row-end. One dc row is 0.3 in (0.8 cm), so this gives about 6.7 sc per inch, which lies flat on a sideways row-end.
In the counts below, “between corners” means the sc that sit between the 3-sc corner groups. The corner sts are counted separately.
Round 1 (RS): Do not turn. Ch 1, 3 sc in the last dc of Row 226 (corner). Then:
- Long side: Work 2 sc in each row-end down the side: 226 row-ends × 2 = 452 sc between corners.
- Bottom corner: 3 sc in the first foundation ch.
- Bottom: Sc in the free loop of each of the next 29 foundation ch (29 sc between corners).
- Bottom corner: 3 sc in the last foundation ch.
- Second long side: 2 sc in each row-end (452 sc between corners).
- Top corner: 3 sc in the beg ch-3 of Row 226.
- Top: Sc in each of the next 29 dc (29 sc between corners).
Join with sl st to the first sc.
Total: 2 × 452 + 2 × 29 + 4 × 3 = 974 sc.
Round 2: Ch 1. Sc in each sc around, with 3 sc in the center sc of each corner group. Join.
- Long sides: 454 sc between corners each.
- Short sides: 31 sc between corners each.
- Corners: 4 groups of 3 sc.
Total: 2 × 454 + 2 × 31 + 12 = 982 sc. Each side gains 2 because the outer sc of each Round 1 corner group now count as side stitches.
Fasten off and weave in ends.
Why the math works: The 31 top stitches are the strip’s full width. The first and last of them carry the corners, which leaves 29 between corners. On the sides, 2 sc per row matches the row height, so the edge neither ruffles nor pulls in. Two rounds of sc add 0.25 in (0.6 cm) on every side:
- Width: 3.0 + 0.5 = 3.5 in (8.9 cm)
- Length: 67.8 + 0.5 = 68.3 in (173.5 cm)
Final Blocking
- Soak the strip in cool water for 10 minutes. Press out the water; do not wring.
- Roll the strip in a towel to remove excess moisture.
- Lay it flat on the blocking surface, working in 24-in (61.0-cm) sections if your space is short.
- Pin the long edges straight at 3.5 in (8.9 cm) apart, placing a pin every 2 in (5.1 cm).
- Ease the length to 68.3 in (173.5 cm). Don’t stretch it past this, because hanging adds a little length.
- Open each lacet and bar so that the X shapes in the lattice are even. Pin the rim and clapper of each bell flat.
- Optional: mist with light spray starch for a crisper hang.
- Let the strip dry completely before you unpin it.
Final Quality-Control Checklist
- [ ] Every row has 10 squares; the edge columns are solid all the way up.
- [ ] 14 bells per strip, all with mouths facing down.
- [ ] Each bell has an 8-block rim, a 6-block flare, a 4-block body, a 2-block crown and a 2-block stem.
- [ ] The clapper is 2 blocks wide and centered under the rim.
- [ ] Each lattice band has 2 lacet rows and 2 bar rows.
- [ ] Border Round 2 totals 982 sc, with 3 sc at each corner.
- [ ] The strip measures 3.5 in × 68.3 in (8.9 cm × 173.5 cm).
- [ ] Bells line up across all ten strips.
- [ ] All ends are woven in securely, with none near the clip area.
Troubleshooting
The bell looks off-center. Count the spaces on each side. R8 needs 1 Sp per side, R10–R12 need 2, and R6, R13 and R14 need 3.
The lattice twists or leans. You probably placed a lacet sc in the wrong chain. Over a bar, the sc always goes in the 3rd ch of the ch-5.
The strips have different lengths. Measure each strip at Row 113 against 33.9 in (86.1 cm). Fix row height with your hook size, not by adding rows.
The border ruffles. Work 2 sc per row-end exactly, and don’t add extras at the bell rows. If it still ruffles, use a hook 0.25 mm smaller for the border only.
The border pulls in. Check that you didn’t skip any row-ends. Each long side must have 452 sc between corners in Round 1.
The strip stretches after hanging. Re-block it with starch. Next time, use mercerized cotton rather than a softer blend.
Care
Hand wash in cool water with mild soap and lay flat to dry, re-pinning to 3.5 in × 68.3 in (8.9 cm × 173.5 cm). Unclip the strips before you wash them, and re-starch them if you want a crisp hang.
Final Notes
The measurement chain holds the whole project together:
- One square = 0.3 in (0.8 cm).
- 10 squares = 3.0 in (7.6 cm) of width.
- 226 rows = 67.8 in (172.2 cm) of length.
- Two border rounds add 0.25 in (0.6 cm) per side, for a finished 3.5 in × 68.3 in (8.9 cm × 173.5 cm).
Check your gauge at Row 17, confirm at Row 113 and match every strip to the first. Then ten clean bell columns will hang evenly across your window.
Happy crocheting!