

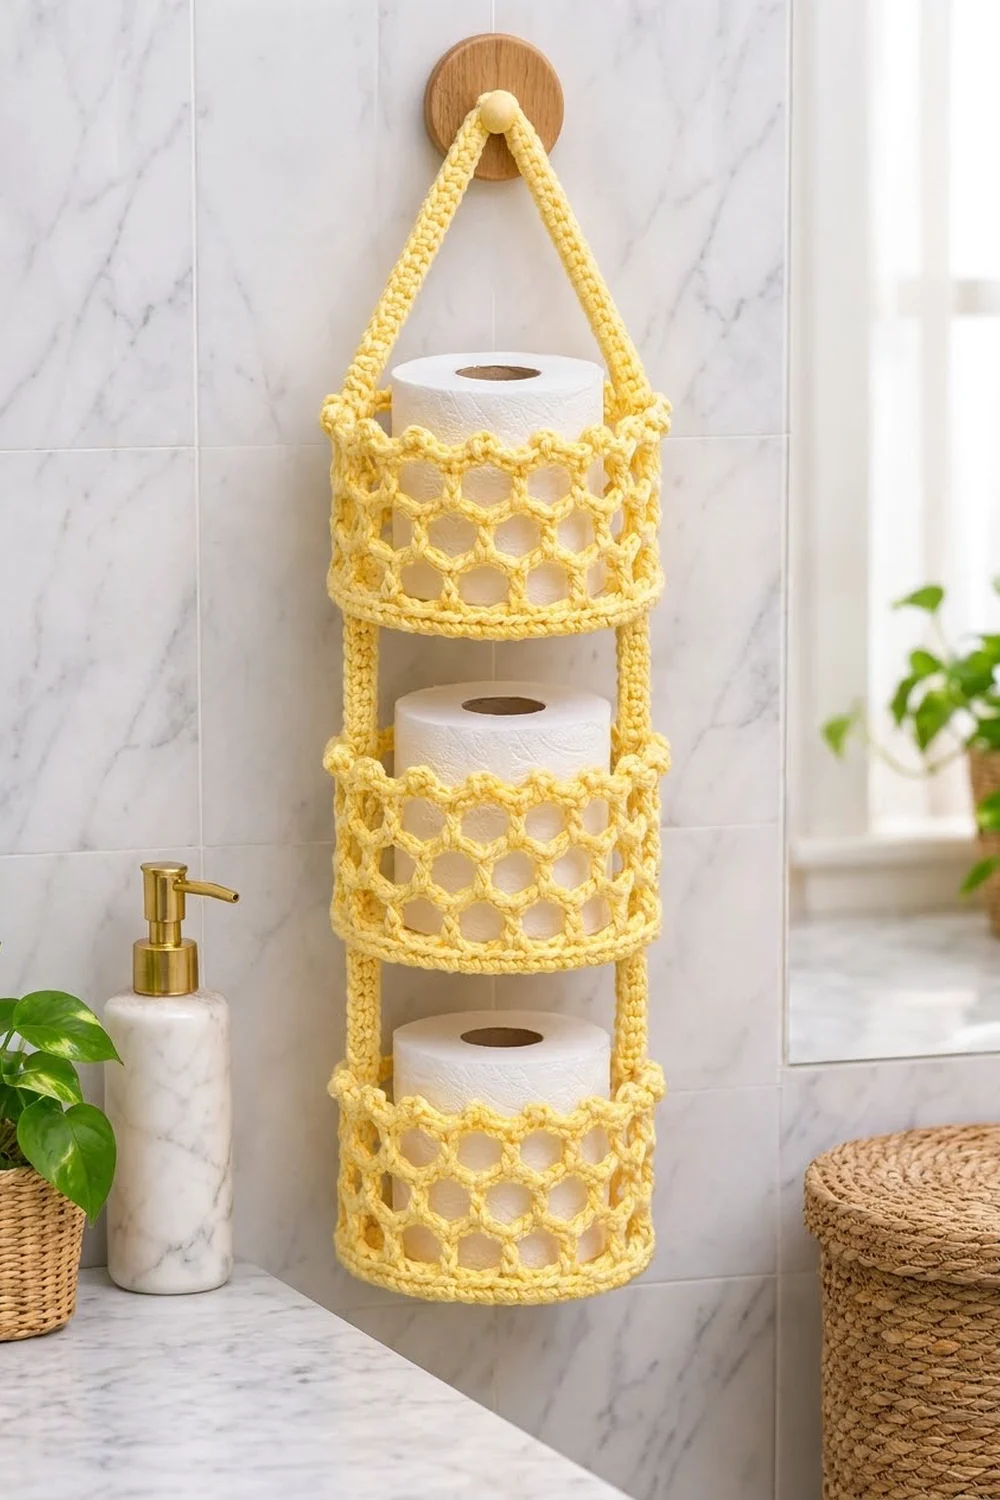
The Honeycomb Tower is a three-tier hanging toilet paper holder. It has three round baskets with honeycomb mesh sides, held together by two slim straps that meet at a hanging loop. The open mesh lets you see at a glance when you’re running low, and the solid bands at the top and bottom of each basket keep the shape crisp.
The sample is made in one soft butter yellow, which looks fresh and clean against white marble or tile. Small picot knots at each mesh junction give the honeycomb a beaded look. The style is modern farmhouse: useful, tidy, and a little playful.
This pattern uses US crochet terms. The finished holder is about 24 in (61.0 cm) long from the bottom of the lowest basket to the top of the hanging loop. Each basket is about 5.5 in (14.0 cm) across and 4 in (10.2 cm) tall, and holds one standard roll.
You make each basket from the bottom up: a flat double crochet base, a solid single crochet band, five rounds of chain-loop honeycomb mesh, a solid top band, and a reverse single crochet rim. Then you crochet two straps in rows and sew them to opposite sides of the stacked baskets.
Finished Size and Construction
- Finished size: about 24 in (61.0 cm) long overall; baskets 5.5 in (14.0 cm) across
- Skill level: Easy–Intermediate
- Terminology: US
- Yarn weight: Worsted (#4), cotton or cotton blend
- Hook: 5.0 mm (H-8)
- Number of pieces: 5 (3 baskets, 1 short strap, 1 long strap with loop)
- Layout: baskets stacked vertically in a single column, straps on the left and right
- Piece size: basket 5.5 in (14.0 cm) across × 4 in (10.2 cm) tall; straps about 1.1 in (2.8 cm) wide × 21 in (53.3 cm) long
- Basket height before border: 3.75 in (9.5 cm)
- Border depth: 0.25 in (0.6 cm), one reverse single crochet rim round
Materials
Use a smooth, firm cotton. Cotton holds its shape under the weight of a roll and shows off the picot knots. Avoid fuzzy or very drapey yarns, because the mesh will sag.
- Butter Yellow worsted cotton: 150 g, about 235 m (257 yd), based on a yarn with about 155 m (170 yd) per 100 g
Tools:
– 5.0 mm (H-8) crochet hook
– Tapestry needle
– 4 locking stitch markers
– Straight pins or clips
– Measuring tape
– Scissors
– A toilet roll or a 4.5 in (11.4 cm) wide jar, for shaping
The yarn quantity includes a margin of about 15% beyond the measured use, so you have room for a gauge swatch and small adjustments.
Abbreviations (US Terms)
- ch – chain
- sl st – slip stitch
- sc – single crochet
- dc – double crochet
- BLO – back loop only
- rev sc – reverse single crochet (crab stitch)
- sk – skip
- st(s) – stitch(es)
- sp – space
Special stitch – Picot: ch 3, sl st into the first of those 3 ch. This makes the small knot at each mesh junction.
Reverse sc: working from left to right (right-handed), insert the hook into the next stitch to the right, yarn over, pull up a loop, yarn over, and pull through both loops.
Gauge and Checkpoints
Gauge: 14 sc and 16 rows = 4 in (10.2 cm) in sc worked in rows.
Make one basket completely before starting the others. It’s your real gauge test, and it should fit a roll. Measure at each checkpoint:
- After Round 1: about 1.1 in (2.8 cm) across
- After Round 3: about 3.3 in (8.4 cm) across
- After Round 5: 5.5 in (14.0 cm) across, lying flat
- After Round 8: side wall 0.75 in (1.9 cm) tall
- After Round 13: wall 3.25 in (8.3 cm) tall
- After Round 15: wall 3.75 in (9.5 cm) tall
- After Round 16: wall 4 in (10.2 cm) tall
If your piece is too big (the base is over 5.75 in / 14.6 cm), go down half a hook size. If it’s too small (under 5.25 in / 13.3 cm, or a roll won’t drop in easily), go up half a hook size. Don’t add stitches, because the mesh needs a multiple of 4.
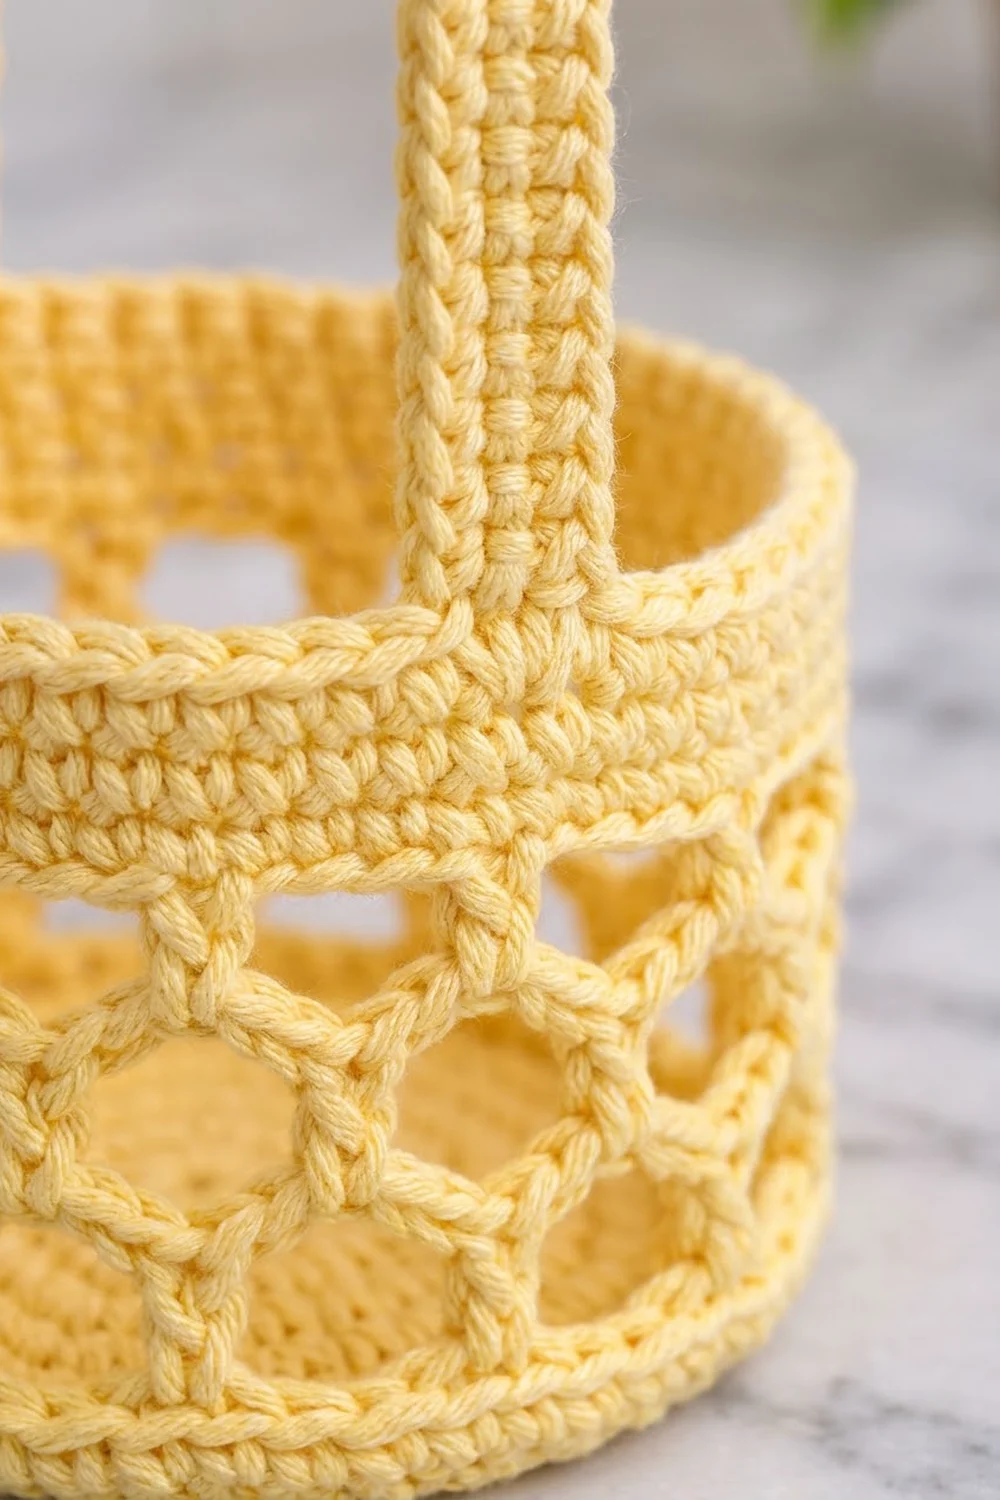
Basket (Make 3)
Base
Round 1: Make a magic ring, ch 2 (doesn’t count as a stitch), work 12 dc into the ring, then sl st to the first dc. Pull the ring tight. (12 sts)
Round 2: Ch 2, 2 dc in each st around, then sl st to the first dc. (24 sts)
Round 3: Ch 2, dc in next st, 2 dc in next st, repeat from * around, then sl st to the first dc. (36 sts)
Round 4: Ch 2, dc in next 2 sts, 2 dc in next st, repeat from * around, then sl st to the first dc. (48 sts)
Round 5: Ch 2, dc in next 3 sts, 2 dc in next st, repeat from * around, then sl st to the first dc. (60 sts)
The base should lie flat and measure 5.5 in (14.0 cm) across. If it ruffles, your dc are too loose. If it cups, they are too tight.
Bottom Band
Round 6 (conversion round): Ch 1, sc BLO in each st around, then sl st to the first sc. (60 worked 1-per-stitch + 0 added = 60 sts)
Working into the back loops makes a sharp fold where the base turns into the wall.
Rounds 7–8: Ch 1, sc in each st around, then sl st to the first sc. (60 sts each round)
The wall is now 0.75 in (1.9 cm) tall.
Honeycomb Mesh
Round 9 (mesh setup): Ch 1, sc in first st, ch 5, sk 3 sts, sc in next st. Repeat from * 13 more times, then ch 5, sk the last 3 sts, and sl st to the first sc. (15 sc, 15 ch-5 loops)
Check: 15 repeats × 4 stitches used (1 sc + 3 skipped) = 60. Every base stitch is accounted for.
Round 10: Sl st into each of the first 3 ch of the next loop so you sit at its center. Ch 1, (sc, picot) in the same loop, ch 5. (Sc, picot) in the next loop, ch 5. Repeat from * around, then sl st to the first sc. (15 loops, 15 picots)
Rounds 11–13: Repeat Round 10. (15 loops, 15 picots each round)
Each mesh round sits halfway between the loops of the round below. This offset is what makes the hexagon cells. The five mesh rounds (9–13) add 2.5 in (6.4 cm), so the wall is now 3.25 in (8.3 cm) tall. Slip a roll inside now and then to keep the loops evenly stretched.
Top Band
Round 14 (conversion round): Sl st to the center of the first loop, ch 1, then work 4 sc into each ch-5 loop around, behind the picots. Sl st to the first sc. (15 loops × 4 sc = 60 sts)
Round 15: Ch 1, sc in each st around, then sl st to the first sc. (60 sts)
The wall is now 3.75 in (9.5 cm) tall, which is the size before the border. Keep the yarn attached and go on to the Border section for this basket.
Straps
Short Strap (Make 1)
Foundation: Ch 5. Sc in the 2nd ch from the hook and in each remaining ch. (4 sts) This is Row 1.
Rows 2–84: Ch 1, turn, sc in each st across. (4 sts each row)
Fasten off and leave a 24 in (61.0 cm) tail. The strap measures 21 in (53.3 cm) long and about 1.1 in (2.8 cm) wide.
Long Strap with Loop (Make 1)
Rows 1–84: Work exactly as for the Short Strap. (4 sts)
Rows 85–112: Ch 1, turn, sc in the first 2 sts only, leaving the other 2 unworked. Keep working on these 2 sts. (2 sts each row)
This narrow tail adds 28 rows, 7 in (17.8 cm). Fasten off with a 12 in (30.5 cm) tail. Fold the narrow tail back and sew its last row to Row 84, centered. This makes a teardrop loop about 3.5 in (8.9 cm) long.
Make All Pieces
- Butter Yellow baskets: 3, about 35 g (54 m) each
- Butter Yellow short strap: 1, about 12 g (19 m)
- Butter Yellow long strap with loop: 1, about 14 g (22 m)
Total used: about 131 g. Your 150 g includes the margin.
Layout grid (front view):
              ( loop )
                 /\
         Strap A /  \ Strap B
                /    \
   Row 84 |  [ BASKET 3 ]  | Row 84
   Row 45 |  [ top tier ]  | Row 45
          |     gap        |
   Row 23 |  [ BASKET 2 ]  |
          |     gap        |
   Row 1  |  [ BASKET 1 ]  | Row 1
Joining
Method: whipstitch with the yarn tail and a tapestry needle, through both loops of the basket stitches and the strap edge stitches.
Mark each basket: Put markers in stitch 1 and stitch 31 of Round 15. They sit exactly opposite each other, with 30 stitches on each half.
Stitch-to-stitch logic: one strap row equals one solid basket round, and two strap rows equal one mesh round. Each basket uses:
- 3 rows against the bottom band (Rounds 6–8)
- 10 rows against the mesh (Rounds 9–13, 2 rows each)
- 2 rows against the top band (Rounds 14–15)
- 1 row against the rim (Round 16)
That is 16 rows, or 4 in (10.2 cm), per basket.
Strap placement (same on both straps):
- Rows 1–16: Basket 1 (bottom)
- Rows 17–22: gap, 6 rows, 1.5 in (3.8 cm)
- Rows 23–38: Basket 2
- Rows 39–44: gap
- Rows 45–60: Basket 3 (top)
- Rows 61–84: free triangle legs, 24 rows, 6 in (15.2 cm)
Pin the straps first, then sew. Lay one strap behind each marker, with Row 1 level with the fold between the base and the wall. Whipstitch both strap edges to the bottom band and the top band, stitch for row. On the mesh, tack the strap center to each picot junction it crosses.
Tension: sew firmly but don’t pull, because tight sewing puckers the band. Check that both straps are the same length between baskets, or the tiers will tilt.
Apex: Bring both Row 84 ends together above the top basket. Overlap the short strap’s Row 84 behind the long strap’s Row 84 and sew all around the overlap. The legs form a triangle about 5.3 in (13.5 cm) tall.
Size checkpoint: baskets and gaps add up to 15 in (38.1 cm). With the triangle and loop, the holder is about 24 in (61.0 cm) long.
Border
Work the border on each basket straight after Round 15, before joining. It gives the rim a firm, corded edge that keeps its round shape under a roll.
Border gauge: one rev sc per stitch, 0.25 in (0.6 cm) deep. At 14 sts per 4 in (10.2 cm), 60 stitches give a circumference of about 17.1 in (43.4 cm), which matches a diameter of 5.5 in (14.0 cm).
Round 16: Ch 1, rev sc in each st around, then sl st to the first st. (60 sts: 30 on each half between the stitch 1 and stitch 31 markers)
Fasten off and weave in the end.
Why the math works: 60 is a multiple of 4, which gives 15 even mesh loops. It also splits into two halves of 30, so the straps sit exactly opposite each other. Because the rim count matches the base count, the wall rises straight up without flaring or pulling in.
Final Blocking
- Weave in all remaining ends, going back through 3 stitches to lock them.
- Spray each basket lightly with water until it’s damp but not soaked.
- Slide a toilet roll or a 4.5 in (11.4 cm) wide jar into each basket. Push the mesh down so the cells open into even hexagons.
- Pull each picot into a round knot with your fingertip.
- Lay the straps flat, pin them to 1.1 in (2.8 cm) wide, and smooth any twist.
- Let everything dry completely, about 12 hours.
- Hang the holder and check that the tiers are level.
Final Quality-Control Checklist
- Each base measures 5.5 in (14.0 cm) and lies flat.
- Each basket has 60 sts at Rounds 5, 6, 14, 15, and 16.
- Every mesh round has 15 loops and 15 picots.
- All three baskets are 4 in (10.2 cm) tall.
- Both straps have 84 four-stitch rows. The long strap also has 28 two-stitch rows.
- The gaps between baskets are an even 1.5 in (3.8 cm).
- The apex is sewn securely and the loop is centered.
- No ends show from the front.
Troubleshooting
The base ruffles: go down a hook size, or check that you haven’t added extra increases.
The base cups: your dc are tight. Loosen up or go up half a hook size.
The mesh slants in a spiral: you didn’t move to the loop center before Round 10 and later rounds. Always sl st into 3 chains first.
The mesh sags: shorten the chains to ch 4 in Rounds 10–13. Expect a slightly shorter basket and add 2 strap rows of gap per tier to make up the difference.
The rim flares: your rev sc is loose. Try the rim round with a hook half a size smaller.
The tiers hang crooked: unpick one strap and re-pin it, counting rows against the placement list.
A roll won’t fit: block the basket over a slightly larger jar, or remake it with a larger hook.
Care
Hand wash in cool water with mild soap, press out the water in a towel, and dry flat over a roll to keep the shape. Don’t tumble dry.
Final Notes
The measurement chain is simple:
- Gauge of 14 sc = 4 in (10.2 cm) gives a 60-stitch base 5.5 in (14.0 cm) across.
- Each wall is 3 band rounds + 5 mesh rounds + 2 band rounds + 1 rim round = 4 in (10.2 cm), which matches 16 strap rows.
- Three baskets and two gaps fill 60 strap rows, or 15 in (38.1 cm).
- 24 more rows make the triangle.
- 28 narrow rows make the hanging loop.
Check each link in the chain and the holder will hang straight and hold three rolls neatly.
Happy crocheting!