

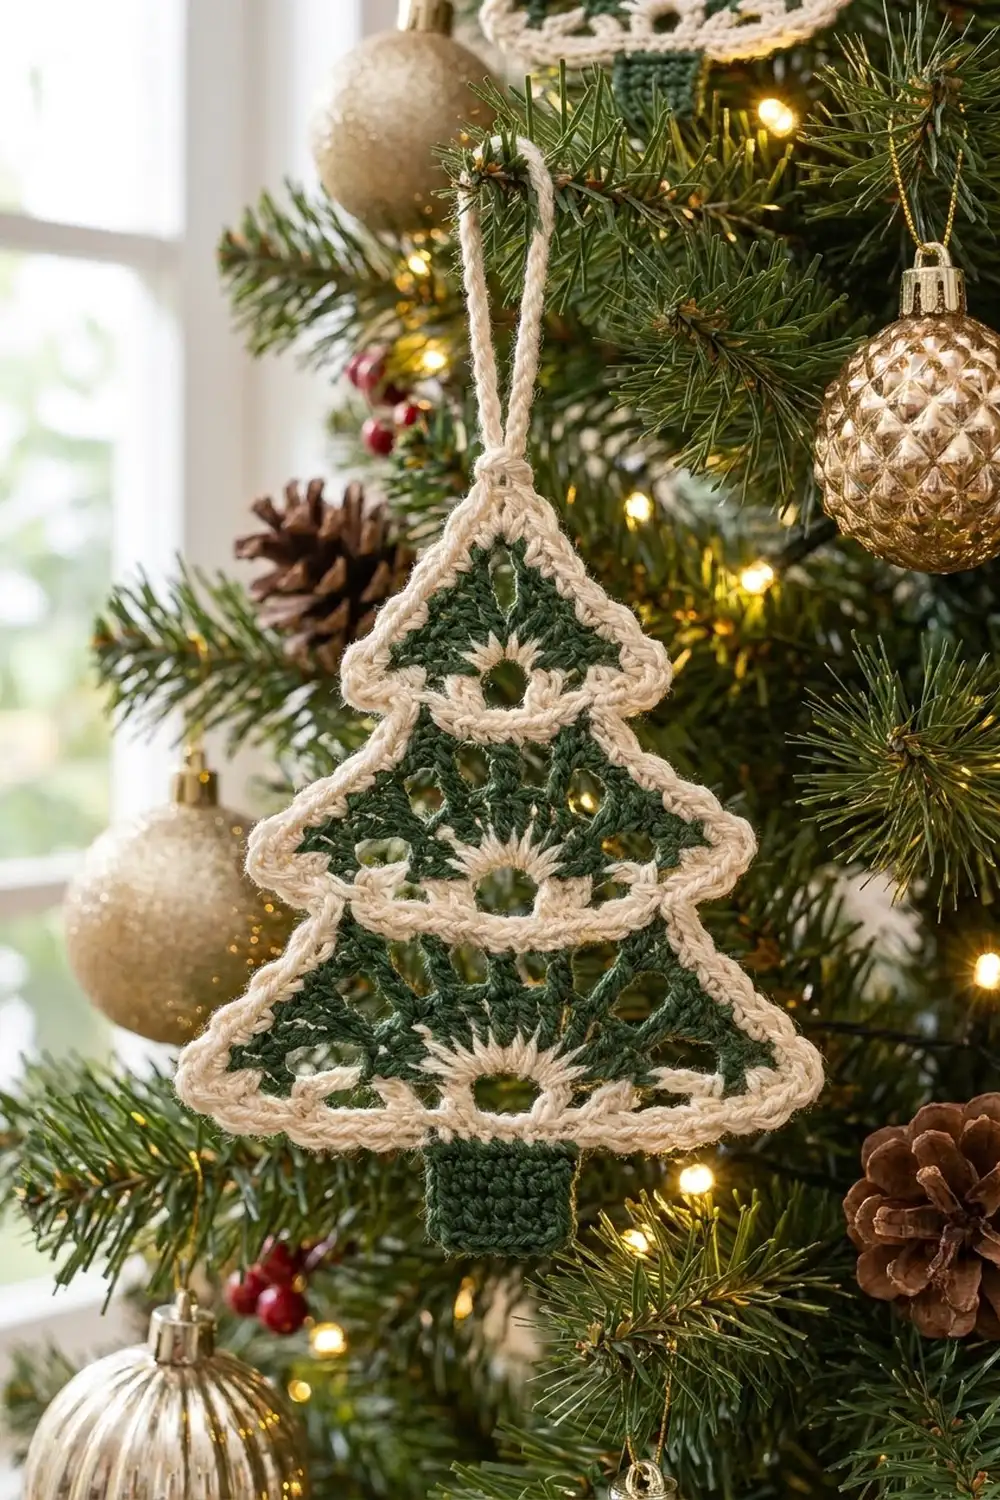
The Frosted Pine Lace Tree is a flat, airy Christmas tree ornament with three stacked tiers of dark green lace, a cream fan with a small eyelet at the base of each tier, and a twisted cream rope edging that traces every step of the outline. A small solid green trunk and a rope-covered hanging loop finish it off.
The palette is classic and calm: deep forest green against warm cream. The style is vintage lace with a bit of rustic texture from the rope edge. It looks right on a real tree, tied to a gift, or hung in a window.
This pattern uses US crochet terms. The finished ornament is 4.75 in (12.1 cm) wide and 6.5 in (16.5 cm) tall from the top point to the bottom of the trunk. With the hanging loop it is 7.75 in (19.7 cm) tall overall.
Construction is continuous. You work the bottom tier first, from a ring at its bottom center up to its top point. The middle tier starts inside the top point of the bottom tier, and the top tier starts inside the top point of the middle tier. A two-round cream border then wraps the whole outline, and the trunk is worked last into the back loops of the first border round.
Finished Size and Construction
- Finished size: 4.75 in (12.1 cm) wide x 6.5 in (16.5 cm) tall; 7.75 in (19.7 cm) tall including the loop
- Skill level: Intermediate (rows worked in clusters, color changes, reverse single crochet)
- Terminology: US
- Yarn weight: DK / light (3) cotton
- Hook: 3.5 mm (E-4)
- Number of pieces: 1 (one continuous ornament)
- Layout: 3 tiers stacked point-to-base, plus a trunk
- Tier sizes (before border): bottom 4.25 in (10.8 cm) wide x 2 in (5.1 cm) tall; middle 3.5 in (8.9 cm) x 1.75 in (4.4 cm); top 2.75 in (7.0 cm) x 1.5 in (3.8 cm)
- Size before border: 4.25 in (10.8 cm) wide x 5.25 in (13.3 cm) tall
- Border depth: 0.25 in (0.6 cm) on every edge
- Trunk: 1.25 in (3.2 cm) wide x 0.75 in (1.9 cm) tall
Materials
Choose a smooth mercerized or combed cotton in DK weight. Cotton keeps the points and the rope edge crisp and does not stretch out of shape while hanging. Avoid fuzzy yarns, which hide the lace.
- Color A – Forest Green: 8 g (about 19 m)
- Color B – Cream: 7 g (about 17 m)
Tools:
- 3.5 mm (E-4) crochet hook
- Tapestry needle
- Scissors
- Rust-proof pins and a foam blocking mat
- Spray bottle or steamer
- Ruler or tape measure
These quantities include about 30% extra for testing gauge and weaving in ends.
Abbreviations (US Terms)
- ch – chain
- sl st – slip stitch
- sc – single crochet
- dc – double crochet
- sp – space
- st(s) – stitch(es)
- BLO / FLO – back loop only / front loop only
- RS / WS – right side / wrong side
- rev sc – reverse single crochet (crab stitch)
Cluster: 3 dc worked into the same space.
Reverse single crochet (rev sc): If you are right-handed, work from left to right. Insert the hook into the next stitch to the right, yarn over, pull up a loop, yarn over, and pull through both loops. This twists each stitch, which makes the rope texture on the edge.
Gauge and Checkpoints
Gauge for the trunk is 22 sc and 26 rows = 4 in (10.2 cm). For the tiers, measure your gauge with the checkpoints below. Lace rows are easier to check by their shape than by counting stitches.
Make the bottom tier first and check it before you continue. Lay it flat without stretching and measure the straight bottom edge:
- After Row 1 (fan): 0.5 in (1.3 cm) wide
- After Row 2: 1.25 in (3.2 cm) wide
- After Row 3: 2 in (5.1 cm) wide
- After Row 6: 4.25 in (10.8 cm) wide and 2 in (5.1 cm) tall
Each row adds about 0.75 in (1.9 cm) to the width of the bottom edge.
If your tier is too big: go down 0.25 mm to 0.5 mm in hook size and make it again. If it is too small: go up 0.25 mm to 0.5 mm. Blocking can fix small differences of about 0.125 in (0.3 cm).
Tier Pattern Basics
Each tier is a triangle worked in turned rows, starting from a point at its bottom center. The row ends form the straight bottom edge. The last row forms both slanted sides and the top point.
Each row has an apex space (ch-2) at the center and clusters on both sides. Any row n has 2n clusters, 2n ch-1 spaces, 1 apex ch-2 space, and 6n + 2 dc in total (2 edge dc plus 3 dc in each cluster). The turning ch-4 counts as 1 dc plus 1 ch-1 space.
Bottom Tier (6 Rows)
Row 1 (RS), Color B: Ch 4, sl st in the first ch to form a ring. Ch 4 (counts as dc + ch 1), (3 dc, ch 2, 3 dc, ch 1, dc) in ring, changing to Color A in the last yarn over of the final dc. Fasten off Color B, leaving a tail. (8 dc: 2 clusters + 2 edge dc; 2 ch-1 sps; 1 ch-2 sp)
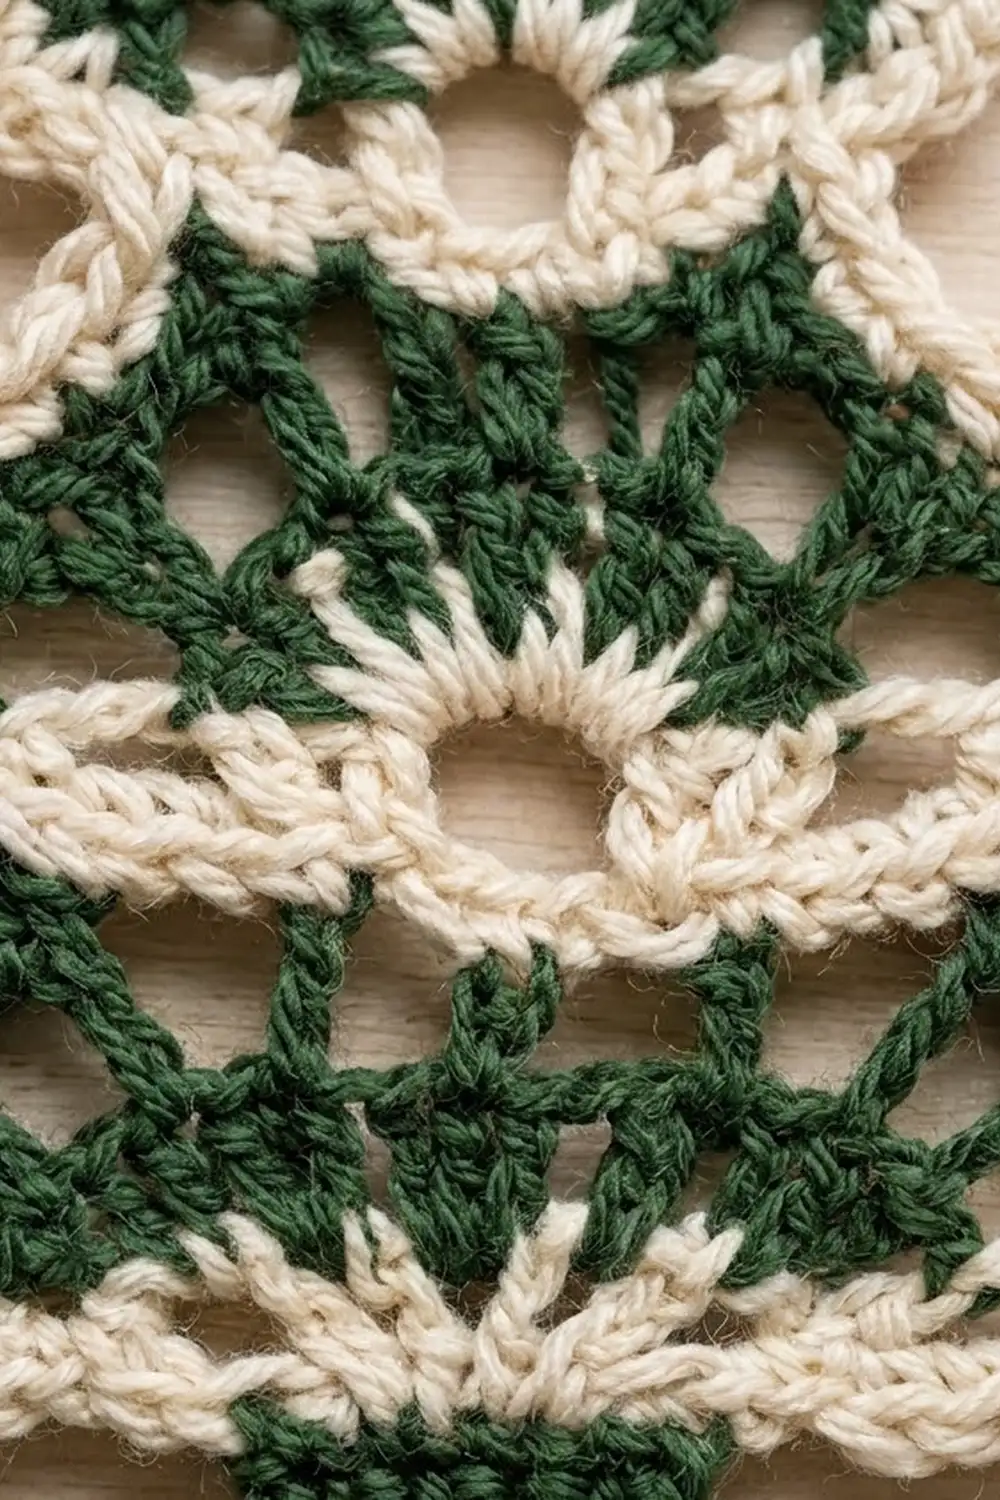
This cream row is the half-circle fan. The ring stays open and becomes the eyelet.
Row 2, Color A: Ch 4 (counts as dc + ch 1), turn. 3 dc in the first ch-1 sp, ch 1, (3 dc, ch 2, 3 dc) in the ch-2 sp, ch 1, 3 dc in the last ch-1 sp (inside the turning ch), ch 1, dc in the 3rd ch of the turning ch. (14 dc: 4 clusters + 2 edge dc)
Rows 3–6: Ch 4, turn. 3 dc in the next ch-1 sp, ch 1; repeat from * to the apex. Work (3 dc, ch 2, 3 dc) in the ch-2 sp. *Ch 1, 3 dc in the next ch-1 sp; repeat from ** to the end of the row, including the sp inside the turning ch. Ch 1, dc in the 3rd ch of the turning ch.
Stitch counts:
- Row 3: 20 dc (6 clusters)
- Row 4: 26 dc (8 clusters)
- Row 5: 32 dc (10 clusters)
- Row 6: 38 dc (12 clusters)
Fasten off. Checkpoint: 4.25 in (10.8 cm) wide x 2 in (5.1 cm) tall.
Middle Tier (5 Rows)
Row 1, Color B: With the RS of the bottom tier facing, join Color B with a sl st in the apex ch-2 sp of bottom-tier Row 6. Ch 4 (counts as dc + ch 1), (3 dc, ch 2, 3 dc, ch 1, dc) in the same sp, changing to Color A on the last dc. Fasten off B. (8 dc)
The apex space of the bottom tier now works as the eyelet of this new fan.
Rows 2–5, Color A: Work exactly as bottom-tier Rows 2–5. Row 2: 14 dc; Row 3: 20 dc; Row 4: 26 dc; Row 5: 32 dc (10 clusters). Fasten off.
Checkpoint: 3.5 in (8.9 cm) wide x 1.75 in (4.4 cm) tall. The bottom edge of the middle tier runs straight across the point of the bottom tier and extends 1.75 in (4.4 cm) to each side of center.
Top Tier (4 Rows)
Row 1, Color B: Join Color B in the apex ch-2 sp of middle-tier Row 5 and work as middle-tier Row 1. (8 dc)
Rows 2–4, Color A: Work as before. Row 2: 14 dc; Row 3: 20 dc; Row 4: 26 dc (8 clusters). Fasten off.
Checkpoint: 2.75 in (7.0 cm) wide x 1.5 in (3.8 cm) tall. The whole tree now measures 4.25 in (10.8 cm) wide x 5.25 in (13.3 cm) tall. Weave in all ends now, before you start the border.
Border
Border gauge: about 6 sc per 1 in (2.5 cm) along the edges.
Round 1, Color B (sc): With the RS facing, join Color B in the apex ch-2 sp of the top tier. Ch 1, (sc, ch 18, sc) in the same sp. The ch-18 becomes the hanging loop. Then work down the first side:
- Top tier slant: sc in each dc of the 4 clusters, then sc in the top of the edge dc (13 sc).
- Ch 1 for the outer corner.
- Underside of the top tier: 2 sc around the post of each row end, Rows 4 to 1 (8 sc).
- Middle tier slant: sc in each dc of the 5 clusters, then sc in the top of the edge dc (16 sc). Ch 1.
- Underside of the middle tier: 2 sc around each row-end post, Rows 5 to 1 (10 sc).
- Bottom tier slant: sc in each dc of the 6 clusters, then sc in the top of the edge dc (19 sc). Ch 1.
- Underside of the bottom tier: 2 sc around each row-end post, Rows 6 to 1 (12 sc).
- Bottom center: 3 sc over the base of the ring.
Work the second side as a mirror image, going up: 12 sc, ch 1, 19 sc, 10 sc, ch 1, 16 sc, 8 sc, ch 1, 13 sc. At each notch, skip the apex space that is already filled; don’t work any stitches there. Sl st to the first sc.
Count per side: 13 + 8 + 16 + 10 + 19 + 12 = 78 sc. Total: 78 x 2 + 2 (apex) + 3 (ring) = 161 sc, plus 6 corner ch-1 sps and the ch-18 loop.
The full bottom edge of the bottom tier is 12 + 3 + 12 = 27 sc.
Round 2, Color B (rope edge): Working in FLO only, ch 1, then rev sc in each sc around. Work 2 rev sc in each corner ch-1 sp. At the loop, rev sc in each of the 18 ch. Sl st to the first st and fasten off. (161 + 12 + 18 = 191 rev sc)
Why the math works: each dc row end is about as tall as 2 sc, so working 2 sc per row end keeps the bottom edges flat. On the slants, 1 sc per dc (skipping the ch-1 sps) matches the length of the slant, so the sides don’t ruffle. The ch-1 corners, with 2 rev sc in each, let the sharp tier points turn without cupping. Working Round 2 in FLO leaves the back loops of Round 1 free for the trunk.
After the border, the tree measures 4.75 in (12.1 cm) wide x 5.75 in (14.6 cm) tall, not counting the trunk or loop.
Trunk
The trunk is centered under the bottom tier, on the 7 middle stitches of the 27-sc bottom edge (stitches 11–17). These are the 3 ring sc plus the 2 sc on each side of them.
Row 1: With the WS facing, join Color A in the free back loop of stitch 11. Ch 1, sc in the BLO of the same st and the next 6 sts. (7 sc)
Rows 2–5: Ch 1, turn, sc in each st across. (7 sc)
Fasten off and weave in ends. Checkpoint: 1.25 in (3.2 cm) wide x 0.75 in (1.9 cm) tall. The cream rope now runs across the top of the trunk.
Final Blocking
- Weave in any remaining ends along the cream edge, where they are easiest to hide.
- Mist the ornament lightly until it is damp, or hold a steamer just above it without touching the yarn.
- Lay it RS up on the blocking mat.
- Pin the top point and the 6 outer tier corners first. Keep the 3 tiers centered on one vertical line.
- Pin the bottom edge of each tier so it is straight and level.
- Check the measurements: 4.75 in (12.1 cm) across the bottom tier and 6.5 in (16.5 cm) from the top point to the bottom of the trunk.
- Open each eyelet and fan with a fingertip, and pin the trunk square.
- Let it dry completely before you remove the pins. This takes about 2 to 4 hours.
Final Quality-Control Checklist
- Cluster counts: 12 in the bottom tier, 10 in the middle tier, 8 in the top tier
- Each cream fan sits at the bottom center of its tier, with an open eyelet
- Border Round 1 = 161 sc; Round 2 = 191 rev sc
- The rope edge runs along the underside of every tier
- The trunk is 7 sc wide, centered, with 5 rows
- The loop is fully covered and lies flat
- Finished size is 4.75 in x 6.5 in (12.1 cm x 16.5 cm)
Troubleshooting
- A tier cups or domes: your clusters are too tight. Go up a hook size or work the ch-1 spaces more loosely.
- A tier ruffles: your clusters are too loose, or there are extra stitches at the apex. Recount each row; it should have 6n + 2 dc.
- A slanted edge waves after the border: check that you skipped the ch-1 sps on the slants.
- The bottom edges pucker: use exactly 2 sc per row end, and work them around the post, not into the turning chain.
- The rope edge looks flat: make sure you are working the rev sc from left to right.
- The trunk is off-center: on the bottom edge, count 10 stitches in from the corner and start in stitch 11.
Care
Hand wash in cool water with mild soap, press the water out in a towel, and dry flat. Pin the points again if they need it.
Final Notes
The measurements build on each other in a short chain that is easy to check. The bottom tier is 4.25 in (10.8 cm) wide, the middle tier is 3.5 in (8.9 cm), and the top tier is 2.75 in (7.0 cm). Together they make a tree 4.25 in x 5.25 in (10.8 cm x 13.3 cm) before the border. The 0.25 in (0.6 cm) border brings it to 4.75 in x 5.75 in (12.1 cm x 14.6 cm), and the trunk brings the height to 6.5 in (16.5 cm). If you check each tier when you finish it, the later measurements will come out right.
Happy crocheting!