

This three-tier hanging organizer is made from three matching oval baskets in deep teal, each with a band of cream shell fans and a cream picot rim. Two chunky cream cords run up both ends of the stack and meet in a point, so the whole organizer hangs from a single wall peg. Each tier holds one standard toilet roll standing upright, with room to spare.
The style is coastal and tidy: firm double crochet bases, straight walls, and a fan band that looks like a row of scallop shells. Only two colors are used. Teal is for the body, and cream is for the fans, rims, and cords.
The pattern uses US crochet terms. Each basket measures about 8.75 in long x 5.75 in wide x 3.25 in tall (22.2 x 14.6 x 8.3 cm). The assembled organizer is about 22.6 in (57.4 cm) tall from the bottom of the lowest basket to the top of the cord point.
Construction is simple. You work an oval base in rounds, then turn the wall up through the back loops. Next you add the shell band and a filler round that levels the top, and finish with a picot edge. Last, you make two cords and sew them to the ends of the three baskets.
Finished Size and Construction
- Finished size (assembled): about 8.75 in (22.2 cm) wide x 22.6 in (57.4 cm) tall
- Skill level: Easy-Intermediate
- Terminology: US terms
- Yarn weight: Worsted (#4), cotton or cotton blend
- Hooks: 5.0 mm (H-8) for baskets; 6.0 mm (J-10) for cords
- Number of pieces: 5 (3 baskets + 2 cords)
- Layout: 3 baskets stacked vertically, 1 cord on each short end
- Piece size (one basket): 8.75 x 5.75 x 3.25 in (22.2 x 14.6 x 8.3 cm)
- Size before border: wall height 3 in (7.6 cm) after Rnd 12
- Border depth: the picot rim adds about 0.25 in (0.6 cm)
Materials
Choose a smooth, firm worsted-weight cotton. Cotton holds the basket shape better than acrylic and shows the shell stitches clearly. Avoid very soft or splitty yarns for the cords, because they stretch under the weight of the rolls.
- Teal (Color A): 160 g / about 272 m (297 yd)
- Cream (Color B): 100 g / about 170 m (186 yd)
These amounts assume cotton with about 170 m per 100 g. They include a margin of about 15% for gauge swatches and differences in tension.
Tools:
- 5.0 mm (H-8) hook
- 6.0 mm (J-10) hook
- Yarn needle
- 8 locking stitch markers
- Scissors
- Measuring tape
- Rust-proof pins
- Spray bottle and a small towel for blocking
Abbreviations (US Terms)
- ch – chain
- sl st – slip stitch
- sc – single crochet
- hdc – half double crochet
- dc – double crochet
- tr – treble crochet
- BLO – back loop only
- st(s) – stitch(es)
- rnd – round
- rep – repeat
Special stitches:
- Fan: 7 dc worked into the same stitch.
- Picot: ch 3, sl st in the 3rd ch from the hook.
Gauge and Checkpoints
Gauge: 13 dc and 7 rnds = 4 in (10.2 cm) with the 5.0 mm hook.
Cord gauge: 3 sc = 1 in (2.5 cm) with two strands held together on the 6.0 mm hook.
Make one full basket before you start the other two. It serves as your swatch, and you can measure it at each stage:
- After Rnd 3: about 6.5 x 3.4 in (16.5 x 8.6 cm)
- After Rnd 5: about 8.75 x 5.75 in (22.2 x 14.6 cm)
- After Rnd 8: the wall is about 1.1 in (2.8 cm) tall
- After Rnd 10: the wall is about 2.25 in (5.7 cm) tall
- After Rnd 12: the wall is about 3 in (7.6 cm) tall
If your base after Rnd 5 is more than 0.25 in (0.6 cm) too big, go down half a hook size. If it is too small, go up half a hook size.
If the base ruffles, your dc are taller than the gauge, so try a smaller hook. If it cups, your stitches are too tight, so use a larger hook. A 5.75 in (14.6 cm) wide base easily holds a standard 4.5 in (11.4 cm) roll.
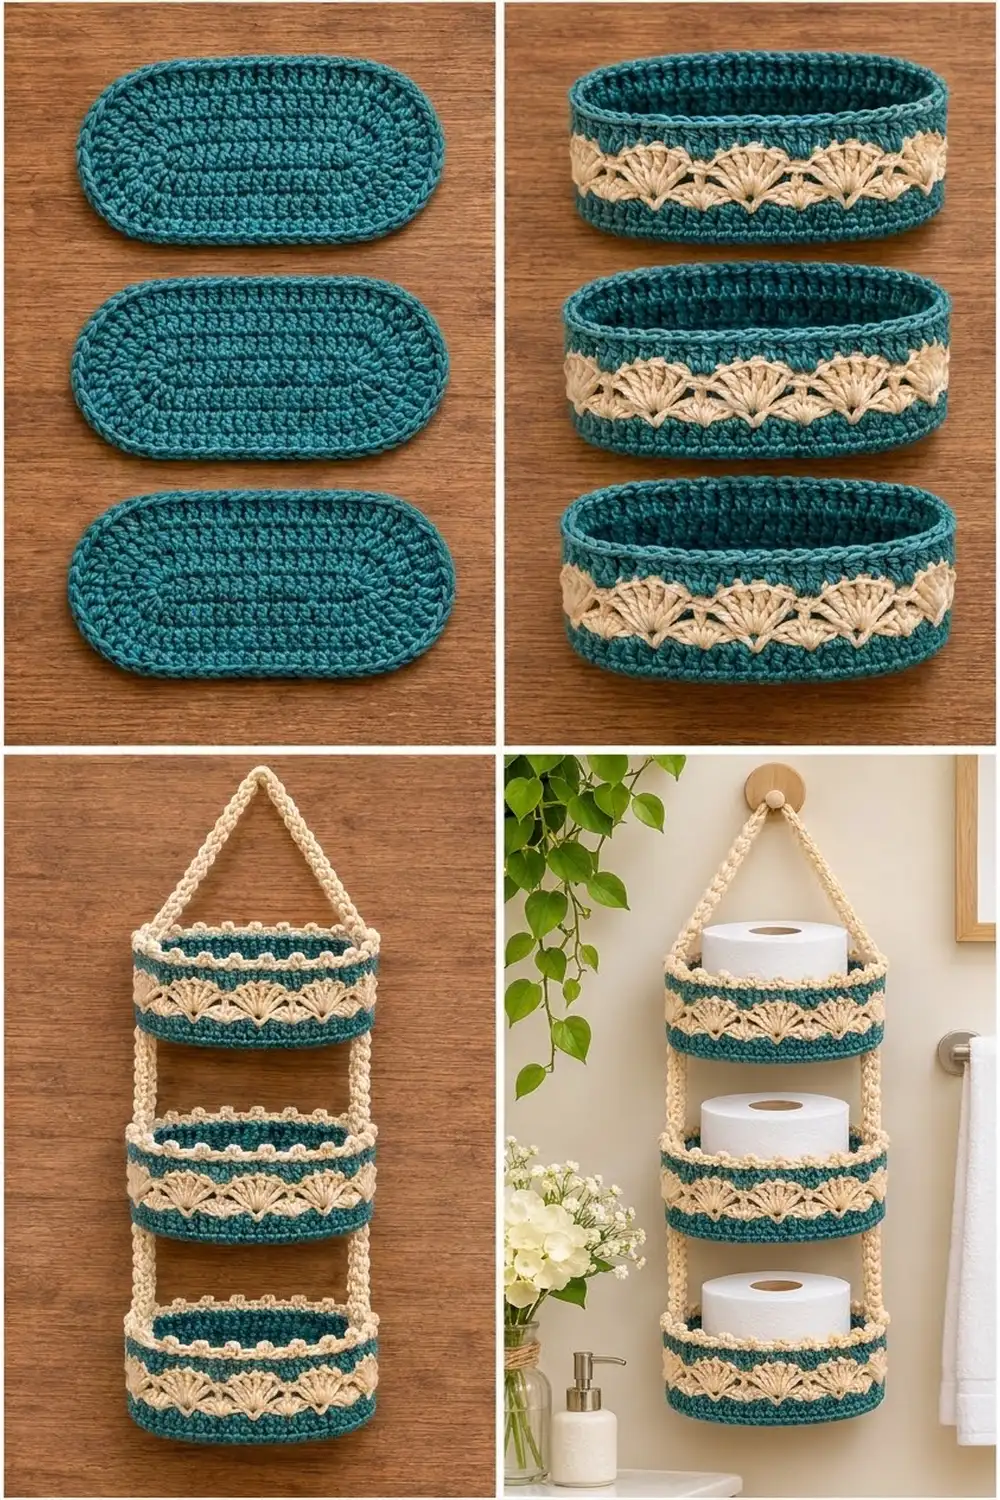
Basket (Make 3)
Oval Base
With teal and the 5.0 mm hook, ch 14.
The ch-2 at the start of each round does not count as a stitch. Join every round with a sl st to the first dc.
Rnd 1: 3 dc in 3rd ch from hook, dc in next 10 ch, 6 dc in last ch. Rotate and work along the underside of the chain: dc in next 10 ch, 3 dc in the same ch as the first 3 dc. Join. (32 dc)
This gives two straight sides of 10 dc and two curved ends of 6 dc each.
Rnd 2: Ch 2, 2 dc in each of the next 3 sts, dc in next 10 sts, 2 dc in each of the next 6 sts, dc in next 10 sts, 2 dc in each of the last 3 sts. Join. (44 dc)
Rnd 3: Ch 2, (dc in next st, 2 dc in next st) 3 times, dc in next 10 sts, (dc in next st, 2 dc in next st) 6 times, dc in next 10 sts, (dc in next st, 2 dc in next st) 3 times. Join. (56 dc)
Rnd 4: Ch 2, (dc in next 2 sts, 2 dc in next st) 3 times, dc in next 10 sts, (dc in next 2 sts, 2 dc in next st) 6 times, dc in next 10 sts, (dc in next 2 sts, 2 dc in next st) 3 times. Join. (68 dc)
Rnd 5: Ch 2, (dc in next 3 sts, 2 dc in next st) 3 times, dc in next 10 sts, (dc in next 3 sts, 2 dc in next st) 6 times, dc in next 10 sts, (dc in next 3 sts, 2 dc in next st) 3 times. Join. (80 dc)
Each round adds 6 stitches to each curved end, for 12 per round. The 10-stitch straight sides never change. After Rnd 5, each end has 30 sts: 10 + 30 + 10 + 30 = 80.
Walls
Rnd 6: Ch 1, sc in BLO of each st around. Join to first sc. (80 sc)
The unworked front loops make a crisp ridge, which helps the wall stand straight up.
Rnd 7: Ch 2 (does not count), dc in each st around. Join to first dc. (80 dc)
Rnd 8: Ch 1, sc in each st around. Join. (80 sc) Fasten off teal.
Shell Band
Rnd 9 (cream): Join cream in any st. Ch 1, sc in same st, skip 3 sts, 7 dc in next st (fan), skip 3 sts, sc in next st; rep from * 8 more times. Then skip 3 sts, fan in next st, skip 3 sts, and join to first sc. (10 sc + 70 dc = 80 sts; 10 fans)
Each repeat uses 8 stitches of Rnd 8 (1 + 3 + 1 + 3), and 80 ÷ 8 = 10 fans. Fasten off cream.
Rnd 10 (teal, filler round): Join teal in any sc of Rnd 9. Ch 4 (counts as tr), dc in next dc, hdc in next dc, sc in next 3 dc, hdc in next dc, dc in next dc, tr in next sc; rep from * around, ending the last rep at . Join to top of ch-4. (80 sts)**
This round works 1 stitch into each of the 80 stitches of Rnd 9, so it’s 8 stitches per repeat (tr, dc, hdc, sc, sc, sc, hdc, dc) x 10. The tall stitches fill the valleys between the fans, and the short ones sit on the fan tops. The result is teal wedges between cream scallops and a level top edge.
Rnd 11: Ch 1, sc in each st around. Join. (80 sc)
Rnd 12: Ch 1, sc in each st around. Join. (80 sc) Fasten off teal.
Checkpoint: the wall should be about 3 in (7.6 cm) tall.
Make All Pieces
- Baskets: 3, each using about 45 g teal and 12 g cream
- Cords: 2, each using about 20 g cream (two strands held together)
Cord (Make 2): With two strands of cream held together and the 6.0 mm hook, ch 76. Sc in the back bump of the 2nd ch from hook and in each ch across. (75 sc) Fasten off and leave a 12 in (30.5 cm) tail.
Each cord is about 25 in (63.5 cm) long and 0.5 in (1.3 cm) wide.
Counting from the starting end, place markers on each cord after sc 10, 20, 30, 40, and 50.
Layout (front view):
        /\
       /  \
      /    \
     |[ 3 ]|   top basket     sc 41-50
     |     |   gap            sc 31-40
     |[ 2 ]|   middle basket  sc 21-30
     |     |   gap            sc 11-20
     |[ 1 ]|   bottom basket  sc 1-10
Joining
Method: Whipstitch each cord to the outer wall at the center of each curved end. Use the cord tail or a separate length of cream.
Finding the centers: Flatten a basket so the two straight sides touch. The two folds are the centers of the curved ends, 40 sts apart on Rnd 12. Mark both folds.
Stitch-to-stitch logic: Once the rim is on, the basket wall has 8 rounds (Rnds 6–13) in 3.25 in (8.3 cm). The cord section for each basket is 10 sc, about 3.3 in (8.4 cm).
Line up cord sc 1 with Rnd 6 and the last sc of the section with Rnd 13. Sew through both edges of the cord and into the wall at every round. Each round gets 1 or 2 cord stitches.
Order:
- Sew cord sc 1–10 to the bottom basket.
- Leave sc 11–20 free as a gap of about 3.3 in (8.4 cm).
- Sew sc 21–30 to the middle basket.
- Leave sc 31–40 free.
- Sew sc 41–50 to the top basket.
- Repeat on the other end with the second cord.
Tension: Pull each stitch snug but not tight. Over-tight seams make the wall pucker and tilt the basket. Keep the cord flat and untwisted, with its smooth side facing out.
Apex: Bring the free ends (sc 51–75) up to meet. Overlap the last 3 sc of each cord, about 1 in (2.5 cm), and sew them together securely along both edges. This leaves about 7.3 in (18.5 cm) of free slant on each side.
Size checkpoint: Hang the organizer from a peg. It should measure about 22.6 in (57.4 cm) from the bottom of the lowest basket to the apex. Each gap should be 3.3 in (8.4 cm) on both sides. If one side hangs lower, re-sew that seam.
Picot Top Edging (Border)
Work the rim on each basket right after Rnd 12, before joining.
Border gauge: 4 sc + 1 picot covers about 1.2 in (3.0 cm) of rim.
Rnd 13 (cream): Join cream in any st of Rnd 12. Ch 1, sc in next 4 sts, picot; rep from * around. Join to first sc. (80 sc + 20 picots) Fasten off and weave in ends.
Counts per side: Each half of the oval (one 10-st straight side plus one 30-st curved end) has 40 sts and gets 10 picots. 40 + 40 = 80 sc, and 10 + 10 = 20 picots.
Why the math works: 80 is divisible by 4, so the picots fall every 4 stitches with no partial repeat at the join. The rim adds no stitches to the wall count, so the top edge stays the same size as the wall below and doesn’t flare.
Final Blocking
- Weave in all ends on the inside of each basket.
- Stuff each basket firmly with a rolled towel, or wrap a towel around a toilet roll to fill the oval.
- Mist all surfaces until they are damp but not soaked.
- Shape the base flat and the walls straight. Pinch the curved ends into smooth arcs.
- Pin the picots outward so they stand up evenly.
- Lay the cords flat and pin them straight without stretching them.
- Let everything dry completely, usually about 24 hours.
- Check that each base still measures 8.75 x 5.75 in (22.2 x 14.6 cm), then do the joining.
Final Quality-Control Checklist
- Each basket has 80 sts on every round from Rnd 5 through Rnd 12.
- Each basket has 10 evenly spaced cream fans.
- Rnd 10 sits level, with no gaps above the fan valleys.
- Each rim has 20 picots.
- All three baskets match in size within 0.25 in (0.6 cm).
- The cords are sewn at the exact centers of the curved ends.
- The gaps are equal on both sides, and the baskets hang level.
- The apex seam is secure along both edges.
- All ends are woven in and hidden from the outside.
Troubleshooting
Base ruffles: Your dc are too tall for 12 increases per round. Use a smaller hook or work a little tighter.
Base cups into a bowl: Your tension is too tight. Go up half a hook size.
Fans look crowded: Make sure you skip exactly 3 sts on each side of every fan.
Top edge is wavy after Rnd 10: You probably used a dc instead of a tr in a valley. Re-check the 8-stitch sequence.
Basket tilts when hung: The cords are sewn off-center. Re-fold the basket to find the true centers and re-sew.
Cords stretch: Use a firmer cotton, or work the cords on a 5.5 mm (I-9) hook.
Wall leans outward: Make sure Rnd 6 is worked in BLO.
Care
Hand wash in cool water with mild soap and press the water out in a towel. Reshape the baskets and dry flat. Don’t tumble dry, because the dryer can stretch the cords.

Final Notes
Every measurement in this organizer comes from one gauge: 13 dc = 4 in (10.2 cm). That gauge gives an 80-stitch base of 8.75 x 5.75 in (22.2 x 14.6 cm).
The 80 stitches carry straight up through ten 8-stitch shell repeats to a 3 in (7.6 cm) wall. Twenty 4-stitch picot repeats then bring the wall to 3.25 in (8.3 cm).
Two 75-stitch cords, marked in 10-stitch sections, set the 3.3 in (8.4 cm) gaps and give a hanging height of 22.6 in (57.4 cm). If you check each measurement as you go, the three tiers will match and hang level.
Happy crocheting!