

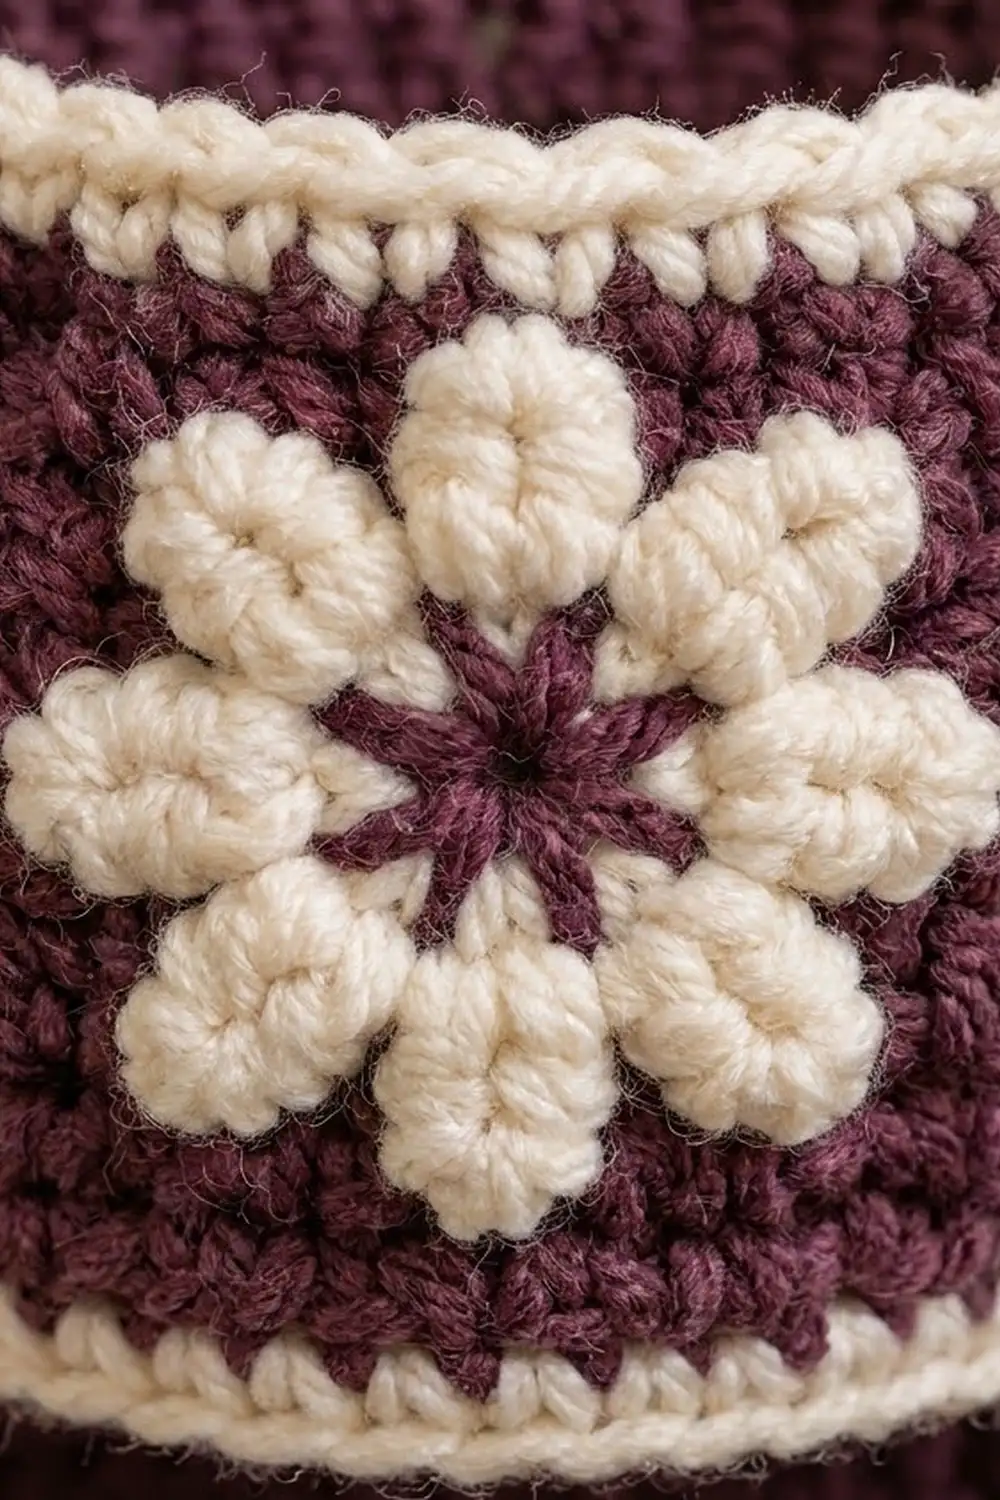
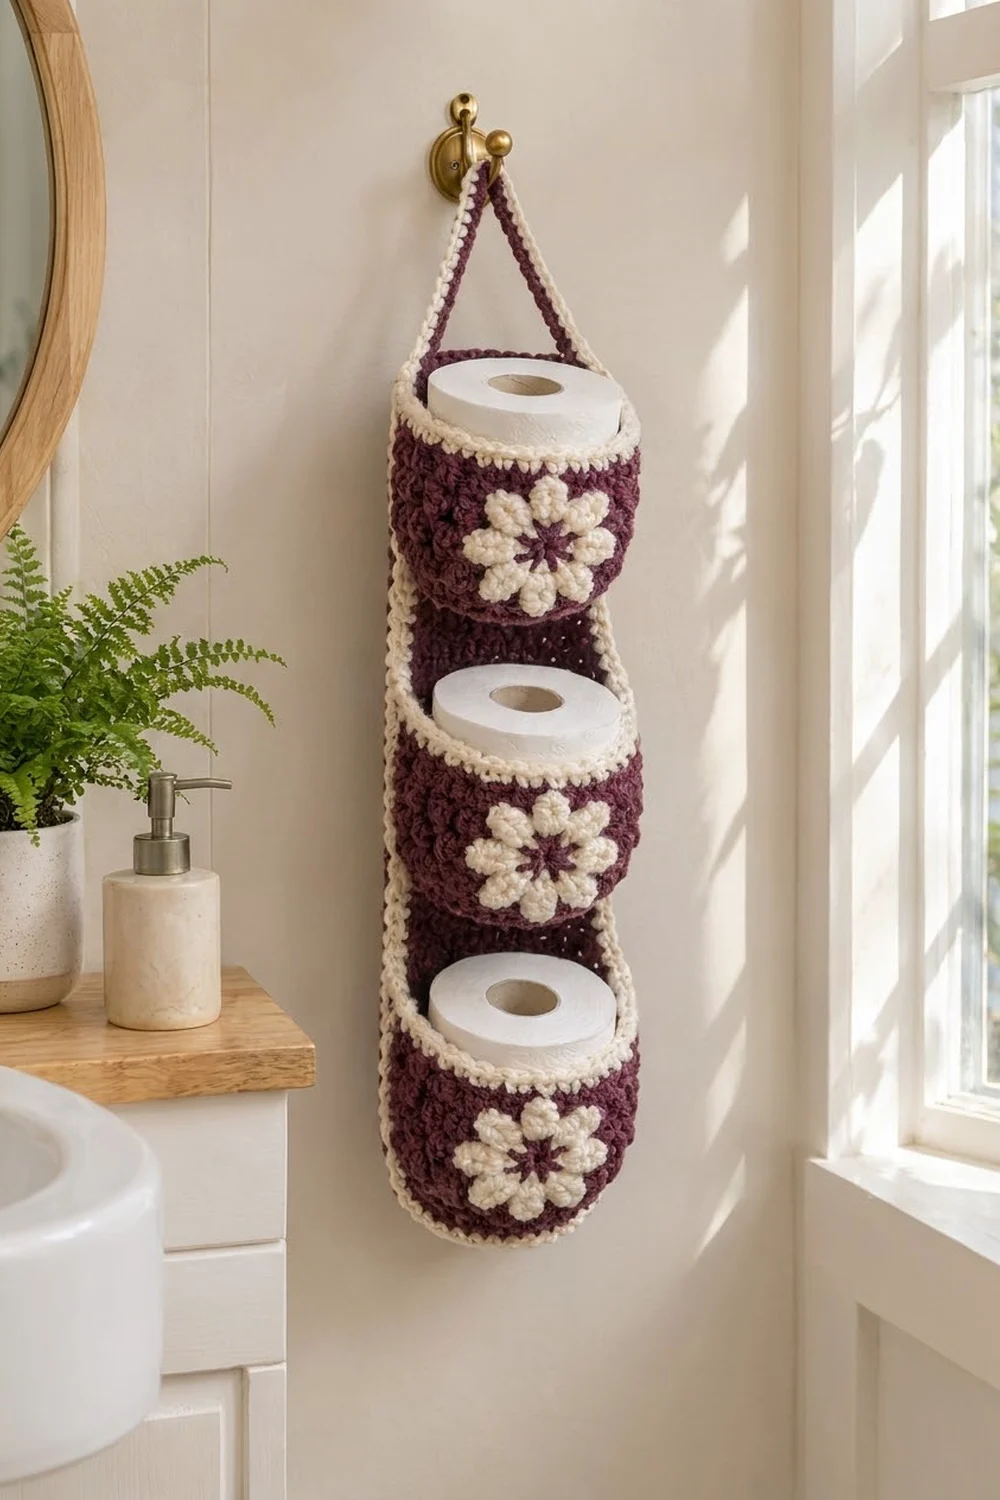
This hanging toilet paper holder has three round, open-top pockets stacked one above another. Each pocket holds one standard roll. The body is a deep plum with a pebbly single crochet texture. Cream trims each pocket at the base and at the rim, and a raised cream flower sits on the front of each pocket.
The look is cozy and a little festive, which suits a winter bathroom, but plum and cream work all year. A cream-edged plum strip, the spine, runs down the back and holds the three pockets together. A matching cream-edged strap arches over the top pocket so the holder can hang from a hook or towel bar.
The pattern uses US crochet terms. Each pocket measures 5.5 in (14.0 cm) across and 3.5 in (8.9 cm) tall. The assembled stack is 13 in (33.0 cm) tall, or about 17 in (43.2 cm) with the hanging loop.
Construction is simple. You crochet three identical pockets in joined rounds, starting with a flat circle for the base. Then you make three flower appliqués, one spine and one strap. You edge the spine and strap in cream and sew everything together.
Finished Size and Construction
- Finished size: 5.5 in (14.0 cm) wide x 13 in (33.0 cm) tall stack; about 17 in (43.2 cm) with the loop
- Skill level: Easy to intermediate
- Terminology: US crochet terms
- Yarn weight: Aran / heavy worsted (weight 4)
- Hook: 5 mm (H-8)
- Number of pieces: 8 (3 pockets, 3 flowers, 1 spine, 1 strap)
- Layout: 3 pockets stacked vertically on one spine, with the strap on top
- Piece size (one pocket): 5.5 in (14.0 cm) diameter x 3.5 in (8.9 cm) tall
- Spine size before border: 2.25 in (5.7 cm) x 12.5 in (31.8 cm)
- Border depth: 0.25 in (0.6 cm), one round of cream sc
Materials
Choose a smooth aran or heavy worsted yarn with good stitch definition. Cotton or a cotton blend holds its shape best in a damp bathroom. Acrylic also works and is easy to wash. Avoid fuzzy yarns, because the texture and the flower petals need crisp edges.
- Plum (Color A): 130 g, about 230 m
- Cream (Color B): 45 g, about 80 m
These amounts include a margin of about 20 percent, which leaves yarn for swatching and sewing.
Tools:
- 5 mm (H-8) crochet hook
- Tapestry needle
- 4 stitch markers
- Measuring tape
- Pins
- Spray bottle and blocking mat
- Scissors
Abbreviations (US Terms)
- ch – chain
- sl st – slip stitch
- sc – single crochet
- hdc – half double crochet
- dc – double crochet
- BLO – back loop only
- MR – magic ring
- st(s) – stitch(es)
- sp – space
- rnd – round
Special stitch – petal: Work (sc, hdc, 3 dc, hdc, sc) in the ch-3 space given. One petal is 7 sts.
Gauge and Checkpoints
Gauge: 14 sc and 16 rows/rnds = 4 in (10.2 cm) in sc with a 5 mm hook. Each sc is about 0.29 in (0.7 cm) wide, and each row is about 0.25 in (0.6 cm) tall.
Make one complete pocket first and use it as your gauge swatch. It tells you more than a flat square because it also shows how well the walls stand up.
Checkpoints:
- Base after Rnd 10: 5.5 in (14.0 cm) across, lying flat
- Pocket wall after Rnd 24: 3.5 in (8.9 cm) tall
- Flower: 2.75 in (7.0 cm) across
- Spine before border: 2.25 in (5.7 cm) x 12.5 in (31.8 cm)
- Spine after border: 2.75 in (7.0 cm) x 13 in (33.0 cm)
If your base is larger than 5.75 in (14.6 cm), go down half a hook size. If it is smaller than 5.25 in (13.3 cm), go up half a size. If the base cups, your tension is too tight. If it ruffles, your tension is too loose. Check that a roll fits before you continue.
Pocket (Make 3)
Work in joined rounds. Join each rnd with a sl st to the first sc, then ch 1. The ch 1 does not count as a st. Keep the join seam in a straight line, because it becomes the center back of the pocket.
Base
With Color A, make an MR.
- Rnd 1: 6 sc in MR. (6)
- Rnd 2: 2 sc in each st around. (12)
- Rnd 3: [sc in next st, 2 sc in next st] 6 times. (18)
- Rnd 4: [sc in next 2 sts, 2 sc in next st] 6 times. (24)
- Rnd 5: [sc in next 3 sts, 2 sc in next st] 6 times. (30)
- Rnd 6: [sc in next 4 sts, 2 sc in next st] 6 times. (36)
- Rnd 7: [sc in next 5 sts, 2 sc in next st] 6 times. (42)
- Rnd 8: [sc in next 6 sts, 2 sc in next st] 6 times. (48)
- Rnd 9: [sc in next 7 sts, 2 sc in next st] 6 times. (54)
- Rnd 10: [sc in next 8 sts, 2 sc in next st] 6 times. (60)
Checkpoint: the base should lie flat and measure 5.5 in (14.0 cm) across. Change to Color B on the final pull-through of the Rnd 10 join. Fasten off Color A.
Walls
- Rnd 11 (Color B): sc in BLO of each st around. (60) This makes the cream ridge at the bottom edge and turns the work upward. Change to Color A on the join.
- Rnds 12–22 (Color A): sc in each st around. (60) This gives 11 rnds of plum.
Change to Color B on the Rnd 22 join. Fasten off Color A.
- Rnds 23–24 (Color B): sc in each st around. (60)
Fasten off and weave in the ends. Checkpoint: the wall measures 3.5 in (8.9 cm) from the base ridge to the top of the rim. That is 14 rnds at 0.25 in (0.6 cm) each. A roll should slide in easily and stand about 0.5 in (1.3 cm) above the rim.
Place a marker in the Rnd 24 st directly above the join seam. This is the center back. The front center is 30 sts away from it.
Flower (Make 3)
- Rnd 1 (Color A): Work 8 sc in an MR. Join with a sl st to the first sc. (8) Fasten off Color A.
- Rnd 2 (Color B): Join with a sl st in any sc. Ch 1, sc in the same st, ch 3, [sc in next st, ch 3] 7 times. Join with a sl st to the first sc. (8 sc, 8 ch-3 sps)
- Rnd 3 (Color B): Sl st into the first ch-3 sp. Work 1 petal in each ch-3 sp around. Join with a sl st to the first sc. (8 petals, 56 sts)
Fasten off and leave a 12 in (30.5 cm) tail for sewing. The plum center stays visible inside a ring of 8 rounded cream petals. Checkpoint: 2.75 in (7.0 cm) across.
Spine (Make 1)
With Color A, ch 9.
- Row 1: sc in 2nd ch from hook and in each ch across, turn. (8)
- Rows 2–50: ch 1, sc in each st across, turn. (8)
Fasten off. Checkpoint: 2.25 in (5.7 cm) wide x 12.5 in (31.8 cm) long, which is 50 rows at 0.25 in (0.6 cm) each.
Strap (Make 1)
With Color A, ch 5.
- Row 1: sc in 2nd ch from hook and in each ch across, turn. (4)
- Rows 2–40: ch 1, sc in each st across, turn. (4)
Fasten off. Checkpoint: 1.1 in (2.8 cm) wide x 10 in (25.4 cm) long.
Make All Pieces
Yarn used by color:
- Plum: 3 pockets (about 35 g each), spine (15 g), strap (6 g), flower centers and sewing (4 g)
- Cream: 3 pocket ridges and rims (about 8 g each), 3 flowers (5 g each), spine and strap edging (6 g)
Layout, front view:
        ____strap____
       /             \
   [ Pocket 1 + Flower ]   rim at 0 in (0 cm)
   [ Pocket 2 + Flower ]   rim at 4.75 in (12.1 cm)
   [ Pocket 3 + Flower ]   rim at 9.5 in (24.1 cm)
   |      spine        |   bottom at 13 in (33.0 cm)
The spine runs behind all three pockets. The strap arches over Pocket 1.
Border
The border is one round of cream sc around the spine and one row of cream sc along each long side of the strap.
Border gauge: Work 1 sc in each st along the top and bottom edges and 1 sc in each row end along the long edges. Sc rows are about 0.25 in (0.6 cm) tall, so 1 sc per row end keeps the edge flat without stretching or gathering it.
Spine Border
Join Color B in the first st of Row 50.
- Rnd 1: Ch 1, 3 sc in first st (corner), sc in next 6 sts, 3 sc in last st (corner). Working down the long edge, sc in each row end from Row 49 to Row 2. (48 sc) Working across the foundation chain, 3 sc in first st, sc in next 6 sts, 3 sc in last st. Working up the other long edge, sc in each row end from Row 2 to Row 49. (48 sc) Join with a sl st to the first sc. (120)
Counts per side, counted from corner center st to corner center st, both included:
- Top and bottom: 1 + 1 + 6 + 1 + 1 = 10 each
- Long sides: 1 + 1 + 48 + 1 + 1 = 52 each
Why the math works: 10 + 10 + 52 + 52 = 124. Each of the 4 corner center sts is counted on two sides, so 124 − 4 = 120, which matches the round total. You can also count by edge: 12 sts on each short edge and 48 on each long edge give 12 + 12 + 48 + 48 = 120. The short edges grow from 8 sts to 10 sts corner to corner. The long edges gain one border row at each end. That brings the spine to 2.75 in (7.0 cm) x 13 in (33.0 cm).
Strap Edging
Join Color B at one corner of a long edge.
- Row 1 (each long side): Ch 1, sc in each row end along the long edge. (40) Fasten off. Repeat on the other long side. (40)
The strap now measures 1.6 in (4.1 cm) wide x 10 in (25.4 cm) long. The short ends stay plain plum because they are sewn inside the pocket.
Joining
Use Color A and a tapestry needle. Whipstitch through both loops of each edge st for a firm seam that barely shows. Pull each stitch snug but not tight, so the fabric lies smooth without puckers.
Step 1 – Flowers. Pin a flower to the front center of each pocket, opposite the marker. Center it between the cream bottom ridge and the cream rim. Sew around the plum center first. Then tack down the base of each petal so the petal tips stay raised.
Step 2 – Pocket 1 to spine. With the right side facing out, lay the spine flat against the back of Pocket 1. Center it on the 10 rim sts around the back marker, 5 sts on each side. Line up the top of the spine with the top of the rim.
Sew across the top, joining the 10 spine border sts to the 10 rim sts one to one. Then sew down each long side. The spine border has 1 sc per row, and the pocket wall has 14 rnds over 3.5 in (8.9 cm), so 14 spine border sts meet 14 wall rnds one to one. Tack the cream bottom ridge to the spine.
Step 3 – Pockets 2 and 3. Repeat Step 2, placing the Pocket 2 rim 4.75 in (12.1 cm) below the top of the spine and the Pocket 3 rim 9.5 in (24.1 cm) below it. This leaves a 1.25 in (3.2 cm) gap between pockets. The base of Pocket 3 sits at the bottom of the spine.
Step 4 – Strap. Sew one end of the strap inside the rim of Pocket 1 on the left side, 15 sts from the back marker. Sew the other end at the same point on the right side. Overlap each end by 0.5 in (1.3 cm) and sew around all edges of the overlap. The strap forms an arch about 4 in (10.2 cm) high.
Size checkpoint: The assembled stack measures 13 in (33.0 cm) from the Pocket 1 rim to the Pocket 3 base, and about 17 in (43.2 cm) to the top of the strap.
Final Blocking
- Put a roll or a rolled towel in each pocket to hold the round shape.
- Lay the holder face up on a blocking mat.
- Spray it lightly with water until damp, not soaked.
- Straighten the spine and pin it at 13 in (33.0 cm) long.
- Smooth the petals with your fingers and shape the tips.
- Shape the strap into an even arch.
- Let it dry completely, at least 12 hours, before hanging it.
For acrylic yarn, you can steam lightly from above instead. Don’t let the iron touch the yarn.
Final Quality-Control Checklist
- Each base has 60 sts and lies flat at 5.5 in (14.0 cm).
- Each pocket wall has 14 rnds and stands 3.5 in (8.9 cm) tall.
- The join seams are hidden behind the spine.
- Each flower has 8 petals and a visible plum center.
- Each flower sits at the front center of its pocket.
- The spine border has 120 sts and neat corners.
- The pocket rims sit at 0, 4.75 and 9.5 in (0, 12.1 and 24.1 cm).
- The strap ends are secure and the arch is even.
- All ends are woven in.
Troubleshooting
Base cups upward. Your tension is tight. Go up a hook size or loosen your sc.
Base ruffles. Your tension is loose. Go down a hook size.
Join seam leans sideways. This is normal in joined rounds. Keep it behind the spine, or stagger the increases so they don’t stack.
Roll doesn’t fit. Add one more increase rnd before the cream BLO rnd: [sc in next 9 sts, 2 sc in next st] 6 times. (66) Then work the walls over 66 sts.
Petals look flat. Tack down only the base of each petal, not the tips.
Pockets tilt forward. Add a second line of stitching between the rim and the spine, or shorten the strap.
Spine edge waves. Your border is too loose. Skip 1 row end every 10 rows.
Care
Hand wash in cool water with mild soap. Press out the water in a towel and dry flat in shape. Cotton versions can go through a gentle machine cycle inside a laundry bag.
Final Notes
Here is how the measurements connect. A gauge of 14 sc and 16 rows per 4 in (10.2 cm) gives a 60-st base of 5.5 in (14.0 cm) and a 14-rnd wall of 3.5 in (8.9 cm). The spine is 8 sts by 50 rows, or 2.25 in (5.7 cm) x 12.5 in (31.8 cm), and its 120-st border brings it to 2.75 in (7.0 cm) x 13 in (33.0 cm). Three pockets spaced 4.75 in (12.1 cm) apart fill that spine exactly, and the 10 in (25.4 cm) strap finishes the hanger.
Check each stage before you move on, and the finished holder will hang straight and hold three rolls neatly.
Happy crocheting!