

This hanging holder has three sage green Christmas trees, each with cream shell frills on every tier and a small cream star at the top. A round pocket under each tree holds a spare toilet roll. Cream cords run up to a wooden ring, so the piece hangs from a single hook.
It uses two colors: a soft sage green and a warm cream. Dense green single crochet keeps the pockets firm. The cream fans add a lacy, cozy holiday look without making the piece fussy.
The pattern uses US crochet terms. The assembled holder is about 18 in (45.7 cm) wide. It is about 10.5 in (26.7 cm) tall from the tops of the stars to the bottoms of the pockets, and about 18.5 in (47.0 cm) tall including the hanger.
You’ll crochet three tree panels from the top down, one tier at a time. Each tier’s cream frill goes into the front loops of its last row. You’ll also make three round pockets with cream shell rims, three stars, and three slip-stitch cords. Then you sew everything together and hang it from the ring.
Finished Size and Construction
- Finished size: 18 in (45.7 cm) wide × 10.5 in (26.7 cm) tall, not counting the hanger
- Skill level: Intermediate
- Terminology: US
- Yarn weight: Worsted (#4), cotton or cotton blend
- Hook: 5.0 mm (H-8)
- Number of pieces: 3 trees, 3 pockets, 3 stars, 3 cords, plus 1 wooden ring
- Layout: 3 trees across, with one pocket sewn under each tree
- Tree size: 6.0 in (15.2 cm) wide × 7 in (17.8 cm) tall
- Pocket size: 6.0 in (15.2 cm) across × 3.75 in (9.5 cm) tall
- Pocket wall before the rim (border): 2.75 in (7.0 cm)
- Rim (border) depth: 1 in (2.5 cm)
Materials
Yarn: Use a smooth worsted cotton of about 170 m per 100 g. Cotton gives firm, washable pockets that hold their shape. Acrylic works too, but the pockets will be softer.
- Color A (sage green): 350 g / 595 m
- Color B (cream): 100 g / 170 m
These quantities include a margin of about 15%.
Tools:
– 5.0 mm (H-8) crochet hook
– Wooden ring, 3 in (7.6 cm) across
– Tapestry needle
– Stitch markers
– Scissors
– Measuring tape
– Rust-proof pins and a blocking mat
Abbreviations (US Terms)
- ch – chain
- sl st – slip stitch
- sc – single crochet
- dc – double crochet
- inc – 2 sc in the same stitch
- sc2tog – single crochet 2 together
- BLO / FLO – back loop only / front loop only
- st(s) – stitch(es)
- RS / WS – right side / wrong side
Special stitch – Fan: 7 dc in one stitch (on the pocket rim) or 5 dc in one stitch (on the tree frills). The count is given in each row.
Frill-and-continue technique: Work each cream frill into the front loops of a tier’s last row, with the RS facing. The next green row then goes into the back loops left behind the frill. This makes the frill stand off the surface and hang over the next tier.
Gauge and Checkpoints
Gauge: 14 sc × 16 rows = 4 in (10.2 cm) in sc. That works out to 3.5 sts and 4 rows per inch.
Test with one real piece first. Make one tree through Row 20 and check these measurements:
- After Row 4 (5 sts): 1.4 in (3.6 cm) wide
- After Row 8 (9 sts): 2.6 in (6.6 cm) wide
- After Row 12 (13 sts): 3.7 in (9.4 cm) wide
- After Row 16 (17 sts): 4.9 in (12.4 cm) wide
- After Row 20 (21 sts): 6.0 in (15.2 cm) wide and 5 in (12.7 cm) tall
For the pockets, the base should be 6.0 in (15.2 cm) across after Round 11. Anything from 5.75 to 6.25 in (14.6 to 15.9 cm) is fine.
If your piece is too big, go down 0.5 mm in hook size. If it is too small, go up 0.5 mm. Don’t change the stitch counts. The trees and pockets must stay at 21 sts and 66 sts so the joining works.
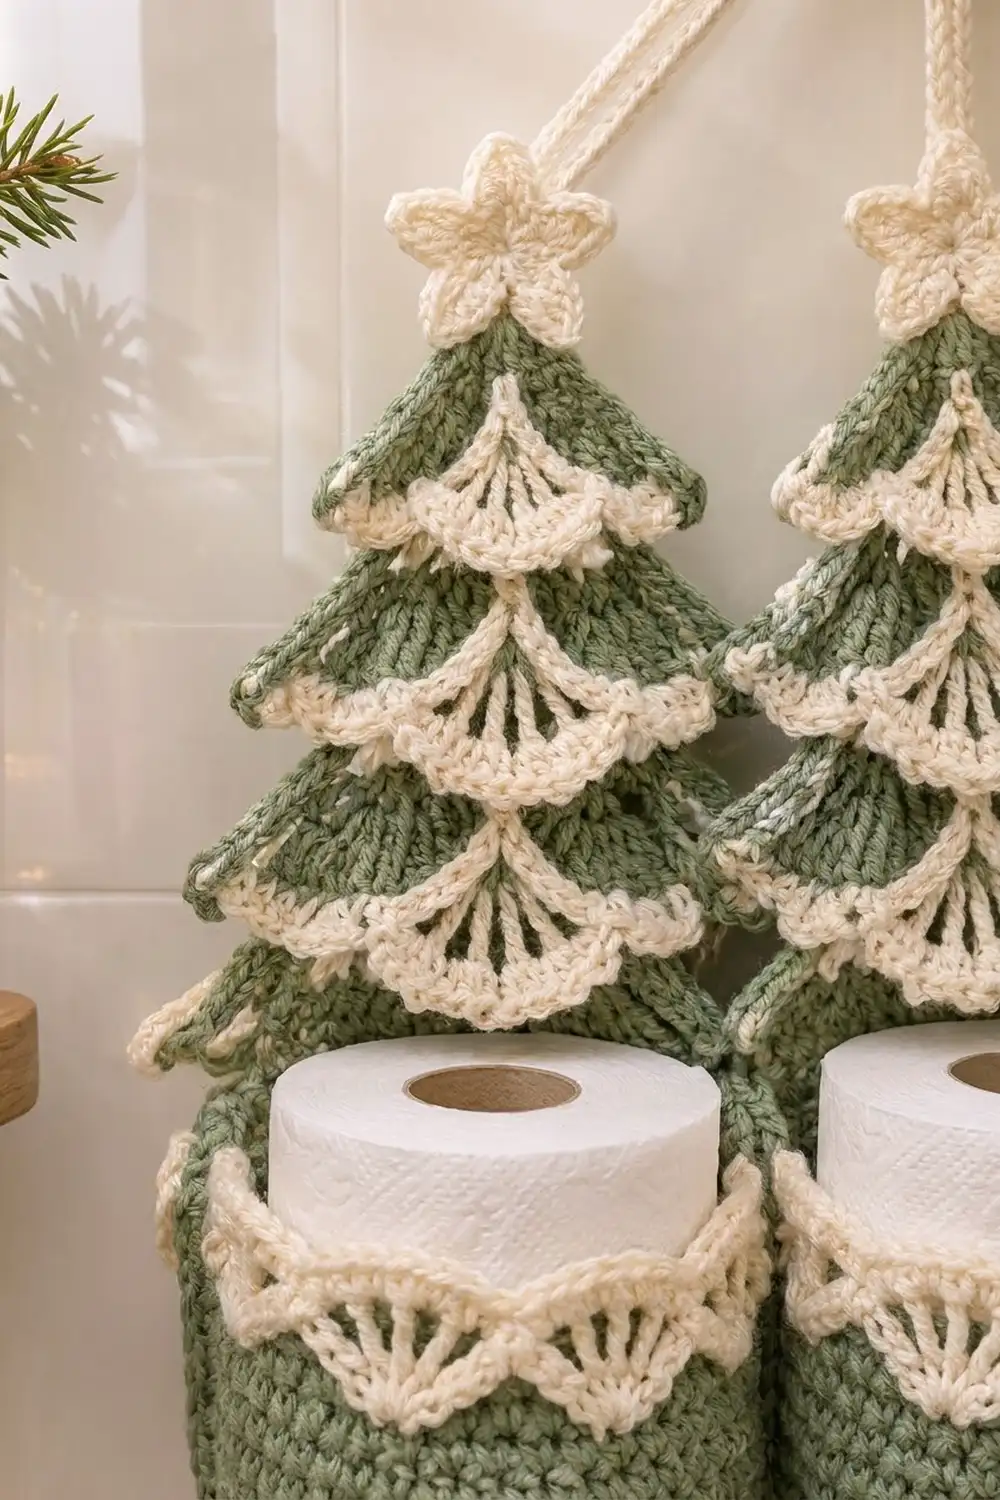
Tree Panel (Make 3)
Work in rows from the top down. Ch 1 at the start of each row does not count as a stitch. Turn at the end of every row. Odd rows are RS rows and even rows are WS rows. Each tier ends on an even (WS) row.
Tier 1
With A:
- Row 1 (RS): Ch 2, 3 sc in the 2nd ch from hook. (3)
- Row 2: Inc, sc 1, inc. (5)
- Rows 3–4: Sc across. (5)
Frill 1: Don’t cut A; drop the loop. Turn so the RS faces you. Join B in the first st. Working in FLO, sc in the first st, then skip 1, 5 dc in the next st, skip 1, sc in the next st. Repeat from * 1 time in total. That gives 1 fan and 7 sts. Fasten off B.
Tier 2
Pick up A at the right edge.
- Row 5 (RS, BLO behind the frill): Ch 1, sc2tog, sc 1, sc2tog. (3)
- Row 6: Inc, sc 1, inc. (5)
- Row 7: Inc, sc 3, inc. (7)
- Row 8: Inc, sc 5, inc. (9)
Frill 2: Work as Frill 1, repeating the fan sequence 2 times. That gives 2 fans and 13 sts.
Tier 3
- Row 9 (BLO): Sc2tog, sc 5, sc2tog. (7)
- Row 10: Inc, sc 5, inc. (9)
- Row 11: Inc, sc 7, inc. (11)
- Row 12: Inc, sc 9, inc. (13)
Frill 3: Repeat the fan sequence 3 times. That gives 3 fans and 19 sts.
Tier 4
- Row 13 (BLO): Sc2tog, sc 9, sc2tog. (11)
- Row 14: Inc, sc 9, inc. (13)
- Row 15: Inc, sc 11, inc. (15)
- Row 16: Inc, sc 13, inc. (17)
Frill 4: Repeat the fan sequence 4 times. That gives 4 fans and 25 sts.
Tier 5
- Row 17 (BLO): Sc2tog, sc 13, sc2tog. (15)
- Row 18: Inc, sc 13, inc. (17)
- Row 19: Inc, sc 15, inc. (19)
- Row 20: Inc, sc 17, inc. (21)
Frill 5: Repeat the fan sequence 5 times. That gives 5 fans and 31 sts.
Frill math: Every frill covers 4f + 1 sts, where f is the number of fans. That fits the tier widths exactly: 5, 9, 13, 17, and 21. The frill’s own count is 6f + 1: f × 5 dc plus (f + 1) sc.
Base Band
- Row 21 (BLO): Sc 21. (21)
- Rows 22–28: Sc 21. (21)
Fasten off. The tree should now measure 6.0 in (15.2 cm) wide × 7 in (17.8 cm) tall, which is 28 rows at 4 rows per inch.
Pocket (Make 3)
Work in joined rounds: sl st to the first st, then ch 1 (not counted). Keep the joins lined up in one column. That column marks the back center.
With A:
- Round 1: 6 sc in a magic ring. (6)
- Round 2: Inc in each st. (12)
- Round 3: Sc 1, inc × 6. (18)
- Round 4: Sc 2, inc × 6. (24)
- Round 5: Sc 3, inc × 6. (30)
- Round 6: Sc 4, inc × 6. (36)
- Round 7: Sc 5, inc × 6. (42)
- Round 8: Sc 6, inc × 6. (48)
- Round 9: Sc 7, inc × 6. (54)
- Round 10: Sc 8, inc × 6. (60)
- Round 11: Sc 9, inc × 6. (66)
Checkpoint: The base should lie flat and measure 6.0 in (15.2 cm) across, with a circumference of about 18.9 in (48.0 cm).
- Round 12 (BLO): Sc 66. (66) This turns the edge up into a wall.
- Rounds 13–22: Sc 66. (66)
Fasten off A. The wall should be 2.75 in (7.0 cm) tall, which is 11 rounds. Work the rim (see Border) before joining.
Star (Make 3)
With B:
- Round 1: 10 sc in a magic ring, then join. (10)
- Round 2: Ch 4, sl st in the 2nd ch from hook, sc in the next ch, hdc in the next ch, skip 1 sc, sl st in the next sc × 5. (5 points)
Fasten off and leave a 10 in (25.4 cm) tail. The star should be about 1.5 in (3.8 cm) across.
Hanging Cords (Make 3)
With B, make slip-stitch cords. Chain the number given, then sl st in the back bump of the 2nd ch from hook and in each ch across.
- Center cord: Ch 29, for 28 sl sts. It should be about 7 in (17.8 cm) long.
- Side cords (make 2): Ch 41, for 40 sl sts. Each should be about 10 in (25.4 cm) long.
Chain gauge is about 4 ch per inch. Add or remove chains to hit these lengths.
Make All Pieces
- Color A: 3 trees (the green rows) and 3 pockets (Rounds 1–22)
- Color B: 15 tree frills (5 per tree), 3 pocket rims, 3 stars, 3 cords
Layout:
          (wooden ring)
         /      |      \
     [Star]  [Star]  [Star]
     [Tree]  [Tree]  [Tree]
    [Pocket][Pocket][Pocket]
Joining
Use whipstitch on the WS for all seams. Match colors: A for green seams and B for cream.
1. Join the trees. Place the trees side by side with the RS up. Sew the side edges of their base bands together (Rows 21–28), matching row end to row end: 8 to 8 at each of the 2 seams. Leave the tiers above unjoined. Tack the outermost dc of neighboring Tier 5 frills together where they touch.
Checkpoint: The joined band is 3 × 21 = 63 sts, which is 18.0 in (45.7 cm). Seams add no stitches.
2. Attach the pockets. Turn each pocket so its join column faces the back. Count 10 sts on each side of the join column. The join column plus those 20 sts gives 21 back sts in Round 22. Sew these 21 sts one to one to the 21 sts of the tree’s Row 28. The back of the pocket flattens slightly against the panel, and the cream rim rises in front of Rows 24–27. Tack Round 23 to the band at 3 points so the rim stays upright.
3. Join the pockets to each other. Where two pocket walls touch, whipstitch them together through Rounds 14–21, one round to one round (8 rounds).
4. Add the stars and cords. Sew one star over Row 1 of each tree. Sew the end of one cord to the back of each star. Pass the other ends through the ring, fold back 2 in (5.1 cm), and sew them down. The center cord should hang 5 in (12.7 cm) and the side cords 8 in (20.3 cm).
Tension: Sew snugly but not tight. The seams should lie flat with no puckering.
Final checkpoint: The piece should be 18 in (45.7 cm) wide, 10.5 in (26.7 cm) from star tops to pocket bottoms, and about 18.5 in (47.0 cm) tall overall.
Border: Pocket Rim
The border on this design is the cream rim on each pocket. Work it in the round on each pocket after Round 22 and before joining.
Border gauge: One fan repeat covers 6 sts, which is about 1.7 in (4.3 cm) of rim.
With B:
- Round 23: Join in any st and sc in each st around. (66 + 0 = 66)
- Round 24: Sc in the next st, skip 2, 7 dc in the next st, skip 2 × 11, then join. (11 sc + 77 dc = 88)
Fasten off. The rim should add 1 in (2.5 cm), for a total pocket height of 3.75 in (9.5 cm).
Why the math works: Each repeat uses 6 stitches: 1 for the sc, 2 skipped, 1 for the fan, and 2 skipped. Round 23 keeps all 66 stitches, and 66 ÷ 6 = 11, so the fans close evenly with no partial repeat. The pockets have no outer border, so the 63-st band width doesn’t change.
Final Blocking
- Lightly mist the trees and frills, or steam them from 1 in (2.5 cm) above. Don’t press.
- Pin each tree flat at 6.0 in (15.2 cm) wide.
- Open each frill so its fans fan out evenly downward.
- Shape the pocket rims so the fans curve slightly outward.
- Stuff each pocket with a toilet roll or a towel so it dries round.
- Let everything dry completely before hanging.
Final Quality-Control Checklist
- Each tree has 5 tiers, with 1, 2, 3, 4, and 5 fans.
- Each tree is 21 sts wide at the base.
- Each pocket has 66 sts and 11 rim fans.
- The pocket joins sit at the back, hidden.
- The trees are joined at their base bands only.
- The stars are centered on the tree tips.
- The cords are even and the piece hangs level.
- All ends are woven in securely.
Troubleshooting
- Frills lie flat instead of standing out: You worked through both loops. Work the frill in FLO and the next row in BLO.
- Tier edges are uneven: Recount the sc2tog at both edges of Rows 5, 9, 13, and 17.
- The pocket base ruffles: Your tension is loose. Go down one hook size.
- The pocket base cups: Go up one hook size.
- Fans don’t fit around the rim: Round 23 must have exactly 66 sts.
- The holder tilts: Adjust the cord folds until the ring sits centered.
- Pockets sag: Add the tacking points at Round 23.
Care
Hand wash in cool water and lay flat to dry, reshaping the pockets around rolls. Don’t tumble dry.

Final Notes
Here is how the measurements build on each other. A gauge of 14 sc × 16 rows = 4 in (10.2 cm) gives trees 21 sts wide, which is 6.0 in (15.2 cm), and 28 rows tall, which is 7 in (17.8 cm). The pockets have 66-st walls, 6.0 in (15.2 cm) across and 2.75 in (7.0 cm) tall. The 11-fan rim adds 1 in (2.5 cm), for a pocket height of 3.75 in (9.5 cm). Three trees joined at their bands make 63 sts, or 18.0 in (45.7 cm), and the stars and cords complete the holder. If you check each stage, the pieces will fit together.
Happy crocheting!