

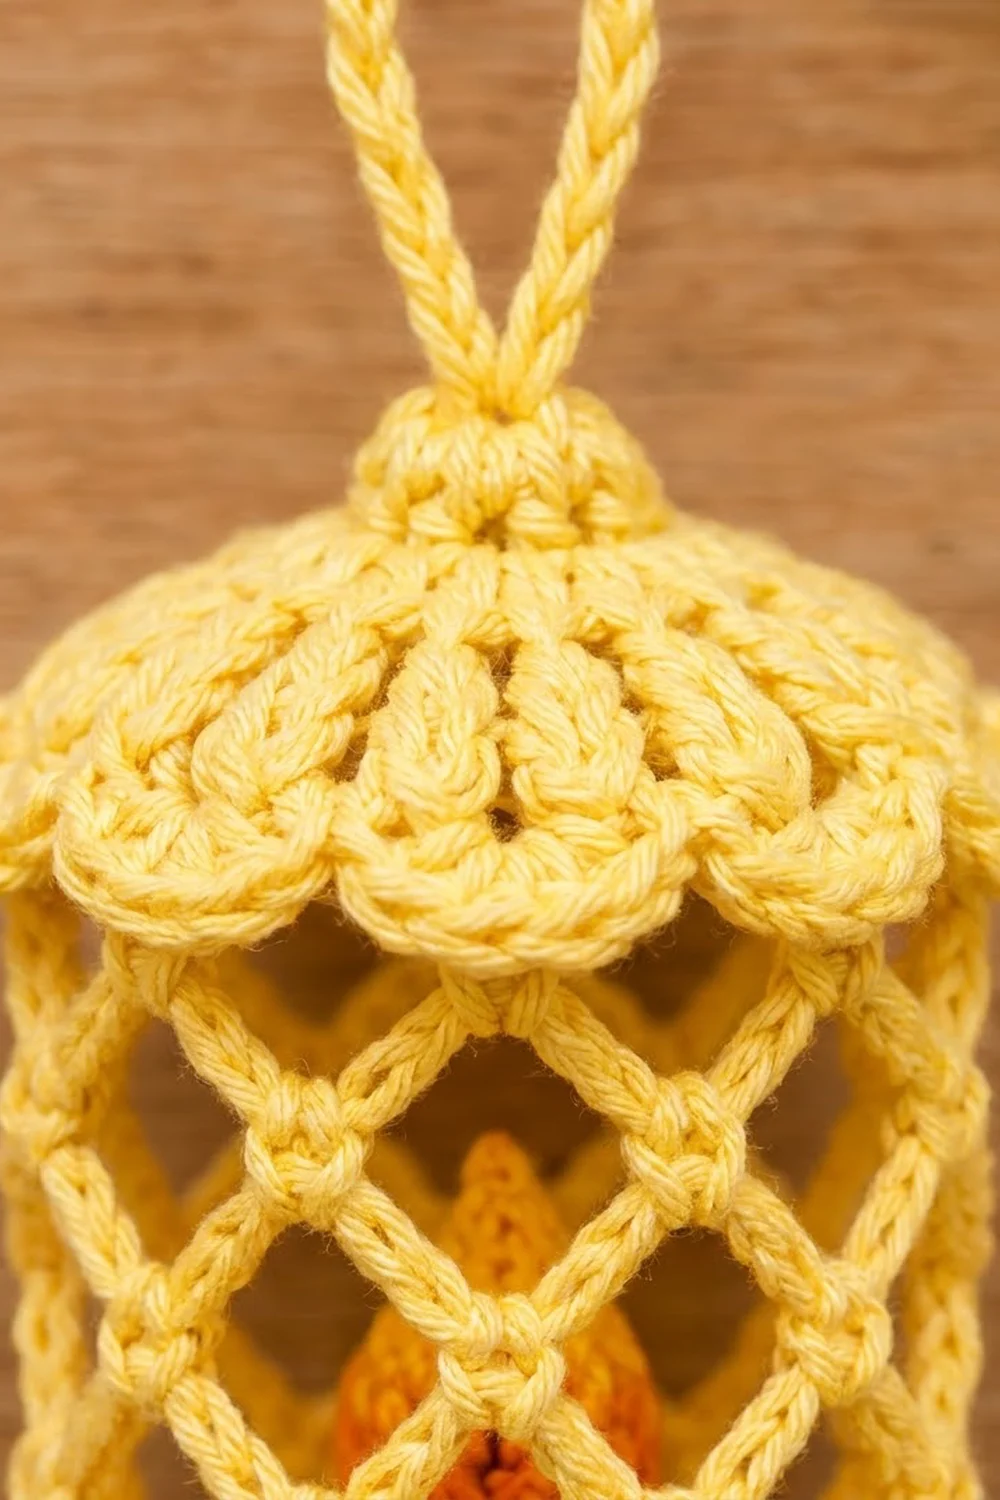
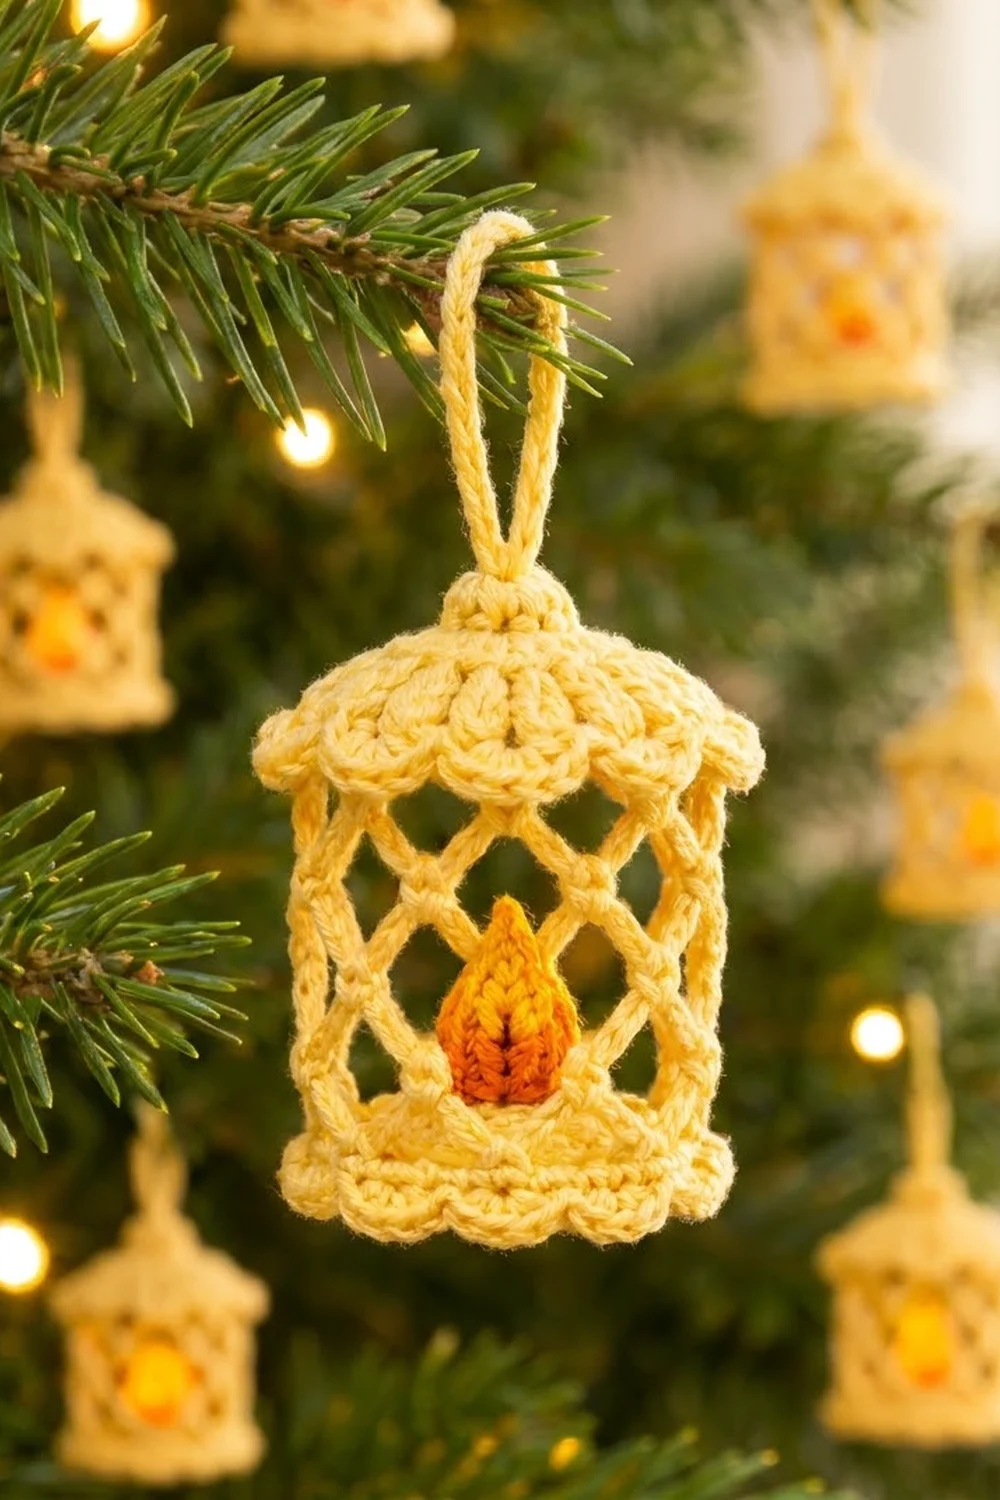
This little lantern ornament looks like it has a candle burning inside. The pale butter-yellow body has an open diamond lattice, so the tiny orange flame shows through from every side. A scalloped cap and a hanging loop complete the vintage lantern shape.
The palette is simple: pale butter yellow for the lantern, deep orange for the flame, and golden yellow for the flame outline. It looks warm and cozy on a green tree, especially near string lights.
The pattern uses US crochet terms. The finished lantern measures about 2 in (5.1 cm) across the walls and 2.5 in (6.4 cm) across the cap scallops. It stands 2.5 in (6.4 cm) tall without the loop and about 3.75 in (9.5 cm) tall with it.
You work the body as one continuous piece. It starts as a flat base circle, then a back-loop round turns it up into the walls. Four rounds of picot net follow, then a solid top band and a decreasing dome that ends in the hanging loop. You add scalloped edgings to the bottom and the cap in leftover front loops. The flame is a separate tiny piece sewn upright onto the base.
Finished Size and Construction
- Finished size: 2 in (5.1 cm) wall diameter; 2.5 in (6.4 cm) tall without loop; 3.75 in (9.5 cm) with loop
- Skill level: Easy-intermediate
- Terminology: US crochet terms
- Yarn weight: Sport weight (2) cotton
- Hook: 2.75 mm (C-2)
- Number of pieces: 2 (lantern body and flame)
- Layout: One 3D ornament; flame sewn inside on the base
- Base circle size: 2 in (5.1 cm) diameter
- Size before edgings: 2 in (5.1 cm) diameter, 2 in (5.1 cm) wall height
- Edging depth: bottom scallops 0.25 in (0.6 cm); cap scallops overhang 0.25 in (0.6 cm)
- Flame size: 0.9 in (2.3 cm) tall x 0.7 in (1.8 cm) wide
Materials
Choose a smooth, tightly plied mercerized cotton in sport weight. Cotton keeps the open lattice crisp and the picots well defined. Avoid fuzzy or very soft acrylics, which make the net sag.
- Color A, pale butter yellow: 10 g, about 30 m (lantern body)
- Color B, deep orange: 2 g, about 6 m (flame center)
- Color C, golden yellow: 1 g, about 3 m (flame outline)
These quantities include a generous margin. One lantern uses roughly 7 g of Color A.
Tools:
- 2.75 mm (C-2) crochet hook
- Tapestry needle
- Scissors
- 1 stitch marker
- Ruler or tape measure
- Optional: fabric stiffener or starch, plastic wrap, and a small cylinder about 2 in (5.1 cm) wide for blocking, such as a spice jar
Abbreviations (US Terms)
- MR – magic ring
- ch – chain
- sl st – slip stitch
- sc – single crochet
- hdc – half double crochet
- dc – double crochet
- sc2tog – single crochet 2 together
- BLO / FLO – back loop only / front loop only
- st(s) – stitch(es)
- sk – skip
Special stitch – Picot: ch 3, sl st in the 3rd ch from hook. This makes the small round knot at each lattice intersection.
Special stitch – Shell: 5 dc (or 5 hdc where stated) worked in the same stitch.
Gauge and Checkpoints
Gauge is measured on the base circle: Rounds 1–5 = 2 in (5.1 cm) diameter. Make the base first and measure it before you continue. Each sc round adds about 0.2 in (0.5 cm) to the diameter.
Checkpoints:
- After Round 5: base is 2 in (5.1 cm) across and lies flat.
- After Round 7: solid band is about 0.25 in (0.6 cm) tall.
- After Round 11: walls are 1.75 in (4.4 cm) tall from the base.
- After Round 13: walls are 2 in (5.1 cm) tall.
- After Round 19: total height is about 2.5 in (6.4 cm) without the loop.
If your base is too big: go down to a 2.5 mm hook. If it’s too small: go up to a 3 mm hook. A ruffled base means you’re crocheting too loosely, and a cupped base means too tightly. Fix it here, because the 40-stitch count sets every later round.
Lantern Body
Work in joined rounds unless told otherwise. The ch 1 at the start of a round does not count as a stitch. Use Color A.
Base
Round 1: MR, 8 sc in ring, sl st to first sc. (8 sts)
Round 2: Ch 1, 2 sc in each st around, sl st to first sc. (16 sts)
Round 3: Ch 1, [sc in next st, 2 sc in next st] 8 times, sl st to first sc. (24 sts)
Round 4: Ch 1, [sc in next 2 sts, 2 sc in next st] 8 times, sl st to first sc. (32 sts)
Round 5: Ch 1, [sc in next 3 sts, 2 sc in next st] 8 times, sl st to first sc. (40 sts)
Pull the ring closed until only a tiny center hole is left. Check the 2 in (5.1 cm) gauge now.
Lower Band
Round 6: Ch 1, sc in BLO of each st around, sl st to first sc. (40 sts) The edge turns upward. The 40 unused front loops of Round 5 are left for the bottom scallops.
Round 7: Ch 1, sc in each st around, sl st to first sc. (40 sts)
Lattice Net
Round 8: Ch 1, sc in first st, picot, [ch 5, sk 4 sts, sc in next st, picot] 7 times, ch 5, sk last 4 sts, sl st to first sc. (8 sc with picots, 8 ch-5 loops)
The math: each repeat uses 5 stitches (1 sc + 4 skipped), and 8 x 5 = 40.
Round 9: Sl st in each of the first 3 ch of the next ch-5 loop to reach the center of the loop. Ch 1, sc in same loop, picot, [ch 5, sc in next ch-5 loop, picot] 7 times, ch 5, sl st to first sc. (8 sc with picots, 8 ch-5 loops)
Each new sc sits at the middle of a loop below. This offsets the loops into diamonds with a picot knot at each intersection.
Rounds 10–11: Repeat Round 9. (8 sc with picots, 8 ch-5 loops each)
You now have four rounds of loops (Rounds 8–11), and the lattice is about 1.5 in (3.8 cm) tall. Push each picot to the outside as you go.
Top Band
Round 12 (conversion round): Ch 1, [sc in the next Round 11 sc, keeping its picot to the front, 4 sc in next ch-5 loop] 8 times, sl st to first sc. The first sc goes in the same sc you just joined into. (8 sc worked 1-per-existing sc + 32 sc worked into loops = 40 sts)
Round 13: Ch 1, sc in each st around, sl st to first sc. (40 sts) Check the wall height: 2 in (5.1 cm).
Cap Scallops
Round 14: Working in FLO of Round 13: ch 1, [sl st in next st, sk 1 st, 5 dc in next st, sk 1 st] 10 times, sl st to first sl st. (10 shells)
The math: each repeat uses 4 stitches, and 10 x 4 = 40.
Dome
Keep using the same yarn. Work into the unused back loops of Round 13, behind the shells.
Round 15: Ch 1, working in BLO of Round 13, [sc in next 3 sts, sc2tog] 8 times, sl st to first sc. (32 sts)
Round 16: Ch 1, [sc in next 2 sts, sc2tog] 8 times, sl st to first sc. (24 sts)
Round 17: Ch 1, [sc in next st, sc2tog] 8 times, sl st to first sc. (16 sts)
Round 18: Ch 1, sc2tog 8 times, sl st to first sc. (8 sts)
Round 19: Ch 1, sc2tog 4 times, sl st to first sc. (4 sts)
Hanging Loop
Ch 24, sl st in the first st of Round 19. Work 30 sc into the ch-24 loop, then sl st to the base of the loop. Fasten off, leaving a 6 in (15.2 cm) tail. Thread the tail through the 4 sts of Round 19, pull tight, and weave in.
The covered loop stands about 1.25 in (3.2 cm) tall.
Flame
Make 1. Start with Color B.
Round 1: Ch 6. Starting in the 2nd ch from hook: sl st, sc in next ch, hdc in next ch, dc in next ch, 6 dc in last ch. Rotate and work along the opposite side of the chain: dc in next ch, hdc in next ch, sc in next ch, sl st in next ch. Ch 2 for the tip, sl st to first sl st. (14 sts + ch-2 tip) Fasten off Color B.
Round 2: Join Color C in the first st after the tip. Ch 1, sc in next 4 sts, 2 sc in each of next 6 dc, sc in next 4 sts, (sc, ch 2, sc) in ch-2 tip, sl st to first sc. (4 + 12 + 4 + 2 = 22 sc + ch-2 tip)
The flame measures 0.9 in (2.3 cm) tall x 0.7 in (1.8 cm) wide. Fasten off, leaving a 12 in (30.5 cm) tail of Color C for sewing.
Attach the flame: Stand the flame upright in the center of the base, rounded end down. Whipstitch the bottom 0.75 in (1.9 cm) of its edge to the base in a straight line through the center hole. Bring the needle back up and tack the tip once to the back of a Round 10 picot. This keeps the flame straight and framed by a front diamond. Weave in all ends.
Border (Scalloped Edgings)
The two edgings act like a border on a flat piece, but they’re worked in the round.
Edging gauge: each scallop repeat covers 4 stitches, about 0.63 in (1.6 cm) of the 6.3 in (16.0 cm) circumference.
Bottom Scallops: Turn the lantern upside down. Join Color A in any unused front loop of Round 5. Ch 1, [sl st in next front loop, sk 1, 5 hdc in next front loop, sk 1] 10 times, sl st to first sl st. (10 shells) Fasten off and weave in.
Cap Scallops: Already done in Round 14. (10 shells)
Why the math works: both edgings sit on a 40-stitch round. Each repeat is 1 sl st + 1 skip + 1 shell stitch + 1 skip = 4 stitches, and 40 / 4 = 10, so the repeats close evenly with no half scallop. The bottom shells use hdc, so they stay shorter and lie flat at about 0.25 in (0.6 cm) deep. The cap shells use dc, so they flare out and overhang the walls by about 0.25 in (0.6 cm) on each side. That gives the 2.5 in (6.4 cm) cap width.
Final Blocking
- Wrap a small cylinder about 2 in (5.1 cm) wide in plastic wrap.
- Dampen the lantern lightly, or brush it with diluted fabric stiffener for a firmer ornament.
- Slide the lantern over the cylinder, base on top, so the walls stretch straight.
- Even out the diamonds by hand so all 8 columns line up vertically.
- Pinch each picot outward and fan each scallop open.
- Let it dry completely, at least 12 hours.
- Remove the cylinder, then shape the dome into a smooth curve and straighten the loop.
Final Quality-Control Checklist
- Base measures 2 in (5.1 cm) and sits flat.
- Round 5 front loops form a clean ridge under the bottom scallops.
- 8 picots per net round, 32 in total across Rounds 8–11.
- Diamonds are even and stacked in neat vertical columns.
- 10 bottom scallops and 10 cap scallops, all the same size.
- Walls are 2 in (5.1 cm) tall; total height is 2.5 in (6.4 cm) without the loop.
- Flame stands upright and shows through a front diamond.
- Loop is centered and firm, and all ends are woven in.
Troubleshooting
Net leans or spirals: You started a net round at the wrong point. Always sl st across 3 ch to reach the center of the loop.
Loops sag: Tighten your chains, or switch to a 2.5 mm hook for Rounds 8–11 only.
Picots disappear inside: Push each picot to the outside before you work the next ch 5.
Round 12 count is off: Work 4 sc per loop plus 1 sc per anchor stitch: 8 + 32 = 40.
Cap scallops curl inward: Work them in FLO only and block over the cylinder.
Hole at the top of the dome: Thread the tail through all 4 sts of Round 19 twice before you tighten.
Flame flops over: Add a second tack stitch at the tip, or stiffen the flame lightly.
Care
Spot clean with cool water and mild soap, then reshape the lantern over a small cylinder to dry. Store it flat in a box so the lattice and scallops keep their shape.
Final Notes
Every measurement depends on the one before it. A 2 in (5.1 cm) base gives 40 stitches. Those 40 stitches hold 8 net loops of 5 stitches each, which convert back to 40 stitches for the top band. The top band and the base each carry 10 scallop repeats of 4 stitches. The dome then decreases from 40 to 32, 24, 16, 8, and 4 stitches to close neatly under the loop. Get the base right first and everything else will fit.
Happy crocheting!