

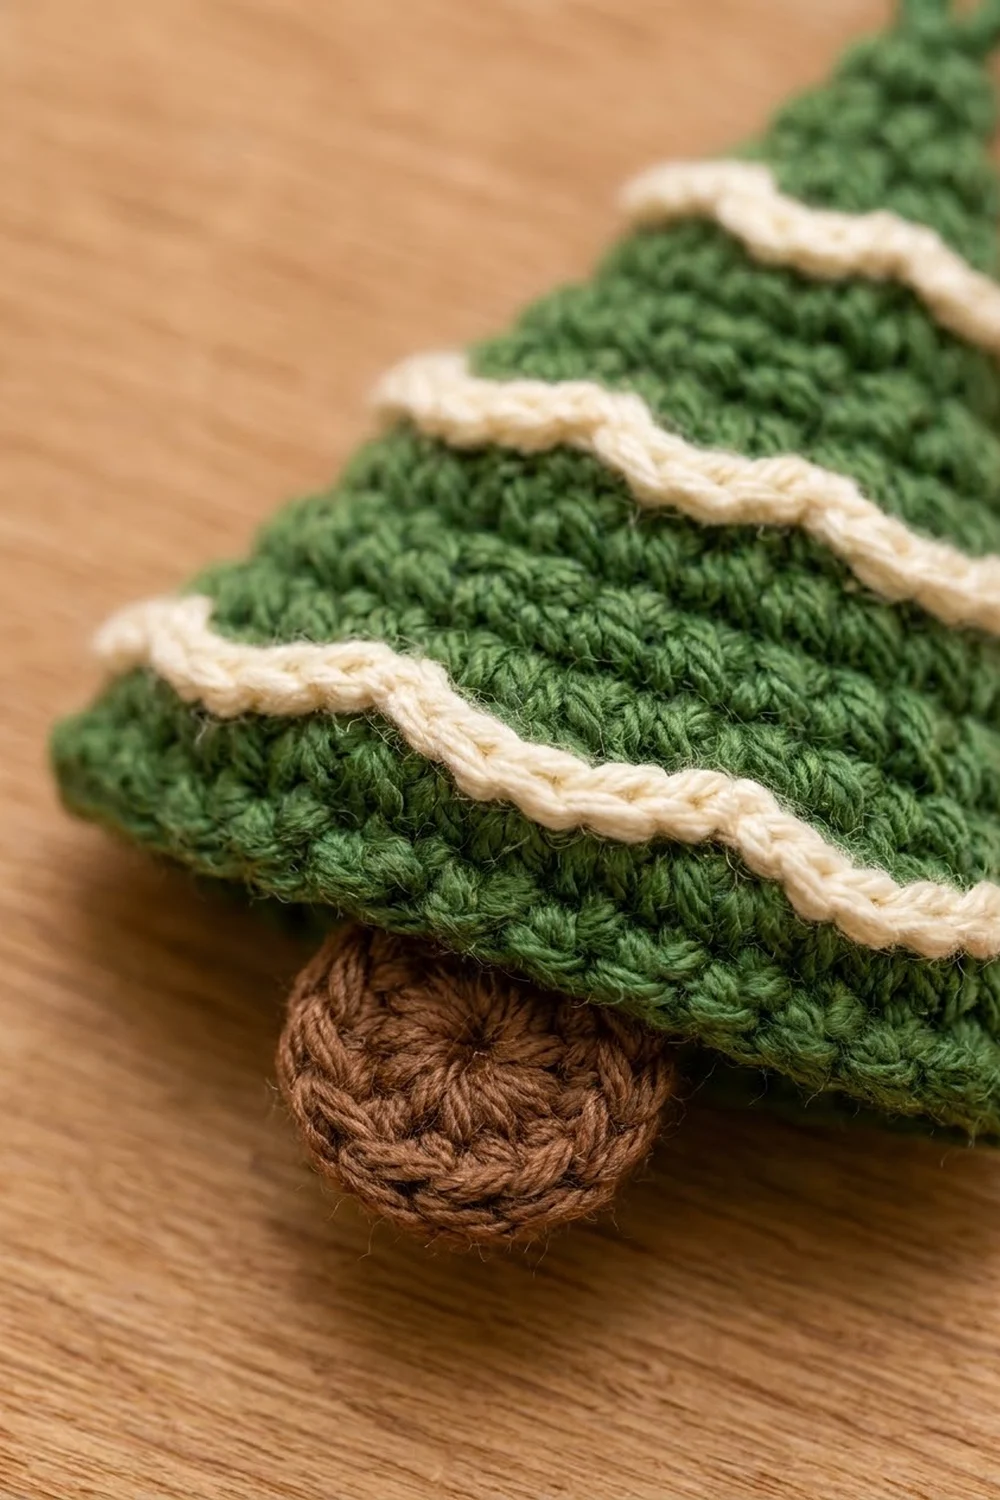
This small tree ornament has a soft, plump body with three tiers of cream snow and a little brown trunk. It’s quick to make, uses very little yarn and hangs neatly from its own loop, so it works well for gift toppers, tree decorations and holiday markets.
The colors are classic: forest green for the tree, creamy white for the scalloped snow and warm chocolate brown for the trunk. The tree is worked in tight single crochet for a clean, sculpted look. The scallops sit on top of the fabric like piped icing.
This pattern uses US crochet terms. The finished ornament is about 3 in (7.6 cm) wide at the bottom trim and 3.5 in (8.9 cm) tall including the trunk. With the hanging loop, it’s about 5 in (12.7 cm) tall.
The cone is worked top-down in a continuous spiral from a magic ring at the tip. Three rounds are worked in back loops only, which leaves rows of free front loops for the cream scallops. The base closes with decrease rounds after light stuffing. A small brown disc is sewn on as the trunk, and a green loop finishes the top.
Finished Size and Construction
- Finished size: 3 in (7.6 cm) wide × 3.5 in (8.9 cm) tall; 5 in (12.7 cm) with the loop
- Skill level: Easy (advanced beginner)
- Terminology: US
- Yarn weight: DK (light #3)
- Hook: 3.0 mm (C/D)
- Number of pieces: 1 ornament, made of 2 crocheted parts (cone body and trunk disc) plus surface trims
- Layout: Single standalone ornament; no other pieces are joined to it
- Cone body size: 2.7 in (6.9 cm) wide flattened × 3 in (7.6 cm) tall
- Size before trim: 2.7 in (6.9 cm) at the widest round
- Trim depth: Each scallop stands about 0.25 in (0.6 cm) off the surface
Materials
Use a smooth, firmly plied DK cotton or cotton blend. Cotton keeps the scallops crisp and the cone firm. If you use acrylic, choose a tightly twisted yarn so the stitches don’t look fuzzy at this small scale.
- Green (tree): 8 g / 20 m
- Cream (snow trims): 3 g / 7.5 m
- Brown (trunk): 2 g / 5 m
These quantities include a small margin for swatching and weaving in ends.
Tools:
– 3.0 mm (C/D) crochet hook
– Stitch marker
– Tapestry needle
– A pinch of polyester fiberfill (about 2 g)
– Scissors
– Pins
Abbreviations (US Terms)
- MR – magic ring
- ch – chain
- sl st – slip stitch
- sc – single crochet
- hdc – half double crochet
- inc – 2 sc in the same stitch
- dec – single crochet decrease (invisible decrease recommended)
- BLO – back loop only
- FL – front loop
- st(s) – stitch(es)
- ( ) × n – repeat the bracketed steps n times
Special stitch: Snow scallop. Work (sl st in next FL, 3 hdc in next FL). One scallop uses 2 free front loops.
Gauge and Checkpoints
Gauge: 11 sc and 12 rounds = 2 in (5.1 cm) in sc worked in the round, which is 5.5 sts and 6 rounds per inch (2.5 cm).
Work the cone through Round 6 as a test before committing. At this small size, a half-stitch difference per inch changes the finished width by almost 0.25 in (0.6 cm).
Checkpoints:
– After Round 6: about 1 in (2.5 cm) tall from the tip; about 1.1 in (2.8 cm) wide when pressed flat.
– After Round 12: about 2 in (5.1 cm) tall; about 2.2 in (5.6 cm) wide flat.
– After Round 18: about 3 in (7.6 cm) tall; about 2.7 in (6.9 cm) wide flat.
– Trunk disc: about 1 in (2.5 cm) across.
If the piece is too big: go down to a 2.75 mm hook. If it’s too small: go up to a 3.25 mm hook. If only the height is off, check that you aren’t skipping or doubling rounds at the marker.
Tree Body (Green)
Work in a continuous spiral and don’t join the rounds. Place a marker in the first stitch of each round and move it up as you go.
Round 1: With green, 6 sc in MR. Pull the ring tight. (6)
Round 2: Sc in each st around. (6)
Round 3: (Sc in next st, inc) × 3. (9)
Round 4: Sc in each st around. (9)
Round 5: (Sc in next 2 sts, inc) × 3. (12)
Round 6: Sc in each st around. (12)
Checkpoint: 1 in (2.5 cm) tall.
Round 7 (BLO): Working in BLO only, (sc in next 3 sts, inc) × 3. (15)
This round leaves the 12 front loops of Round 6 free. These are the base for the top snow tier.
Round 8: Sc in each st around, through both loops. (15)
Round 9: (Sc in next 4 sts, inc) × 3. (18)
Round 10: Sc in each st around. (18)
Round 11: (Sc in next 5 sts, inc) × 3. (21)
Round 12: (Sc in next 6 sts, inc) × 3. (24)
Checkpoint: 2 in (5.1 cm) tall; 2.2 in (5.6 cm) wide flat.
Round 13 (BLO): Working in BLO only, (sc in next 7 sts, inc) × 3. (27)
This leaves the 24 front loops of Round 12 free for the middle tier.
Round 14: Sc in each st around. (27)
Round 15: (Sc in next 8 sts, inc) × 3. (30)
Round 16: Sc in each st around. (30)
Round 17: Sc in each st around. (30)
Round 18 (BLO): Working in BLO only, sc in each st around. (30)
This leaves the 30 front loops of Round 17 free for the bottom tier.
Checkpoint: 3 in (7.6 cm) tall; 2.7 in (6.9 cm) wide flat.
Closing the Base
Round 19 (BLO): Working in BLO only, (sc in next 3 sts, dec) × 6. (24)
Working this round in BLO turns a crisp corner from the side wall into the flat base.
Push a small amount of fiberfill into the cone, mostly in the lower half. Use just enough to give it body. The ornament should press flat easily between two fingers.
Round 20: (Sc in next 2 sts, dec) × 6. (18)
Round 21: (Sc in next st, dec) × 6. (12)
Round 22: Dec × 6. (6)
Fasten off, leaving a 6 in (15.2 cm) tail. Weave the tail through the front loops of the last 6 sts, pull tight to close, and weave in.
Gently press the cone flat so the three increase lines sit at the sides and back. The face with the smoothest increase line is the front.
Trunk (Brown)
Round 1: With brown, 6 sc in MR. (6)
Round 2: Inc in each st around. (12)
Round 3: (Sc in next st, inc) × 6. (18)
Sl st in the next st to smooth the edge. Fasten off, leaving an 8 in (20.3 cm) tail for sewing.
Checkpoint: 1 in (2.5 cm) across.
Attaching the Trunk
Hold the flattened tree front-side up. Center the disc on the base so its upper half lies against the underside and its lower half extends about 0.5 in (1.3 cm) below the hem. Pin it in place.
Whipstitch along the line where the disc meets the base, catching the Round 19 stitches. Make a few stitches across the upper half for stability. Weave in the tail.
Border: Scalloped Snow Trims
The trims are this ornament’s border. Each one is worked into the free front loops left by a BLO round.
Trim gauge: One snow scallop uses 2 front loops. That’s about 0.36 in (0.9 cm) of width, and each scallop stands about 0.25 in (0.6 cm) off the surface.
Hold the ornament tip-up with the front facing you. Work each trim from right to left across the front, the same direction as the body rounds.
Top Tier (Round 6 Front Loops)
Join cream with a sl st in any free FL of Round 6 at the back of the tree. 3 hdc in next FL, sl st in next FL. Repeat from * around. End with 3 hdc in the last FL and sl st into the first sl st to join. Fasten off.
Count: 12 sts worked 1-per-loop (6 sl st + 6 hdc placements) + 12 extra hdc (2 extra in each of 6 scallops) = 24 sts, which makes 6 scallops.
Per side when flattened: 3 scallops on the front, 3 on the back.
Middle Tier (Round 12 Front Loops)
Join cream in a free FL of Round 12 at the back. Work the same way around all 24 loops.
Count: 24 sts worked 1-per-loop + 24 extra hdc = 48 sts, which makes 12 scallops.
Per side: 6 scallops on the front, 6 on the back.
Bottom Tier (Round 17 Front Loops)
Join cream in a free FL of Round 17 at the back. Work the same way around all 30 loops.
Count: 30 sts worked 1-per-loop + 30 extra hdc = 60 sts, which makes 15 scallops.
Per side: 7 full scallops on each face, with half a scallop sitting on each side fold. This is intended and gives the tree a soft, rounded silhouette.
Why the Math Works
Every trim round is an even number of free loops: 12, 24 and 30. Since each scallop uses exactly 2 loops, every tier closes evenly with no leftover loop and no squeezed final scallop.
The tiers grow with the tree: 6, then 12, then 15 scallops. That keeps the scallop size the same on every tier, so the snow looks even from tip to hem.
The bottom tier adds about 0.15 in (0.4 cm) on each side of the 2.7 in (6.9 cm) body. This gives the finished width of about 3 in (7.6 cm).
Hanging Loop
With green, join with a sl st at the tip next to the magic ring. Ch 18. Sl st back into the same spot to form the loop. Then sl st in each of the 18 ch around the loop for a firm, cord-like finish. Fasten off and weave the end down into the cone.
The loop stands about 1.5 in (3.8 cm) above the tip.
Final Blocking
- Lightly mist the ornament with water, or hover a steam iron about 1 in (2.5 cm) above it. Never press the iron onto the yarn.
- Lay it flat with the front facing up. Ease the sides into a straight-edged triangle.
- Pinch each scallop upward and outward so all three tiers sit level and point slightly down, like hanging snow.
- Straighten the trunk so it hangs centered below the hem.
- Shape the loop into a neat upright teardrop.
- Let it dry fully flat, at least 4 hours.
- Check the measurements: 3 in (7.6 cm) wide at the bottom trim, 3.5 in (8.9 cm) tall without the loop.
Final Quality-Control Checklist
- The tip is closed tightly, with no hole at the magic ring.
- The increase lines sit at the sides or back, not on the front face.
- The three cream tiers are level and evenly spaced: about 1 in (2.5 cm), 2 in (5.1 cm) and 3 in (7.6 cm) down from the tip.
- Each tier has its full scallop count: 6, 12 and 15.
- No stuffing shows between stitches.
- The trunk is centered, with about 0.5 in (1.3 cm) showing below the hem.
- The loop is firm and stands straight up from the tip.
- All ends are woven in and trimmed out of sight.
Troubleshooting
Gaps show the stuffing. Your tension is too loose for the hook. Go down 0.25 mm or use invisible decreases, and use less fiberfill.
The cone leans or twists. Spiral rounds drift naturally. When flattening, line up the front by the trims rather than by the increase lines. Steam blocking corrects most leaning.
The scallops flop flat. Use hdc rather than sc in the scallops, and keep the sl st between scallops snug. A light steam helps them stand up.
The last scallop doesn’t fit. Recount the free front loops. You may have worked an extra sc or missed one in the BLO round. The count must be 12, 24 or 30.
The tier slants. Each tier starts at the back, so where it starts and ends doesn’t matter. A slant means the BLO round itself drifted. Check that you worked it fully in BLO.
The trunk hangs too low. Re-pin it so only about 0.5 in (1.3 cm) shows, and add a stitch across the top of the disc.
Care
Spot clean with cool water and mild soap, then reshape and dry flat. Store loosely in tissue so the scallops and loop don’t get crushed.

Final Notes
The measurements build on each other:
– A gauge of 5.5 sts and 6 rounds per inch gives 1 in (2.5 cm) of height every 6 rounds.
– That puts the free front loops for the snow tiers at Rounds 6, 12 and 17, giving 12, 24 and 30 loops.
– Those loops become 6, 12 and 15 even scallops, and the 30-stitch hem flattens to 2.7 in (6.9 cm).
– The bottom trim brings the width to 3 in (7.6 cm), the 1 in (2.5 cm) trunk brings the height to 3.5 in (8.9 cm), and the loop adds about 1.5 in (3.8 cm).
If you match gauge at the first checkpoint, every count and measurement after it should line up. Make one, then make a whole forest.
Happy crocheting!