

This curtain is made of 12 hanging vines. Each one is a firm green cord with deep cranberry poinsettias and small pointed leaves sewn along it. When it hangs in a window, light comes through between the strands and the flowers seem to float in front of the glass. It works as a holiday room divider or as a Christmas window treatment.
You need three colors: cranberry red for the petals, olive green for the vines and leaves, and golden yellow for the bobble centers. Each poinsettia has 8 pointed petals with a line of small eyelets down the middle, a crisp single-crochet edge, and a center of 7 gold bobbles.
The pattern uses US crochet terms. The finished curtain drops 60 in (152.4 cm) below the rod and measures about 49.25 in (125.1 cm) across, including how far the outer flowers stick out. Each flower measures 5.25 in (13.3 cm) from tip to tip.
You make three small motifs and a long cord. You then sew the motifs onto the cords following a staggered layout and loop each cord over the rod. Nothing is joined side to side, so every strand moves on its own.
Finished Size and Construction
- Finished curtain: 60 in (152.4 cm) drop × about 49.25 in (125.1 cm) wide
- Skill level: Intermediate
- Terminology: US crochet terms
- Yarn weight: DK (#3), cotton or cotton blend
- Hook: 3.5 mm (E-4)
- Number of pieces: 12 vine cords, 66 poinsettias, 66 gold centers, 144 leaves
- Layout: 12 strands, spaced 4 in (10.2 cm) apart, alternating Strand A and Strand B
- Piece size: flower 5.25 in (13.3 cm); leaf 1.75 in (4.4 cm) long × 1 in (2.5 cm) wide
- Flower size before border: 5 in (12.7 cm)
- Border depth: 0.125 in (0.3 cm) on every petal edge
Materials
Choose a smooth DK cotton or cotton blend with about 110 m (120 yd) per 50 g. Cotton holds the petal points crisply and does not stretch much when the strands hang.
- Color A, Cranberry Red (petals): 500 g / 1,100 m (about 7 g / 15 m per flower)
- Color B, Olive Green (vines and leaves): 150 g / 330 m
- Color C, Golden Yellow (centers): 50 g / 110 m
Tools:
– 3.5 mm (E-4) hook
– Tapestry needle
– Stitch markers
– Measuring tape
– Rust-proof pins and a blocking board
– Spray bottle
– Curtain rod up to 1 in (2.5 cm) in diameter
The quantities include a margin of about 10–15% for swatching and sewing tails.
Abbreviations (US Terms)
- ch – chain
- sl st – slip stitch
- sc – single crochet
- hdc – half double crochet
- dc – double crochet
- st(s) – stitch(es)
- sp – space
- sk – skip
- tc – turning chain
- RS / WS – right side / wrong side
Special stitches:
– dc2tog: [yarn over, insert hook in next st, pull up a loop, yarn over, pull through 2 loops] twice, then yarn over and pull through all 3 loops.
– 3-dc bobble: [yarn over, insert hook, pull up a loop, yarn over, pull through 2 loops] 3 times in the same place, then yarn over and pull through all 4 loops.
– Picot: ch 3, then sl st in the 3rd ch from the hook.
– Sl st cord: a foundation chain with a sl st worked into the back bump of each ch.
Gauge and Checkpoints
Gauge: 20 dc and 10 rows = 4 in (10.2 cm). Each dc is about 0.2 in (0.5 cm) wide and each dc row is about 0.4 in (1.0 cm) tall.
Make one complete flower before anything else and check it at each stage:
- Center after Rnd 4: 1.5 in (3.8 cm) across.
- One petal: 1.75 in (4.4 cm) from the edge of Rnd 4 to the tip, and 1.4 in (3.6 cm) wide at Row 2.
- Flower before edging: 5 in (12.7 cm) tip to tip (1.5 + 1.75 + 1.75).
- Flower after edging: 5.25 in (13.3 cm).
- Leaf: 1.75 in (4.4 cm) long, not counting the stem.
- Cord: the first 50 sl st measure 10 in (25.4 cm).
If your flower comes out larger than 5.5 in (14.0 cm), go down a half hook size. If it is smaller than 5 in (12.7 cm), go up a half size. Check the cord on its own, because slip stitch tension often differs from dc tension.
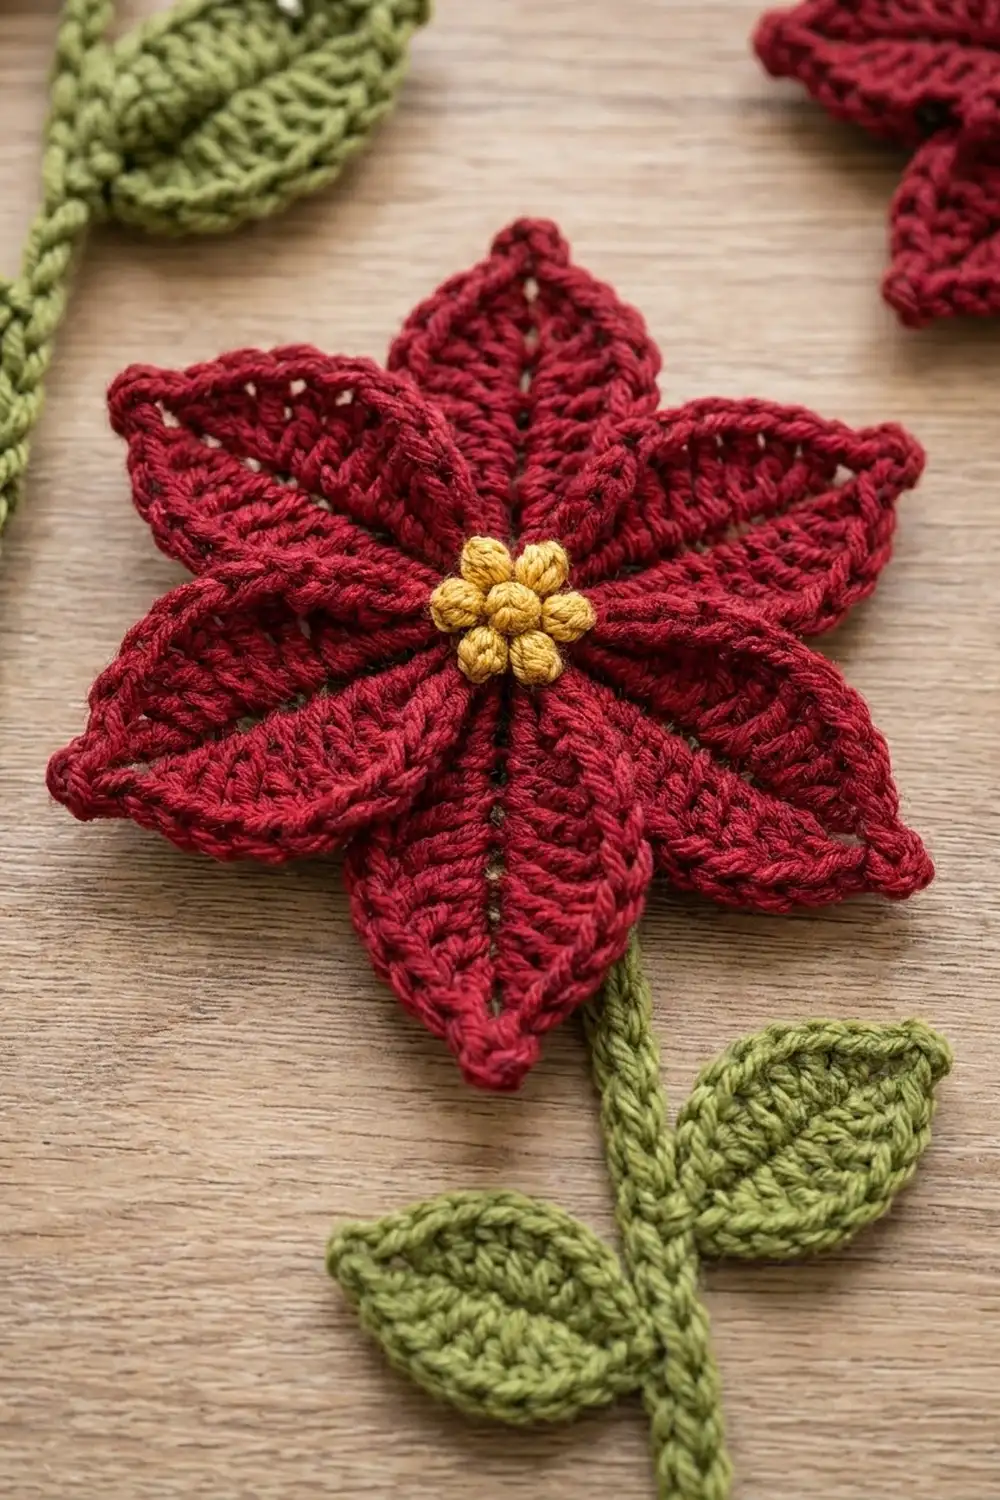
Poinsettia (make 66)
Use Color A.
Rnd 1: Make a magic ring. Ch 1, work 8 sc in the ring, then sl st to the first sc. (8 sts)
Rnd 2: Ch 1, work 2 sc in each st around, then sl st to the first sc. (16 sts)
Rnd 3: Ch 1, work [sc in next st, 2 sc in next st] 8 times, then sl st to the first sc. (24 sts)
Rnd 4: Ch 1, work [sc in next 2 sts, 2 sc in next st] 8 times, then sl st to the first sc. (32 sts)
Checkpoint: the center measures 1.5 in (3.8 cm) across. The 32 sts form 8 groups of 4, one group per petal.
Rnd 5: Petals (worked in rows, 8 times)
Sl st in the first st of Rnd 4. This is st 1 of the first petal group.
Row 1 (RS): Ch 3 (counts as dc), dc in next st, ch 1, dc in next st, dc in next st, turn. (4 dc + 1 ch-1 sp)
Row 2 (WS): Ch 3 (counts as dc), dc in same st, dc in next dc, ch 1, sk ch-1 sp, dc in next dc, 2 dc in top of tc, turn. (6 dc + 1 ch-1 sp)
Row 3 (RS): Ch 3 (counts as dc), dc2tog over next 2 dc, ch 1, sk ch-1 sp, dc2tog over next 2 dc, dc in top of tc, turn. (4 sts + 1 ch-1 sp)
Row 4 (WS): Ch 2 (does not count), dc2tog over next 2 sts, ch 1, sk ch-1 sp, dc2tog over last 2 sts, turn. (2 clusters + 1 ch-1 sp)
Row 5 (RS): Ch 2 (does not count), dc2tog over the 2 clusters, skipping the ch-1 sp. Work a picot. (1 st + picot tip)
The ch-1 spaces in Rows 1–4 stack on top of each other and make the 4-eyelet center spine.
Move to the next petal: Work 4 sl st loosely down the side edge of the petal, one in each row end of Rows 4, 3, 2, and 1. Then sl st in the next unworked st of Rnd 4, which becomes st 1 of the next petal group.
Repeat Rows 1–5 and the move until you have 8 petals. After the 8th petal, work the 4 side sl st, then sl st into the gap before Petal 1. Do not fasten off.
The petals are 1.4 in (3.6 cm) wide at their widest point, so they sit edge to edge and overlap slightly near the base. This is intended. The narrowing Rows 3–5 open them into separate points.
Gold Center (make 66)
Use Color C.
Rnd 1: Make a magic ring. Ch 2 (does not count), then work [3-dc bobble in ring, ch 1] 7 times. Sl st to the top of the first bobble. (7 bobbles, 7 ch-1 sps)
Pull the ring tight so the bobbles push up into a raised cluster about 1 in (2.5 cm) across. Fasten off, leaving a 10 in (25.4 cm) tail for sewing.
Leaf (make 144)
Use Color B.
Ch 11.
Side 1: Starting in the 2nd ch from the hook, work sc, hdc, dc, dc, dc, hdc, sc (7 sts). Work 3 sc in the next ch. Leave the last 2 ch unworked as the stem.
Side 2: Rotate the work. Along the free loops of the same 7 ch, work sc, hdc, dc, dc, dc, hdc, sc. (7 sts)
Tip: Ch 2, then sl st in the first sc of Side 1.
Each leaf has 17 sts plus the ch-2 tip. The foundation chain reads as a center vein, the 3 sc make a rounded base, and the ch-2 makes the point. Fasten off, leaving a 10 in (25.4 cm) tail.
Checkpoint: the leaf is 1.75 in (4.4 cm) long and 1 in (2.5 cm) wide, and the stem is 0.4 in (1.0 cm).
Vine Cord (make 12)
Use Color B.
Ch 321. Sl st in the back bump of the 2nd ch from the hook and in each ch across. (320 sl st)
At 5 sl st per inch, the cord is 64 in (162.6 cm) long: 60 in (152.4 cm) of drop plus 4 in (10.2 cm) for the rod loop. Keep the sl st as loose as the chain so the cord stays straight and does not spiral.
Make All Pieces
| Piece | Color | Quantity |
|---|---|---|
| Poinsettia | A | 66 (36 for Strand A + 30 for Strand B) |
| Gold center | C | 66 |
| Leaf | B | 144 (12 strands × 6 pairs × 2) |
| Vine cord | B | 12 |
Strands 1, 3, 5, 7, 9, and 11 are Strand A, with 6 flowers and 6 leaf pairs each. Strands 2, 4, 6, 8, 10, and 12 are Strand B, with 5 flowers and 6 leaf pairs each.
All positions are measured from the bottom end of the cord. F = flower center, L = leaf pair, . = bare cord.
Height          1  2  3  4  5  6  7  8  9  10 11 12
58 in (147.3)   L  .  L  .  L  .  L  .  L  .  L  .
54 in (137.2)   F  L  F  L  F  L  F  L  F  L  F  L
49 in (124.5)   L  F  L  F  L  F  L  F  L  F  L  F
44 in (111.8)   F  L  F  L  F  L  F  L  F  L  F  L
39 in (99.1)    L  F  L  F  L  F  L  F  L  F  L  F
34 in (86.4)    F  L  F  L  F  L  F  L  F  L  F  L
29 in (73.7)    L  F  L  F  L  F  L  F  L  F  L  F
24 in (61.0)    F  L  F  L  F  L  F  L  F  L  F  L
19 in (48.3)    L  F  L  F  L  F  L  F  L  F  L  F
14 in (35.6)    F  L  F  L  F  L  F  L  F  L  F  L
9 in (22.9)     L  F  L  F  L  F  L  F  L  F  L  F
4 in (10.2)     F  L  F  L  F  L  F  L  F  L  F  L
Flowers are 10 in (25.4 cm) apart on each strand and are offset by 5 in (12.7 cm) between neighboring strands, so the flowers never touch across the 4 in (10.2 cm) gaps.
Joining
Gold center to flower: Center the bobble cluster over Rnds 1–2 of the flower. Whipstitch through the ch-1 spaces of the gold center into the Rnd 2 sts underneath, working 7 stitches. Weave in the tail on the back.
Flower to cord: Place pins on the cord at the heights shown in the grid. Lay the flower face up with the cord running behind it. Sew the back loops of Rnd 3 to the cord in 4 places. Then tack the backs of the top and bottom petals at Row 2 to the cord with one stitch each. This holds the flower flat and keeps it from flipping.
Leaf pair to cord: Set one leaf on each side of the cord with the stems angled upward about 45°. Sew each stem to 2 consecutive sl st of the cord. Add one tack at the leaf base so it does not droop.
Rod loop: Fold the top 4 in (10.2 cm) of the cord back on itself and sew the end securely to the cord at the 60 in (152.4 cm) mark. This makes a loop with a 4 in (10.2 cm) circumference that fits rods up to 1 in (2.5 cm) in diameter.
Tension: Sew with snug but relaxed stitches. If you pull too hard, the cord bunches behind the flowers and the strand gets shorter.
Size checkpoint: Hang each finished strand for 24 hours. It should drop 60 in (152.4 cm) from the fold of the loop. Slide the loops onto the rod so the strands are 4 in (10.2 cm) apart. Eleven gaps of 4 in give 44 in (111.8 cm) between the outer strands, and the outer flowers add 2.625 in (6.7 cm) on each side, for a total width of about 49.25 in (125.1 cm).
Border: Petal Edging (Rnd 6)
This round finishes each flower. Continue with Color A from the gap before Petal 1.
Border gauge: One dc row end is 0.4 in (1.0 cm) tall, and one sc is 0.2 in (0.5 cm) wide. That means 2 sc fit along each dc row end.
Rnd 6, worked around each petal:
– First side: 2 sc in each row end of Rows 1, 2, and 3 (6 sc), then 1 sc in the row end of Row 4 (1 sc). (7 sc)
– Tip: (sc, ch 2, sc) in the picot. (2 sc + ch-2 point)
– Second side: 1 sc in the row end of Row 4, then 2 sc in each row end of Rows 3, 2, and 1. (7 sc)
– Valley: Sl st in the gap between this petal and the next.
Per petal: 7 + 2 + 7 = 16 sc, plus 1 ch-2 tip and 1 sl st.
Round total: 8 × 16 = 128 sc, 8 ch-2 tips, and 8 sl st.
Sl st to the first sc and fasten off.
Why the math works: Each side gets 7 sc × 0.2 in = 1.4 in (3.6 cm) of edging along a petal side that measures about 1.6 in (4.1 cm) on the slant. The slightly short edge pulls the side in and sharpens the point. Row 4 is a short cluster row, so it gets only 1 sc. The edging adds 0.125 in (0.3 cm) at each tip, which takes the flower from 5 in (12.7 cm) to 5.25 in (13.3 cm).
Final Blocking
- Before you sew anything to the cords, pin each flower face up into a 5.25 in (13.3 cm) circle.
- Pin each petal tip out straight from the center.
- Pin each leaf to 1.75 in (4.4 cm), pinning the tip into a point.
- Mist everything until damp, but not soaked.
- Use your fingers to press each petal so it lies flat and the eyelet spine runs straight.
- Let the pieces dry completely, which takes about 12 hours.
- Hang the cords and mist them lightly so any twist relaxes. A clothespin clipped to the bottom end works as a light weight.
Final Quality-Control Checklist
- Every flower has 8 petals, 4 stacked eyelets per petal, and 128 sc in the edging.
- Each gold center has 7 bobbles and sits right over the middle of the flower.
- Each leaf has 17 sts, a sharp ch-2 tip, and a stem angled upward.
- Each cord has 320 sl st and is 64 in (162.6 cm) long before folding.
- Every Strand A has 6 flowers, and every Strand B has 5.
- All loops are the same size, and every strand drops 60 in (152.4 cm).
- All tails are woven in on the back.
Troubleshooting
- Petals overlap too much: Your dc gauge is loose. Go down a hook size for Rnd 5 only.
- Petals curl forward: Your edging is too tight. Work the side sc a little more loosely and keep the counts the same.
- Spine eyelets are off center: Make sure each Row 1 starts in st 1 of its 4-st group.
- Cord spirals: Loosen your sl st, or work the cord with a hook one size larger.
- Strands hang shorter after sewing: You pulled the stitches too tight. Unpick them and sew more loosely.
- Flowers tilt: Add the extra tacks at the top and bottom petals.
Care
Remove the curtain from the rod and hand wash it in cool water. Lay the strands flat to dry, then reshape the petals and leaves while they are damp.
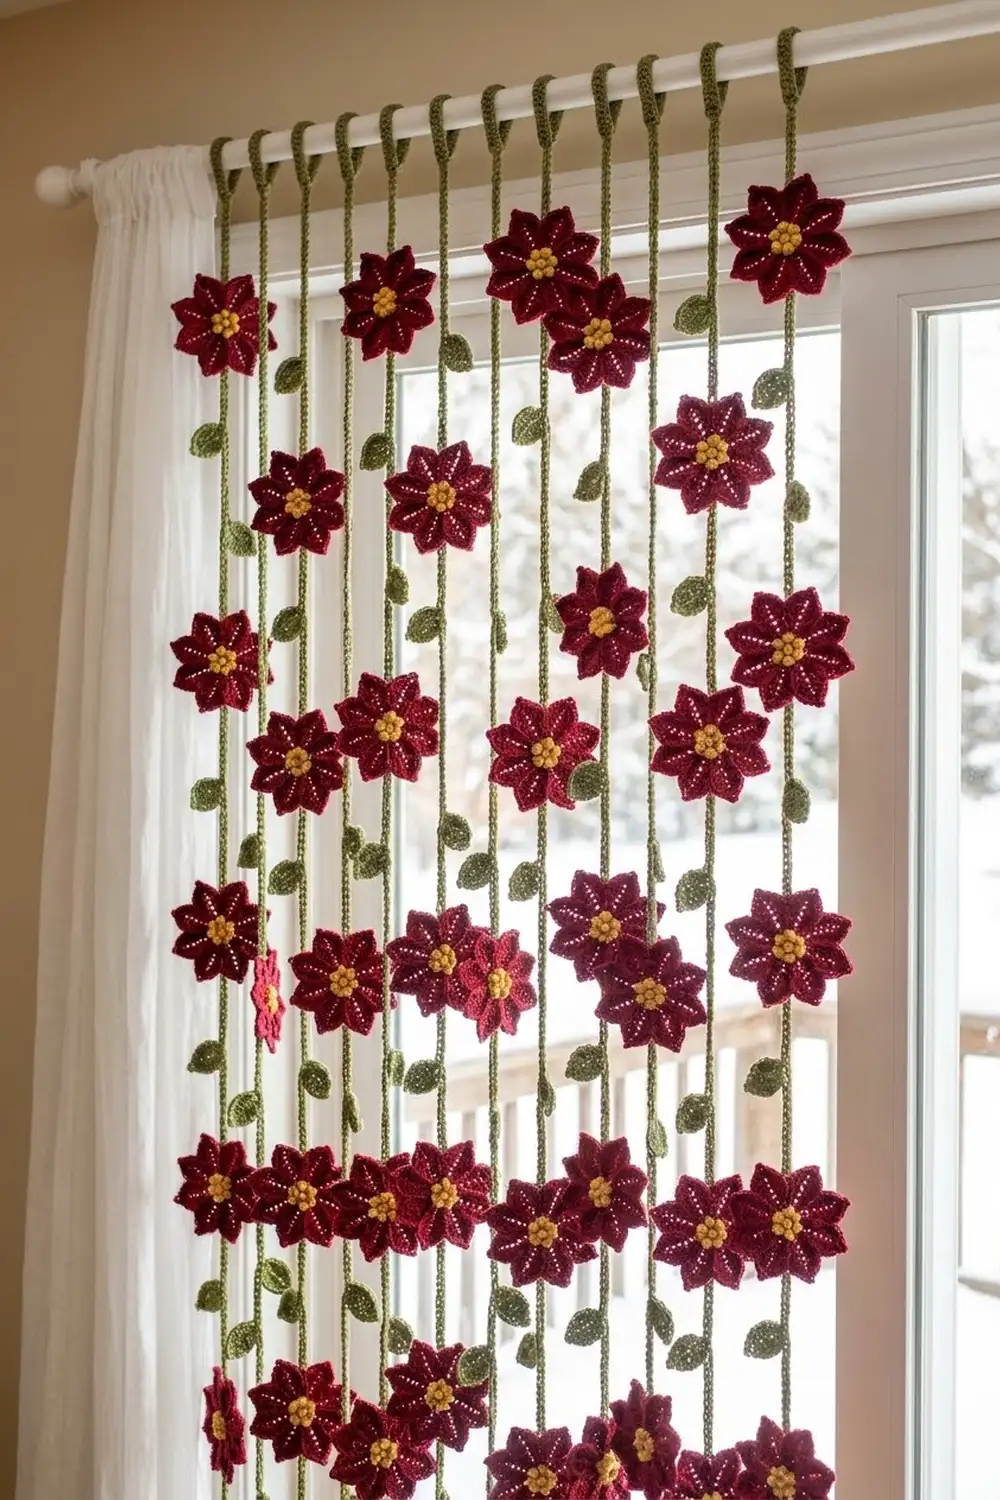
Final Notes
Here is how the measurements build on each other. The 1.5 in (3.8 cm) center plus two 1.75 in (4.4 cm) petals gives a 5 in (12.7 cm) flower. The edging takes it to 5.25 in (13.3 cm). A 64 in (162.6 cm) cord folds to a 60 in (152.4 cm) drop, and 12 strands spaced 4 in (10.2 cm) apart span about 49.25 in (125.1 cm). If each checkpoint matches, the whole curtain will too.
Happy crocheting!