

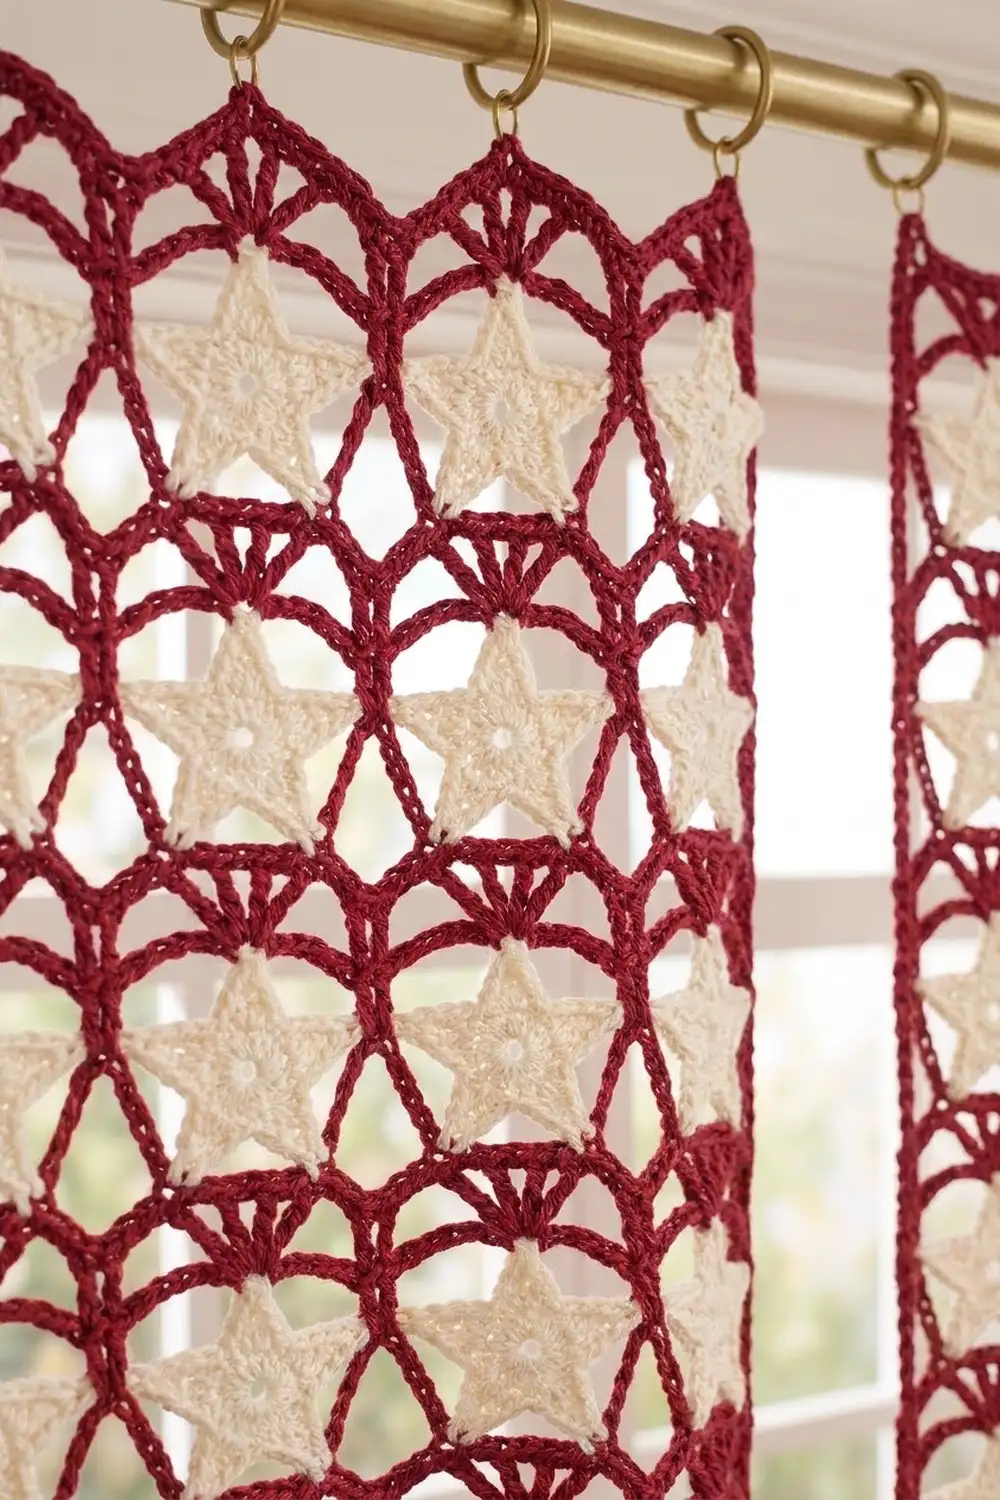
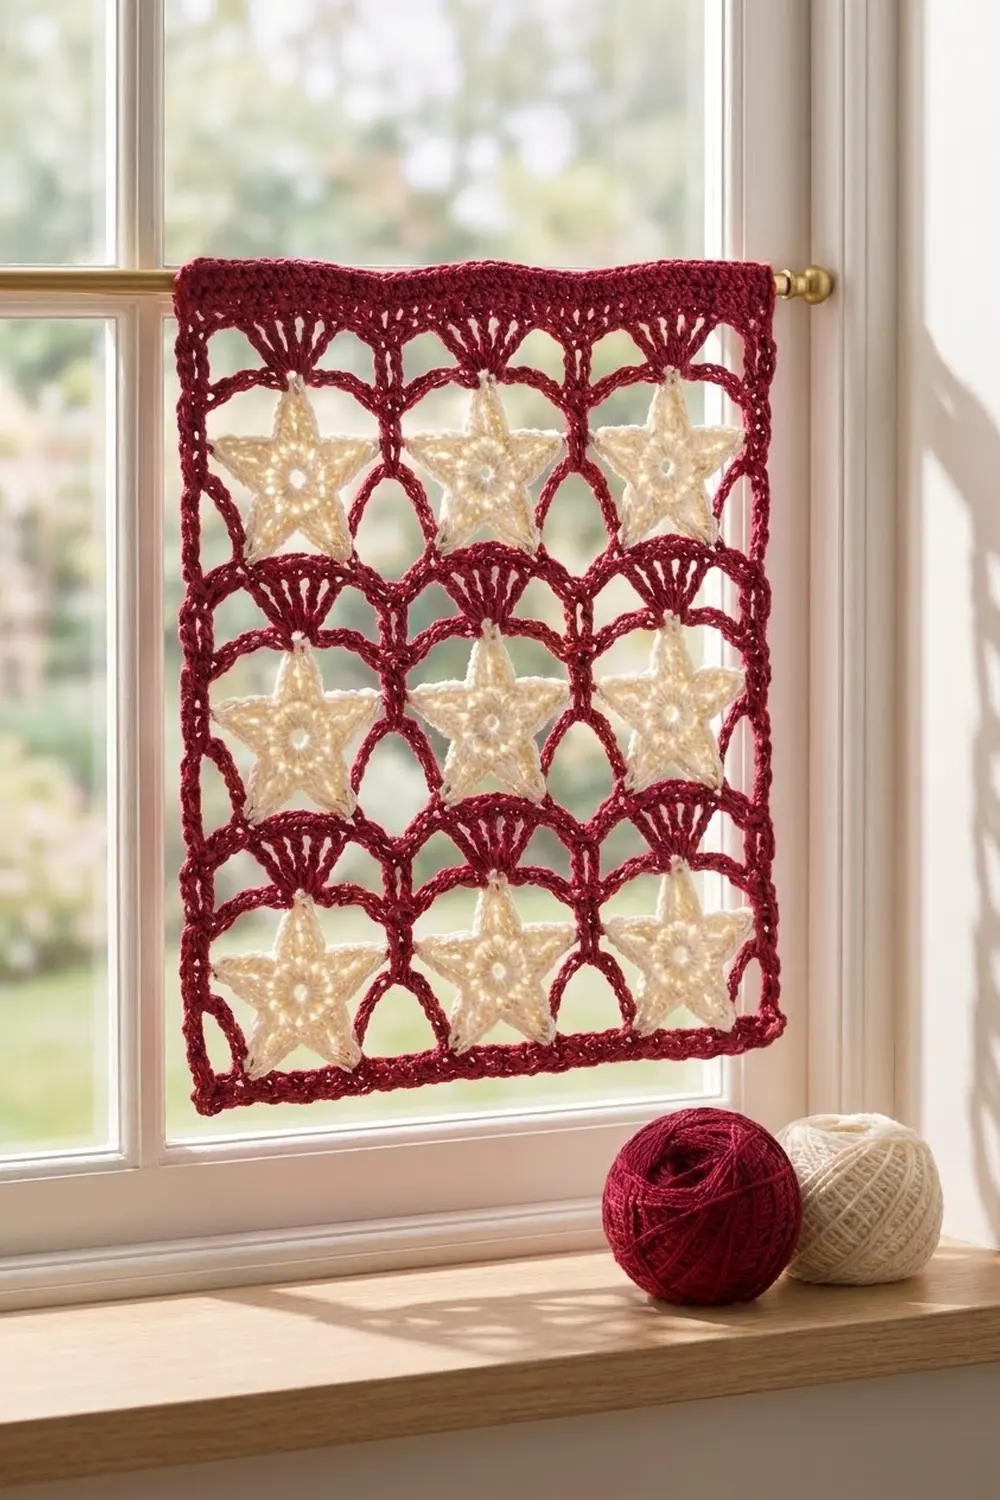
The Starlight Lattice Panel is a small, square, open-mesh piece in two holiday colors. Nine cream stars sit in a 3 x 3 grid inside a cranberry-red lattice. Each star has its own square cell, a fan-topped arch above it and tall posts on either side.
Two-color contrast and a lot of negative space give this panel its look. It works well as a table mat, a wall hanging or a window-pane sample for a full star-mesh curtain. The finished panel is 11.75 in x 11.75 in (29.8 cm x 29.8 cm).
This pattern uses US crochet terms throughout.
Construction is join-as-you-go. First you make nine separate stars in cream. Then you work the red lattice in rows from the bottom up, catching each star’s legs, side tips and top tip as you go. Two rounds of single crochet finish the edge.
Finished Size and Construction
- Finished size: 11.75 in x 11.75 in (29.8 cm x 29.8 cm)
- Skill level: Intermediate
- Terminology: US terms
- Yarn weight: Worsted (#4)
- Hook: 5.0 mm (H-8)
- Number of pieces: 9 star motifs joined into 1 lattice panel
- Layout: 3 stars across x 3 stars high
- Piece size: each star is 2.75 in (7.0 cm) tip to tip, and each cell is 3.5 in x 3.5 in (8.9 cm x 8.9 cm)
- Size before border: 10.75 in x 10.75 in (27.3 cm x 27.3 cm)
- Border depth: 0.5 in (1.3 cm) per side
Materials
Choose a smooth worsted-weight yarn that holds its shape, such as a cotton blend or soft acrylic, with about 180 m per 100 g. Smooth yarn shows the star points clearly and blocks well.
- Color A, cranberry red: 50 g, about 90 m (98 yd)
- Color B, cream: 20 g, about 36 m (39 yd)
Tools:
- 5.0 mm (H-8) crochet hook
- Tapestry needle
- Scissors
- Stitch markers (4 or more)
- Rust-proof pins and a blocking mat
- Spray bottle
- Measuring tape
The yarn amounts include a safety margin of about 20% for gauge swatches and tails.
Abbreviations (US Terms)
- ch – chain
- sl st – slip stitch
- sc – single crochet
- hdc – half double crochet
- dc – double crochet
- tr – treble crochet
- dtr – double treble crochet (yo 3 times, insert hook, pull up a loop, [yo, pull through 2 loops] 4 times)
- sp – space
- st(s) – stitch(es)
- RS / WS – right side / wrong side
- yo – yarn over
Special stitch – Fan: work 7 dc into the same spot.
Star tip: the single chain you skip at the start of each point. It forms the sharp point and is where the lattice joins.
Gauge and Checkpoints
Gauge in single crochet: 16 sc x 16 rows = 4 in (10.2 cm).
Before you make all nine stars, make one star as a test.
- Star, after Round 1: the ring of dc is 1.25 in (3.2 cm) across.
- Star, after Round 2: 2.75 in (7.0 cm) from the tip of the top point to the line across the two lower legs.
- Lattice, after Row 0: the foundation row of 43 sc measures 10.75 in (27.3 cm).
- Lattice, after each band: each band adds 3.5 in (8.9 cm) at the side edge, once lightly stretched.
If your star is too big, the lattice will pucker around it, so go down 0.5 mm. If your star is too small, the chains will pull it flat and tight, so go up 0.5 mm. Do the same check on the foundation row: if 43 sc measure more than 10.75 in (27.3 cm), change to a smaller hook, and if they measure less, change to a larger one.
Star Motif (Make 9)
Use Color B.
Round 1: Make a magic ring. Ch 3 (counts as dc), work 14 dc into the ring. Join with a sl st to the top of the ch-3. (15 dc)
Pull the ring closed, but leave a small open center about 0.25 in (0.6 cm) across.
Round 2: Ch 5, sc in the 2nd ch from hook, hdc in the next ch, dc in the next ch, tr in the next ch, skip the next 2 dc of Round 1, sl st in the next dc. Repeat from * to * 4 more times. The last sl st lands in the top of the beginning ch-3. (5 points, 4 sts per point)
Each point uses 3 dc of Round 1, and 5 points x 3 dc = 15 dc, so the round closes exactly.
Fasten off and leave a 6 in (15.2 cm) tail. Weave in the ends on the WS.
Lay the star flat and pinch each point into shape. Tip to tip it should measure 2.75 in (7.0 cm).
Make All Pieces
Make 9 stars in Color B. The red lattice is worked as one piece, so there is nothing else to make ahead of time.
Layout (RS facing, top tips up):
Band 3:  [Star 7] [Star 8] [Star 9]
Band 2:  [Star 4] [Star 5] [Star 6]
Band 1:  [Star 1] [Star 2] [Star 3]
         ----- Row 0 (foundation) -----
Joining: The Red Lattice
The lattice does the joining. Each band of 4 rows catches 3 stars. Each cell is 14 sts wide, and one extra sc closes the last cell, so 3 x 14 + 1 = 43 sts on every full sc row.
Foundation: With Color A, ch 44.
Row 0: Sc in the 2nd ch from hook and in each ch across. Turn. (43 sc)
The post positions are sts 1, 15, 29 and 43. You can mark them if you like.
Band (Rows 1–4; work 3 times)
Row 1 (RS, leg row): Hold the next 3 stars in a line across the row, RS facing and top tips up.
Ch 1, sc in the first sc.
Ch 3, skip 2 sc, sc in the next sc. Ch 2, sl st in the tip of the first leg you reach of the next star, ch 2, skip 2 sc, sc in the next sc. Ch 2, skip 1 sc, sc in the next sc. Ch 2, sl st in the tip of that star’s other leg, ch 2, skip 2 sc, sc in the next sc. Ch 3, skip 2 sc, sc in the next sc.
Repeat from * to * 2 more times. Turn.
(16 sc: 1 + 5 per cell; the 1st, 6th, 11th and 16th sc are the post sts)
Each cell uses 14 sc of the row below (2 + 1 + 2 + 1 + 1 + 1 + 2 + 1 + 2 + 1 + 1 = 14). The two chain V’s lift the legs about 0.4 in (1.0 cm) above the base.
Row 2 (WS, post row): Ch 5 (counts as dtr).
Ch 3, sl st in the nearest side tip of the star. Ch 4, sl st in the top tip. Ch 4, sl st in the other side tip. Ch 3, dtr in the next post sc.
Repeat from * to * 2 more times. Turn.
(4 dtr including the turning ch, 9 star tips joined)
The two side tips of neighboring stars sit close to the same post, so the post holds them in place.
Row 3 (RS, fan row): Ch 5 (counts as dtr).
Ch 3, work a Fan into the top tip of the star (insert the hook under the tip chain where the Row 2 sl st sits). Ch 3, dtr in the next dtr.
Repeat from * to * 2 more times, with the last dtr in the top of the turning ch. Turn.
(4 dtr, 21 dc, 6 ch-3 sps)
The fans spread upward from each top tip and form the scalloped arches.
Row 4 (WS, sc row): Ch 1, sc in the first dtr.
3 sc in the ch-3 sp, sc in each of the 7 dc, 3 sc in the ch-3 sp, sc in the next dtr.
Repeat from * to * 2 more times. Turn.
(43 sc: 1 + 3 x [3 + 7 + 3 + 1])
This brings the count back to 43, and Row 4 becomes the base for the next band.
Work the Band (Rows 1–4) 2 more times for Bands 2 and 3, using Stars 4–6 and then Stars 7–9. Do not fasten off after the last Row 4.
Tension advice: Chain at an even, slightly relaxed tension. If the chains are tight, the stars cup forward. If they are loose, the stars twist. Each star should lie flat in its cell, with all 5 tips caught and nothing pulling.
Size checkpoint: The panel should measure 10.75 in x 10.75 in (27.3 cm x 27.3 cm). That is 43 sts across, and Row 0 (0.25 in / 0.6 cm) plus three 3.5 in (8.9 cm) bands up the side.
Border
Border gauge is the same as the main gauge, 16 sc x 16 rows = 4 in (10.2 cm). Continue with Color A.
Round 1: Ch 1. Work 3 sc in the first st (corner).
- Side edge: work 41 sc along the row ends. For each full band, put 1 sc in the Row 1 end, 6 sc around the Row 2 dtr post, 6 sc around the Row 3 dtr post and 1 sc in the Row 4 end. For the last band, skip the Row 4 end, because it is a corner. That gives 14 + 14 + 13 = 41.
- Bottom corner: 3 sc in the first free loop of the foundation ch.
- Bottom edge: 1 sc in each of the next 41 free loops.
- Bottom corner: 3 sc in the last loop.
- Side edge: work 41 sc along the second side, in the same way as the first.
- Top edge: 3 sc in the last sc of Row 4, then sc in each of the next 41 sc.
Join with a sl st to the first sc.
(176 sc: 41 between the corner groups on each side + 4 corner groups of 3)
Each side now has 45 sts, counting both corner center sts.
Round 2: Ch 1. Sc in each st around, with 3 sc in each corner center st. Join.
(184 sc; 47 sts per side, counting both corner center sts)
Fasten off and weave in the ends.
Why the math works:
- The panel has 3 cells x 14 sts + 1 closing st = 43 sts on the top and bottom edges.
- The sides have Row 0 (1) + 3 bands x 14 rows’ worth of sc = 43.
- Both directions match the 16 sc = 4 in (10.2 cm) gauge, so the panel stays square.
- Each border round adds 2 sts per side and 0.25 in (0.6 cm) all around.
- 47 sts at 4 sc per in = 11.75 in (29.8 cm), the finished size.
Final Blocking
- Weave in all the ends before blocking.
- Pin the panel to 11.75 in x 11.75 in (29.8 cm x 29.8 cm), placing the corners first.
- Pin the midpoint of each side, then pin every 1 in (2.5 cm) along the edges.
- Pin each star at all 5 tips so the points are sharp and the top tip lines up under its fan.
- Pull each post straight up and down. Check that every cell is 3.5 in (8.9 cm) square.
- Mist the panel until it is damp, but not soaked.
- Let it dry completely before you unpin it.
Final Quality-Control Checklist
- [ ] 9 stars, each 2.75 in (7.0 cm) tip to tip, each with an open center
- [ ] Every star joined at 5 tips: 2 legs, 2 side tips and 1 top tip
- [ ] Every full sc row has 43 sts
- [ ] 4 straight dtr posts in every band
- [ ] One 7-dc fan above each star
- [ ] Border Round 1 has 176 sts and Round 2 has 184 sts
- [ ] The panel measures 11.75 in (29.8 cm) on all four sides
- [ ] All ends woven in on the WS
Troubleshooting
Star has gaps at the base of the points: Pull the magic ring tighter, and work the sl sts firmly.
Row 4 count is off: Check that each ch-3 sp got exactly 3 sc, and that you worked into the turning ch at the end.
Stars tilt in their cells: Make sure you joined Row 1 into the correct legs, so the top tip points straight up.
Panel is taller than it is wide: The dtr posts are too loose. Block the side edges down to 10.75 in (27.3 cm) before the border, or use a smaller hook for Rows 2 and 3.
Border ruffles: Undo the round and work 5 sc instead of 6 around each dtr post.
Border cups: Work 7 sc around one post per band.
Care
Hand wash in cool water, press out the water gently in a towel, and dry flat, reshaping the star points while the panel is damp. Do not tumble dry.
Final Notes
Every measurement depends on the one before it:
- One star measures 2.75 in (7.0 cm) and fits a 3.5 in (8.9 cm) cell.
- Three cells of 14 sts plus 1 closing st give 43 sts, or 10.75 in (27.3 cm) across.
- Row 0 plus three 3.5 in (8.9 cm) bands give the same 10.75 in (27.3 cm) height.
- Two border rounds add 0.5 in (1.3 cm) per side, for a finished 11.75 in (29.8 cm) square.
If each checkpoint matches, the next stage will fit without forcing.
Happy crocheting!