

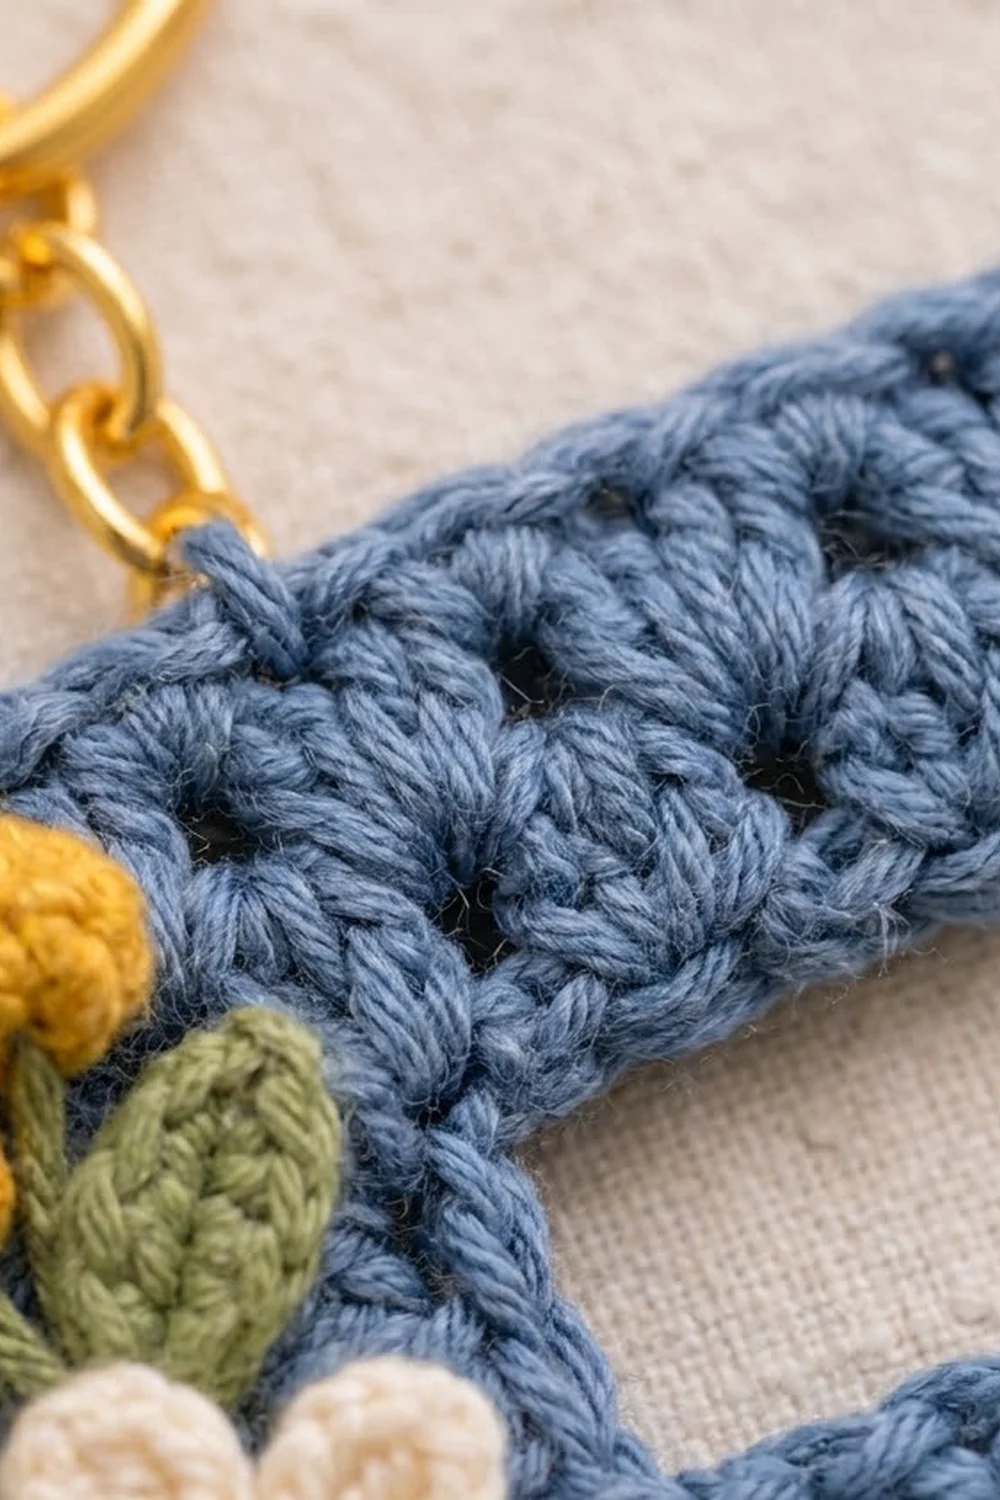
This little letter F is a bag charm with a garden on it. The letter is worked in a soft denim blue shell stitch, so the surface is covered in small fans with tiny star-shaped holes between them. A smooth single crochet outline frames the shape and gives it a neat edge.
A vine of appliqués runs down the left side of the upright bar. It has two cream daisies with golden yellow centers, three small yellow berries, and four sage-green leaves. A gold split ring on a short chain sits at the top-left corner, so the letter can hang from a bag, a set of keys, or a zipper.
The pattern uses US crochet terms. With its border, the finished letter measures 3.4 in (8.6 cm) wide and 4.7 in (11.9 cm) tall.
The F is a single flat piece, worked in rows from the bottom up. Each arm starts with a short chain, and slip stitches bring the work back to the width of the bar. Two rounds of single crochet go around the whole outline. You make the flowers, berries, and leaves separately and sew them on.
Finished Size and Construction
- Finished size: 3.4 in (8.6 cm) wide × 4.7 in (11.9 cm) tall
- Skill level: Easy-intermediate
- Terminology: US
- Yarn weight: Sport (#2), cotton or cotton blend
- Hook: 2.75 mm (US C/2)
- Number of pieces: 1 letter, plus 9 small appliqués (2 daisies, 3 berries, 4 leaves)
- Layout: Single piece, no joining
- Letter size before border: 2.9 in (7.4 cm) wide × 4.2 in (10.7 cm) tall
- Upright bar before border: 2 in (5.1 cm) wide
- Border depth: 0.25 in (0.6 cm) on every edge (2 rounds)
Materials
Choose a smooth, tightly plied sport-weight cotton of about 300 m per 100 g. Cotton keeps the shell texture crisp and stands up to life on a bag. Avoid fuzzy yarns, because they blur the small holes.
- Denim blue (letter and border): 12 g, about 36 m
- Cream (daisy petals): 4 g, about 12 m
- Golden yellow (daisy centers and berries): 3 g, about 9 m
- Sage green (leaves): 3 g, about 9 m
All quantities include extra for checking gauge and for sewing tails.
Tools:
- 2.75 mm (US C/2) crochet hook
- Tapestry needle
- 4 stitch markers
- Gold split ring, 1 in (2.5 cm), with a short chain attached
- 6 mm jump ring and two pairs of small pliers
- Foam blocking mat and rust-proof pins
- Spray bottle with water
- Scissors and a ruler
Abbreviations (US Terms)
- ch: chain
- sl st: slip stitch
- sc: single crochet
- hdc: half double crochet
- dc: double crochet
- sc2tog: single crochet 2 together
- MR: magic ring
- sk: skip
- st(s): stitch(es)
- RS / WS: right side / wrong side
Shell: Work 5 dc in the same stitch. A shell plus the sc on each side covers 6 stitches.
Half shell: At the end of a row, work 3 dc in the same stitch. At the start of a row, ch 3 and work 2 dc in the first stitch. The ch 3 counts as a dc.
Gauge and Checkpoints
Gauge in shell stitch: 13 sts = 2 in (5.1 cm) wide, and 10 rows = 3 in (7.6 cm) tall. Each row is 0.3 in (0.8 cm).
You don’t need a separate swatch. Rows 1–6 of the letter act as your test piece, so measure at each checkpoint below.
- After Row 6: 2 in (5.1 cm) wide × 1.8 in (4.6 cm) tall
- After Row 8: 2.9 in (7.4 cm) wide at the middle arm × 2.4 in (6.1 cm) tall
- After Row 12: 3.6 in (9.1 cm) tall
- After Row 14: 2.9 in (7.4 cm) × 4.2 in (10.7 cm)
- After the border: 3.4 in (8.6 cm) × 4.7 in (11.9 cm)
If the bar is too wide after Row 6, go down half a hook size. If it is too narrow, go up half a size. Being off by 0.1 in (0.3 cm) is fine.
If your rows are taller than 0.3 in (0.8 cm), the letter will come out too long. Pull each loop snug before you yarn over to shorten the dc.
Letter F
Work in denim blue from the bottom to the top. Odd rows are RS rows and are worked right to left. The arms grow out from the right edge.
Foundation: Ch 14.
Row 1 (RS): Sc in 2nd ch from hook, sk 2 ch, shell in next ch, sk 2 ch, sc in next ch. Repeat from * once more. (13 sts: 2 shells, 3 sc)
Row 2 (WS): Ch 3 (counts as dc), turn. Work 2 dc in first sc, sk 2 dc, sc in center dc of shell, sk 2 dc, shell in next sc. Repeat from * once more, but work only 3 dc in the last sc. (13 sts: 1 shell, 2 half shells, 2 sc)
Row 3: Ch 1, turn. Sc in first dc, sk 2 dc, shell in next sc, sk 2 dc, sc in center dc of next shell. Repeat from * once more; the last sc goes in the top of the turning ch. (13 sts)
Rows 4–6: Repeat Row 2, Row 3, then Row 2. (13 sts each row)
Row 6 ends at the right edge. Check that the bar is 2 in (5.1 cm) wide.
Middle Arm
Row 7 (RS): Ch 7, turn. Sc in 2nd ch from hook, sk 2 ch, shell in next ch, sk 2 ch. Sc in the first dc of Row 6. Finish the row like Row 3: sk 2 dc, shell in next sc, sk 2 dc, sc in center dc of next shell, repeat from * once more. (19 sts: 6 on the chain plus 13 on the bar; 3 shells and 4 sc)
Row 8 (WS): Ch 3, turn. Work 2 dc in first sc, sk 2 dc, sc in center dc, sk 2 dc, shell in next sc. Repeat from * once more. Then sk 2 dc, sc in center dc, sk 2 dc, and work 3 dc in the last sc. (19 sts: 2 shells, 2 half shells, 3 sc)
Upper Bar
Row 9 (RS): Turn. Sl st in each of the first 7 sts. Ch 1 and sc in the same st as the last sl st; this is the center dc of the first shell. Sk 2 dc, shell in next sc, sk 2 dc, sc in center dc of next shell. Repeat from * once more. (13 sts, plus 7 sl sts sitting on top of the arm)
The slip stitches move you back to the edge of the bar. They lie along the top of the middle arm, and the border will cover them.
Rows 10–12: Repeat Row 2, Row 3, then Row 2. (13 sts each row)
Top Arm
Row 13: Work as Row 7. (19 sts)
Row 14: Work as Row 8. (19 sts)
Fasten off. The letter should now measure 2.9 in (7.4 cm) × 4.2 in (10.7 cm). Here’s how that height breaks down:
- The lower bar below the middle arm is 1.8 in (4.6 cm) tall.
- Each arm is 0.6 in (1.5 cm) tall and sticks out 0.9 in (2.3 cm) past the bar.
- The gap between the two arms is 1.2 in (3 cm).
Daisies (Make 2)
Round 1: With yellow, work 8 sc in MR. Pull the ring closed and sl st to the first sc. Fasten off yellow. (8 sc)
Round 2: Join cream in any sc. (Ch 2, 2 dc, ch 2, sl st) all in the same sc, then sl st in the next sc. Repeat from * around. (8 petals)
Fasten off, leaving a 10 in (25.4 cm) tail. Each daisy is about 1.1 in (2.8 cm) across. Push the yellow center up from behind so it forms a small dome.
Berries (Make 3)
With yellow, work 6 hdc in MR. Pull the ring tightly closed and sl st to the first hdc. Fasten off, leaving an 8 in (20.3 cm) tail. Tuck the starting tail inside so the berry puffs into a dome about 0.35 in (0.9 cm) across.
Leaves (Make 4)
With green, ch 7.
Round 1: Sc in 2nd ch from hook, hdc in next ch, dc in next 2 ch, hdc in next ch, 3 sc in last ch. Turn the piece and work along the other side of the chain: hdc in next ch, dc in next 2 ch, hdc in next ch, sc in next ch. Ch 2 for the tip and sl st to the first sc. (13 sts plus a ch-2 tip)
Fasten off, leaving an 8 in (20.3 cm) tail. Each leaf is about 0.9 in (2.3 cm) long.
Border
Use denim blue and keep the RS facing. Work counterclockwise: across the bottom, up the right side and around both arms, across the top, then down the left side.
Border gauge: Work 1 sc in each stitch along the top and bottom edges, and 2 sc in each row end along the sides. Both work out to about 6.5 sc per 1 in (2.5 cm), which matches how sc naturally sits in this yarn, so the edge lies flat.
Round 1: Join yarn in the first foundation chain at the bottom left.
- Bottom: 3 sc in first st, sc in next 11 sts, 3 sc in last st. (17)
- Lower right bar, Rows 1–6: 2 sc in each of Rows 1–5, then 1 sc in Row 6. (11)
- Sc2tog: first leg in the Row 6 row end, second leg in the first free chain under the arm. (1)
- Under middle arm: sc in next 4 ch, 3 sc in last ch. (7)
- End of middle arm, Rows 7–8: 2 sc in each row end. (4)
- Top of middle arm: 3 sc in first st, sc in next 4 sts. (7)
- Sc2tog: over the next st and the Row 9 row end. (1)
- Upper right bar, Rows 9–12: 1 sc in Row 9, 2 sc in each of Rows 10–11, 1 sc in Row 12. (6)
- Sc2tog: over the Row 12 row end and the first free chain of the top arm. (1)
- Under top arm: sc in next 4 ch, 3 sc in last ch. (7)
- End of top arm, Rows 13–14: 2 sc in each row end. (4)
- Top edge: 3 sc in first st, sc in next 17 sts, 3 sc in last st. (23)
- Left side, Rows 14 down to 1: 2 sc in each row end. (28)
Sl st to the first sc. Total: 117 sc.
Round 2: Ch 1. Work 1 sc in each sc around, with two changes:
- At each of the 7 outer corners, work 3 sc in the center sc of the 3-sc group.
- At each of the 3 inner corners, sc2tog over the Round 1 sc2tog and the sc after it.
Counts by section: bottom 21, lower right bar 11, sc2tog 1, under middle arm 8, end of middle arm 4, top of middle arm 9, sc2tog 1, upper right bar 5, sc2tog 1, under top arm 8, end of top arm 4, top edge 27, left side 28.
Sl st to the first sc and fasten off. Total: 128 sc.
Why the math works:
- Starting count: The straight edges have 50 stitches (13 + 6 + 6 + 6 + 19) and 28 row ends. At 2 sc per row end, the row ends give 56 sc (12 + 4 + 8 + 4 + 28). That makes 106 in all.
- Round 1: The 7 outer corners add 2 sc each (+14) and the 3 inner corners lose 1 each (−3): 106 + 14 − 3 = 117.
- Round 2: The same corner changes repeat: 117 + 14 − 3 = 128.
- Size: Each round adds about 0.125 in (0.3 cm) per side, so the letter grows by 0.5 in (1.3 cm) in each direction.
Final Blocking
- Weave in the letter’s ends on the WS, staying inside the stitches.
- Spray the letter lightly until it is damp all the way through.
- Pin it RS up on the mat at 3.4 in (8.6 cm) × 4.7 in (11.9 cm). Put a pin at every outer corner.
- Square both arms so they are parallel. Each arm should stick out 1.15 in (2.9 cm) past the bar, measured over the border.
- Leave it to dry completely, which takes about 4 hours.
- Lay out the appliqués on the left half of the bar. Measure the positions below down from the top of the letter:
- Top: two berries at 0.4 in (1.0 cm) and 0.6 in (1.5 cm). A leaf goes behind them, angled up toward the left.
- Just right of the berries: a second leaf at 0.7 in (1.8 cm).
- Upper daisy: center at 1.5 in (3.8 cm), 0.6 in (1.5 cm) in from the left edge.
- Below the upper daisy: a third leaf on the left and the last berry beside it, at 2.3 in (5.8 cm) and 2.4 in (6.1 cm).
- Lower daisy: center at 3.3 in (8.4 cm).
- Bottom: the fourth leaf below the lower daisy, angled right, at 4.1 in (10.4 cm).
- Sew the pieces on in layers: leaves first, then berries, then daisies, which overlap the leaf bases. Stitch through the outer edges of each piece and keep your stitches hidden on the back.
- Open the jump ring with pliers. Thread it through both border rounds at the top-left corner, 0.1 in (0.3 cm) in from the edge, and through the last link of the chain. Close it fully.
Final Quality-Control Checklist
- 13 sts across the bar and 19 sts across each arm
- 14 rows in total, with both arms 2 rows tall
- Border Round 1 has 117 sc and Round 2 has 128 sc
- Finished size 3.4 in (8.6 cm) × 4.7 in (11.9 cm)
- Every corner is square and the inner corners lie flat
- 2 daisies, 3 berries, and 4 leaves are sewn on securely
- No tails show on the RS
- The jump ring is fully closed
Troubleshooting
- Shells lean or the edges slant: Make sure you skip exactly 2 sts on each side of every shell and sc.
- An arm is crooked: Count the Row 7 chain again. You need 7, with 6 of them used for stitches.
- There’s a bump where the arm meets the bar: The slip stitches were pulled too tight. Work them loosely.
- The border ruffles: You probably put more than 2 sc into a row end. Count each side again.
- The border cups: Your sc is too tight. Go up half a hook size for the border only.
- The daisy petals curl: Steam them lightly, then press them flat with your fingers.
- The letter is floppy: Block it again, and pin it more firmly.
Care
Hand wash in cool water and press out the water in a towel. Reshape the letter and dry it flat, and don’t use the dryer.

Final Notes
Here is how the measurements build on each other. The bar is 13 sts = 2 in (5.1 cm). Each arm adds 6 sts = 0.9 in (2.3 cm), which brings the letter to 2.9 in (7.4 cm) wide. Fourteen rows at 0.3 in (0.8 cm) each give 4.2 in (10.7 cm) of height. A border 0.25 in (0.6 cm) deep finishes the letter at 3.4 in (8.6 cm) × 4.7 in (11.9 cm). Check each stage as you go and the charm will come out right.
Happy crocheting!