

This organizer is three lacy baskets stacked one above the other on a tapered mesh hanger. Each basket has a sturdy rounded-square base, a solid band at the bottom, an open lace window on every side and a raised six-petal flower on each side. The rim flares into eight soft scallops with a corded edge.
Everything is worked in one calm periwinkle blue cotton, so the texture does the decorating. Hung on a door or wall, each basket holds a standard toilet-paper roll, a rolled hand towel or small bathroom supplies.
The pattern uses US crochet terms. Each basket measures 5.5 in (14.0 cm) square at the base and 3.75 in (9.5 cm) tall at the scallop peaks. The finished mesh strip is 23.5 in (59.7 cm) long, 2.25 in (5.7 cm) wide at the top and 6.5 in (16.5 cm) wide at the bottom.
How it’s made: each basket starts with a flat rounded-square base and continues upward into the wall without breaking the yarn. You make the flowers separately and sew them on. You crochet the mesh strip from the ring downward, add the border, and finally sew the baskets to the front of the strip.
Finished Size and Construction
- Finished size: about 25.5 in (64.8 cm) tall including the ring
- Skill level: Intermediate
- Terminology: US crochet terms
- Yarn weight: worsted (medium #4) cotton
- Hook: 4.0 mm (US G-6)
- Number of pieces: 3 baskets, 12 flowers, 1 mesh strip, 1 wooden ring
- Layout: 1 column of 3 baskets on a tapered strip
- Basket size: 5.5 in (14.0 cm) base, 3.75 in (9.5 cm) tall
- Strip size before border: 23 in (58.4 cm) long
- Border depth: 2 rounds/rows, about 0.25 in (0.6 cm) on the basket rim and 0.5 in (1.3 cm) on the strip
Materials
Yarn: use a smooth, firmly twisted 100% cotton or cotton blend in worsted weight. Cotton holds the basket shape and the crisp scallops much better than acrylic.
- Periwinkle blue: 250 g, about 400 m (437 yd)
This works out to roughly 57 g per basket including its four flowers, and about 40 g for the strip. The total includes a safety margin of about 40 g.
Tools:
- 4.0 mm (US G-6) crochet hook
- Wooden ring, 2.5 in (6.4 cm) outer diameter
- 8 locking stitch markers
- Tapestry needle
- Scissors
- Blocking mat, rust-proof pins and a spray bottle
- Measuring tape
Abbreviations (US Terms)
- ch – chain
- sl st – slip stitch
- sc – single crochet
- hdc – half double crochet
- dc – double crochet
- tr – treble crochet
- sk – skip
- sp – space
- st(s) – stitch(es)
- BLO – back loop only
- MR – magic ring
- rev sc – reverse single crochet (crab stitch): sc worked from left to right (right to left if you crochet left-handed)
- rep – repeat
Special stitch – Petal: ch 3, then work a 3-tr cluster in the same st. For the cluster, [yo twice, insert hook, pull up a loop, (yo, pull through 2 loops) twice] 3 times, then yo and pull through all 4 loops on the hook. Finish the petal with ch 3, sl st in the same st.
Gauge and Checkpoints
Gauge: 16 sc and 16 rounds = 4 in (10.2 cm) in sc. This means 4 sts and 4 rounds per inch (2.5 cm).
Make one complete basket before starting the others. It works as your gauge swatch, and it confirms that a roll will fit.
Checkpoints:
- After Base Round 6: 48 sts, about 3 in (7.6 cm) across
- After Base Round 11: 88 sts, 5.5 in (14.0 cm) across
- After Wall Round 16: the band is 1.25 in (3.2 cm) tall
- Finished basket: 3.75 in (9.5 cm) tall at the peaks
- Strip after Row 24: 11 in (27.9 cm) long
If your base is too big, go down to a 3.75 mm hook. If it is too small, go up to a 4.5 mm hook. Don’t add rounds to fix size: the stitch count of 88 is what makes the lace and scallop repeats fit.
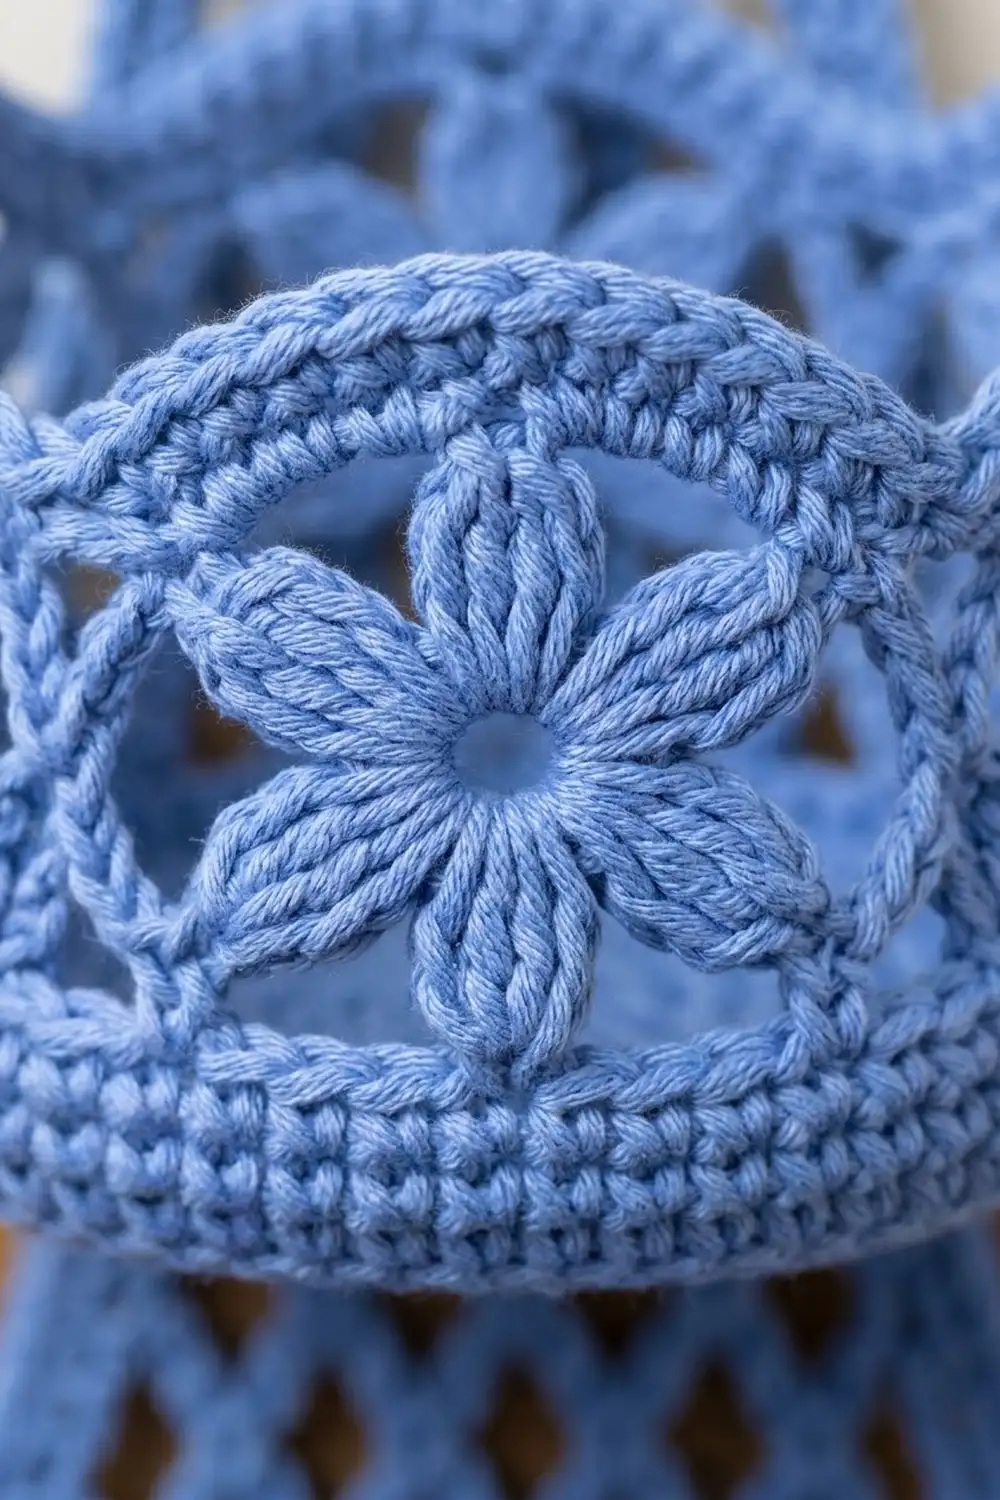
Basket (Make 3)
Base
Round 1: Make an MR, ch 1, work 8 sc in the ring, then sl st to the first sc to join. (8 sts)
Round 2: Ch 1, then sc in next st, 3 sc in next st. Rep from * 3 more times and join. (16 sts) The middle sc of each 3-sc group is a corner center. Mark all four corner centers.
Rounds 3–8: Ch 1, then sc in each st to the marked corner center, 3 sc in the corner center. Work around, moving the markers up to the new center st each round, and join.
Each round adds 8 sts. Round totals: Round 3 (24), Round 4 (32), Round 5 (40), Round 6 (48), Round 7 (56), Round 8 (64).
Rounds 9–11 (rounding the corners): Ch 1, then sc in each st to 1 st before the corner center, 2 sc in next st, sc in the corner center, 2 sc in next st. Work around and join. Spreading the increases this way softens the corners.
Round totals: Round 9 (72), Round 10 (80), Round 11 (88). That’s 22 sts per side, with the corner center shared between sides.
Check: the base should be 5.5 in (14.0 cm) across and lie flat.
Wall
Round 12: Ch 1, work sc in BLO in each st around, and join. (88 sts) The unused front loops form a crisp ridge that turns the base edge upward. Keep the corner markers.
Rounds 13–16: Ch 1, sc in each st around, and join. (88 sts)
Check: the band is 1.25 in (3.2 cm) tall. End Round 16 with the join in a marked corner st.
Round 17 (lace): Ch 3 in the corner st (counts as dc), then dc in next 2 sts. Then work (ch 2, sk 2, dc in next st) 5 times, ch 2, sk 2, dc in next 5 sts. Rep from * 3 more times, but end the last rep with dc in next 2 sts instead of 5. Join to the top of the beginning ch 3.
This gives a 5-dc pillar centered on each corner and 6 ch-2 windows on each side. (40 dc + 24 ch-2 sps) Each side uses 3 + 15 + 2 + 2 = 22 sts, and 4 × 22 = 88.
Round 18: Ch 3 (counts as dc). Work dc in each dc and ch 2 over each ch-2 sp, and join. (40 dc + 24 ch-2 sps)
Round 19 (conversion): Ch 1, then sc in each dc and 2 sc in each ch-2 sp. Join. (40 + 48 = 88 sts)
Round 20 (scallops): Sl st in next 5 sts. Then work sc in next st, hdc in next st, dc in next st, 2 dc in next st, 2 tr in next st, 3 tr in next st, 2 tr in next st, 2 dc in next st, dc in next st, hdc in next st, sc in next st. Rep from * 7 more times and join.
You now have 8 scallops: 4 centered on the sides and 4 on the corners. (88 worked into + 48 extra = 136 sts) Each scallop uses 11 sts and makes 17 sts.
Round 21 (corded edge): Ch 1, then rev sc in each st around. (136 sts) Fasten off and weave in the ends.
Flower (Make 12)
Round 1: Make an MR, ch 1, work 12 sc in the ring, and join. (12 sts)
Round 2: Sl st in next st, Petal in next st. Rep from * 5 more times and sl st to the first sl st. (6 petals)
Fasten off and leave a 12 in (30.5 cm) tail. Pull the ring tight so the center sits up as a raised dome. Each flower measures about 2.5 in (6.4 cm) across.
Mesh Strip (Make 1)
Row 1: Join the yarn around the wooden ring and work 5 sc over the ring. Turn. (5 sts)
Rows 2–4: Ch 1, sc in each st across, turn. (5 sts) The tab is now 1 in (2.5 cm) long.
Row 5: Ch 1, sc in first st, ch 5, sk 1, sc in next st, ch 5, sk 1, sc in last st. Turn. (2 loops)
The rest of the strip uses three row types. L is the number of loops in the previous row.
- Row A: Ch 5 (counts as dc + ch 2), sc in first loop, (ch 5, sc in next loop) L − 1 times, ch 2, dc in last sc. Turn. (L − 1 loops + 2 half loops)
- Row B: Ch 1, sc in first dc, (ch 5, sc in next loop) L − 1 times, ch 5, sc in 3rd ch of turning ch. Turn. (L loops)
- Row A+ (increase): Ch 1, sc in first sc, ch 5, sc in first loop, (ch 5, sc in next loop) L − 1 times, ch 5, sc in last sc. Turn. (L + 1 loops)
Mesh sequence:
- Row 6: A+ (3 loops)
- Rows 7–14: (A, B) 4 times
- Row 15: A+ (4 loops)
- Rows 16–23: (A, B) 4 times
- Row 24: A+ (5 loops) Check: 11 in (27.9 cm) long
- Rows 25–32: (A, B) 4 times
- Row 33: A+ (6 loops)
- Rows 34–41: (A, B) 4 times
- Row 42: A+ (7 loops)
- Rows 43–48: (A, B) 3 times (7 loops, 8 sc)
Do not fasten off. Each mesh row is 0.5 in (1.3 cm) tall, so 44 mesh rows = 22 in (55.9 cm). With the tab, the strip is 23 in (58.4 cm) long. Each diamond is about 0.9 in (2.3 cm) wide.
Make All Pieces
Total pieces: 3 baskets, 12 flowers and 1 strip, all in periwinkle blue.
Before assembly: sew 4 flowers to each basket, one centered on each side. Put each flower’s center on Round 18, halfway between the corner pillars. The petals will overlap the band below and the conversion round above. Whipstitch around the center and tack each petal tip down.
Layout (front view):
      ( O )   ring
       |=|    tab
      /XXX\   mesh
     [BSKT3]  base 15.5 in up
     /XXXXX\
    [BSKT2]   base 7.75 in up
    /XXXXXX\
   [ BSKT1 ]  base at bottom edge
Joining
Method: whipstitch each basket’s back side to the front of the strip with matching yarn.
Stitch-to-stitch logic:
- Line up the back side’s 22 sts of Round 16 horizontally across the strip.
- Take one whipstitch through each Round 16 st and through the mesh sc or loop directly behind it.
- Tack the back corner scallop peaks of Round 21 to the mesh behind them, with 3 stitches each.
Placement: measure from the strip’s bottom edge to each basket base.
- Basket 1: flush with the bottom edge
- Basket 2: 7.75 in (19.7 cm) up
- Basket 3: 15.5 in (39.4 cm) up
Tension: pull each stitch snug but don’t let it pucker the mesh. The diamonds should stay open and evenly spread.
Checkpoint: after joining, about 4 in (10.2 cm) of mesh and tab shows above the top basket, and the strip still hangs straight.
Border
The baskets’ Rounds 20–21 already form their rim border. This section covers the strip.
Border gauge: 4 sc per in (2.5 cm), the same as the main gauge.
Row 1: Ch 1. Work down the first side edge and the tab, putting 1 sc in each row-end of Rows 4–1 and 2 sc in each row-end of Rows 48–5. This gives 92 sts, with the corners not counted.
At the bottom corner, rotate to work along the last row. Work 3 sc in the edge sc, then 2 sc in next loop, sc in next sc 6 times. Finish with 2 sc in last loop and 3 sc in the last edge sc. That’s 26 sts including both 3-sc corner groups.
Work up the second side: 2 sc in each row-end of Rows 5–48 and 1 sc in each row-end of Rows 1–4, for 92 sts. The row total is (92 + 26 + 92 = 210 sts). Turn.
Row 2: Ch 1, rev sc in each st. (210 sts) Fasten off.
Why the math works:
- Sides: 44 mesh rows × 2 sc = 88, plus 4 tab sts = 92 sts. At 4 per in that’s 23 in (58.4 cm), which matches the unbordered length.
- Bottom: 26 sts at 4 per in = 6.5 in (16.5 cm), which matches 7 diamonds plus the border.
- Baskets: 88 = 4 × 22 for the lace, 8 × 11 for the scallops, and 40 + 48 for the conversion round.
Final Blocking
- Lightly mist all pieces with water.
- Stuff each basket firmly with a toilet-paper roll wrapped in a towel.
- Shape the scallops by hand, pinch each peak upward and pin the rim if needed.
- Pin the strip flat: 23.5 in (59.7 cm) long, 2.25 in (5.7 cm) at the top and 6.5 in (16.5 cm) at the bottom.
- Open each diamond evenly with your fingertips.
- Let everything dry completely, about 24 hours, before hanging.
Final Quality-Control Checklist
- Each base measures 5.5 in (14.0 cm) and sits flat
- Each basket has 4 corner pillars, 24 windows and 8 even scallops
- All 12 flowers are centered and the petal tips are tacked down
- The strip has 7 diamonds across the bottom row
- Both side borders have 92 sts and the bottom has 26
- Baskets sit level at the measured heights
- The ring tab is snug and all ends are woven in securely
Troubleshooting
- Base cups before Round 12: your tension is too tight. Go up a hook size for the base.
- Base ripples: your tension is too loose, or a corner got an extra stitch. Recount: each round should be 8 more than the last.
- Windows don’t line up at the corners: Round 17 didn’t start at a corner center. Rip it back and restart at the marker.
- Scallops lopsided: Round 20 began in the wrong stitch. Slip stitch exactly 5 sts first.
- Strip edges wavy: Rows A and B were mixed up. Every A+ row must follow a B row.
- Basket tilts forward: add tacking stitches along the back rim.
Care
Hand wash in cool water and press out the water in a towel without wringing. Reshape the baskets while damp and dry them flat.

Final Notes
The measurement chain runs like this:
- Gauge is 4 sts per inch, so the 88-st base measures 5.5 in (14.0 cm).
- The same 88 sts divide evenly into the four lace sides and the eight scallops.
- 44 mesh rows plus the tab make a 23 in (58.4 cm) strip, and its 92-st border sides match that length exactly.
- The 26-st bottom gives a 6.5 in (16.5 cm) base for three well-spaced baskets.
Check each stage against its number, and the finished hanger will hang straight and hold its shape.
Happy crocheting!