

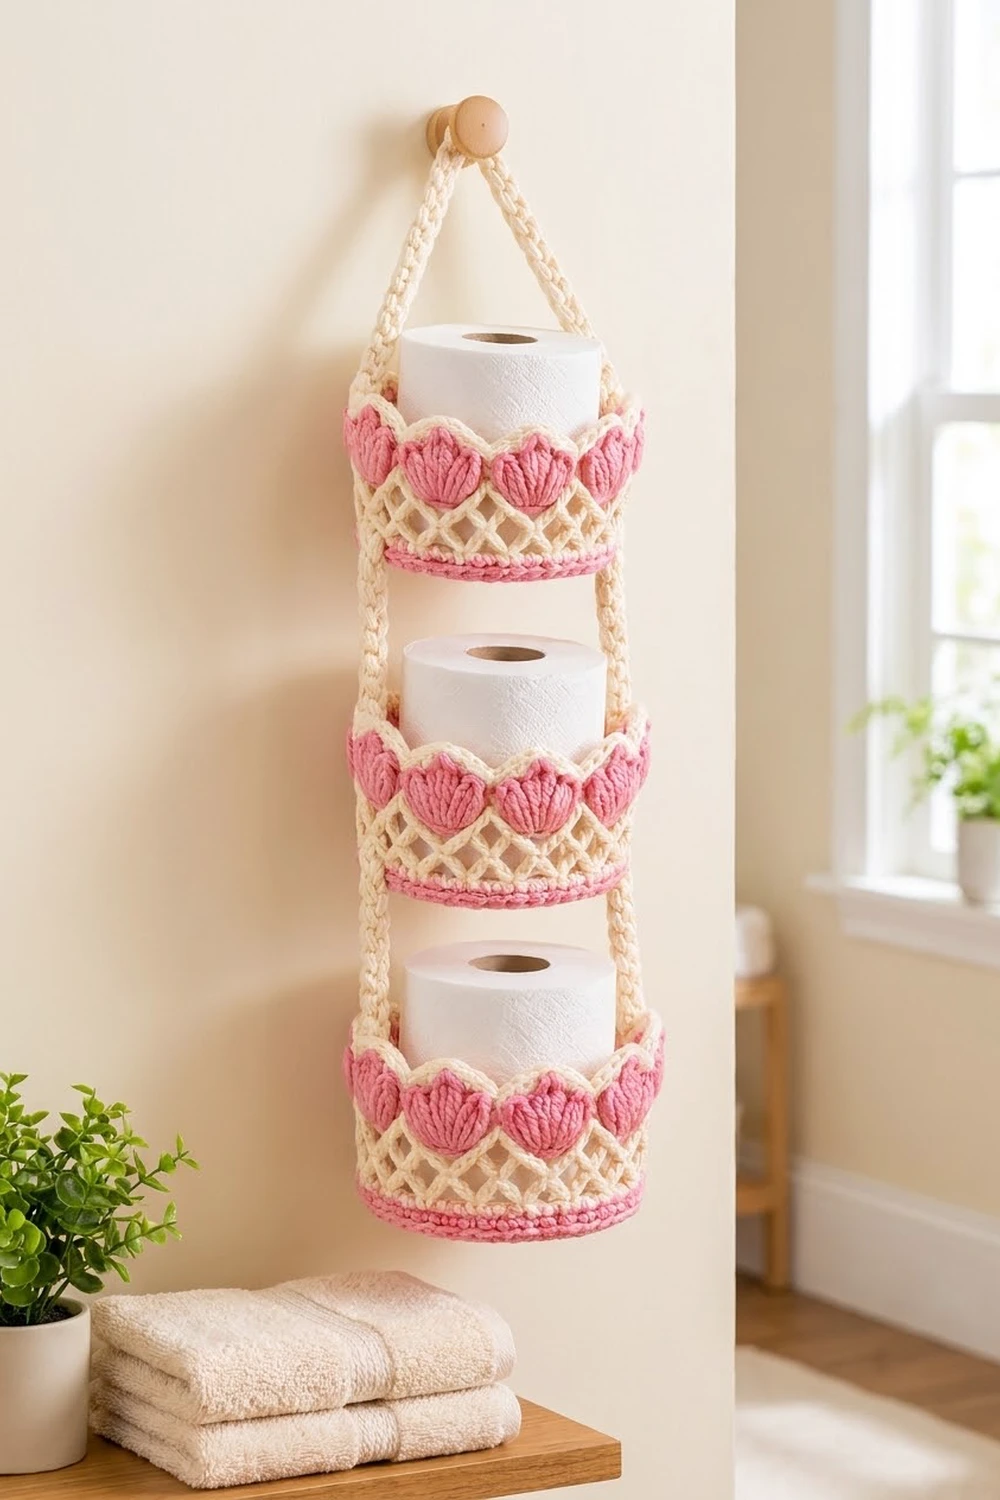
This hanging organizer has three round baskets stacked on two cream braided cords. The cords meet in a point at the top, so the whole set hangs from a single peg. Each basket holds a spare toilet roll or small towels.
Each basket has a solid pink base and a ridged pink band. Above the band are an open cream diamond lattice, a ring of pink tulip shells, more lattice, and a scalloped rim outlined in cream. The look is soft rose and natural cream, cottage-romantic and airy.
The pattern uses US crochet terms. The baskets are graduated. The Small base is about 5.75 in (14.6 cm) across, the Medium is 6.4 in (16.3 cm), and the Large is 7 in (17.8 cm). Every basket stands 3.75 in (9.5 cm) tall. The assembled hanger is about 22.6 in (57.4 cm) from the top point to the bottom.
You work each basket from the bottom up in this order: a flat hdc circle, a back-loop round to turn the wall upward, lattice rounds, the tulip band, and the scalloped rim. Then you sew two Romanian cords to opposite sides of all three baskets.
Finished Size and Construction
- Finished size (assembled): about 7 in (17.8 cm) wide at the bottom basket × 22.6 in (57.4 cm) tall
- Skill level: Intermediate
- Terminology: US crochet terms
- Yarn weight: Worsted (CYC 4) cotton
- Hook: 4.5 mm (US 7) for the baskets; 5.5 mm (US I-9) for the cords
- Number of pieces: 5 (3 baskets + 2 cords)
- Layout: 3 baskets stacked vertically, Small on top and Large on the bottom, joined by 2 side cords
- Piece size: bases 5.75 in (14.6 cm), 6.4 in (16.3 cm), and 7 in (17.8 cm) across; each basket 3.75 in (9.5 cm) tall; each cord 24 in (61.0 cm) long
- Size before border: wall height 3.25 in (8.3 cm)
- Border depth: 0.5 in (1.3 cm) scalloped rim
Materials
Use a smooth worsted cotton or cotton blend. Cotton holds the basket shape and shows the lattice clearly.
- Pink: 110 g (about 209 m / 229 yd)
- Cream: 130 g (about 247 m / 270 yd), including the doubled cords
These quantities include a margin of about 15 percent. They assume yarn of about 1.9 m per gram.
Tools: 4.5 mm (US 7) and 5.5 mm (US I-9) hooks, 4 locking stitch markers, a tapestry needle, scissors, a tape measure, rustproof pins, a spray bottle, and optionally a wooden peg or wall hook.
Abbreviations (US Terms)
- ch – chain
- sl st – slip stitch
- sc – single crochet
- hdc – half double crochet
- dc – double crochet
- BLO – back loop only
- st(s) – stitch(es)
- MR – magic ring
- rep – repeat
Tulip shell: Work 7 dc in the same stitch. The center (4th) dc is the shell’s tip.
Romanian cord: Ch 2, then sc in the 2nd ch from the hook. Turn the work clockwise like a page, insert the hook into the single vertical loop on the left side, and sc. Turn clockwise again, insert the hook under the 2 left-side loops, and sc. Rep from * to *. This makes a firm cord that looks braided on both faces.
Gauge and Checkpoints
Gauge with the 4.5 mm hook:
- 16 sc and 18 rounds = 4 in (10.2 cm)
- 16 hdc and 13 rounds = 4 in (10.2 cm)
Make one piece first. Make the Small base before anything else and use it as your gauge swatch.
- After Round 4 (32 sts), the base should be about 2.5 in (6.4 cm) across.
- After Round 9 (72 sts), it should be 5.75 in (14.6 cm) across and lie flat.
If the base is too big, go down 0.5 mm in hook size. If it is too small, go up 0.5 mm. If it cups, try a larger hook; if it ruffles, try a smaller one.
Wall checkpoints (all sizes):
- After W3: 0.75 in (1.9 cm)
- After M3: 2 in (5.1 cm)
- After T1: 2.5 in (6.4 cm)
- After T3: 3.25 in (8.3 cm)
- After the border: 3.75 in (9.5 cm)
The wall circumference should be 18 in (45.7 cm) for the Small, 20 in (50.8 cm) for the Medium, and 22 in (55.9 cm) for the Large.
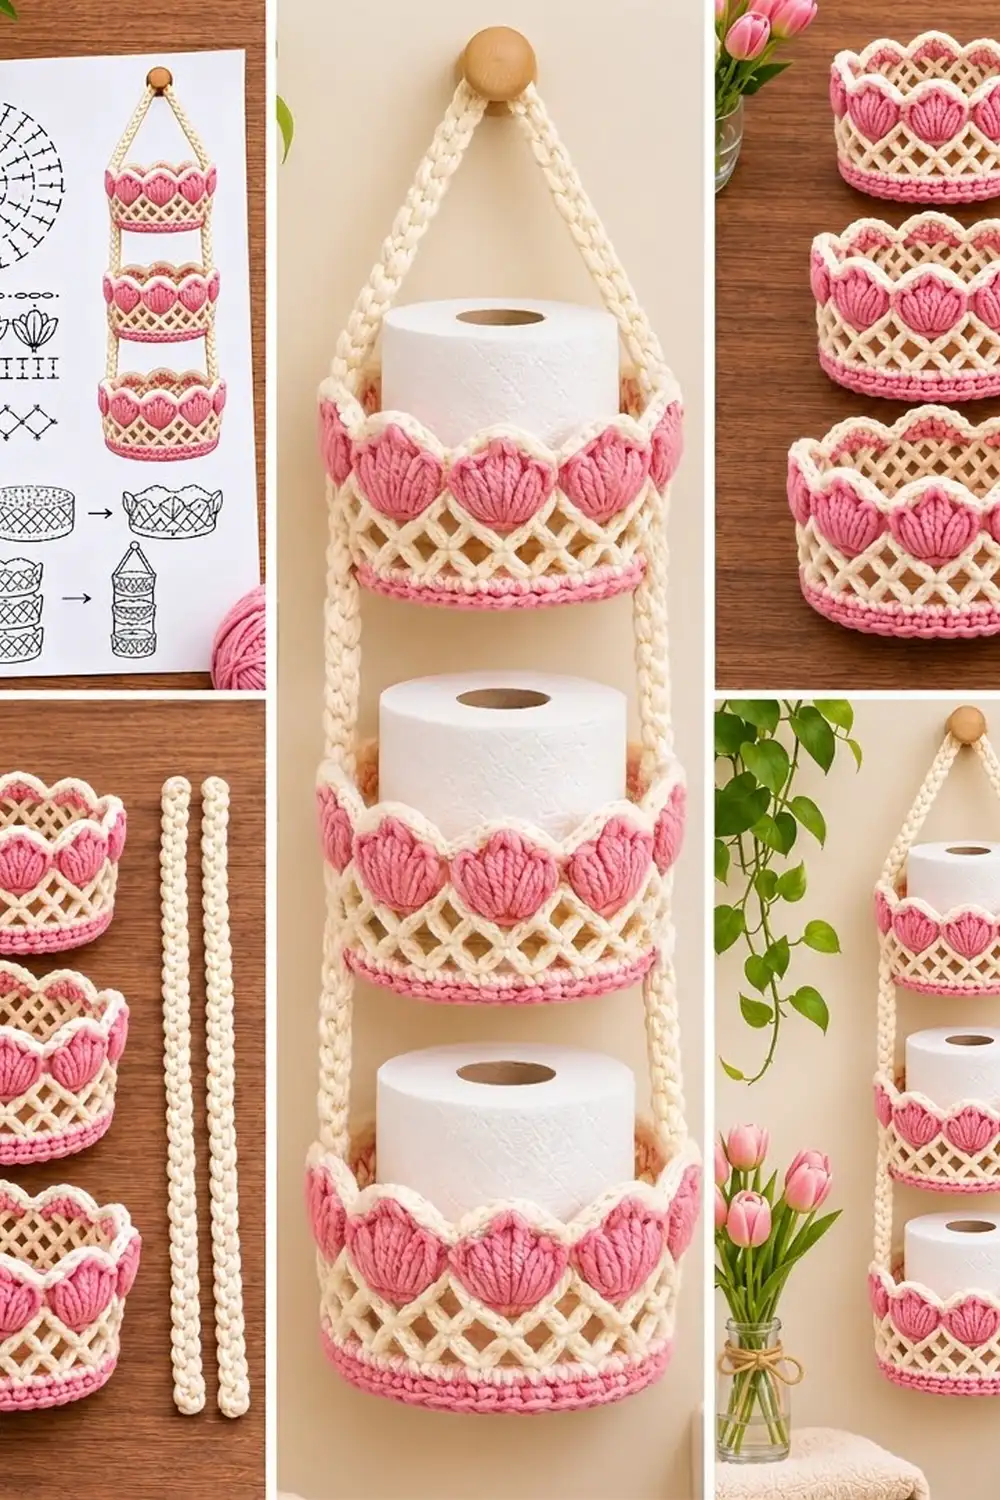
Basket Base (Make 3)
Instructions are written as Small (Medium, Large). Use the 4.5 mm hook and pink. Join every round with a sl st to the first hdc. The ch 2 at the start of a round does not count as a stitch.
R1: MR, ch 2, 8 hdc in ring, pull the ring closed. (8)
R2: Ch 2, 2 hdc in each st. (16)
R3: Ch 2, hdc in next st, 2 hdc in next st; rep 8 times. (24)
R4: Ch 2, hdc in next 2 sts, 2 hdc in next st; rep 8 times. (32)
R5: Ch 2, hdc in next 3 sts, 2 hdc in next st; rep 8 times. (40)
R6: Ch 2, hdc in next 4 sts, 2 hdc in next st; rep 8 times. (48)
R7: Ch 2, hdc in next 5 sts, 2 hdc in next st; rep 8 times. (56)
R8: Ch 2, hdc in next 6 sts, 2 hdc in next st; rep 8 times. (64)
R9: Ch 2, hdc in next 7 sts, 2 hdc in next st; rep 8 times. (72)
Small: stop here at 72 sts.
R10 (Medium and Large only): Ch 2, hdc in next 8 sts, 2 hdc in next st; rep 8 times. (80)
Medium: stop here at 80 sts.
R11 (Large only): Ch 2, hdc in next 9 sts, 2 hdc in next st; rep 8 times. (88)
On even rounds, you can work the increase first and then the plain stitches. This staggers the increases so the circle doesn’t turn into an octagon. The count stays the same.
The base should measure 5.75 (6.4, 7) in, or 14.6 (16.3, 17.8) cm. Do not fasten off.
Basket Wall
W1 (pink): Ch 1, sc in BLO of each st, join. (72, 80, 88) This round turns the wall upward with a crisp ridge.
W2 (pink): Ch 1, sc in each st, join. (72, 80, 88) Fasten off pink.
W3 (cream): Join cream with sc in any st, sc in each st around, join. (72, 80, 88)
Lattice
M1: Ch 1, sc in first st, ch 5, skip 3 sts, sc in next st; rep around. End with ch 5, skip 3 sts, sl st to first sc. (18, 20, 22 ch-5 loops) Each loop uses 4 sts: 18 (20, 22) × 4 = 72 (80, 88).
M2: Sl st in the next 3 ch to reach the center of the loop. Ch 1, sc in the same loop, ch 5, sc in next loop; rep around. End with ch 5, sl st to first sc. (18, 20, 22 loops) The loops now form diamonds.
M3 (conversion round): Sl st into the next loop, ch 1, 4 sc in each loop, join. 18 (20, 22) loops × 4 sc = 72 (80, 88) sts. Fasten off cream.
Checkpoint: the wall should be 2 in (5.1 cm) tall.
Tulip Band
T1 (pink): Join pink with sc in any st. Skip 3 sts, tulip shell in next st, skip 3 sts, sc in next st; rep around. On the last repeat, end with skip 3 sts and sl st to the first sc. Each repeat is 8 sts (7 dc + 1 sc), so 9 (10, 11) tulips × 8 = 72 (80, 88) sts. Fasten off.
The shells start narrow and open into rounded, ribbed petals.
T2 (cream lattice): Join cream with sc in the center (4th) dc of any tulip. Ch 5, sc in next sc between tulips, ch 5, sc in center dc of next tulip; rep around. On the last repeat, end with ch 5, sc in the last between-tulip sc, ch 5, sl st to first sc. That makes 2 loops per tulip, or 18 (20, 22) loops. The cream chains frame each tulip in a V.
T3 (conversion round): Sl st into the next loop, ch 1, 4 sc in each loop, join. 18 (20, 22) × 4 = 72 (80, 88) sts. Fasten off.
Checkpoint: the wall should be 3.25 in (8.3 cm) tall.
Make All Pieces
- Pink: 3 bases, 3 base bands (W1–W2), 3 tulip bands, 3 scallop rounds
- Cream: 3 lattice sections, 3 rim outlines, 2 cords
Cords (make 2): Use the 5.5 mm hook and hold 2 strands of cream together. Work Romanian cord until it measures 24 in (61.0 cm), about 72 rows at 3 rows per inch. Each cord is about 0.75 in (1.9 cm) wide. Fasten off and leave a 12 in (30.5 cm) tail.
Layout:
            /\          apex: cord tops overlapped 0.75 in
           /  \         free legs 7 in each
     |  [  SMALL  ]  |  5.75 in base, 3.75 in tall
     |               |  2.5 in gap
     | [  MEDIUM   ] |  6.4 in base, 3.75 in tall
     |               |  2.5 in gap
     |[    LARGE    ]|  7 in base, 3.75 in tall
   cord            cord
Joining
Markers: On each basket, place one marker in W2 at st 1. Place a second marker at st 37 (41, 45). It is 36 (40, 44) sts away, so the two cords sit directly opposite each other.
Positions along each cord, measured from the bottom end:
- Large: 0–3.75 in (0–9.5 cm)
- Gap: 2.5 in (6.4 cm)
- Medium: 6.25–10 in (15.9–25.4 cm)
- Gap: 2.5 in (6.4 cm)
- Small: 12.5–16.25 in (31.8–41.3 cm)
- Remaining length: 7.75 in (19.7 cm)
Method: Lay the cord on the outside of the wall over a marker. Whipstitch both edges of the cord to the wall from W1 up to the rim. Catch every solid round (W1–W3, M3, the T1 sc, T3, and T5). In the lattice rounds, sew only into the sc anchors and never into the ch-5 loops. Work one wall stitch for each cord row so the cord cannot twist.
Tension: Sew snugly. Each basket uses exactly 3.75 in (9.5 cm) of cord. If the wall puckers, loosen your stitches. If the cord bows away from the wall, tighten them.
Apex: Overlap the top 0.75 in (1.9 cm) of the two cords and sew through both layers. Each free leg is now 7 in (17.8 cm) long.
Size checkpoint: Hang the piece. The apex should sit about 6.4 in (16.3 cm) above the Small rim, and the total height should be about 22.6 in (57.4 cm).
Border: Scalloped Rim (All Baskets)
Work the border on T3 of each basket before you assemble the hanger. It adds 0.5 in (1.3 cm) of height. Border gauge: each scallop spans 8 sts, or 2 in (5.1 cm) of circumference.
T4 (pink scallops): Join pink with sc in the 5th sc of T3. Skip 3 sts, tulip shell in next st, skip 3 sts, sc in next st; rep around. On the last repeat, end with skip 3 sts and sl st to first sc. You get 9 (10, 11) scallops and 72 (80, 88) sts. Fasten off.
Starting in the 5th sc puts each shell in the 9th st, the 17th st, and so on, so every scallop sits directly above a tulip.
T5 (cream outline): Join cream with sc in any sc between scallops. Sc in next 3 dc, 2 sc in center dc, sc in next 3 dc, sc in next sc; rep around. On the last repeat, leave out the final sc and join. Count: 72 (80, 88) sts worked one per stitch + 9 (10, 11) extra sts at the scallop tips = 81 (90, 99) sts. Fasten off.
Why the math works: Each base is a multiple of 8, so the tulip and scallop repeats fit exactly. Each lattice section converts back at 4 sc per loop, which returns you to the same count. The only stitches added are the 9 (10, 11) tip stitches in T5. They let the outline curve around each shell without cupping or flaring.
Final Blocking
- Weave in all ends along stitches of the same color.
- Mist each basket until it is damp but not soaked.
- Put a can or jar about the size of the base inside each basket, and shape the walls straight up.
- Line up the tulip tips and pin each scallop point outward.
- Let everything dry completely, about 24 hours.
- Mist and straighten the cords, then hang the piece and check that the baskets are level.
Final Quality-Control Checklist
- [ ] Bases measure 5.75 / 6.4 / 7 in (14.6 / 16.3 / 17.8 cm) and lie flat
- [ ] Wall counts are 72 / 80 / 88 at W1, M3, T1, T3, and T4
- [ ] Each basket has 9 / 10 / 11 tulips and the same number of scallops
- [ ] T5 counts are 81 / 90 / 99
- [ ] Each basket is 3.75 in (9.5 cm) tall
- [ ] Cords are 24 in (61.0 cm) long and sit directly opposite each other
- [ ] Gaps between baskets are 2.5 in (6.4 cm)
- [ ] The hanger is level and about 22.6 in (57.4 cm) tall
Troubleshooting
- Base cups: Use a larger hook, and check that you have exactly 8 increases per round.
- Base ruffles: You have extra stitches or your hook is too large. Recount from R5.
- Lattice is floppy: Change to ch-4 loops, but still work 4 sc per loop in M3 and T3.
- Tulips lean: Recount the 3 skipped sts on each side of every shell.
- Rim flares: Work T5 with 1 sc in the center dc instead of 2. The count becomes 72 (80, 88).
- Basket tilts: The cords are not exactly opposite. Recheck the 36 (40, 44) st spacing and sew them again.
Care
Hand wash in cool water. Lay flat to dry, reshaping each basket over a jar, and do not tumble dry.
Final Notes
The measurements build on each other. The 8-increase hdc base gives 72, 80, or 88 sts, and that count carries through every wall round. Each basket is 3.75 in (9.5 cm) tall on a 24 in (61.0 cm) cord. With 2.5 in (6.4 cm) gaps and 7 in (17.8 cm) legs, the hanger is about 22.6 in (57.4 cm) tall. If your first base matches the gauge, everything else will fit.
Happy crocheting!