

Keep your book, glasses, and phone within reach with this dusty rose bedside caddy. A tall back panel tucks under your mattress, and a two-pocket front hangs neatly against the side of the bed frame.
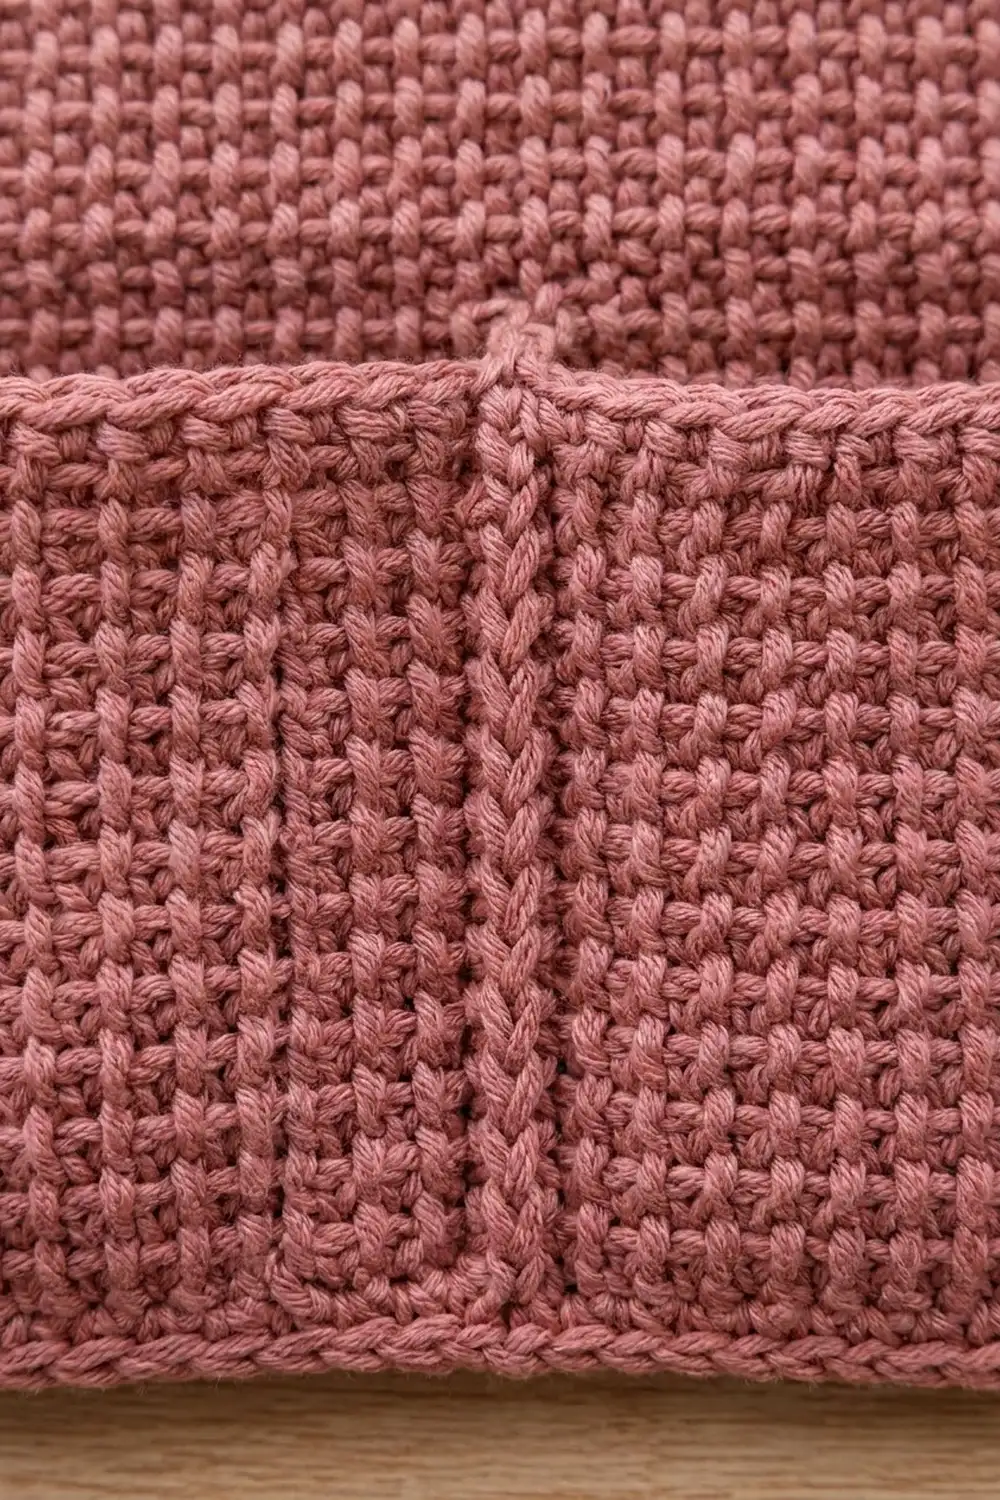
The whole caddy is worked in linen stitch (also called moss stitch), a simple pattern of single crochet and chain-1 spaces. It makes a dense, woven-looking fabric that holds its shape and doesn’t stretch out under the weight of a paperback. A corded crab-stitch edge finishes every side and the pocket opening.
The pattern uses US crochet terms. The finished caddy measures 10.25 in wide by 14.5 in tall (26.0 × 36.8 cm), and the pockets are about 6 in (15.2 cm) deep.
Construction is simple. You crochet two flat rectangles: a back panel and a pocket panel. The pocket panel goes over the bottom of the back panel, and a slip-stitch seam down its center divides it into two pockets. A two-round border goes around the whole caddy and joins the pocket’s sides and bottom as you work.
Finished Size and Construction
- Finished size: 10.25 × 14.5 in (26.0 × 36.8 cm)
- Skill level: Easy / advanced beginner
- Terminology: US crochet terms
- Yarn weight: Worsted (#4), cotton or cotton blend
- Hook: 5.0 mm (H-8)
- Number of pieces: 2 (back panel + pocket panel), joined into one caddy
- Layout: Pocket panel over the lowest 6 in (15.2 cm) of the back panel
- Back panel before border: 39 sts × 70 rows = 9.75 × 14 in (24.8 × 35.6 cm)
- Pocket panel: 39 sts × 30 rows = 9.75 × 6 in (24.8 × 15.2 cm)
- Border depth: 2 rounds, about 0.25 in (0.6 cm) per edge
Materials
Yarn: Use a smooth worsted-weight cotton or cotton blend. Cotton gives crisp stitch definition and a firm fabric that won’t sag. Avoid fuzzy or very stretchy yarns, because they blur the woven texture and let the pockets droop.
- Dusty Rose: 140 g, about 265 m (290 yd)
This amount includes a margin of about 15% for your gauge swatch and small differences in tension.
Tools:
- 5.0 mm (H-8) crochet hook
- Tapestry needle
- Stitch markers (4–6)
- Rust-proof pins
- Measuring tape
- Blocking mat or towel
- Scissors
Abbreviations (US Terms)
- ch – chain
- sc – single crochet
- slst – slip stitch
- sk – skip
- sp – space
- st(s) – stitch(es)
- RS / WS – right side / wrong side
- rev sc – reverse single crochet (crab stitch)
Reverse single crochet (crab stitch): Work from left to right (if you’re right-handed). Insert the hook into the next st to the right, yarn over, pull up a loop, yarn over, and pull through both loops on the hook. This makes the corded edge.
Stitch counting: In linen stitch, every sc and every ch-1 counts as 1 stitch.
Gauge and Checkpoints
Gauge: 16 sts and 20 rows = 4 in (10.2 cm) in linen stitch, after blocking.
Make a test piece first. Ch 24 and work the linen-stitch rows below on 23 sts for 24 rows. Measure 4 in (10.2 cm) across the center of the swatch, not at the edges.
- Too many stitches (fabric too small): go up a hook size.
- Too few stitches (fabric too big): go down a hook size.
- If the width is right but your row count is off, keep your hook size and track length by measuring instead of counting rows.
Checkpoints for the back panel:
- After Row 1: 9.75 in (24.8 cm) wide
- After Row 20: 4 in (10.2 cm) tall
- After Row 40: 8 in (20.3 cm) tall
- After Row 70: 14 in (35.6 cm) tall
If your panel is off by more than 0.25 in (0.6 cm) at any checkpoint, fix it now. The difference only grows as the piece gets bigger.
Back Panel
Ch 40.
Row 1 (RS): Sc in 2nd ch from hook, ch 1, sk next ch, sc in next ch; repeat from * 19 times. Turn. (39 sts: 20 sc + 19 ch-1 sps)*
Row 2: Ch 1 (does not count as st), sc in first sc, sc in next ch-1 sp, ch 1, sk next sc, sc in next ch-1 sp; repeat from * 18 times, sc in last sc. Turn. (39 sts: 21 sc + 18 ch-1 sps)*
Row 3: Ch 1, sc in first sc, ch 1, sk next sc, sc in next ch-1 sp; repeat from * 18 times, ch 1, sk next sc, sc in last sc. Turn. (39 sts: 20 sc + 19 ch-1 sps)*
Each sc sits in a ch-1 sp of the row below. That offset is what creates the woven grid.
Rows 4–70: Repeat Rows 2 and 3, ending with a Row 2 repeat on Row 70. (39 sts in every row)
Fasten off.
Panel check: 9.75 × 14 in (24.8 × 35.6 cm).
Pocket Panel
Ch 40.
Rows 1–3: Work as Back Panel Rows 1–3. (39 sts)
Rows 4–28: Repeat Rows 2 and 3, ending with a Row 2 repeat on Row 28. (39 sts)
Checkpoint: 9.75 × 5.6 in (24.8 × 14.2 cm).
Row 29 (trim row, RS): Ch 1, sc in each sc and each ch-1 sp across. Do not turn.
(21 sc worked into sc + 18 sc worked into ch-1 sps = 39 sc; 0 extra sts added)
Row 30 (corded rim, RS): Ch 1. Rev sc in each sc across. (39 rev sc, 1 per existing st; 0 extra sts added)
Fasten off, leaving a 6 in (15.2 cm) tail.
Pocket check: 9.75 × 6 in (24.8 × 15.2 cm). The rev sc rim is a little shorter than a linen-stitch row, so the 30 pocket rows line up with about 30 back-panel rows.
Make All Pieces
You need one of each piece, both in Dusty Rose:
- Back panel: 1 piece, 39 sts × 70 rows (about 100 g)
- Pocket panel: 1 piece, 39 sts × 30 rows (about 40 g)
Layout (RS facing you, top of caddy at top):
+-----------------------------+
|                             |
|         BACK PANEL          |
|   rows 31-70, single layer  |
|  (tucks under the mattress) |
|                             |
+--------------+--------------+  <- pocket rim (Row 30)
|   POCKET 1   |   POCKET 2   |
|   19 sts   | 1 |   19 sts   |  <- center st 20 = divider
|   rows 1-30, double layer   |
+--------------+--------------+
Joining
Step 1 – Place the pocket. Lay the back panel flat, RS up, with the foundation edge at the bottom. Lay the pocket panel on top, RS up, with its foundation edge over the back panel’s foundation edge. Line up the side edges exactly: st 1 over st 1, st 39 over st 39. The pocket rim should sit at about Row 30 of the back panel.
Pin the four corners, then pin along each side every 1 in (2.5 cm).
Step 2 – Divider seam. Find the pocket’s center stitch column: st 20 of 39, which leaves 19 sts on each side. Place a marker at the top of this column on the rim and another at the bottom on the foundation.
Make a slip knot. Starting at the rim, insert the hook through the pocket and the back panel in the center column, pull up a loop, and work slst downward through both layers, 1 slst per row. (30 slst) Fasten off at the foundation edge and weave the tails in on the WS.
The slip stitches make a raised chain line on the front, like a ridge seam. Keep them relaxed. Tight stitches make the pockets pucker, and loose ones let the seam drift off the column. Check that each pocket is about 4.9 in (12.4 cm) wide on either side of the seam.
Step 3 – Side and bottom edges. You’ll join these during Border Round 1 by working through both layers wherever the pocket overlaps the back panel. Leave the pins in for now.
Size check: With the pocket pinned and seamed, the caddy should still measure 9.75 × 14 in (24.8 × 35.6 cm) and lie flat with no ripples.
Border
Border gauge: Along the row-end edges, work 4 sc for every 5 rows. This matches the stitch gauge (16 sts per 4 in) to the row gauge (20 rows per 4 in), so the sides stay flat.
Round 1 (sc and joining): With RS facing, join yarn in the top right corner st of Row 70.
- Top: 3 sc in first st, sc in next 37 sts, 3 sc in last st. (43 sc)
- Left side, upper (back panel only): Working down the row ends of Rows 70–31, sc in next 4 row ends, sk 1 row end; repeat from * 8 times. (32 sc)*
- Left side, lower (through both layers): Working through back-panel row ends 30–1 and pocket row ends 30–1 together, sc in next 4 row ends, sk 1 row end; repeat from * 6 times. (24 sc)*
- Bottom (through both layers): Working into the free loops of both foundation chains together, 3 sc in first ch, sc in next 37 ch, 3 sc in last ch. (43 sc)
- Right side, lower (through both layers): Rows 1–30 together, sc in next 4 row ends, sk 1 row end; repeat from * 6 times. (24 sc)*
- Right side, upper (back panel only): Rows 31–70, sc in next 4 row ends, sk 1 row end; repeat from * 8 times. (32 sc)*
Join with slst to the first sc. (198 sc: 43 + 56 + 43 + 56)
Per-side counts, including corners: The center sc of each 3-sc corner group is the corner stitch. Top and bottom = 41 sts each (corner + 39 + corner). Each side = 60 sts (corner + 1 + 56 + 1 + corner). Check: 41 + 60 + 41 + 60 − 4 shared corners = 198.
Round 2 (corded edge): Ch 1, do not turn. Rev sc in each sc around. Join with slst to the first rev sc. (198 rev sc, 1 per existing st; 0 extra sts added)
Fasten off and weave in the tail.
Why the math works: The top and bottom stay at 1 sc per st, so the 39 panel sts keep their 9.75 in (24.8 cm) width. Each side gets 56 sc over 70 rows. At 16 sts per 4 in, 56 sc = 14 in (35.6 cm), which is exactly the panel height. The 3-sc corner groups add 2 sts at each corner so the corners lie flat instead of cupping. The two rounds add about 0.25 in (0.6 cm) per edge, bringing the caddy to 10.25 × 14.5 in (26.0 × 36.8 cm).
Final Blocking
- Weave in all remaining ends on the WS, through both layers where possible.
- Soak the caddy in cool water for 10–15 minutes.
- Gently press out the water in a towel. Don’t wring it.
- Lay it flat, RS up, on a blocking mat.
- Pin the corners to 10.25 × 14.5 in (26.0 × 36.8 cm).
- Pin along each side every 2 in (5.1 cm) to straighten the edges.
- Use your fingers to straighten the divider seam so it runs perfectly vertical.
- Open each pocket slightly so it dries with a little room inside.
- Let it dry completely before unpinning, which usually takes about 24 hours.
Final Quality-Control Checklist
- [ ] Back panel: 39 sts × 70 rows
- [ ] Pocket panel: 39 sts × 30 rows, with corded rim
- [ ] Divider seam: 30 slst, centered on st 20
- [ ] Border Round 1: 198 sc (43 + 56 + 43 + 56)
- [ ] Border Round 2: 198 rev sc
- [ ] Finished size: 10.25 × 14.5 in (26.0 × 36.8 cm)
- [ ] Each pocket: about 6 in (15.2 cm) deep
- [ ] Sides straight, with no ripples or cupping
- [ ] All ends woven in securely
Troubleshooting
The woven grid looks like plain rows. Make sure each sc goes into a ch-1 sp, not into the sc below.
The panel is getting narrower. You’re probably skipping the last sc. Count to 39 sts every 10 rows.
The sides ripple after the border. There are too many sc on the sides. Stick to 4 sc per 5 rows.
The sides pull in. There are too few sc, or your tension is tight. Check that you have 56 sc per side and loosen up.
The pockets pucker at the divider. Redo the seam with a larger hook or looser slst.
The pocket rim flares. Your rev sc is too loose. Redo Row 30 with a hook one size smaller.
The caddy slides off the bed. Tuck more of the back panel under the mattress, at least 6 in (15.2 cm).
Care
Hand wash in cool water, or machine wash on a gentle cycle in a mesh bag, then lay flat to dry. Reshape to 10.25 × 14.5 in (26.0 × 36.8 cm) while damp.

Final Notes
Every size in this caddy follows from your gauge. A gauge of 16 sts and 20 rows = 4 in (10.2 cm) makes the 39-st back panel 9.75 in (24.8 cm) wide and 14 in (35.6 cm) tall after 70 rows. The 30-row pocket panel covers the bottom 6 in (15.2 cm), and the 30-slst divider seam splits it into two pockets. The 198-st border joins the pieces and brings the caddy to 10.25 × 14.5 in (26.0 × 36.8 cm).
Check your measurements at each stage, and the finished caddy will hang straight and hold your bedtime essentials for years.
Happy crocheting!