

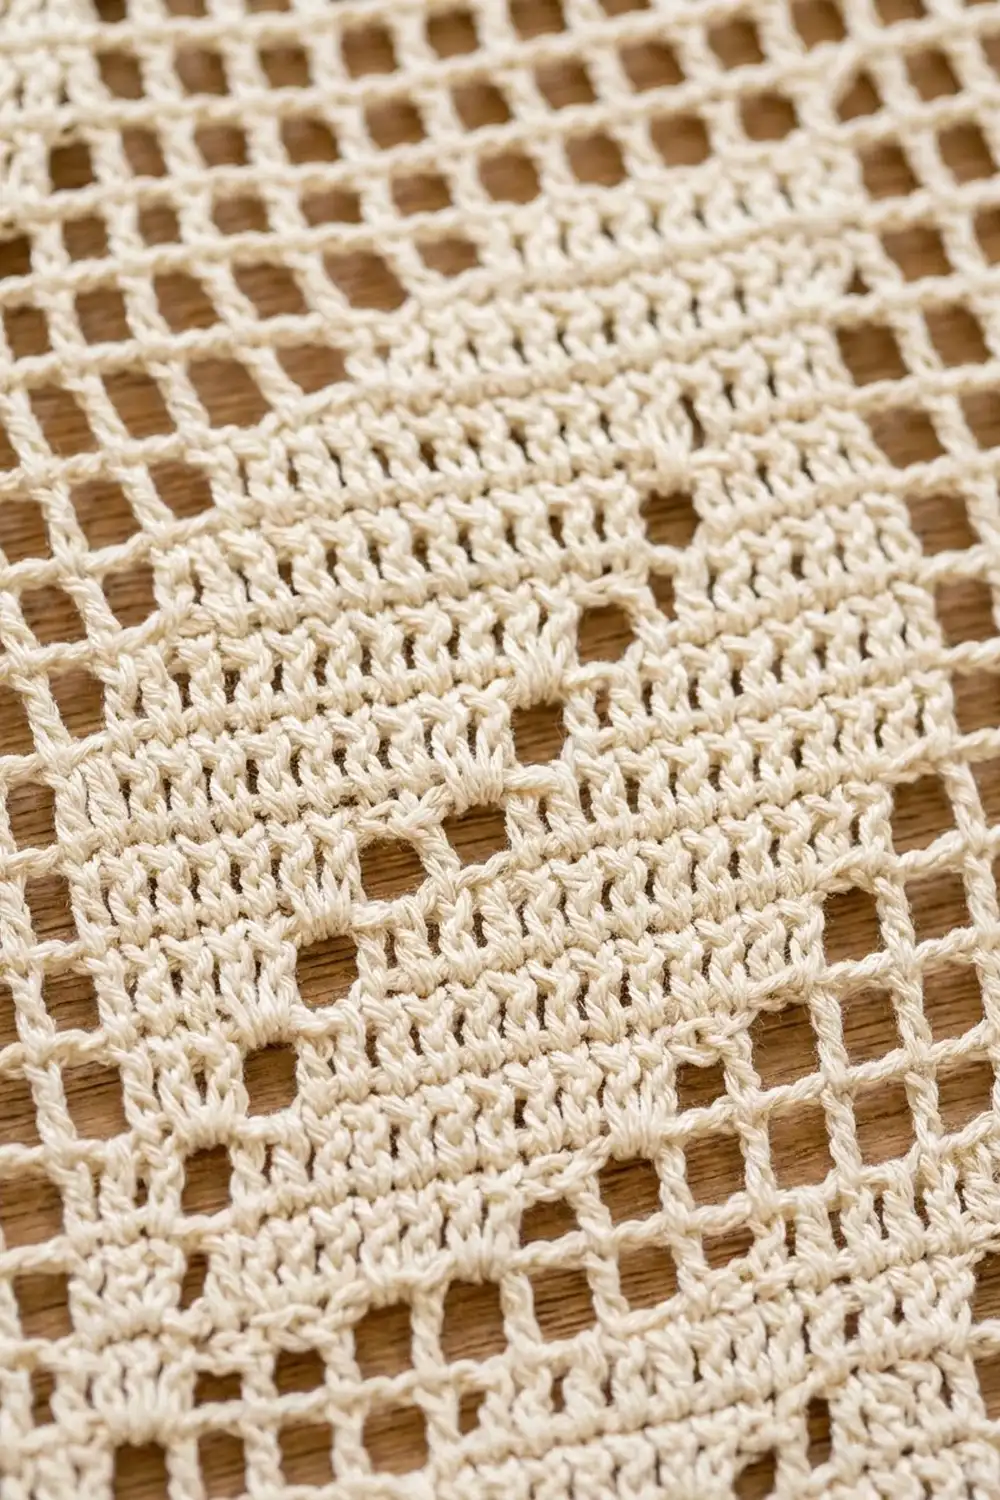
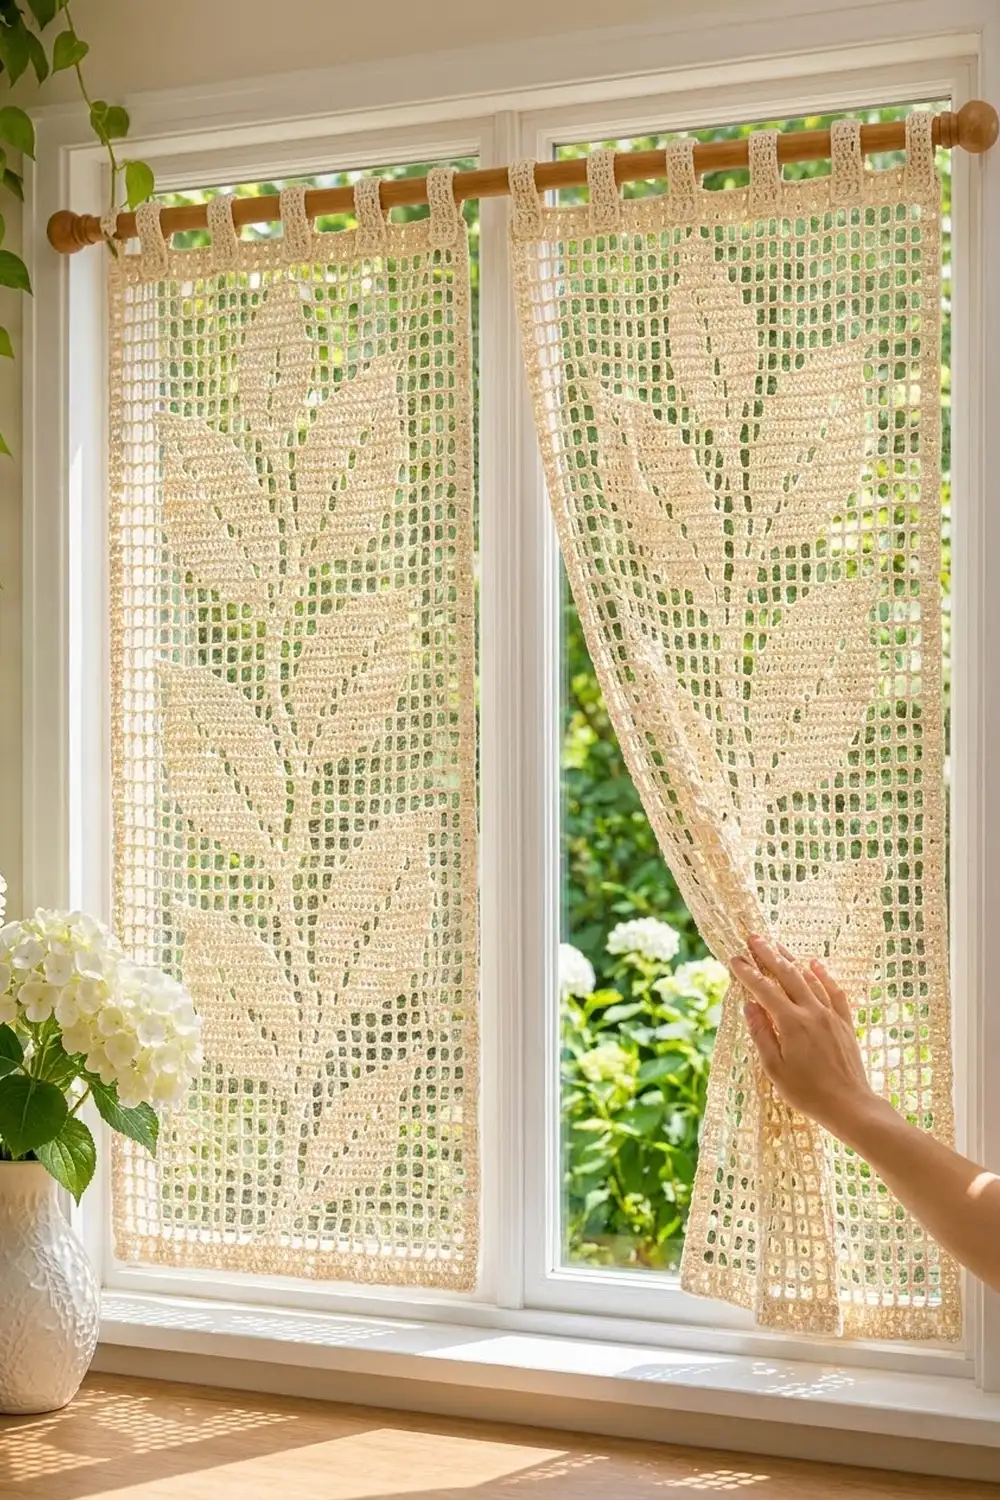
This pattern makes a pair of filet crochet curtain panels in soft cream cotton. Each panel shows one tall leafy branch: a single-mesh stem runs up the center, with angled leaves branching off left and right and a small closed bud at the top. The open grid around the branch lets light through, so the leaves stand out as a silhouette when the panel hangs in a window.
The style is cottage-classic: one color, plain mesh, crisp solid blocks and a neat single crochet edge. Five tabs across the top of each panel slide straight onto a curtain rod, so you don’t need rings or clips. The two panels are made the same way and hang side by side. They are not sewn to each other.
The pattern uses US crochet terms. Each blocked panel measures 14.8 x 32.8 in (37.6 x 83.3 cm) without the tabs, and 34.3 in (87.1 cm) tall with the folded tabs.
Construction is simple. Each panel is worked flat in rows of filet mesh from the bottom up, using the placement tables below. Next you add a two-round single crochet border, then work five tabs from the top edge, fold them to the back and sew them down. Make a second identical panel.
Finished Size and Construction
- Finished panel size: 14.8 x 32.8 in (37.6 x 83.3 cm), plus 1.5 in (3.8 cm) tab loops
- Skill level: Intermediate (filet blocks and meshes, reading placement tables)
- Terminology: US
- Yarn weight: Super Fine (#1) fingering-weight mercerized cotton
- Hook: 2.75 mm (US C-2)
- Number of pieces: 2 separate identical panels
- Layout: 2 panels side by side on one rod, not joined
- Panel grid: 35 meshes wide x 80 rows tall
- Size before border: 14 x 32 in (35.6 x 81.3 cm)
- Border depth: 2 rounds of sc, about 0.4 in (1.0 cm) per side
Materials
Use a smooth mercerized cotton or cotton blend in fingering weight. Mercerized cotton gives crisp blocks, crisp open squares and a light sheen, and it won’t stretch much when it hangs. Avoid fuzzy or very stretchy yarns. They blur the leaf shapes, and the panels will sag over time.
- Cream: 200 g (about 680 m / 744 yd) total, 100 g (about 340 m) per panel
The quantities include a margin of roughly 25% for your gauge swatch, small tension differences and the tab seams.
Tools:
- 2.75 mm (US C-2) crochet hook
- Tapestry needle
- Locking stitch markers
- Rust-proof pins and a blocking mat or towel
- Spray bottle
- Measuring tape
- Curtain rod, up to 3/4 in (1.9 cm) in diameter
Abbreviations (US Terms)
- ch – chain
- sl st – slip stitch
- sc – single crochet
- dc – double crochet
- sp – space
- st(s) – stitch(es)
- RS / WS – right side / wrong side
Special stitches:
- Open mesh: ch 2, skip 2 sts (or the ch-2 sp), dc in next dc. It makes one empty square.
- Block: If the mesh below is open, work 2 dc in the ch-2 sp, then dc in next dc. If the mesh below is a block, dc in each of next 3 sts. It makes one solid square.
Each mesh is 3 sts wide, and every row has 1 extra dc at the start. A row of 35 meshes therefore always has 106 sts: (35 x 3) + 1.
Gauge and Checkpoints
Gauge: 10 meshes = 4 in (10.2 cm) wide, and 10 rows = 4 in (10.2 cm) tall. One mesh is 0.4 in (1.0 cm) square.
Test the panel itself before you commit. Work Rows 1–10, then lay the piece flat without stretching it and check it:
- After Row 10: 14 in (35.6 cm) wide and 4 in (10.2 cm) tall.
- After Row 40: 16 in (40.6 cm) tall. The second right leaf and the second left leaf should be finished.
- After Row 80: 14 x 32 in (35.6 x 81.3 cm).
- After the border: 14.8 x 32.8 in (37.6 x 83.3 cm).
If your piece is more than 0.25 in (0.6 cm) too wide or too tall, go down half a hook size and start again. If it’s too small, go up half a size. If the width matches but the rows come out short, make your dc taller by pulling up the first loop a little higher. The blocks should look square, not like flattened rectangles.
Panel (Make 2)
How to read the placement: Number the columns 1–35 from left to right with the RS facing you. Column 18 is the center. Odd rows (RS) are worked from column 35 to column 1. Even rows (WS) are worked from column 1 to column 35. Any mesh not listed as a block is an open mesh. Columns 1–3 and 33–35 stay open in every row from Row 2 to Row 79.
Row openings: Rows 2–79 all start with an open mesh. Begin with ch 5 (counts as dc + ch 2), skip the first 2 sts, then dc in next dc. Every row ends with an open mesh: ch 2, then dc in the 3rd ch of the turning ch-5. The count is 106 sts (35 meshes) on every row.
Base Rows
Foundation: Ch 108.
Row 1 (RS): Dc in 4th ch from hook (the skipped ch count as the first dc) and in each ch across. Turn. (106 sts = 35 blocks)
Row 2: Ch 5, skip 2 sts, dc in next dc. Work open mesh across, ending with a dc in the top of the turning ch. Turn. (106 sts = 35 open meshes)
Row 3: Repeat Row 2. (106 sts = 35 open meshes)
Stem and Leaves (Rows 4–69)
Stem: Work column 18 as a block on every row from Row 4 to Row 69.
Rows 4–5: Make only the stem block at column 18. (106 sts: 1 block, 34 open)
Leaf placement: Right leaves begin on Rows 6, 22, 38 and 54. Left leaves begin on Rows 12, 28, 44 and 60. Each leaf is 9 rows tall, or 3.6 in (9.1 cm). Leaf Row L1 is the leaf’s starting row.
Right leaf (block columns):
- L1: 19–20
- L2: 19–22
- L3: 20, 22–24
- L4: 21–22, 24–26
- L5: 22–24, 26–28
- L6: 24–26, 28–30
- L7: 26–28, 30–31
- L8: 29–32
- L9: 31–32
Left leaf (block columns, mirrored):
- L1: 16–17
- L2: 14–17
- L3: 12–14, 16
- L4: 10–12, 14–15
- L5: 8–10, 12–14
- L6: 6–8, 10–12
- L7: 5–6, 8–10
- L8: 4–7
- L9: 4–5
The single open mesh left in Rows L3–L7 steps diagonally out from the stem. This forms the open center vein you can see in each leaf. Each leaf has 38 blocks in total.
On every row, work the stem block plus the blocks for any leaf that is active on that row. Left and right leaves overlap in some rows, such as Rows 12–14. That’s fine because they sit on opposite sides of the stem.
Checkpoint rows:
- Row 6: blocks 18–20 (3 blocks, 32 open)
- Row 12: blocks 16–18, 26–28, 30–31 (8 blocks, 27 open)
- Row 13: blocks 14–18, 29–32 (9 blocks, 26 open)
- Row 21: block 18 only (1 block, 34 open)
- Row 68: blocks 4–5, 18 (3 blocks, 32 open)
- Row 69: block 18 only (1 block, 34 open)
Every row is still 106 sts.
Bud and Top Rows (Rows 70–80)
The stem ends at Row 69. The bud sits directly on top of it.
- Row 70: blocks 17–19 (3 blocks)
- Row 71: blocks 16–20 (5 blocks)
- Row 72: blocks 16–17, 19–20 (4 blocks; column 18 stays open as the bud vein)
- Row 73: blocks 16–17, 19–20 (4 blocks)
- Row 74: blocks 17–19 (3 blocks)
- Row 75: block 18 (1 block)
- Rows 76–79: all open mesh (35 open)
Row 80 (WS): Ch 3 (counts as dc). Work 2 dc in each ch-2 sp and 1 dc in each dc across, ending with 2 dc in the last sp and a dc in the 3rd ch of the turning ch. Don’t fasten off. (106 sts = 35 blocks)
Your panel should now measure 14 x 32 in (35.6 x 81.3 cm).
Make All Pieces
Make 2 panels using the same placement. Both panels are cream, for a total of 200 g (about 680 m).
Layout on the rod, viewed from the room:
[ Panel A ][ Panel B ]
  5 tabs     5 tabs
The panels hang edge to edge or slightly overlapping. Because the branches are identical, the pair looks balanced in the window.
Joining: Tabs and Hanging
The panels are not joined to each other. The only joining in this project is attaching each tab to its own panel. Work the border (below) first, then come back to this section.
Tab placement: On the top edge, count from the center sc of the top-right corner group to the center sc of the top-left corner group. That’s 108 sts: 1 + 106 + 1. Five tabs of 8 sts with four gaps of 17 sts fill it exactly: (5 x 8) + (4 x 17) = 108. Mark the first st of each tab before you start.
Each tab:
- Row 1 (RS): Join yarn in the first marked st, ch 1, then sc in same st and next 7 sts. Turn. (8 sc)
- Rows 2–18: Ch 1, sc in each st across. Turn. (8 sc)
The flat tab is about 3 in (7.6 cm) long and 1 in (2.5 cm) wide. Fasten off, leaving a 10 in (25.4 cm) tail. Fold the tab to the WS so the last row lines up with the base of the tab, and whipstitch it in place stitch to stitch: 8 last-row sts to 8 border sts. This forms a 1.5 in (3.8 cm) loop.
Keep the sewing tension firm but not tight. If you pull too hard the top edge puckers, and if your stitches are loose the tab twists on the rod.
Checkpoint: The tabs are spaced about 2.2 in (5.6 cm) apart, and the outer tabs sit flush with the panel corners.
Border
Border gauge: About 7.6 sc per inch (3 sc per cm) along every edge. This matches the dc gauge: 106 sts over 14 in. The sides get 3 sc per row-end because each dc row is 0.4 in (1.0 cm) tall, and 3 sc over 0.4 in is 7.5 sc per inch.
Round 1 (RS): Ch 1. Work 3 sc in the first st of Row 80 (corner).
- Top: 1 sc in each of the next 104 sts, then 3 sc in the last st (corner).
- Side: 3 sc in each of the 80 row-ends (240 sc).
- Bottom: Work into the base of each Row 1 st. Put 3 sc in the first one (corner), 1 sc in each of the next 104, then 3 sc in the last one (corner).
- Side: 3 sc in each of the 80 row-ends (240 sc).
Sl st to the first sc. (700 sc: 104 + 104 + 240 + 240 between corners, plus 4 corner groups of 3)
Round 2: Ch 1. Sc in each sc around, working 3 sc in the center sc of each corner group. Sl st to the first sc. Fasten off.
Each side gains 2 sc. Count between the corner groups: top and bottom 106 each, sides 242 each, plus 4 corner groups of 3 (708 sc).
Why it works: The per-side counts come straight from the panel. There are 106 sts across, minus the 2 corner sts that get their own 3-sc groups, so 104 sc go between the corners. The sides have 80 rows x 3 sc. No extra stitches are hidden anywhere. Each round adds exactly 8 sts, 2 per corner, which keeps the corners square without ruffling. Two rounds add about 0.4 in (1.0 cm) per side. That gives 14.8 x 32.8 in (37.6 x 83.3 cm).
Once the border is done, work the tabs as described in the Joining section.
Final Blocking
- Weave in all ends along solid blocks or the border, never across open meshes.
- Soak each panel in cool water for 15 minutes. Gently press the water out with a towel. Don’t wring it.
- Lay the panel RS up on a blocking mat and pin it to 14.8 x 32.8 in (37.6 x 83.3 cm).
- Pin every 2 in (5.1 cm) along the border so the edges stay straight.
- Square up the mesh by eye. The vertical dc lines should run parallel, and the leaves should sit at a clean angle.
- Pin the tabs flat so they point upward.
- Leave the panel to dry completely. Repeat for the second panel. Measure both and check that they match within 0.25 in (0.6 cm).
Final Quality-Control Checklist
- Every row has 106 sts (35 meshes).
- Columns 1–3 and 33–35 are open in Rows 2–79.
- The stem is continuous from Row 4 to Row 69.
- Each panel has 4 right leaves and 4 left leaves, each with an open diagonal vein.
- The bud has an open center at column 18 in Rows 72–73.
- Border Round 2 has 708 sc.
- Each panel has 5 tabs of 8 sts with 17-st gaps, folded and sewn evenly.
- The blocked size is 14.8 x 32.8 in (37.6 x 83.3 cm), and both panels match.
Troubleshooting
- Leaves look slanted the wrong way: You probably read an even row in the wrong direction. Compare your work with Row 13: the left leaf’s blocks (14–17) should touch the stem, and the right leaf’s blocks (29–32) should sit out near the edge.
- Blocks look short and wide: Raise your dc height or go down a hook size so your rows match your mesh width.
- Panel gets narrower toward the top: You’re probably missing the last dc into the turning ch. Count to 106 sts on each row.
- Border ruffles: Your sc are larger than your dc gauge. Use a hook half a size smaller for the border.
- Border pulls in: Check that you worked 3 sc into every row-end, not 2.
- Tabs twist: Line up the folded last row exactly over the 8 base sts before you sew.
Care
Hand wash in cool water with mild detergent, then reshape and dry flat. Iron on the WS with a pressing cloth if needed. Don’t hang the panels to dry while they’re wet.
Final Notes
The measurement chain for this curtain is short and reliable:
- 1 mesh = 0.4 in (1.0 cm)
- 35 meshes x 80 rows = 14 x 32 in (35.6 x 81.3 cm)
- The 2-round sc border brings each panel to 14.8 x 32.8 in (37.6 x 83.3 cm).
- Five 8-st tabs with 17-st gaps fill the 108-st top edge exactly.
If your mesh matches the gauge at Row 10, every later number will fall into place. Make two panels and hang them side by side to frame your window with a climbing branch.
Happy crocheting!