

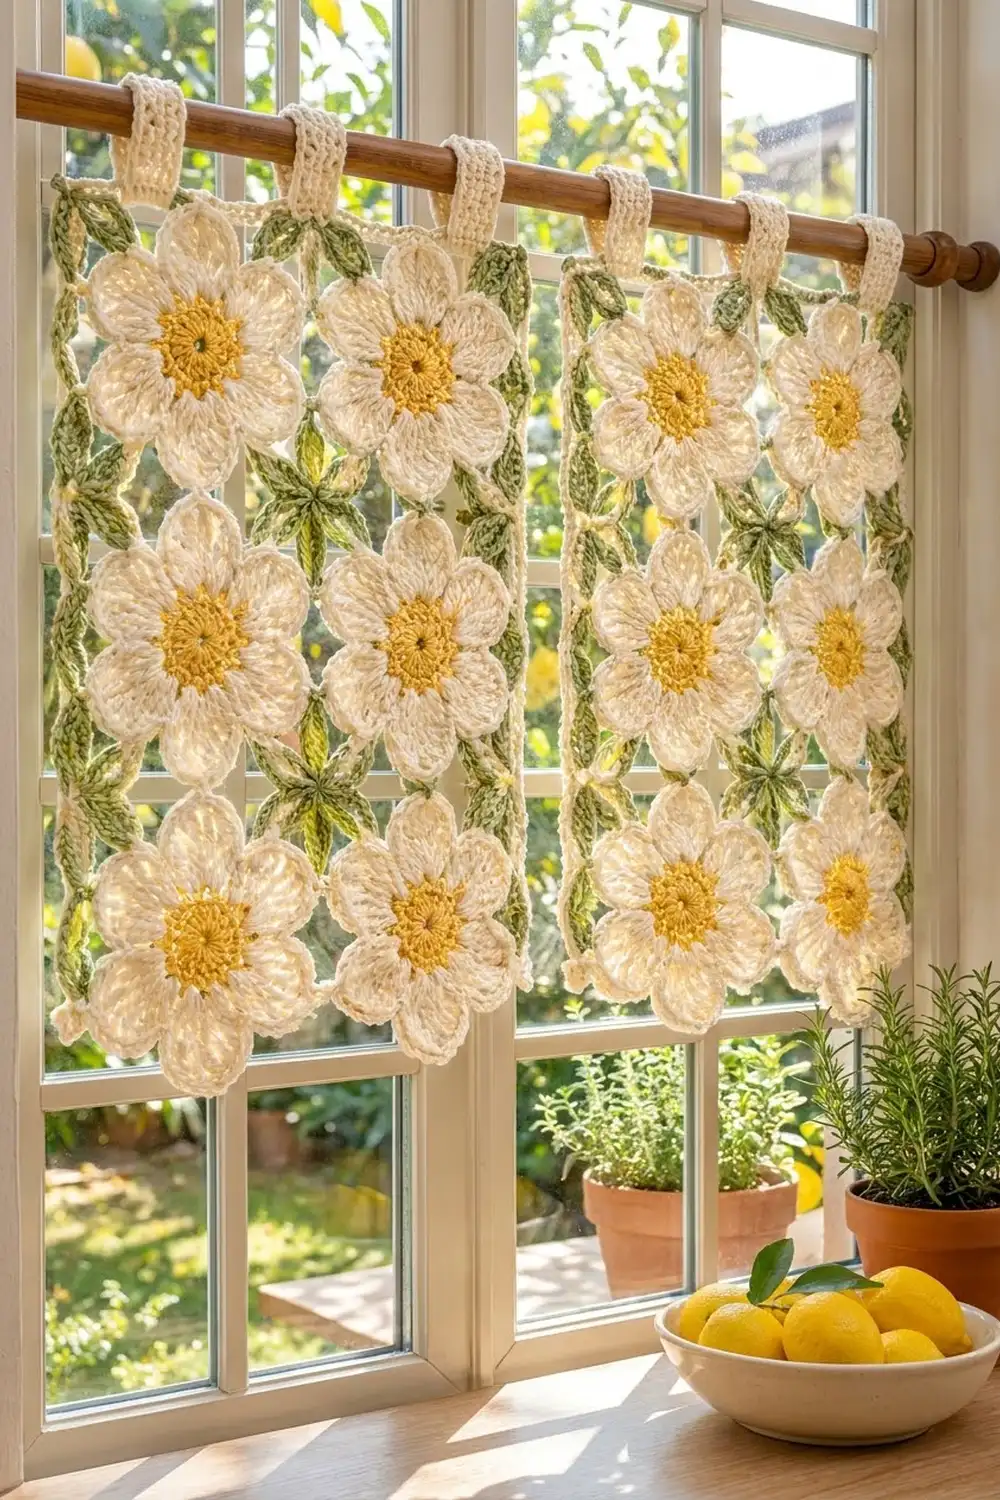
This Lemon Daisy café curtain brings a sunny cottage-kitchen look to a small window. Each panel is a grid of plump cream daisies with golden centers. Sage-green leaf clusters hold the daisies together, and the panel is finished with green side edges, a cream top band, and four hanging tabs.
The colors are warm cream for the petals and band, golden yellow for the centers, and soft sage for the leaves and side borders. The bottom edge has no border, so the lowest daisies form a natural scalloped hem.
The pattern uses US crochet terms. Each panel measures 10.5 in (26.7 cm) wide and 16.6 in (42.2 cm) tall without the tabs, or 18.6 in (47.2 cm) to the top of the tabs. Two panels hang side by side as a pair.
How it’s made:
1. Crochet six daisies per panel, joining them at the petal tips as you go in a 2 x 3 grid.
2. Work green leaf clusters into the gaps.
3. Add the green side borders, then the cream top band with tabs.
Finished Size and Construction
- Finished panel size: 10.5 in x 16.6 in (26.7 cm x 42.2 cm), plus 2 in (5.1 cm) tabs
- Skill level: Intermediate
- Terminology: US
- Yarn weight: Worsted (#4) cotton
- Hook: 5 mm (H-8)
- Number of pieces: 2 panels. Each panel has 6 daisies, 2 interior leaf clusters, and 4 side leaf sprigs.
- Layout per panel: 2 daisies wide x 3 daisies tall
- Daisy size: 4.5 in (11.4 cm) wide across the side tips, 5.2 in (13.2 cm) tall from tip to tip
- Panel size before border: 9 in x 15.6 in (22.9 cm x 39.6 cm)
- Border depth: 0.75 in (1.9 cm) on each side; the top band adds 1 in (2.5 cm) above the top tips
Materials
Choose a smooth worsted-weight cotton or cotton blend. Cotton keeps the petal shapes crisp, blocks well, and stands up to sunlight and washing. The amounts below assume about 170 m per 100 g.
- Cream: 150 g (255 m), for the petals, top band, and tabs
- Golden yellow: 50 g (85 m), for the flower centers
- Sage green: 50 g (85 m), for the leaf clusters and side borders
These amounts are for two panels. They include a margin of about 15–25% to allow for gauge differences and a test flower.
Tools:
– 5 mm (H-8) crochet hook
– Tapestry needle
– Stitch markers
– Scissors and measuring tape
– Blocking mats, rust-proof pins, and a spray bottle
Abbreviations (US Terms)
- ch – chain
- sl st – slip stitch
- sc – single crochet
- hdc – half double crochet
- dc – double crochet
- tr – treble crochet
- sk – skip
- st(s) – stitch(es)
- sp – space
- RS / WS – right side / wrong side
Special stitch – Joining tip: Normally each petal tip is (sc, ch 2, sc) in the center dc. For a joining tip, work instead: sc, ch 1, sl st into the neighboring daisy’s ch-2 tip sp, ch 1, sc in the same center dc. A joined tip counts as one ch-2 tip.
Gauge and Checkpoints
Make one complete daisy before you start the panels. Every later measurement depends on it.
- After Round 1: 1.5 in (3.8 cm) across
- After Round 2: 2.75 in (7.0 cm) across
- After Round 5: 4.5 in (11.4 cm) across the two side tips, and 5.2 in (13.2 cm) from top tip to bottom tip
- Border gauge: 16 sc and 16 rows = 4 in (10.2 cm)
If your daisy is too big, change to a 4.5 mm hook. If it is too small, change to a 5.5 mm hook. Pin the test flower flat and let it dry before you measure, because cotton relaxes a little when blocked.
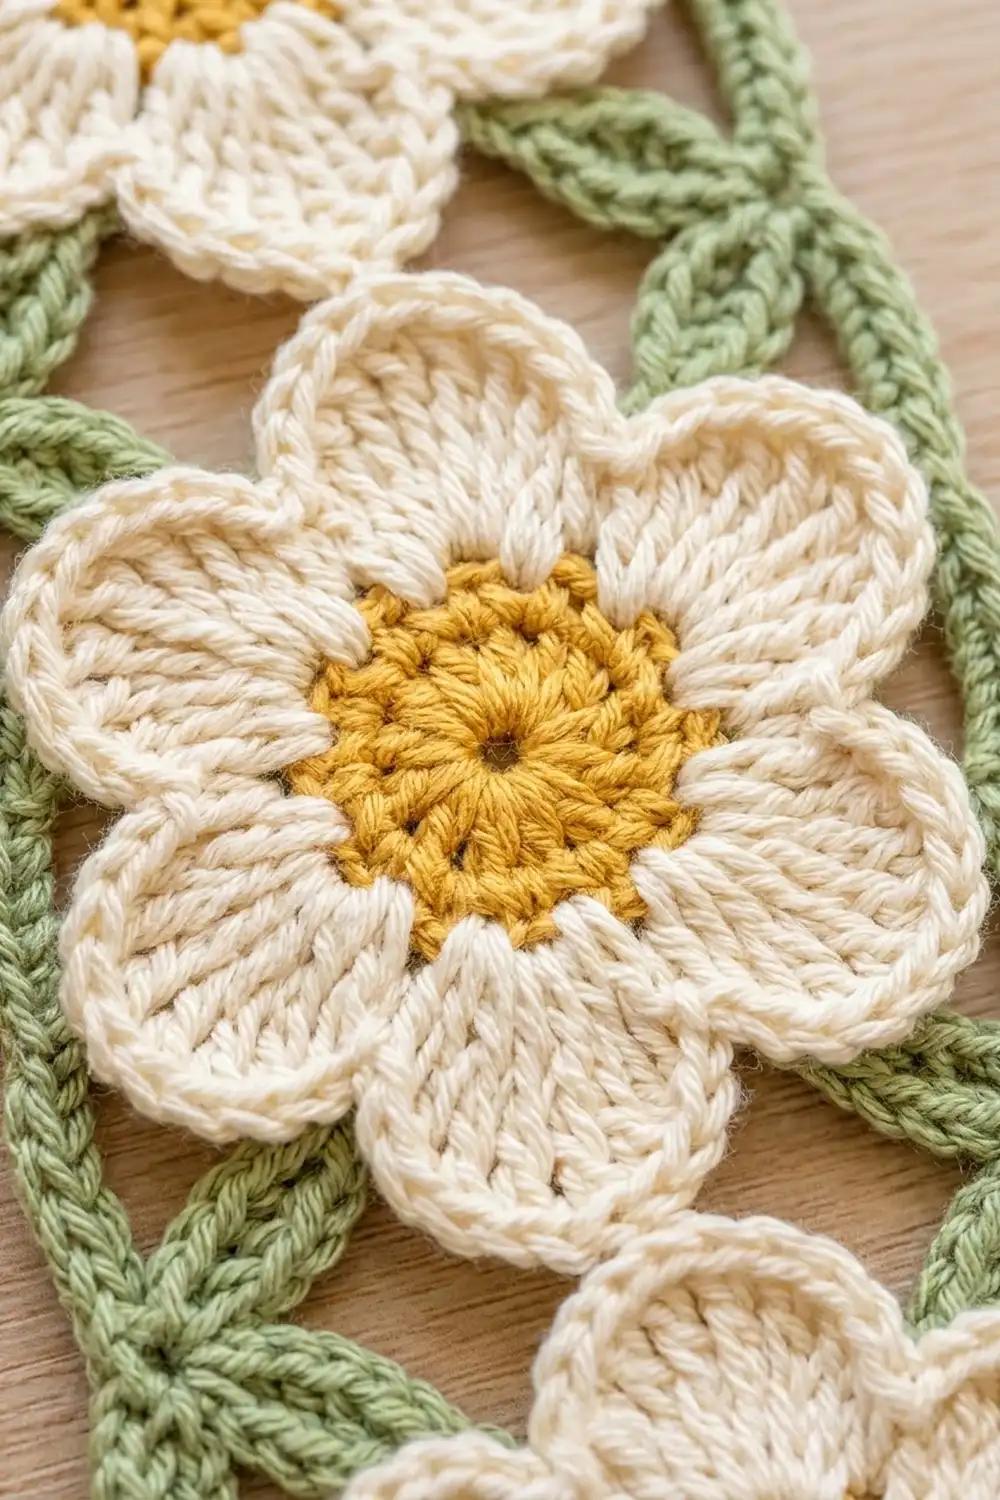
Daisy Motif (Make 6 per Panel)
Petal tips are named by where they sit on the panel: top, upper-right, lower-right, bottom, lower-left, and upper-left. In the grid, one tip of each daisy points straight up.
Round 1 (yellow): Make a magic ring. Ch 3 (counts as dc), work 11 dc in the ring, then sl st to the top of the ch-3. Pull the ring closed. (12 dc)
Round 2 (yellow): Ch 3 (counts as dc), dc in the same st, then 2 dc in each st around. Sl st to the top of the ch-3 and fasten off. (24 dc)
Round 3 (cream): Join cream in any st. Ch 1, sc in the st, ch 3, sk the next 3 sts; repeat from * 5 more times. Sl st to the first sc. (6 sc + 6 ch-3 sps = 24 sts)*
Round 4 (cream): In each ch-3 sp, work (sc, hdc, 5 dc, hdc, sc). Sl st to the first sc. (6 petals of 9 sts each = 54 sts)
Round 5 (cream, outline): Ch 1. On each petal, work: sc in the sc, sc in the hdc, sc in the next 2 dc, (sc, ch 2, sc) in the center dc, sc in the next 2 dc, sc in the hdc, sc in the sc. Sl st to the first sc. (60 sc + 6 ch-2 tips; 10 sc per petal)
This round gives each petal its raised, outlined edge and a small pointed tip for joining. Fasten off the first daisy. For every other daisy, use joining tips as shown below.
Make All Pieces
For a pair of panels, make:
- Daisies: 12 (12 yellow centers, 12 cream petal rounds)
- Interior leaf clusters (green): 4 (2 per panel)
- Side leaf sprigs (green): 8 (4 per panel)
Layout of one panel (D = daisy, C = interior cluster, S = side sprig):
D1   D2
S  C  S
D3   D4
S  C  S
D5   D6
Joining
All daisies are joined tip to tip on Round 5. Joining only at the tips keeps the open, lacy look.
Join order for one panel:
- D1: Complete it with no joins.
- D2: Join its upper-left and lower-left tips to D1’s upper-right and lower-right tips.
- D3: Join its top tip to D1’s bottom tip.
- D4: Join its top tip to D2’s bottom tip. Then join its upper-left and lower-left tips to D3’s upper-right and lower-right tips. These are three tips in a row on Round 5.
- D5: Join its top tip to D3’s bottom tip.
- D6: Join its top tip to D4’s bottom tip. Then join its upper-left and lower-left tips to D5’s right-hand tips.
Stitch logic: A joining tip swaps one ch-2 for (ch 1, sl st, ch 1). Every daisy still has exactly 60 sc and 6 tips. Side-by-side daisies share 2 tips; stacked daisies share 1 tip.
Tension: Keep each joining sl st loose, about the height of a ch. A tight join makes the petals pucker.
Size checkpoint: The joined grid should measure 9 in (22.9 cm) across the outer side tips. From D1’s top tip to D5’s bottom tip it should measure 15.6 in (39.6 cm).
Interior Leaf Cluster (Make 2 per Panel)
Each cluster fills an opening surrounded by four daisies. Its leaves reach the joined tips above and below and the stacked-daisy joins on the left and right.
With green, make a magic ring. Ch 1, then sc in the ring.
- Short leaf (up): Ch 6, then sl st into the joined tips above. Working back down the chain, work sc, hdc, dc, hdc, sc, and sl st. Sl st in the ring. (About 1.2 in / 3.0 cm)
- Long leaf (right): Ch 10, then sl st into the join on the right. Working back down the chain, work sc, hdc, 5 dc, hdc, sc, and sl st. Sl st in the ring. (About 2 in / 5.1 cm)
- Short leaf (down) and long leaf (left): Work these the same way, joining to the tips below and the join on the left.
Pull the ring closed, sl st to the first sc, and fasten off.
Side Leaf Sprig (Make 4 per Panel)
Each sprig fills the notch between two stacked daisies on an outer edge. Make it like the interior cluster, but with only three leaves:
- A short leaf up to the outer side tip of the daisy above
- A long leaf inward to the stacked-daisy join
- A short leaf down to the outer side tip of the daisy below
Border
First add a green border to each long side, then a cream top band with four tabs. The bottom edge has no border.
Border gauge: 16 sc = 4 in (10.2 cm), or 4 sts per inch.
Side Borders (Green, One on Each Side)
Row 1: With RS facing, join green in the upper outer tip of the top daisy. Work down the edge as follows:
- For each daisy (9 sts): sc in the upper outer tip, ch 7, sc in the lower outer tip.
- For each seam between daisies (7 sts): ch 3, sc into the center of the side sprig, ch 3.
Count: 3 daisies x 9 sts + 2 seams x 7 sts = 27 + 14 = 41 sts
Row 2: Ch 1, turn. Sc in each sc and each ch across. (41 sc)
Row 3: Ch 1, turn. Sc in each st across, then fasten off. (41 sc)
Why the math works:
– Row 1 runs from the highest outer tip to the lowest, a distance of 10.4 in (26.4 cm).
– Its 41 sts make 40 intervals, which is 10 in (25.4 cm) at 4 sts per inch. The chain spans stretch just enough to cover the extra distance, so the edge lies flat.
– Each daisy and each seam covers 2.6 in (6.6 cm) with 8 intervals, so the stitches are spaced evenly all the way down.
Top Band (Cream)
Row 1: With RS facing, join cream at the top end of the left side border. Then work:
- 3 sc evenly across the ends of the 3 border rows
- Over D1 (17 sts): ch 8, sc in D1’s top tip, ch 8
- Seam (1 st): sc in the joined tips between D1 and D2
- Over D2 (17 sts): ch 8, sc in D2’s top tip, ch 8
- 3 sc evenly across the ends of the 3 right border rows
Count: 3 + (2 daisies x 17) + 1 seam + 3 = 41 sts
Row 2 (leveling): Ch 4 (counts as tr), turn, and tr in the next 2 sts. Then:
- Over each ch-8 span that climbs toward a top tip: tr in 1 ch, dc in 2 ch, hdc in 2 ch, sc in 3 ch.
- Sc in each top-tip sc.
- Over each ch-8 span that drops toward a low point: sc in 3 ch, hdc in 2 ch, dc in 2 ch, tr in 1 ch.
- Tr in the seam sc.
- Tr in the last 3 sts.
(41 sts) The tall stitches fill the low V shapes and the short ones sit over the tips, so the band ends up straight.
Rows 3–4: Ch 1, turn, and sc in each st across. (41 sc)
Why the math works: The center 35 sts cover 9 in (22.9 cm), or about 3.9 sts per inch. The 3 sc at each end cover 0.75 in (1.9 cm), or 4 sts per inch. Both match the border gauge, so the band lies flat at 10.5 in (26.7 cm).
Tabs (Make 4 per Panel)
The 41 band sts split into tabs and gaps: 5 + 7 + 5 + 7 + 5 + 7 + 5 = 41. The tabs go on sts 1–5, 13–17, 25–29, and 37–41.
Each tab:
1. Join cream in the first st of the tab. Ch 1, sc in 5 sts, and turn.
2. Work 15 more rows of 5 sc, for 16 rows in all, 4 in (10.2 cm) long.
3. Fasten off, leaving a 10 in (25.4 cm) tail.
4. Fold the tab to the WS and whipstitch its last row to the back of Row 3.
The finished loop is 2 in (5.1 cm) tall and 1.25 in (3.2 cm) wide. It fits a rod up to 1 in (2.5 cm) thick.
Final Blocking
- Weave in all ends through stitches of the same color.
- Soak the panel in cool water, then roll it in a towel to remove the extra water.
- Lay the panel RS up on the blocking mats.
- Pin the top band corners 10.5 in (26.7 cm) apart.
- Pin each side border straight down to the lowest outer side tip.
- Pin every petal tip so each daisy is 4.5 in x 5.2 in (11.4 cm x 13.2 cm).
- Open out each leaf so it points straight at its join.
- Pin the tabs flat and let everything dry completely.
Final Quality-Control Checklist
- Every daisy has 6 petals, 60 sc, and 6 tips.
- Side-by-side daisies share 2 tips; stacked daisies share 1 tip.
- Each panel has 2 interior clusters and 4 side sprigs, with every leaf joined.
- Every side border row and every top band row has 41 sts.
- The 4 tabs are evenly spaced, and each is 5 sts wide and 16 rows long.
- Each panel measures 10.5 in x 16.6 in (26.7 cm x 42.2 cm) without the tabs.
- The two panels match within 0.25 in (0.6 cm).
Troubleshooting
- Petals cup: Round 4 is too loose. Use a smaller hook for that round.
- Center bulges: Round 2 is too tight. Go up one hook size for the yellow rounds only.
- Grid skews: A joining sl st went into the wrong tip. Check the join order and redo that tip.
- Leaves sag: Make the chain 1 st shorter and leave out one dc.
- Side border ruffles: Use ch 6 instead of ch 7 on each daisy. That gives 38 sts in Row 1, so work 38 sts in Rows 2 and 3.
- Top band dips: In Row 2, change the dc next to each low point to tr.
- Tabs are tight on the rod: Add 2 rows to each tab.
Care
Hand wash, or machine wash cold on a gentle cycle in a mesh bag. Reshape the panels and dry them flat, re-pinning the petal tips if needed.
Final Notes
Here is how the measurements build on each other:
– One daisy measures 4.5 in x 5.2 in (11.4 cm x 13.2 cm).
– Six daisies in a 2 x 3 grid make a panel 9 in x 15.6 in (22.9 cm x 39.6 cm).
– The side borders add 0.75 in (1.9 cm) each, for a width of 10.5 in (26.7 cm).
– The top band adds 1 in (2.5 cm), for a height of 16.6 in (42.2 cm).
– The tabs bring the total height to 18.6 in (47.2 cm).
Get your test daisy right and everything else will follow.
Happy crocheting!