

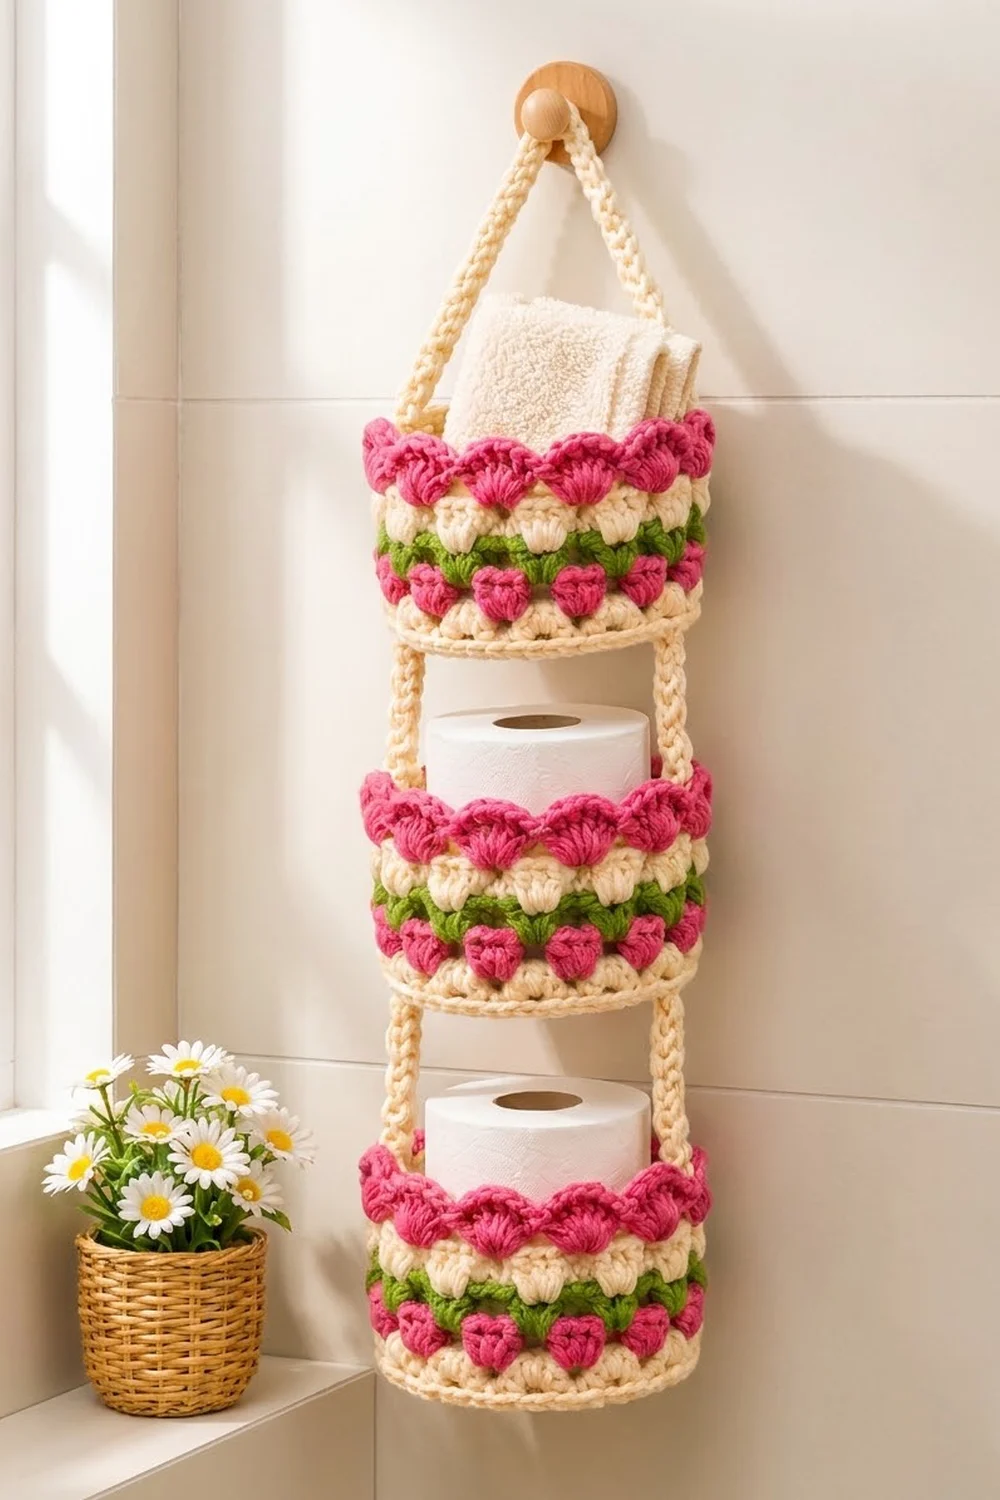
This three-tier hanging organizer stacks three small round baskets on two sturdy cream cords. Each basket fits a standard toilet roll, a folded washcloth, or small bathroom extras, and the whole piece hangs from one wall knob or hook.
The colors are soft and cheerful. Each basket has a cream base and walls, a band of raspberry puff “tulips,” a leaf-green stripe, a row of offset cream puffs, and a scalloped raspberry shell rim. It has a cottage look, but the construction is simple and solid.
The pattern uses US crochet terms. Each basket measures 5.5 in (14.0 cm) across and 3.5 in (8.9 cm) tall. The assembled organizer measures about 21.5 in (54.6 cm) from the top of the hanging loop to the bottom of the lowest basket.
How it’s made: crochet a flat double-crochet base in joined rounds, turn the wall up with a back-loop round, work the colorwork bands, and finish with a shell rim. After making three baskets, crochet two slip-stitch cords with doubled yarn, sew them to opposite sides of each basket, and join the tops with a small hanging loop.
Finished Size and Construction
- Finished size: about 21.5 in (54.6 cm) tall overall; 5.5 in (14.0 cm) wide
- Skill level: Easy (advanced beginner)
- Terminology: US crochet terms
- Yarn weight: Worsted (#4), cotton or cotton blend
- Hooks: 5.0 mm (H-8) for baskets; 6.0 mm (J-10) for cords and loop
- Number of pieces: 6 (3 baskets, 2 side cords, 1 hanging loop)
- Layout: 3 baskets stacked vertically in 1 column
- Piece size: each basket 5.5 in (14.0 cm) across x 3.5 in (8.9 cm) tall
- Size before border: each basket 5.5 in (14.0 cm) across x 2.9 in (7.4 cm) tall after Round 14
- Border depth: the pink shell rim adds 0.6 in (1.5 cm) of height
Materials
Choose a smooth, firm worsted cotton. Cotton holds the basket shape, copes well with a humid bathroom, and shows the puffs and shells clearly. Acrylic also works, but the baskets will be softer.
- Cream: 120 g, about 187 m
- Raspberry pink: 35 g, about 55 m
- Leaf green: 15 g, about 23 m
These quantities include a margin of about 10–15 percent for gauge differences. The cream total includes the cords, which use doubled yarn.
Tools:
- 5.0 mm (H-8) crochet hook
- 6.0 mm (J-10) crochet hook
- Tapestry needle
- 4 locking stitch markers
- Scissors
- Measuring tape
- Spray bottle and a toilet roll or similar cylinder for blocking
Abbreviations (US Terms)
- ch: chain
- sl st: slip stitch
- sc: single crochet
- dc: double crochet
- BLO: back loop only
- sk: skip
- sp: space
- st(s): stitch(es)
- inc: 2 dc in the same st
- rep: repeat
Puff stitch (puff): (Yarn over, insert hook in the indicated st or sp, pull up a loop to about 0.5 in (1.3 cm) tall) 3 times, then yarn over and draw through all 7 loops on hook.
Shell: 5 dc in the same st.
Slip-stitch cord: Chain the required number, then sl st into the back bump of the 2nd ch from hook and of each ch across.
Gauge and Checkpoints
Gauge: 14 sc and 15 rounds = 4 in (10.2 cm) with the 5.0 mm hook. 14 dc = 4 in (10.2 cm), and each dc round of the base adds about 1.1 in (2.8 cm) to the diameter.
Make one complete basket first and check it against a toilet roll before you make all three. The base diameter controls everything that follows.
Base checkpoints (diameter):
- After Round 2: 2.2 in (5.6 cm)
- After Round 3: 3.3 in (8.4 cm)
- After Round 4: 4.4 in (11.2 cm)
- After Round 5: 5.5 in (14.0 cm)
Wall checkpoints (height from the fold):
- After Round 9: 1 in (2.5 cm)
- After Round 14: 2.9 in (7.4 cm)
- After Round 16: 3.5 in (8.9 cm)
If your base is wider than 5.5 in (14.0 cm) or ruffles, go down half a hook size. If it is smaller or cups upward before Round 6, go up half a hook size. Don’t add or remove increases, because the shell rim needs exactly 60 stitches.
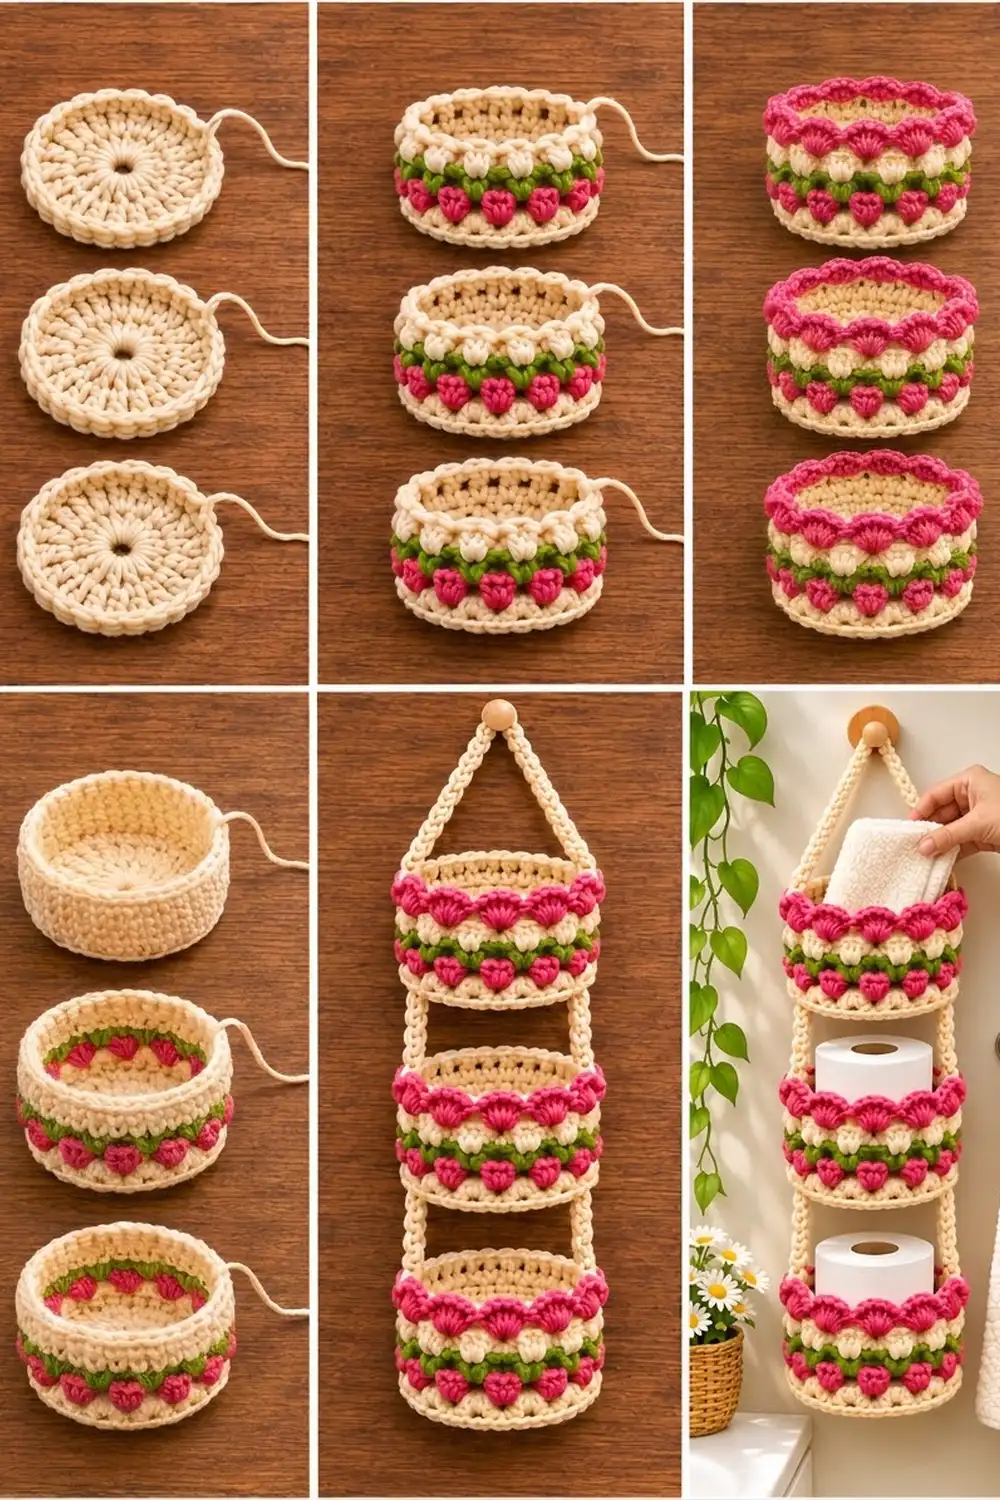
Basket (Make 3)
Work in joined rounds. Join each round with a sl st to the first st, and do not turn. The starting ch 2 or ch 1 never counts as a stitch.
Base
With cream and the 5.0 mm hook, make a magic ring.
Round 1: Ch 2, 12 dc in ring, join. Pull the ring tight. (12 sts)
Round 2: Ch 2, inc in each st around, join. (24 sts)
Round 3: Ch 2, dc in next st, inc in next st; rep from * 12 times, join. (36 sts)
Round 4: Ch 2, dc in next 2 sts, inc in next st; rep from * 12 times, join. (48 sts)
Round 5: Ch 2, dc in next 3 sts, inc in next st; rep from * 12 times, join. (60 sts)
Checkpoint: the base lies flat and measures 5.5 in (14.0 cm) across.
Wall
Round 6 (turning round): Ch 1, sc BLO in each st around, join. 60 worked one per stitch + 0 added = 60 sts. The unused front loops form a neat ridge that turns the wall upward.
Rounds 7–9: Ch 1, sc in each st around, join. (60 sts)
Checkpoint: the wall stands 1 in (2.5 cm) above the fold. Fasten off cream.
Round 10 (pink tulips): Join pink in any st. Ch 1, puff in same st, ch 1, sk next st, puff in next st, ch 1, sk next st; rep from * 29 more times, join to the top of the first puff. (30 puffs + 30 ch-1 sps = 60 sts) Fasten off pink.
Round 11 (green stripe): Join green in any puff. Ch 1, sc in same puff, sc in next ch-1 sp, sc in next puff, sc in next ch-1 sp; rep from * 29 more times, join. (60 sts) Fasten off green.
Round 12 (cream puffs): Join cream in any sc that sits above a ch-1 sp. Ch 1, puff in same st, ch 1, sk next st, puff in next st, ch 1, sk next st; rep from * 29 more times, join to the top of the first puff. (30 puffs + 30 ch-1 sps = 60 sts) Each cream puff now sits between two pink puffs.
Round 13: Ch 1, sc in top of puff, sc in next ch-1 sp; rep from * 30 times, join. (60 sts)
Round 14: Ch 1, sc in each st around, join. (60 sts) Fasten off cream.
Checkpoint: the wall is 2.9 in (7.4 cm) tall from the fold and still 5.5 in (14.0 cm) across. Weave in the ends on the inside. Then work the rim from the Border section below before you assemble anything.
Make All Pieces
Make 3 baskets, each with the shell rim from the Border section finished. Then make the cords and the loop.
Per basket: about 32 g cream, 10 g pink, 4 g green.
Side Cords (Make 2)
With cream held double and the 6.0 mm hook, ch 67. Sl st in the back bump of the 2nd ch from hook and of each ch across. (66 sl sts)
Checkpoint: 3 sl sts = 1 in (2.5 cm), so the cord measures 22 in (55.9 cm). If yours is shorter or longer, redo the chain. The length matters more than the stitch count. Leave a 12 in (30.5 cm) tail at each end for sewing.
Hanging Loop (Make 1)
With cream held double and the 6.0 mm hook, ch 8, then sl st in the first ch to form a ring. Leave a 10 in (25.4 cm) tail. The loop measures about 1 in (2.5 cm) long when flattened.
Layout grid (front view):
        [loop]
         /  \
     cord    cord
      |  [B1]  |
      |  gap   |
      |  [B2]  |
      |  gap   |
      |  [B3]  |
B1 = top basket, B2 = middle basket, B3 = bottom basket. All three are identical.
Joining
Each cord runs up the outside of all three baskets. Mark these sections on each cord, measuring from one end:
- 0 to 0.5 in (0 to 1.3 cm): end tucked under the bottom basket
- 0.5 to 4 in (1.3 to 10.2 cm): along the bottom basket
- 4 to 6 in (10.2 to 15.2 cm): gap
- 6 to 9.5 in (15.2 to 24.1 cm): along the middle basket
- 9.5 to 11.5 in (24.1 to 29.2 cm): gap
- 11.5 to 15 in (29.2 to 38.1 cm): along the top basket
- 15 to 22 in (38.1 to 55.9 cm): rising section
On each basket, place markers in Round 13 at stitch 1 and stitch 31. These points are 30 stitches apart, so the two cords sit directly opposite each other.
Method: Use the cord tail or a separate length of cream. Whipstitch the cord to the basket with one stitch through the cord for each basket round, working straight up the marked column: first the front-loop ridge of Round 6, then Rounds 7 through 14. Fold the 0.5 in (1.3 cm) end of each cord under the bottom basket and tack it to Round 5.
Sew both cords to the bottom basket first, then the middle basket, then the top one. Keep each gap relaxed but not slack; it should measure 2 in (5.1 cm) when the organizer hangs. Pull each sewing stitch snug enough to hide the yarn, but not so tight that the wall puckers.
Bring the two rising sections together above the top basket. Overlap the last 0.5 in (1.3 cm) of each cord and sew them together, then sew the hanging loop to the overlap.
Size checkpoint: the rising cords form a triangle about 6 in (15.2 cm) tall. The assembled organizer measures about 21.5 in (54.6 cm): 10.5 in (26.7 cm) of baskets, 4 in (10.2 cm) of gaps, 6 in (15.2 cm) of triangle, and 1 in (2.5 cm) of loop.
Border: Pink Shell Rim
Work this rim on every basket after Round 14 and before joining.
Border gauge: each shell spans 4 stitches of Round 14, which is about 1.1 in (2.8 cm) of the rim, and stands 0.6 in (1.5 cm) tall.
Round 15 (shells): With the 5.0 mm hook, join pink in any st of Round 14. Ch 1, sc in same st, sk 1 st, shell in next st, sk 1 st, sc in next st, sk 1 st, shell in next st, sk 1 st; rep from * 14 more times, join to first sc. This is a conversion round: 15 sc worked one per stitch + 15 shells of 5 dc = 15 + 75 = 90 sts.
Round 16 (edge): Sl st loosely in each st around, join. 90 worked one per stitch + 0 added = 90 sts. Fasten off and weave in.
Why the math works: Each repeat uses exactly 4 stitches of Round 14 (sc, skip, shell, skip). 60 ÷ 4 = 15 repeats, so the last shell ends right before the first sc, with no gap or crowding. The extra dc in each shell makes a gentle scallop without changing the 5.5 in (14.0 cm) diameter. The slip-stitch round firms up the edge so the scallops don’t flop.
Final Blocking
- Weave in any remaining ends inside the baskets, away from the cords.
- Slide a toilet roll or similar 4.5 in (11.4 cm) cylinder into each basket.
- Mist each basket lightly until damp, not soaked.
- Press each base flat and straighten the walls against the cylinder.
- Pinch each shell into a rounded scallop with your fingers.
- Hang the organizer from a hook and straighten the cords so both sides are even.
- Let it dry completely while hanging, for at least 24 hours.
Final Quality-Control Checklist
- Each base measures 5.5 in (14.0 cm) and lies flat.
- Each basket has 60 sts through Round 14 and 90 sts in the rim.
- All three baskets are 3.5 in (8.9 cm) tall.
- The cream puffs sit between the pink puffs all the way around.
- Each rim has 15 evenly spaced shells.
- The cords sit directly opposite each other on every basket.
- Both gaps measure 2 in (5.1 cm).
- The organizer hangs level.
- No sewing yarn shows on the outside.
Troubleshooting
Base ruffles: Your tension is loose or an increase is in the wrong place. Recount each round and go down half a hook size.
Base cups before Round 6: Go up half a hook size or loosen your dc.
Puffs lean or look uneven: Pull every loop up to the same height before closing the puff.
Cream puffs sit directly above pink puffs: You started Round 12 in the wrong stitch. Restart it in a sc above a ch-1 sp.
Shell count is off: Round 14 must have exactly 60 sts. Recount before you start the rim.
Organizer tilts: One cord is sewn higher than the other, or one gap is longer. Measure both cords from the bottom and re-sew.
Baskets sag: Use cotton yarn, crochet more tightly, or add an extra round of sc before Round 15.
Care
Hand wash in cool water with mild soap, press out the water in a towel, and dry with a cylinder inside each basket to hold the shape. Re-block if the rims relax.
Final Notes
Here is how the measurements build: a 60-stitch base measures 5.5 in (14.0 cm) across, the 60-stitch wall rises 2.9 in (7.4 cm), and the 90-stitch shell rim brings each basket to 3.5 in (8.9 cm). Three baskets, two 22 in (55.9 cm) cords, and a small loop make an organizer about 21.5 in (54.6 cm) tall. Check your first basket against a toilet roll and keep your stitch counts steady.
Happy crocheting!