

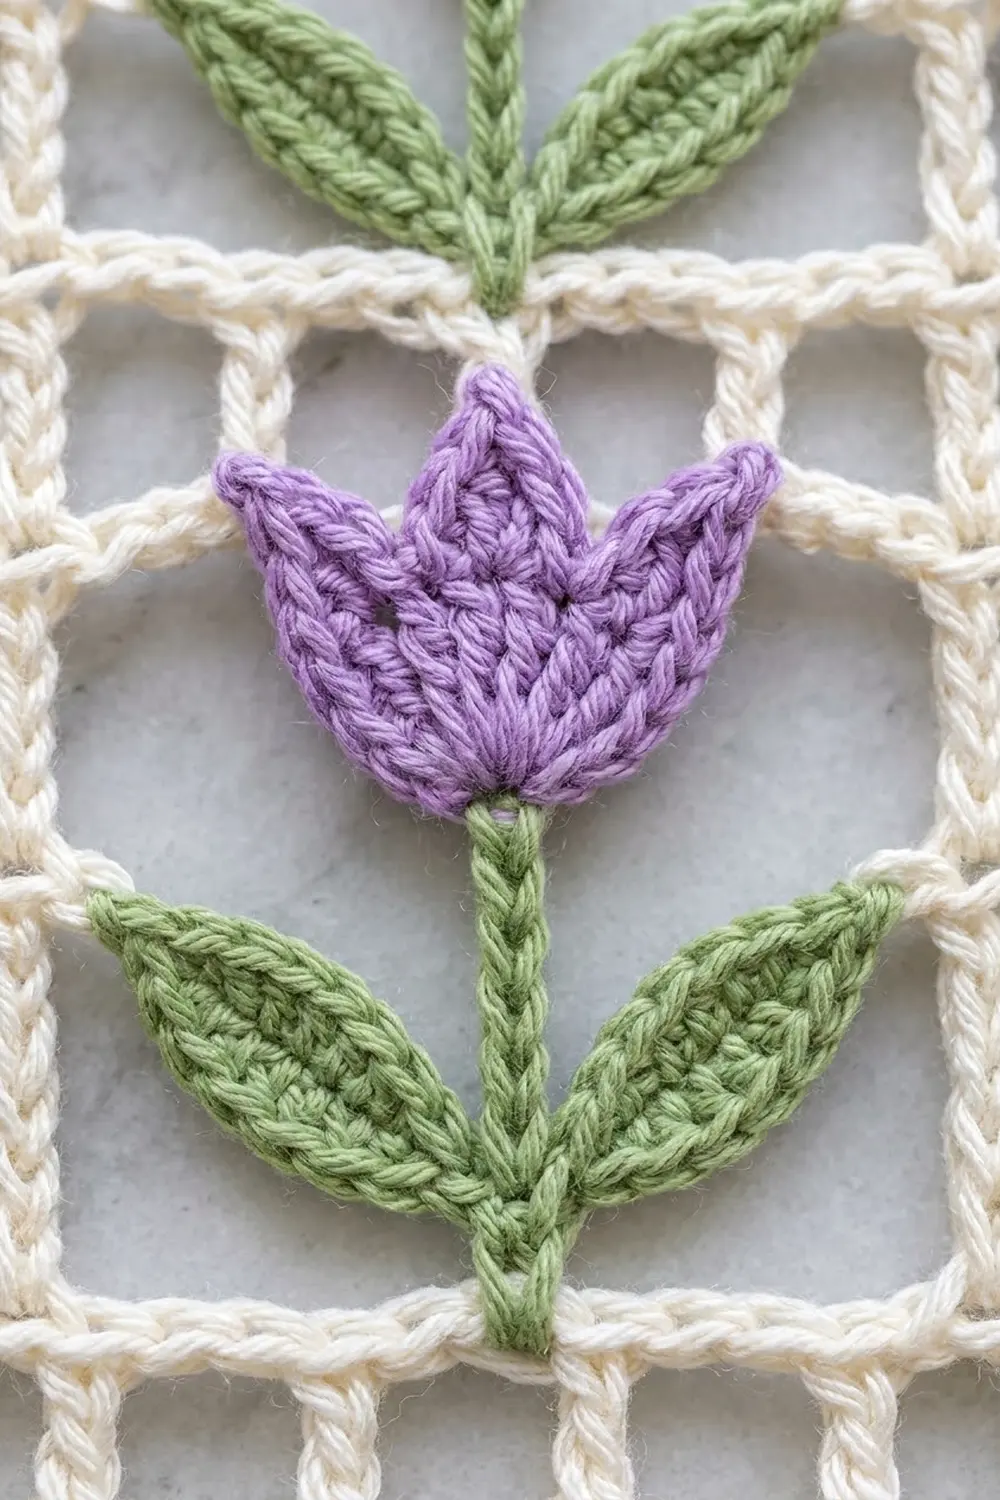
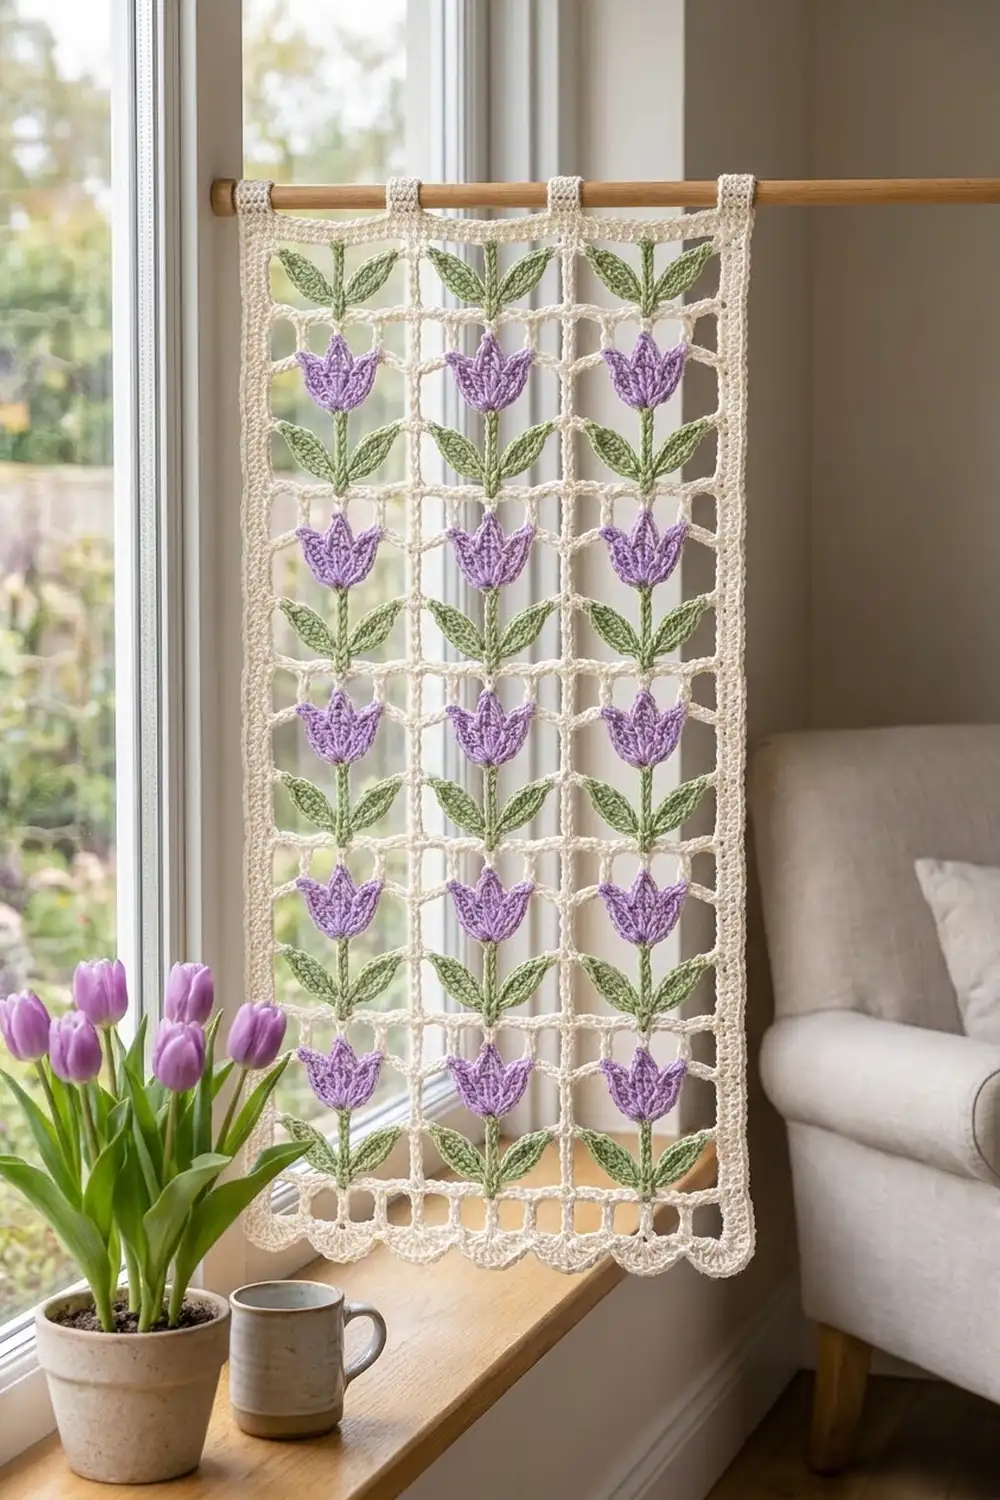
The Tulip Trellis Mesh Panel is an open cream grid with small lavender tulips standing in neat rows across it. Each tulip has a green slip-stitch stem, two pointed leaves, and a three-petal head with picot tips. A row of shell scallops finishes the bottom edge.
The colors are cream for the mesh, lavender for the blooms, and sage green for the stems and leaves. The style is airy and cottage-garden, and light shows through every open cell.
This pattern uses US crochet terms. After blocking, the panel measures 10 in wide x 10.25 in tall (25.4 cm x 26.0 cm).
You crochet one rectangular mesh panel in rows and add a two-round border with scallops along the bottom. Then you make 12 tulip appliqués and sew them on in 4 rows of 3. The result is one finished piece.
Finished Size and Construction
- Finished size: 10 in x 10.25 in (25.4 cm x 26.0 cm)
- Skill level: Easy-intermediate
- Terminology: US crochet terms
- Yarn weight: Worsted (#4) cotton
- Hook: 5.0 mm (H-8)
- Number of pieces: 1 mesh panel plus 12 sewn-on tulip appliqués (each tulip is 1 green sprig and 1 lavender head)
- Layout: 9 cells wide x 9 rows tall, with tulips in 3 columns and 4 rows
- Cell size: 1 in x 1 in (2.5 cm x 2.5 cm)
- Size before border: 9 in x 9 in (22.9 cm x 22.9 cm)
- Border depth: 0.5 in (1.3 cm) on the top and sides, and 0.75 in (1.9 cm) on the scalloped bottom
Materials
Use a smooth worsted-weight cotton or cotton blend with about 93 yd (85 m) per 50 g. Cotton keeps the grid square and the petal points crisp.
- Cream (mesh and border): 40 g, about 74 yd (68 m)
- Sage green (stems and leaves): 25 g, about 47 yd (43 m)
- Lavender (tulip heads): 20 g, about 37 yd (34 m)
These amounts include about 15% extra for your gauge swatch and sewing tails.
Tools:
- 5.0 mm (H-8) crochet hook
- Tapestry needle
- Scissors
- Rustproof pins
- Blocking mat
- Spray bottle
- Tape measure
- 1 stitch marker
Abbreviations (US Terms)
- ch – chain
- sl st – slip stitch
- sc – single crochet
- hdc – half double crochet
- dc – double crochet
- tr – treble crochet
- sk – skip
- sp(s) – space(s)
- st(s) – stitch(es)
Special stitches:
- Small petal (SP): In the same stitch, work (hdc, dc, ch 2, sl st in top of the dc just made, dc, hdc).
- Tall petal (TP): In the same stitch, work (dc, tr, ch 2, sl st in top of the tr just made, tr, dc).
The ch 2 and sl st in each petal form a small picot point. The picot isn’t counted as a stitch.
Gauge and Checkpoints
Mesh gauge: 4 cells and 4 rows = 4 in x 4 in (10.2 cm x 10.2 cm). Each cell is 1 in (2.5 cm) square.
Border gauge: 16 sc = 4 in (10.2 cm).
Make a test swatch first. Ch 21 and work 4 rows of mesh that are 4 cells wide, with 5 tr per row. Block the swatch lightly and measure it. Then make one complete tulip and check it against the sizes below.
Checkpoints:
- Row 1: 9 in (22.9 cm) wide
- After Row 5: 5 in (12.7 cm) tall
- After Row 9: 9 in x 9 in (22.9 cm x 22.9 cm)
- After Border Round 1: 9.5 in x 9.5 in (24.1 cm x 24.1 cm)
- After Border Round 2: 10 in x 10.25 in (25.4 cm x 26.0 cm)
- Each leaf: 1 in (2.5 cm) long
- Stem: 1 in (2.5 cm) long
- Tulip head: 1.25 in (3.2 cm) wide x 1 in (2.5 cm) tall
- Assembled tulip: 1.75 in (4.4 cm) tall
If your swatch is too big, use a 4.5 mm hook. If it’s too small, use a 5.5 mm hook. If only the height is wrong, change how tall you pull up the first loop of each tr. Square cells keep the tulips centered in their spaces.
Mesh Panel
Use cream.
Foundation: Ch 41.
Row 1: Tr in 9th ch from hook (the skipped ch count as the first tr and ch-3 sp). Ch 3, sk 3 ch, tr in next ch. Repeat from * 7 more times. Turn. (10 tr counting the beginning ch, 9 ch-3 sps = 37 sts)
To check the math: 10 posts plus 9 spaces of 3 ch is 10 + 27 = 37 sts. Add 4 ch for the height of the first tr and you get 41.
Row 2: Ch 7 (counts as tr and ch 3). Tr in next tr. Ch 3, tr in next tr. Repeat from * 6 more times. Ch 3, tr in top of turning ch. Turn. (10 tr, 9 ch-3 sps = 37 sts)
Rows 3–9: Repeat Row 2. (Each row: 10 tr, 9 ch-3 sps = 37 sts) At the end of Row 9, don’t turn and don’t fasten off.
The panel should now measure 9 in x 9 in (22.9 cm x 22.9 cm).
Border
Each corner is worked as (sc, ch 2, sc). Each side’s stitch count includes the sc on its side of both corner ch-2 sps. The ch-2 sps aren’t counted.
Border gauge: 4 sc per 1 in (2.5 cm).
Round 1 (cream):
- Ch 1. Work (sc, ch 2, sc) in top of the last tr made. This is the first corner.
- Work 4 sc around each row-end post down the side (36 sc).
- Work (sc, ch 2, sc) in the corner foundation ch.
- Work 1 sc in each of the 35 free foundation-ch loops along the bottom.
- Work (sc, ch 2, sc) in the last foundation ch.
- Work 4 sc around each row-end post up the other side (36 sc).
- Work (sc, ch 2, sc) in the first tr of Row 9.
- Across the top, work 3 sc in each ch-3 sp and 1 sc in each of the 8 inner tr.
- Join with sl st to the first sc.
Round 1 stitch counts:
- Top: 1 + 27 + 8 + 1 = 37 sc
- Each side: 1 + 36 + 1 = 38 sc
- Bottom: 1 + 35 + 1 = 37 sc
- Total: 150 sc, plus 4 corner ch-2 sps
Why the math works: Each 1 in (2.5 cm) cell is 4 sts wide (1 tr and 3 ch) and gets exactly 4 sc. Each 1 in (2.5 cm) row end also gets 4 sc. That matches the border gauge of 4 sc per inch, so the edge lies flat. The panel now measures 9.5 in x 9.5 in (24.1 cm x 24.1 cm).
Round 2 (cream):
- Sl st in the first corner ch-2 sp. Ch 1, then work (sc, ch 2, sc) in the same sp.
- Sc in each of the 38 sc down the side.
- Work (sc, ch 2, sc) in the corner sp.
- Bottom scallops: Sc in first sc. Sk 2 sc, 7 dc in next sc, sk 2 sc, sc in next sc. Repeat from * 5 more times, for 6 scallops.
- Work (sc, ch 2, sc) in the corner sp.
- Sc in each of the 38 sc up the other side.
- Work (sc, ch 2, sc) in the corner sp.
- Sc in each of the 37 sc across the top.
- Join with sl st to the first sc and fasten off.
Round 2 stitch counts:
- Top: 1 + 37 + 1 = 39 sc
- Each side: 1 + 38 + 1 = 40 sc
- Bottom: 1 + (7 sc + 42 dc) + 1 = 51 sts
- Total: 170 sts, plus 4 corner ch-2 sps
Why the scallops fit: One sc plus 6 repeats of 6 sts uses 1 + 36 = 37 sts. That is exactly the bottom count from Round 1, and it puts 2 scallops under each tulip column.
This round adds 0.25 in (0.6 cm) to the top and sides. The scallops add 0.5 in (1.3 cm) along the bottom. The panel now measures 10 in x 10.25 in (25.4 cm x 26.0 cm).
Tulip Sprig (Make 12)
Use sage green. Each sprig is worked in one piece: a left leaf, then the stem, then a right leaf, all meeting at one junction.
Left leaf:
- Ch 6. The slip-knot end will be the leaf tip.
- Sc in 2nd ch from hook, hdc in next ch, dc in next ch, hdc in next ch.
- In the last ch (the tip), work (sc, ch 2, sc).
- Turn the leaf and work along the other side of the chain: hdc in next ch, dc in next ch, hdc in next ch, sc in next ch.
(10 sts plus ch-2 tip) Place a marker in the last sc. This is the junction where the stem and leaves meet.
Stem: Ch 7. Sl st in 2nd ch from hook and in each of the next 5 ch. (6 sl st) You’re now back at the junction. The stem is a firm, slightly braided cord 1 in (2.5 cm) long.
Right leaf:
- Ch 6.
- Hdc in 2nd ch from hook, dc in next ch, hdc in next ch, sc in next ch.
- Sl st in the marked junction st.
- Work along the other side of the same chain: sc in next ch, hdc in next ch, dc in next ch, hdc in next ch.
- Work (sc, ch 2, sc) in the skipped tip ch.
(10 sts plus ch-2 tip) Fasten off, leaving a 10 in (25.4 cm) tail for sewing.
The two leaves are mirror images: sc at the base, dc at the widest point, and a pointed tip. The chain runs down the center of each leaf like a vein. Each leaf is 1 in (2.5 cm) long.
Tulip Head (Make 12)
Use lavender.
Foundation: Ch 4.
Row 1: 3 dc in 4th ch from hook. Turn. (4 dc, counting the skipped ch as 1 dc)
Row 2: Ch 3 (counts as dc), dc in same st, 2 dc in next st, dc in next st, 2 dc in top of beginning ch. Turn. (7 dc)
Row 3: Ch 1, sc in first dc, SP in next dc, sc in next dc, TP in next dc, sc in next dc, SP in next dc, sc in last st. (4 sc + 3 petals of 4 sts = 16 sts, plus 3 picots)
Fasten off, leaving a 10 in (25.4 cm) tail. The head forms a small cup that opens into three points, with the middle petal tallest. It measures 1.25 in (3.2 cm) wide x 1 in (2.5 cm) tall.
Appliqué Placement
Lay the panel right side up with the scallops at the bottom. Number the cells 1–9 from left to right and the rows 1–9 from bottom to top.
- Columns: Center the tulips over cells 2, 5 and 8.
- Rows: Each tulip fills a 2-row band. Its stem starts on the bar at the top of Row 1, 3, 5 or 7.
Band 4 (Rows 8–9)  . T . . T . . T .
Band 3 (Rows 6–7)  . T . . T . . T .
Band 2 (Rows 4–5)  . T . . T . . T .
Band 1 (Rows 2–3)  . T . . T . . T .
Row 1 (plain)      . . . . . . . . .
For each tulip:
- Pin the sprig’s junction to the center of its bar. The stem runs straight up and its tip reaches the next bar, 1 in (2.5 cm) higher.
- With the green tail, whipstitch the junction to the bar and tack the stem tip to the bar above. Tack each leaf tip to the nearest post so the leaves angle up and out.
- Center a head over the stem tip so it overlaps the stem by 0.25 in (0.6 cm) and sits across the bar. Use the lavender tail to whipstitch the base and lower edges of the head in place.
Each tulip is 1.75 in (4.4 cm) tall. This leaves 0.25 in (0.6 cm) between the petal tips and the bar where the next band starts. Weave tails into the appliqué itself so they don’t show through the open cells.
Final Blocking
- Weave in any remaining ends.
- Pin the 4 corners to 10 in x 10.25 in (25.4 cm x 26.0 cm).
- Pin along each side every 1 in (2.5 cm), keeping the posts in straight vertical lines.
- Pin the center of each of the 6 scallops.
- Mist the piece until damp. Pat the leaves flat and open each picot point.
- Let it dry for at least 12 hours before you remove the pins.
Final Quality-Control Checklist
- The panel measures 10 in x 10.25 in (25.4 cm x 26.0 cm).
- Every mesh row has 10 tr and 9 ch-3 sps.
- The cells are square and the posts line up.
- Border Round 1 has 37 / 38 / 37 / 38 sc.
- Border Round 2 has 39 / 40 / 51 / 40 sts and 6 even scallops.
- There are 12 tulips in 3 straight columns and 4 level rows.
- The stems are vertical and the leaves are symmetrical.
- No sewing stitches show on the front.
Troubleshooting
- Cells are wider than they are tall: Pull up your tr loops taller.
- The panel leans: You probably missed the last tr in the turning ch. Count 10 posts in every row.
- The border ruffles: Work 3 sc in each ch-3 sp, not 4.
- The border cups: Work 4 sc around each row-end post, not 3.
- Scallops are uneven at one end: Recount the bottom of Round 1. It must have exactly 37 sc.
- Leaves twist: Steam them flat before sewing.
- Heads flop forward: Add a tack stitch at each side of the head.
Care
Hand wash in cool water with a mild detergent. Roll the panel in a towel to remove water, then dry it flat and reshape the scallops and petals.
Final Notes
Each size in this pattern builds on the one before it:
- Square 1 in (2.5 cm) cells make a 9 in x 9 in (22.9 cm x 22.9 cm) panel.
- Border Round 1 adds 4 sc per inch and brings the panel to 9.5 in x 9.5 in (24.1 cm x 24.1 cm).
- Round 2 adds a 0.25 in (0.6 cm) edge and 0.5 in (1.3 cm) scallops, for a finished size of 10 in x 10.25 in (25.4 cm x 26.0 cm).
- Each 1.75 in (4.4 cm) tulip fits inside its 2-row band.
If your gauge is right at each stage, everything else will fit.
Happy crocheting!