

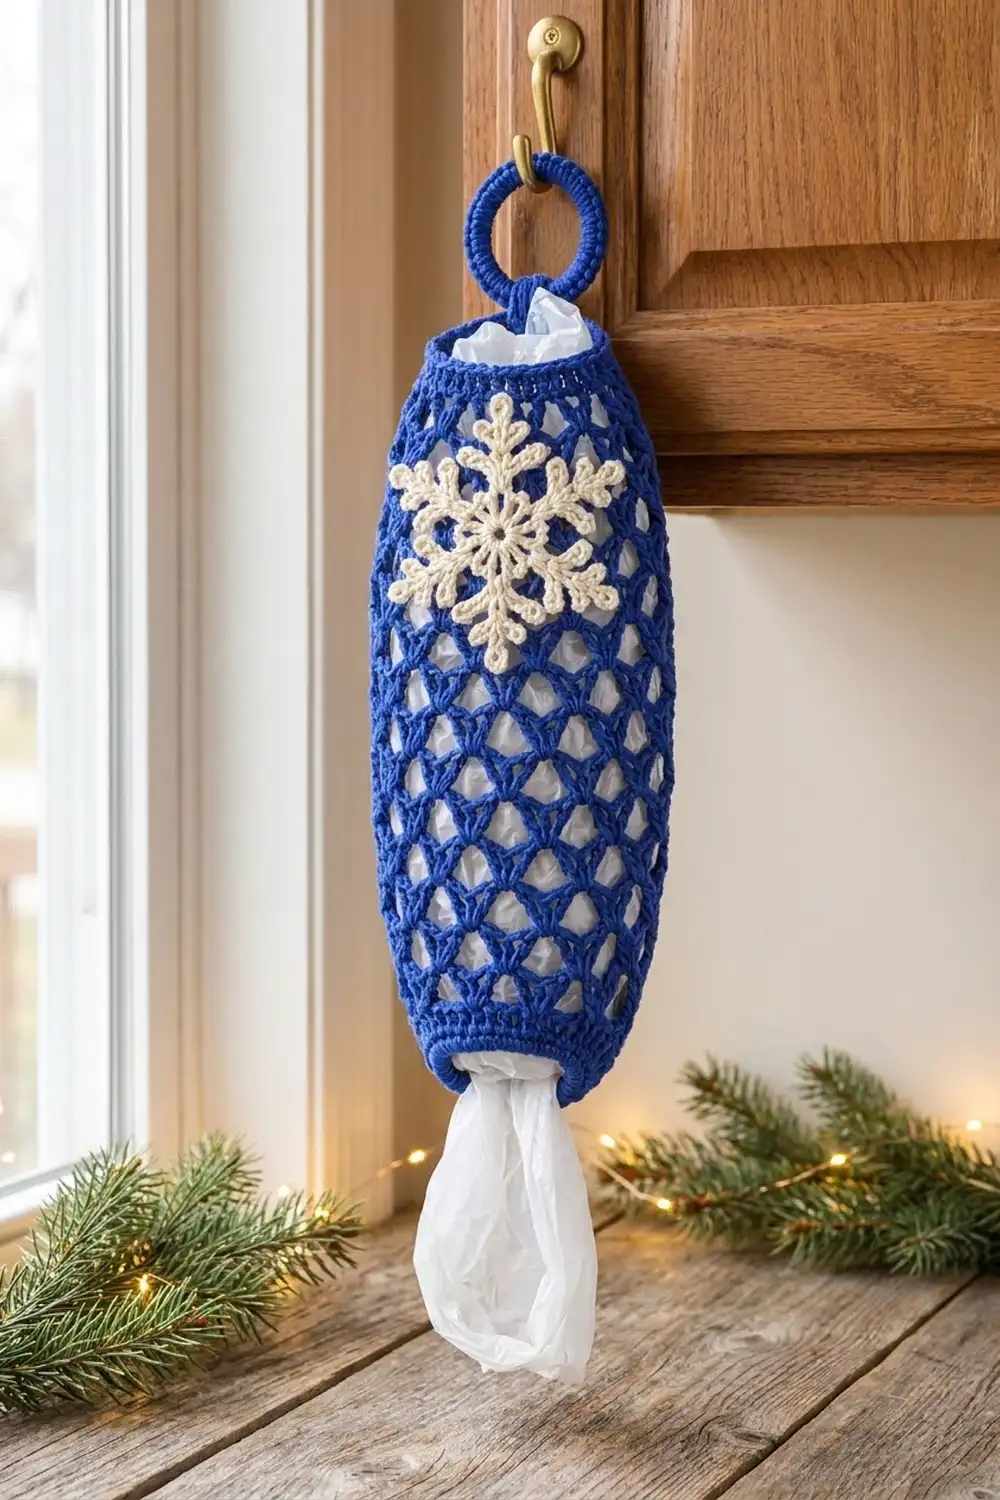
This holder keeps a stash of plastic grocery bags tidy and on hand. It also looks festive hanging on a cabinet door all winter. The body is an open diamond lattice of offset V-stitches, so you can see the bags inside and pull them out one at a time through the bottom opening.
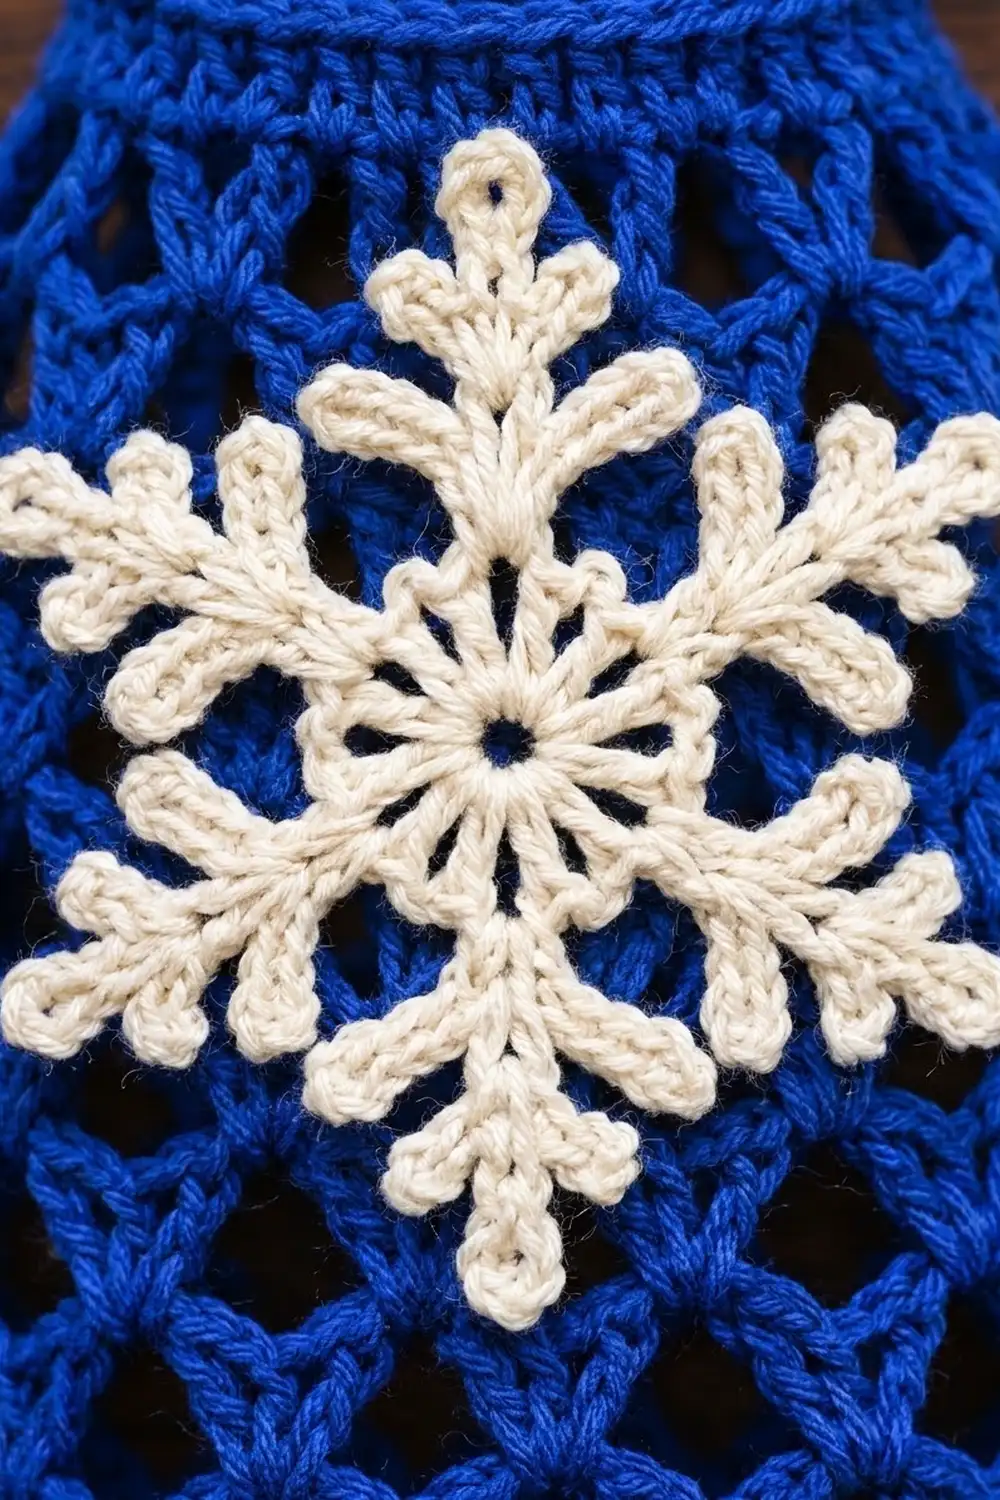
The sample uses royal blue cotton for the body, ring and strap, with a cream snowflake appliqué on the front. The style is crisp and wintry with a little Nordic feel. A deep red body with the same cream snowflake makes a matching second holder.
The pattern uses US crochet terms. The finished body measures 17.5 in (44.5 cm) long and 7 in (17.8 cm) wide when flattened at its widest point. With the ring included, it hangs about 21 in (53.3 cm) long.
The body is worked from the bottom up in joined rounds. You’ll make a solid single crochet band around the bottom opening, then 25 rounds of V-stitch lattice, then a solid top band. The lattice keeps 12 V-stitches in every round, and its shape comes only from the length of the chains between them. Next you make a covered ring and a short strap, and finally a six-point snowflake that is sewn to the front.
Finished Size and Construction
- Finished size: 17.5 in (44.5 cm) long × 7 in (17.8 cm) flat width at the middle; about 21 in (53.3 cm) including the ring
- Skill level: Easy-intermediate
- Terminology: US crochet terms
- Yarn weight: Worsted (#4), cotton or cotton blend
- Hook: 5.0 mm (H-8)
- Number of pieces: 1 body, 1 covered ring, 1 strap and 1 snowflake, all sewn into a single holder
- Layout: One vertical tube with the ring at the top and the snowflake centered on the front of the upper third
- Body size before border: 17 in (43.2 cm) long
- Bottom opening: 9 in (22.9 cm) around, 4.5 in (11.4 cm) flat
- Top opening: 10.5 in (26.7 cm) around, 5.3 in (13.3 cm) flat
- Border depth: 0.25 in (0.6 cm) at each end
- Snowflake: 4.5 in (11.4 cm) from tip to tip
Materials
Cotton is the best choice here. It holds the lattice open, does not stretch out under the weight of the bags, and can be washed. Acrylic will work but sags more over time.
- Color A, royal blue: 100 g, about 170 m (body, ring and strap)
- Color B, cream: 10 g, about 17 m (snowflake)
These quantities include a margin of about 15%.
Tools:
– 5.0 mm (H-8) crochet hook
– A plastic or metal ring, 2 in (5.1 cm) outside diameter
– Tapestry needle
– 4 stitch markers
– Scissors
– Measuring tape
– Rust-proof pins and a blocking mat
Abbreviations (US Terms)
- ch: chain
- sl st: slip stitch
- sc: single crochet
- sc2tog: single crochet 2 together
- dc: double crochet
- sk: skip
- sp(s): space(s)
- st(s): stitch(es)
- rnd(s): round(s)
- rev sc: reverse single crochet (crab stitch), worked left to right
Special stitches
- V-st (V-stitch): (dc, ch 1, dc) in the same stitch or space.
- Beginning V-st: ch 4 (counts as dc + ch 1), then dc in the same stitch or space.
- Picot: ch 3, then sl st in the 3rd ch from the hook.
Gauge and Checkpoints
- Single crochet gauge: 16 sc × 16 rnds = 4 in (10.2 cm), worked in the round.
- Lattice gauge: 5 mesh rnds = 3 in (7.6 cm), so each rnd is about 0.6 in (1.5 cm) tall.
Before you start the body, make a test piece. Work Rnds 1–4, check the width, then work 5 mesh rnds and measure their height. Rip it out afterward or keep it as a reference.
Checkpoints:
– After Rnd 1: the opening is 9 in (22.9 cm) around, or 4.5 in (11.4 cm) flat.
– After Rnd 4: the body is 12 in (30.5 cm) around, or 6 in (15.2 cm) flat, and 1 in (2.5 cm) tall.
– After Rnd 15: the mesh is 7 in (17.8 cm) wide flat, and the body is about 7 in (17.8 cm) tall.
– After Rnd 29: the body is 16 in (40.6 cm) tall.
– After Rnd 33: the body is 17 in (43.2 cm) tall and 5.3 in (13.3 cm) wide flat at the top.
If your gauge is off: If the piece is too big, go down 0.5 mm in hook size. If it is too small, go up 0.5 mm. If only the mesh is too tall, make your dc stitches shorter by keeping the yarn-over close to the hook. Don’t change the stitch counts, because the shaping depends on them.
Body
The body is worked in joined rnds with the right side facing you, and you don’t turn between rnds. Place a marker in the first stitch of each rnd.
Bottom band (Color A)
Rnd 1: Ch 36 and sl st into the first ch to form a ring, taking care not to twist it. Ch 1, then sc in each ch around. Sl st into the first sc to join. (36 sc)
Rnd 2: Ch 1, sc in each st around, then join. (36 sc)
Rnd 3 (growth rnd): Ch 1, sc in the next 2 sts, 2 sc in the next st. Repeat from * 12 times in total, then join. (48 sc)
Rnd 4: Ch 1, sc in each st around, then join. (48 sc)
Check that the band is 6 in (15.2 cm) wide flat and 1 in (2.5 cm) tall.
Lattice
In every mesh rnd, each new V-st goes into the chain space between two V-sts of the rnd below. This offset is what creates the diamond pattern. Only the number of chains between the V-sts changes from rnd to rnd.
Rnd 5: Work a beginning V-st in the first st. Ch 2, sk the next 3 sts, V-st in the next st. Repeat from * 10 more times. Ch 2, sk the last 3 sts, then sl st into the 3rd ch of the beginning ch-4. (12 V-sts, 12 ch-2 sps)
Rnd 6: Sl st into the next ch-1 sp, sl st into the next dc, then sl st into the next ch-2 sp. Work a beginning V-st in the same sp. Ch 2, V-st in the next ch-2 sp. Repeat from * 10 more times, ch 2, then join. (12 V-sts, 12 ch-2 sps)
Rnd 7: Repeat Rnd 6. (12 V-sts, 12 ch-2 sps)
Rnds 8–10: Work as for Rnd 6, but ch 3 between the V-sts and work each V-st into the next ch sp. (12 V-sts, 12 ch-3 sps)
Rnds 11–23: Work as for Rnd 6, but ch 4 between the V-sts. (12 V-sts, 12 ch-4 sps) These 13 rnds form the widest part of the body. It should measure 7 in (17.8 cm) wide flat and 14 in (35.6 cm) around.
Rnds 24–26: Work as for Rnd 6, but ch 3 between the V-sts. (12 V-sts, 12 ch-3 sps)
Rnds 27–29: Work as for Rnd 6, with ch 2 between the V-sts. (12 V-sts, 12 ch-2 sps)
You now have 25 mesh rnds, which measure 15 in (38.1 cm).
Top band
Rnd 30 (conversion rnd): Ch 1. Work 1 sc into each dc and each ch-1 sp of every V-st, then 1 sc into each ch-2 sp. Join. (36 sc in the V-sts + 12 sc in the ch-2 sps = 48 sc)
Rnd 31: Ch 1, sc in the next 6 sts, sc2tog. Repeat from * 6 times in total, then join. (42 sc)
Rnds 32–33: Ch 1, sc in each st around, then join. (42 sc)
Leave the yarn attached for the border. The body is now 17 in (43.2 cm) tall.
Ring and Strap
Covered ring (Color A): Attach the yarn by holding the tail along the plastic ring. Work 40 sc over the ring, packing the stitches closely so no plastic shows. Sl st into the first sc to join. Fasten off and weave the end in through the stitches. The covered ring measures about 2.75 in (7.0 cm) across.
Strap (Color A):
Row 1: Ch 5. Sc in the 2nd ch from the hook and in each remaining ch. Turn. (4 sc)
Rows 2–12: Ch 1, sc in each st across, then turn. (4 sc)
The finished strap is 1 in (2.5 cm) wide and 3 in (7.6 cm) long. Fasten off and leave a 12 in (30.5 cm) tail.
Snowflake (Color B)
Rnd 1: Make a magic ring. Ch 3 (counts as dc), work 11 dc into the ring, and sl st into the top of the ch-3. Pull the ring closed, leaving a small center hole. (12 dc)
Rnd 2: Ch 3 (counts as dc), dc in the next st, ch 3. Dc in the next 2 sts, ch 3. Repeat from * 5 times in total, then join. (12 dc, 6 ch-3 sps) The center now measures 1.5 in (3.8 cm) across.
Rnd 3 (arms): Sl st into the first ch-3 sp. Then make each arm as follows:
– Work 1 sc in the sp, then ch 6 for the spine.
– Make 3 picots, then sl st into the base of the first picot to form the 3-picot tip.
– Sl st in each of the next 3 ch of the spine.
– Make 2 picots. Push one to each side of the spine to form the side branches.
– Sl st in the last 3 ch of the spine.
– Work 1 sc in the same ch-3 sp, then sc in each of the next 2 dc.
Repeat for all 6 arms and join. (6 arms, 24 sc)
Fasten off and leave a 16 in (40.6 cm) tail for sewing. Each arm is about 1.5 in (3.8 cm) long, so the snowflake measures 4.5 in (11.4 cm) from tip to tip.
Border
The border uses the same gauge as the bands, 4 sts per inch (2.5 cm). Each round works exactly 1 stitch into each stitch, so the circumference stays the same and the edges neither flare nor pinch.
Top edge, Rnd 34: With the yarn still attached, ch 1. Work rev sc in each st around, then join. (42 rev sc, or 21 per flattened side) Fasten off.
Bottom edge: Hold the body upside down and join Color A at the base of Rnd 1.
Rnd B1: Ch 1. Sc into each of the free loops of the foundation chain, then join. (36 sc, or 18 per flattened side)
Rnd B2: Ch 1, rev sc in each st around, then join. (36 rev sc, or 18 per flattened side) Fasten off.
Why the math works: The top has 42 sts from Rnd 33 and gets 42 border sts. The bottom has 36 foundation chains, 36 sc in Rnd B1 and 36 rev sc in Rnd B2. Because no stitches are added or removed, the openings stay at 10.5 in (26.7 cm) and 9 in (22.9 cm) around. Each border adds 0.25 in (0.6 cm), which brings the body to 17.5 in (44.5 cm).
Assembly
- Attach the strap. Pass the top 1 in (2.5 cm) of the strap through the covered ring, fold it back and whipstitch it down.
- Sew the strap to the body. Center the free end on the outside of the top band at center front. Sew its bottom 1 in (2.5 cm) flat to the band, which leaves 1 in (2.5 cm) of strap showing above the rim.
- Position the snowflake. Center it on the front, directly below the strap, with its center 4 in (10.2 cm) below the top edge. The top arm will overlap the top band slightly.
- Sew the snowflake. With the tail, tack down the center round and then the base and tip of each arm, catching the V-sts behind them. Weave in all the ends.
Final Blocking
- Wet the holder in cool water, then roll it in a towel to press out the water.
- Lay it flat with the strap and snowflake facing up.
- Pin the middle to 7 in (17.8 cm) wide, tapering to 6 in (15.2 cm) just above the bottom band.
- Pin the length to 17.5 in (44.5 cm).
- Open each diamond evenly with your fingertips.
- Pin the six snowflake tips into a circle 4.5 in (11.4 cm) across, with the side picots spread out.
- Let it dry completely before you unpin it.
Final Quality-Control Checklist
- Every mesh rnd has 12 V-sts.
- The diamonds line up in offset columns with no stacked V-sts.
- The bottom opening is 4.5 in (11.4 cm) flat, and the top opening is 5.3 in (13.3 cm) flat.
- The length is 17.5 in (44.5 cm).
- The rev sc edges are even and rolled.
- The ring is fully covered, and the strap is sewn securely through both layers.
- The snowflake is centered and has 6 arms with 3-picot tips.
- All ends are woven in.
Troubleshooting
- Diamonds stack instead of offsetting: You worked a V-st into a V-st’s ch-1 sp. Always work into the chain space between V-sts.
- The holder looks straight with no barrel shape: Make sure you changed the chain length at Rnds 8, 11, 24 and 27.
- The bottom opening is too loose and bags fall out: Work Rnd B1 with a hook 0.5 mm smaller.
- The snowflake curls: Block it flat and pin it hard, or loosen the chains on the arm spines.
- The ring shows through the stitches: Add 2–4 more sc, packing them tightly.
- The rnds spiral: Keep the joining sl st and beginning chains in a straight vertical line.
Care
Hand wash or machine wash on a gentle cycle in cool water, then reshape and dry flat. Don’t put it in the dryer, because heat can warp the snowflake.
Final Notes
Here is the measurement chain:
– Bottom band: 36 sc, 9 in (22.9 cm) around, growing to 48 sc, 12 in (30.5 cm) around.
– Lattice: 25 rnds of 12 V-sts each, 15 in (38.1 cm) tall and 7 in (17.8 cm) wide flat at the middle.
– Top band: 48 sc, decreasing to 42 sc, 10.5 in (26.7 cm) around.
– Body: 17 in (43.2 cm) before the border and 17.5 in (44.5 cm) after it.
If your gauge matches at each checkpoint, the finished holder will match. Fill it, hang it and enjoy the snowflake.
Happy crocheting!