

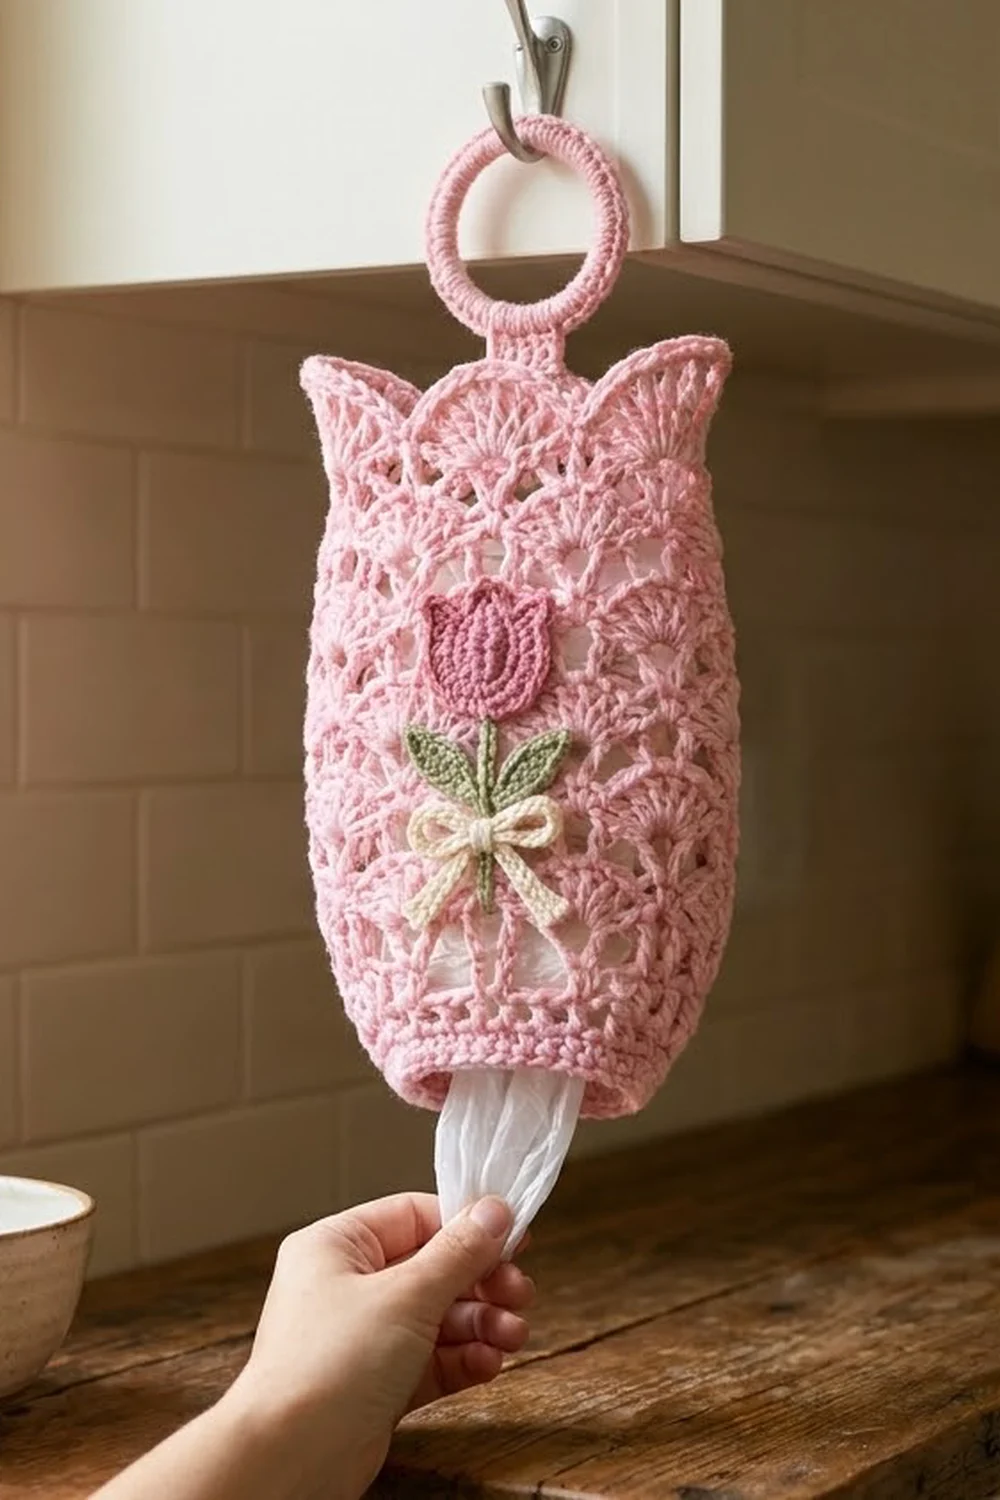
This lacy bag holder looks like a tulip in bloom. The body is a soft pink tube of staggered shell fans. The top edge opens into five pointed petals, and the front has a small tulip with a stem, two leaves, and a cream bow. It hangs from a crocheted ring, and you pull bags out through the open bottom.
The design uses four colors: light pink for the body and ring, rose pink for the tulip head, sage green for the stem and leaves, and cream for the bow. A lavender body with the same appliqué colors works just as well.
The pattern uses US crochet terms. The finished holder is 8.5 in (21.6 cm) wide laid flat at its widest point. The body is 11.75 in (29.8 cm) tall to the petal tips, and the total hanging length is about 15 in (38.1 cm) including the ring.
Construction overview: You work the body in joined rounds from the bottom opening up. First comes a solid band, then 14 rounds of shells and V-stitches, then two rounds that shape the petals. You make the ring, tulip, stem with leaves, and bow separately, then sew them on.
Finished Size and Construction
- Finished size: 8.5 in (21.6 cm) wide flat × 15 in (38.1 cm) long, including the ring
- Skill level: Easy–Intermediate
- Terminology: US terms
- Yarn weight: Worsted (#4), cotton or cotton blend
- Hook: 5 mm (H-8)
- Number of pieces: 5 (body, ring with tab, tulip head, stem with leaves, bow)
- Layout: One vertical stack: ring on top, body below it, appliqué centered on the front
- Body size before the petal border: 7.5 in (19.1 cm) wide at the bottom band, 8.5 in (21.6 cm) at the middle, 10 in (25.4 cm) tall
- Petal border depth: 1.75 in (4.4 cm)
Materials
Use a smooth worsted-weight cotton, about 85 m per 50 g. Cotton holds the shell pattern crisply and doesn’t stretch much under the weight of the bags.
- Light Pink (body, ring): 100 g, about 170 m
- Rose Pink (tulip head): 5 g, about 8 m
- Sage Green (stem, leaves): 5 g, about 8 m
- Cream (bow): 5 g, about 8 m
All quantities include a margin of about 25%.
Tools:
– 5 mm (H-8) crochet hook
– One plastic ring, 2.5 in (6.4 cm) across
– Stitch marker
– Tapestry needle
– Scissors
– Rust-proof pins and a blocking surface
Abbreviations (US Terms)
- ch – chain
- sl st – slip stitch
- sc – single crochet
- hdc – half double crochet
- dc – double crochet
- tr – treble crochet
- sp – space
- st(s) – stitch(es)
- RS – right side
Special stitches:
– V-st (small V): (dc, ch 1, dc) in the same stitch or space.
– V2 (large V): (dc, ch 2, dc) in the same stitch or space.
– Shell: 5 dc in the same space.
– Big shell: 7 dc in the same space.
– Picot: ch 2, sl st in the 2nd ch from the hook.
Gauge and Checkpoints
Gauge in plain dc: 16 dc and 8 rounds = 4 in (10.2 cm).
Gauge in sc: 16 sc and 18 rows = 4 in (10.2 cm).
Shell pattern:
– One small repeat (shell + V-st) is 1.5 in (3.8 cm) wide.
– One big repeat (big shell + V2) is 1.7 in (4.3 cm) wide.
– Two pattern rounds are 1.25 in (3.2 cm) tall.
Test first: Work Rounds 1–3 of the body before you go further. This band is your swatch.
Checkpoints:
– After Rnd 3: the tube is 7.5 in (19.1 cm) wide laid flat and 1.25 in (3.2 cm) tall.
– After Rnd 14: 8.5 in (21.6 cm) wide flat and 7.5 in (19.1 cm) tall.
– After Rnd 17: 10 in (25.4 cm) tall.
– After Rnd 19: 11.75 in (29.8 cm) tall to the petal tips.
If it’s off:
– Band wider than 7.5 in (19.1 cm): go down to a 4.5 mm hook.
– Band narrower than 7 in (17.8 cm): go up to a 5.5 mm hook.
– Rounds too short or too tall: adjust how far you pull up each loop rather than changing hooks. That keeps the width the same.
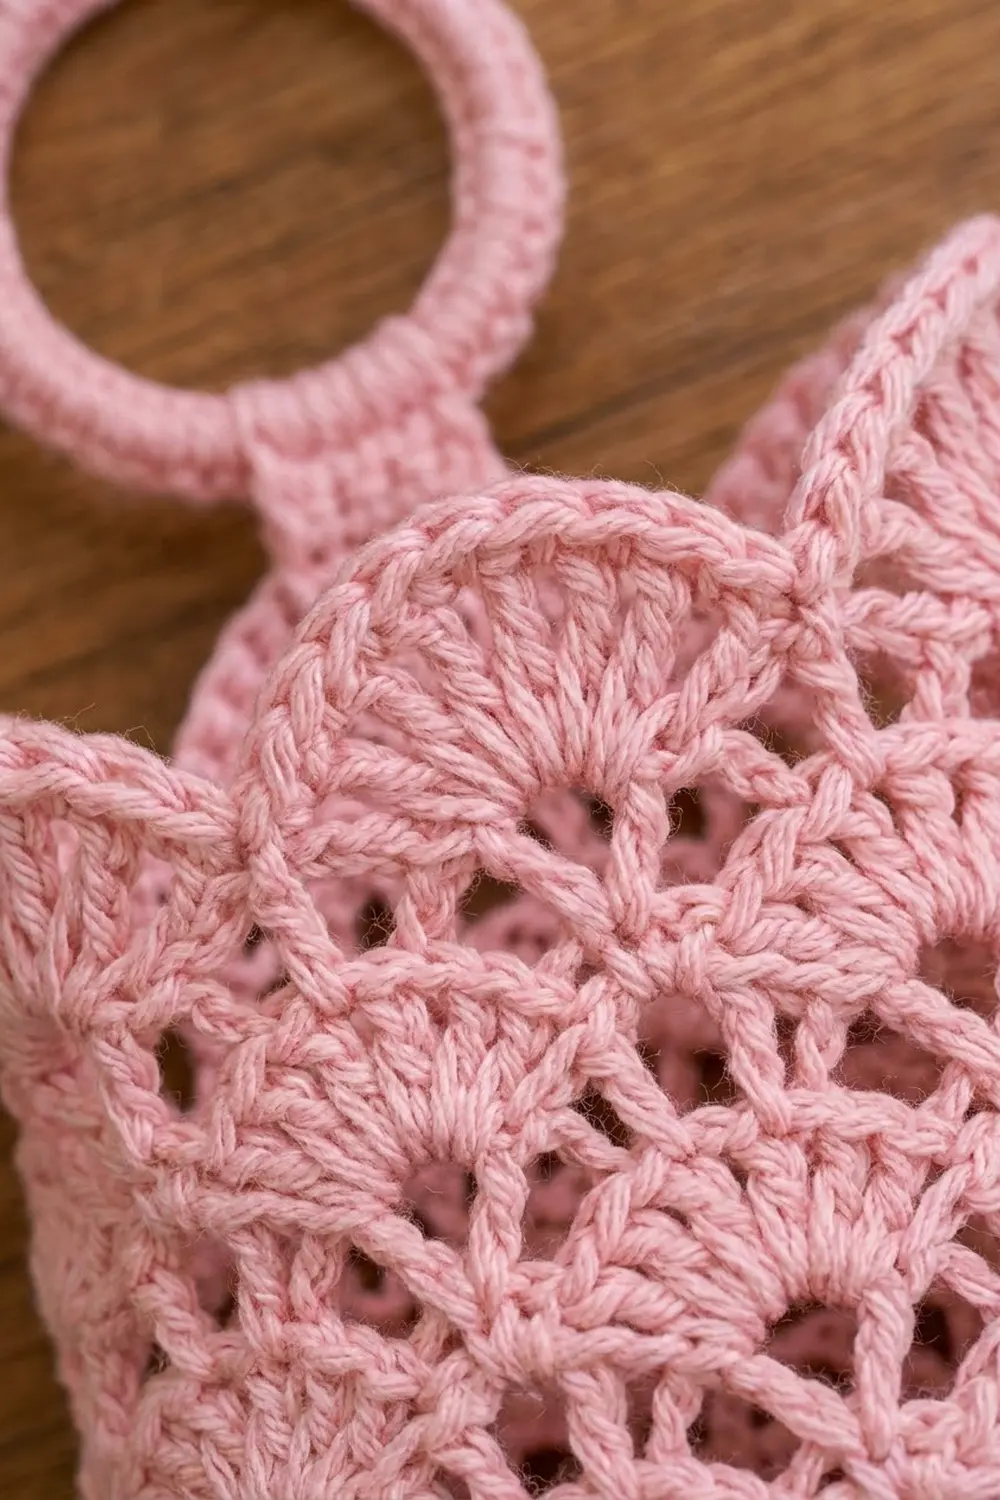
Body
Start at the bottom opening.
Foundation: With Light Pink, ch 60. Join with a sl st to the first ch to form a ring, making sure the chain isn’t twisted.
Rnd 1: Ch 3 (counts as dc throughout), dc in each of the next 59 ch. Join to the top of the beg ch-3. (60 dc)
Rnd 2: Ch 1, sc in each st around. Join to the first sc. (60 sc)
Rnd 3: Ch 3, dc in each st around. Join. (60 dc)
Checkpoint: 7.5 in (19.1 cm) wide flat.
Rnd 4 (set-up):
1. Ch 4 (counts as dc + ch 1), dc in the same st (first V-st).
2. Skip 2 sts, shell in the next st, skip 2 sts.
3. V-st in the next st, skip 2 sts, shell in the next st, skip 2 sts. Repeat from * 8 more times.
4. Join to the 3rd ch of the beg ch-4.
(10 V-sts + 10 shells = 70 dc and 10 ch-1 sps.) Each repeat uses 6 sts, and 6 × 10 = 60.
Rnd 5 (shell round):
1. Sl st into the first ch-1 sp. Ch 3, 4 dc in the same sp (first shell).
2. V-st in the center (3rd) dc of the next shell.
3. Shell in the next V-st sp, V-st in the center dc of the next shell. Repeat from * 8 more times.
4. Join to the top of the beg ch-3.
(70 dc, 10 ch-1 sps.)
Rnd 6 (V round):
1. Sl st in the next 2 dc to reach the center dc of the first shell. Ch 4, dc in the same st.
2. Shell in the next V-st sp.
3. V-st in the center dc of the next shell, shell in the next V-st sp. Repeat from * 8 more times.
4. Join to the 3rd ch of the beg ch-4.
(70 dc, 10 ch-1 sps.)
Each fan now sits over a V from the round below. The staggered fans and eyelets come from this alternation.
Rnd 7 (widening, shell round):
1. Sl st into the first ch-1 sp. Ch 3, 6 dc in the same sp (first big shell).
2. V2 in the center (3rd) dc of the next shell.
3. Big shell in the next V-st sp, V2 in the center dc of the next shell. Repeat from * 8 more times.
4. Join.
(Big shells 10 × 7 = 70 dc, plus V2s 10 × 2 = 20 dc, for a total of 90 dc and 10 ch-2 sps.)
Rnd 8 (V round):
1. Sl st in the next 3 dc to reach the center (4th) dc of the first big shell. Ch 5 (counts as dc + ch 2), dc in the same st.
2. Big shell in the next V2 sp.
3. V2 in the center dc of the next big shell, big shell in the next V2 sp. Repeat from * 8 more times.
4. Join to the 3rd ch of the beg ch-5.
(90 dc, 10 ch-2 sps.)
Rnds 9, 11, 13: Work like Rnd 7, but start in the first ch-2 sp, and work each V2 into the center (4th) dc of a big shell. (90 dc each)
Rnds 10, 12, 14: Work like Rnd 8. (90 dc each)
Checkpoint: 8.5 in (21.6 cm) wide flat (10 × 1.7 in = 17 in, or 43.2 cm, around), 7.5 in (19.1 cm) tall.
Rnd 15 (narrowing, shell round):
1. Sl st into the first ch-2 sp. Ch 3, 4 dc in the same sp.
2. V-st in the center (4th) dc of the next big shell.
3. Shell in the next V2 sp, V-st in the center dc of the next big shell. Repeat from * 8 more times.
4. Join.
(70 dc, 10 ch-1 sps.)
Rnd 16: Work like Rnd 6. (70 dc)
Rnd 17: Work like Rnd 5. (70 dc)
Checkpoint: 10 in (25.4 cm) tall. Don’t fasten off.
Make All Pieces
Light Pink, hanging ring with tab:
1. Join the yarn to the plastic ring. Work 44 sc tightly over the ring and join. (44 sc)
2. Tab, Row 1: Ch 1, sc in the next 6 sts, turn. (6 sc)
3. Rows 2–12: Ch 1, sc in each st, turn. (6 sc per row)
4. Fasten off, leaving a 12 in (30.5 cm) tail.
The tab is 1.5 in (3.8 cm) wide and 2.7 in (6.9 cm) long. The ring is 3 in (7.6 cm) across.
Rose Pink, tulip head (rows):
1. Row 1: Ch 5, sc in the 2nd ch from the hook and in each ch across, turn. (4 sc)
2. Row 2: Ch 1, 2 sc in the first st, sc in the next 2 sts, 2 sc in the last st, turn. (6 sc)
3. Row 3: Ch 1, 2 sc in the first st, sc in the next 4 sts, 2 sc in the last st, turn. (8 sc)
4. Rows 4–5: Ch 1, sc in each st, turn. (8 sc)
5. Row 6 (petal points):
– Ch 1, sc in st 1.
– (Hdc, dc, picot, hdc) in st 2. Sc in st 3.
– (Dc, tr) in st 4, picot, (tr, dc) in st 5.
– Sc in st 6.
– (Hdc, dc, picot, hdc) in st 7. Sc in st 8.
6. Fasten off, leaving a 10 in (25.4 cm) tail.
This makes three points, with the center one tallest. The finished head is 2 in (5.1 cm) wide and 1.75 in (4.4 cm) tall.
Sage Green, stem with leaves:
1. Ch 12. Sl st in the 2nd ch from the hook and in the next 4 ch. (5 sl st)
2. Leaf 1: Ch 6.
– Starting in the 2nd ch from the hook, work sc, hdc, dc, hdc, sl st along the chain.
– Working along the opposite side of the same chain, work sl st, hdc, dc, hdc, sc.
– Sl st in the same stem ch.
3. Leaf 2: Repeat Leaf 1 in the same stem ch.
4. Sl st in each of the remaining 6 ch of the stem.
5. Fasten off and leave a tail.
The stem is 2.75 in (7.0 cm) long and each leaf is 1.25 in (3.2 cm) long.
Cream, bow:
1. Ch 40. Sl st in the back bump of the 2nd ch from the hook and in each ch across. (39 sl st)
2. Fasten off. The cord is about 9 in (22.9 cm) long.
3. Tie it into a bow with two 1 in (2.5 cm) loops and tails about 1.5 in (3.8 cm) long. The bow is 2.25 in (5.7 cm) wide.
Layout (front view):
        ( ring )
          |tab|
  /\   /\   /\   /\   /\     <- petal border
 |        tulip head      |
 |      leaf \|/ leaf     |
 |           |            |  <- body
 |         ~bow~          |
 |      bottom band       |
  \______opening_________/
Joining
Sew everything with the tails from each piece. Use a whipstitch for the tab and a small backstitch along the edges of the appliqués.
Tab:
– Lay the body flat with the round joins at the center back.
– Put the bottom 1 in (2.5 cm) of the tab inside the back, centered on the back valley sc of Rnd 18.
– Whipstitch around the three overlapped edges, catching one tab stitch for each body stitch or chain space.
– About 1.7 in (4.3 cm) of tab shows above the valley.
Tulip head: Center it on the front with its top edge on Rnd 14.
Stem: Tuck the top end of the stem under the bottom of the tulip head. Run the stem straight down to about Rnd 7, and sew the leaves angled outward.
Bow: Sew the knot over the stem at Rnd 8, and tack each loop and tail once.
Tension: Sew loosely enough that the lace doesn’t pucker. Keep the stitches small enough that they’re hidden in the eyelets.
Size checkpoint: The total length from the bottom edge to the top of the ring is about 15 in (38.1 cm).
Border
The petal border is worked into Rnd 17 and continues straight from the body.
Border gauge: Each petal spans two small repeats, which is 3 in (7.6 cm). The 10 repeats make 5 petals.
Rnd 18 (petals):
1. Sl st in the next 2 dc to reach the center dc of the first shell. Ch 1, sc in the same st (valley).
2. Ch 2, 5 dc in the next V-st sp, ch 1.
3. (2 tr, ch 3, 2 tr) in the center dc of the next shell (petal tip).
4. Ch 1, 5 dc in the next V-st sp, ch 2.
5. Sc in the center dc of the next shell, then repeat steps 2–4. Repeat from * 3 more times.
6. Join to the first sc.
Each petal has 1 sc + 10 dc + 4 tr = 15 sts, so the round has 75 sts in total. It also has 5 ch-3 tips.
Rnd 19 (edging): Ch 1. 2 sc in the ch-2 sp, sc in the next 5 dc, sc in the ch-1 sp, sc in the next 2 tr, (2 sc, ch 2, 2 sc) in the ch-3 tip, sc in the next 2 tr, sc in the ch-1 sp, sc in the next 5 dc, 2 sc in the ch-2 sp, sl st in the valley sc. Repeat from * 4 more times. Fasten off.
Each petal has 24 sc, so the round has 120 sc, 5 sl sts, and 5 ch-2 points.
Why the math works:
– Rnd 17 has 10 shells and 10 V-sts, and each petal uses exactly 2 shells and 2 V-sts: 10 ÷ 2 = 5 petals, with nothing left over.
– The valley sc and the tip both land on shell centers, so the petals line up with the fan columns below.
– The round starts at a valley, so the round join and the tab both end up at center back.
Final Blocking
- Mist the body until it’s evenly damp.
- Stuff it lightly with a rolled towel so it’s 8.5 in (21.6 cm) wide flat.
- Pin each petal tip, keeping the petals 1.75 in (4.4 cm) deep.
- Lay the tulip, leaves, and bow flat and pin the points.
- Let everything dry completely.
- Remove the pins and check the measurements again.
Final Quality-Control Checklist
- Rnd 3 has 60 dc, and the band is 7.5 in (19.1 cm) wide flat.
- Small-shell rounds have 70 dc and big-shell rounds have 90 dc.
- Rnd 18 has 75 sts and 5 tips. Rnd 19 has 120 sc.
- There are five even petals, with the round join at the back valley.
- The tab is centered at the back and stitched securely.
- The appliqué runs straight down the front center.
- Total length is about 15 in (38.1 cm).
- All ends are woven in.
Troubleshooting
- The fans don’t stagger: You’ve put a shell into a shell. Every V-st goes into a shell’s center dc.
- The tube twisted: The foundation chain was twisted when you joined it. Undo it and rejoin.
- The petals are uneven: Recount Rnd 17. It must have exactly 10 repeats.
- The tab sags: Add a second line of whipstitch across the top of the overlap.
- The tulip curls: Block it flat, or work the next one with a hook one size larger.
- The bottom opening is too loose: Work Rnd 2 with a 4.5 mm hook.
Care
Hand wash cold and lay flat to dry, reshaping the petals while damp. Remove the plastic ring if you need to iron the piece.
Final Notes
Each stage builds on the measurement before it:
- The 60-dc band measures 7.5 in (19.1 cm) wide flat.
- The big-shell rounds widen the body to 8.5 in (21.6 cm).
- The body reaches 10 in (25.4 cm) tall after Rnd 17.
- The petals add 1.75 in (4.4 cm), for 11.75 in (29.8 cm) to the tips.
- The tab and ring bring the total to about 15 in (38.1 cm).
If you check each stage, the finished holder will come out right. Happy crocheting!