

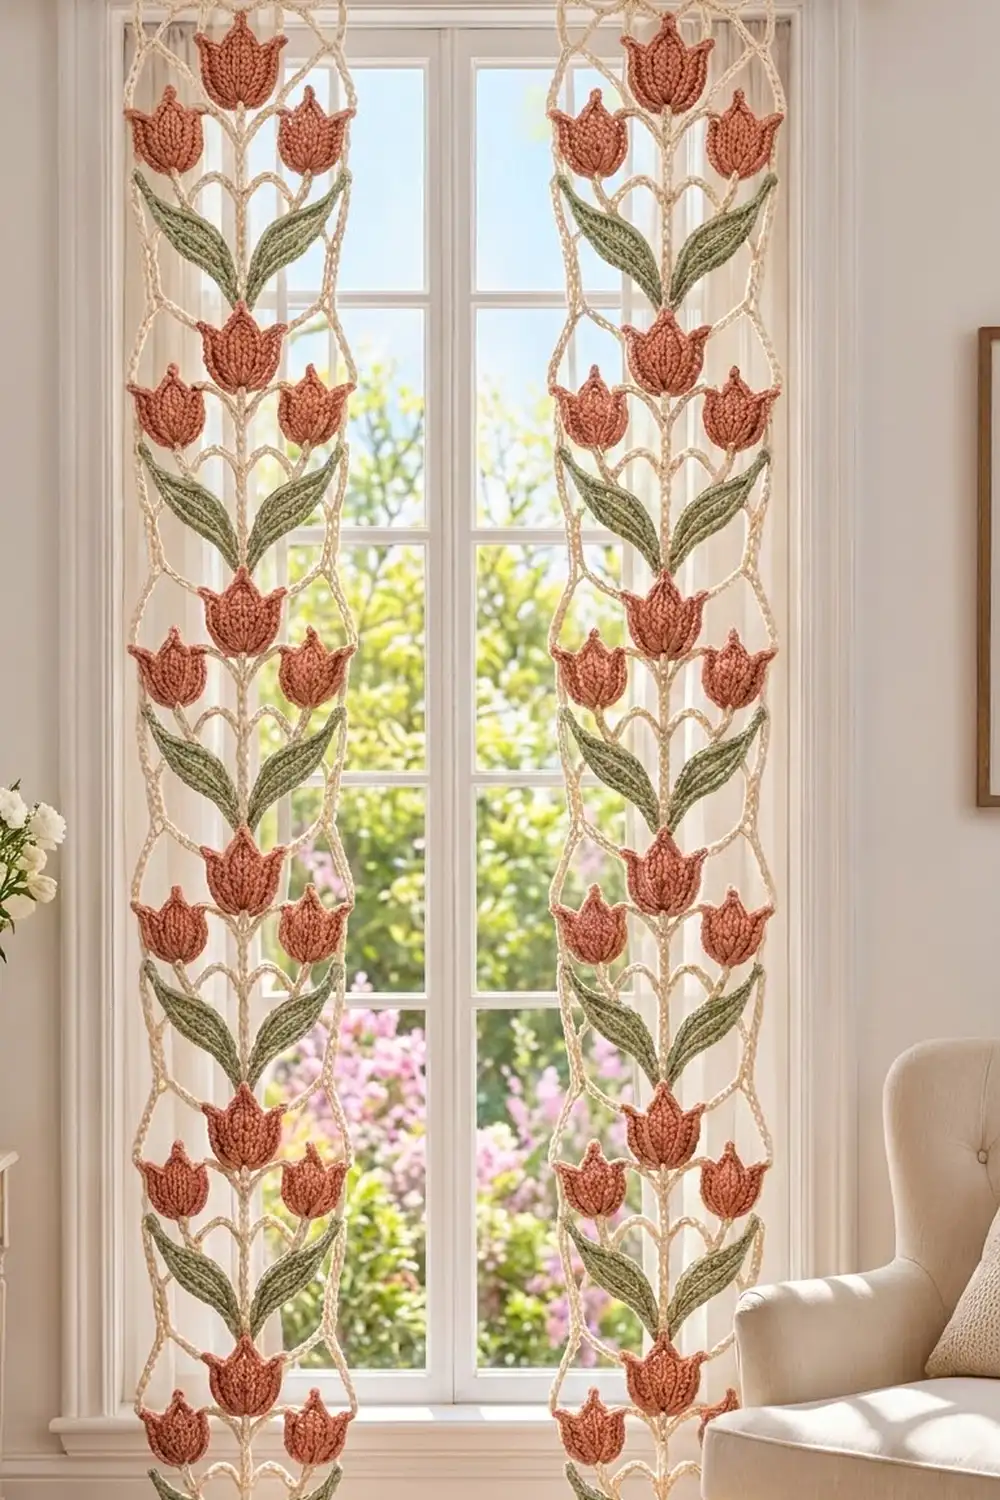
These airy curtain panels look like climbing tulip vines. Terracotta tulips bloom along cream cord stems, and sage-green leaves branch out in pairs. The open lace lets the daylight through, which suits a sunny bedroom window or a glass door.
The palette is warm and soft: terracotta for the tulips, sage for the leaves and cream for the stems and frame. The tulips use a knit-look stitch, the leaves have ridged edges, and the stems are firm slip-stitch cords that keep their shape when hung.
This pattern uses US crochet terms. Each finished panel measures 6.5 in (16.5 cm) wide and 35 in (88.9 cm) long, or about 36.25 in (92.1 cm) including the hanging loops. You make two panels.
The construction is modular. You crochet small pieces (a stem cord, three tulips and two leaves), sew them into one motif, and join five motifs end to end. A cream frame worked around the strip ties every leaf tip and side tulip into place. Hanging loops finish the top edge.
Finished Size and Construction
- Finished panel size: 6.5 in × 35 in (16.5 cm × 88.9 cm), plus 1.25 in (3.2 cm) loops
- Skill level: Intermediate
- Terminology: US
- Yarn weight: DK (#3), cotton or cotton blend
- Hook: 4.0 mm (G-6)
- Number of pieces: 2 panels, each with 5 motifs (10 motifs total)
- Layout: 1 motif wide × 5 motifs tall per panel
- Single motif size: 6 in wide × 7 in tall (15.2 cm × 17.8 cm)
- Size before border: 6 in × 35 in (15.2 cm × 88.9 cm)
- Border depth: about 0.25 in (0.6 cm) per side
Materials
Choose a smooth, mercerized or combed cotton in DK weight. Cotton gives crisp stitch definition and keeps the cords from stretching once they hang. Avoid fuzzy or very stretchy yarns, because the panel hangs from its stems.
- Cream (stems, frame, loops): 100 g / about 230 m (252 yd)
- Terracotta (tulips): 50 g / about 115 m (126 yd)
- Sage green (leaves): 50 g / about 115 m (126 yd)
These quantities cover both panels and include a margin of about 15–20% for gauge swatches and tails.
Tools:
– 4.0 mm (G-6) crochet hook
– Tapestry needle
– Stitch markers (at least 6)
– Rustproof pins and a blocking mat
– Measuring tape
– Spray bottle
– Scissors
Abbreviations (US Terms)
- ch – chain
- sl st – slip stitch
- sc – single crochet
- hdc – half double crochet
- dc – double crochet
- tr – treble crochet
- BLO – back loop only
- st(s) – stitch(es)
- sp – space
- RS – right side
Special stitches
- hdc3L (third-loop hdc / knit-look hdc): Work an hdc into the horizontal bar below the top two loops on the side facing you. The front loops push forward and make a knit-like V texture.
- Ch-3 picot: Ch 3, then sl st in the 3rd ch from the hook.
- Cord row: Work a sl st into the back bump of each chain. This makes a firm, rope-like cord.
Gauge and Checkpoints
Make one complete motif before you start the rest. Every later measurement depends on it.
- hdc3L: 18 sts and 14 rows = 4 in (10.2 cm)
- Chain / cord: 5 ch = 1 in (2.5 cm)
- sc on frame: 5 sc = 1 in (2.5 cm)
Checkpoints:
– Large tulip: 2.5 in (6.4 cm) wide and tall
– Small tulip: 1.5 in wide × 1.75 in tall (3.8 cm × 4.4 cm)
– Leaf: 3.5 in long × 1.25 in wide (8.9 cm × 3.2 cm)
– Stem cord: 7 in (17.8 cm)
– Assembled motif: 6 in × 7 in (15.2 cm × 17.8 cm)
If your pieces come out too big, go down 0.5 mm in hook size. If they are too small, go up 0.5 mm. If only the cords are off, adjust your chain tension and keep the same hook for the tulips.
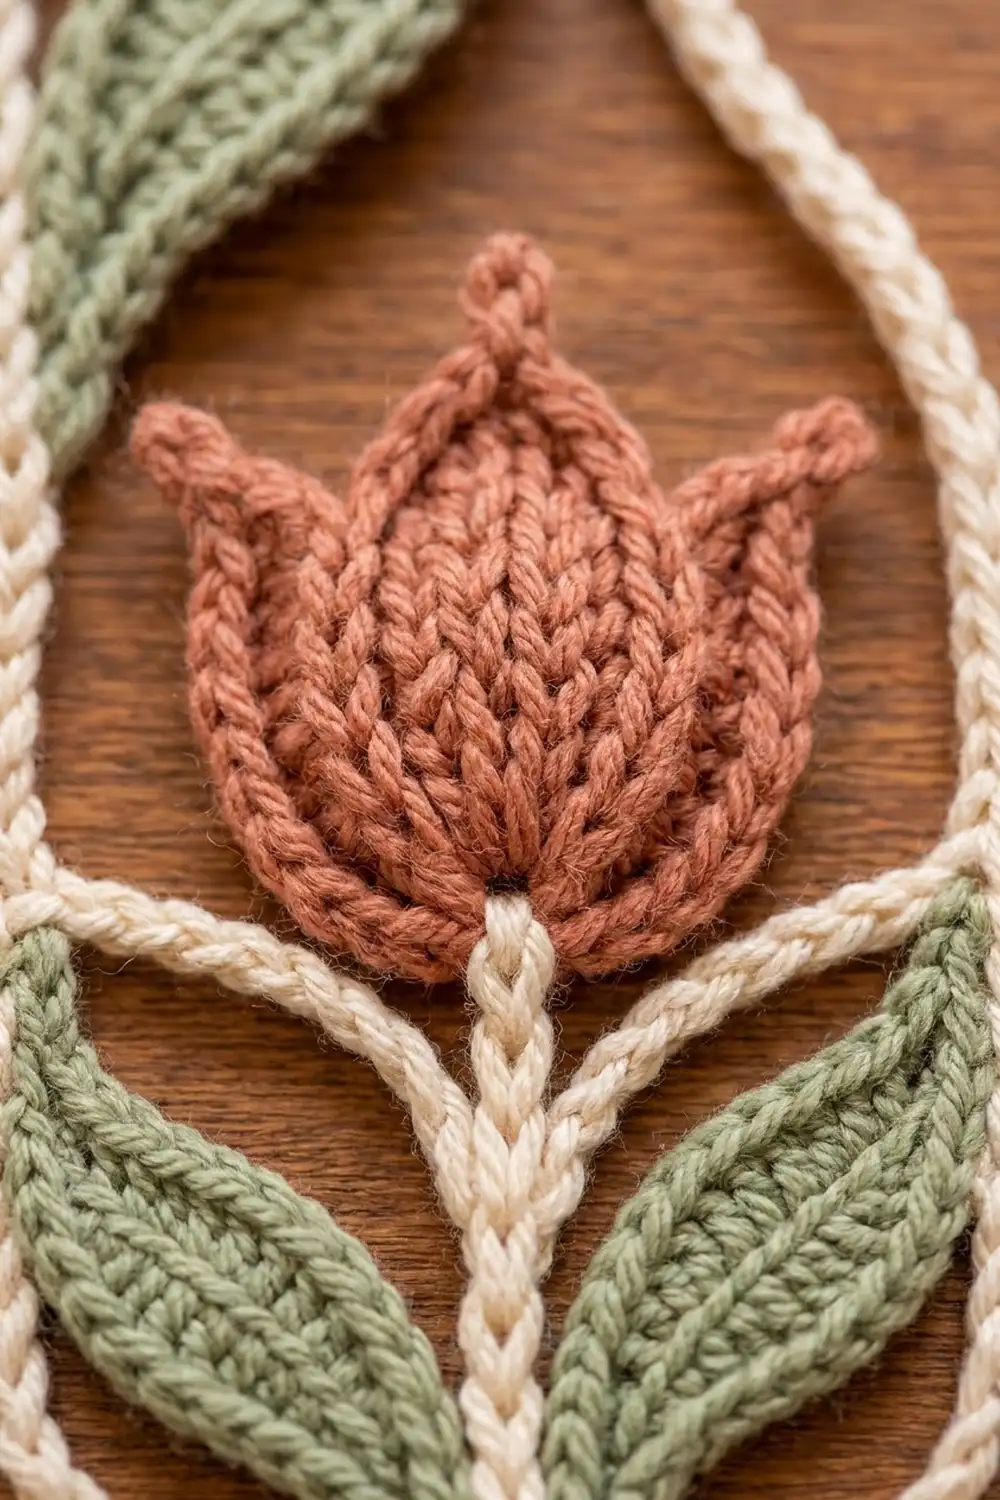
Large Tulip (make 1 per motif)
Use terracotta. Turning ch 1 does not count as a stitch.
Ch 6.
Row 1: Hdc in 2nd ch from hook and in each ch across. Turn. (5 hdc)
Row 2: Ch 1, 2 hdc3L in first st, hdc3L in next 3 sts, 2 hdc3L in last st. Turn. (7 sts)
Row 3: Ch 1, 2 hdc3L in first st, hdc3L in next 5 sts, 2 hdc3L in last st. Turn. (9 sts)
Row 4: Ch 1, 2 hdc3L in first st, hdc3L in next 7 sts, 2 hdc3L in last st. Turn. (11 sts)
Rows 5–7: Ch 1, hdc3L in each st across. Turn. (11 sts)
Checkpoint: the piece should be about 2.5 in (6.4 cm) wide and 2 in (5.1 cm) tall.
Row 8 (petal points): Ch 2, then work across:
– st 1: (dc, ch-3 picot, hdc)
– st 2: sc
– st 3: sl st
– st 4: sc
– st 5: hdc
– st 6: (tr, ch-3 picot, tr)
– st 7: hdc
– st 8: sc
– st 9: sl st
– st 10: sc
– st 11: (hdc, ch-3 picot, dc), then ch 2 and sl st in the same st
All 11 sts are used. This gives three points: two side petals that flare out at the outer corners and a taller center petal with a picot loop tip. Fasten off and leave a 12 in (30.5 cm) tail for sewing.
Small Tulip (make 2 per motif)
Use terracotta.
Ch 4.
Row 1: Hdc in 2nd ch from hook and in each ch across. Turn. (3 hdc)
Row 2: Ch 1, 2 hdc3L in first st, hdc3L in next st, 2 hdc3L in last st. Turn. (5 sts)
Row 3: Ch 1, 2 hdc3L in first st, hdc3L in next 3 sts, 2 hdc3L in last st. Turn. (7 sts)
Rows 4–5: Ch 1, hdc3L in each st across. Turn. (7 sts)
Row 6 (petal points): Ch 2, then work across:
– st 1: (dc, ch-3 picot, hdc)
– st 2: sc
– st 3: sl st
– st 4: (dc, ch-3 picot, dc)
– st 5: sl st
– st 6: sc
– st 7: (hdc, ch-3 picot, dc), then ch 2 and sl st in the same st
All 7 sts are used. Fasten off and leave a 10 in (25.4 cm) tail. Checkpoint: 1.5 in × 1.75 in (3.8 cm × 4.4 cm).
Leaf (make 2 per motif)
Use sage green.
Ch 16.
Rnd 1: Work the first side into the chain:
– Sl st in 2nd ch from hook
– sc in next 2 ch
– hdc in next 3 ch
– dc in next 4 ch
– hdc in next 3 ch
– sc in next ch
– (sc, ch 2, sc) in the last ch for the tip
Rotate and work along the unused loops of the chain:
– sc in next ch
– hdc in next 3 ch
– dc in next 4 ch
– hdc in next 3 ch
– sc in next 2 ch
– sl st in the last ch
Join with a sl st to the first sl st.
Count: side one has 14 sts, the tip has 2 sc plus the ch-2 sp, and side two has 14 sts. (30 sts plus the tip ch-2 sp)
Rnd 2: Ch 1, sc BLO in each of the next 15 sts up to and including the first tip sc. Work (sc, ch 2, sc) in the ch-2 sp. Sc BLO in each of the next 15 sts. Join. (32 sc plus the tip ch-2 sp)
Working in BLO leaves a raised ridge around the leaf. Fasten off and leave a 10 in (25.4 cm) tail. Checkpoint: 3.5 in × 1.25 in (8.9 cm × 3.2 cm), with a sharp point.
Stem Cord (make 1 per motif)
Use cream.
Center stem: Ch 36. Work a cord row across: sl st in the back bump of the 2nd ch from hook and of each ch across. (35 sl st) Fasten off. Number the stitches 1–35 from the base, and mark st 12 and st 18.
Branches: Join cream with a sl st at st 18.
1. Ch 16, then work a cord row back along it. (15 sl st) Sl st into st 18.
2. Repeat on the other side of the stem.
3. Fasten off. Each branch is 3 in (7.6 cm) long.
Leaf arcs: Join cream at st 12.
1. Ch 11, then work a cord row back along it. (10 sl st) Sl st into st 12.
2. Repeat on the other side of the stem.
3. Fasten off. Each arc is 2 in (5.1 cm) long.
Motif Assembly
Pin the stem cord flat, RS up, on your blocking mat.
- Leaves: Sew each leaf base (its sl st end) to stem st 6, 1.2 in (3.0 cm) above the base. Angle the leaves up and out at about 45°.
- Leaf arcs: Curve each arc upward and outward to make a heart shape. Sew the free end to the upper edge of its leaf, halfway along.
- Branches: Curve each branch up and out. The end should sit about 2.2 in (5.6 cm) out from the stem and 4.5 in (11.4 cm) up from the base.
- Small tulips: Sew one small tulip over each branch end, covering the last 2 sl st. Its outer side picot should sit about 3 in (7.6 cm) from the stem.
- Large tulip: Center the large tulip over stem sts 23–35, with the center picot level with st 35. Sew around the tulip’s outer edge.
Checkpoint: the motif measures 6 in × 7 in (15.2 cm × 17.8 cm).
Make All Pieces
For 10 motifs (2 panels × 5 motifs), make:
- Terracotta: 10 large tulips and 20 small tulips
- Sage green: 20 leaves
- Cream: 10 stem cords, plus the frame and loops for 2 panels
Layout for each panel (bottom motif is M1):
Panel A    Panel B
 [M5]       [M5]
 [M4]       [M4]
 [M3]       [M3]
 [M2]       [M2]
 [M1]       [M1]
Joining
Method: Whipstitch with cream, joining stem to stem.
Stitch-to-stitch logic: Lay motif 2 above motif 1. Butt stem st 1 of motif 2 against stem st 35 of motif 1, overlapping by one stitch only. Whipstitch through both cords 3 times. Motif 1’s large tulip covers the join from the front.
This is a 1-to-1 join, so it adds no length. Repeat until all 5 motifs are joined.
Tension: Pull firmly enough that the stems form one straight line, but don’t let them pucker. Each join should be invisible from the front.
Checkpoint: 2 joined motifs measure 14 in (35.6 cm). The finished 5-motif strip measures 35 in (88.9 cm) long and 6 in (15.2 cm) wide.
Border (Cream Frame)
Border gauge: 5 ch = 1 in (2.5 cm); 5 sc = 1 in (2.5 cm).
On each side, the frame anchors to two points per motif:
– Leaf tip: the ch-2 sp at the leaf tip
– Tulip picot: the outer side picot of the small tulip
Rnd 1 (frame chains): With RS facing, join cream with a sl st at stem st 1 of M1 (the bottom point).
- Right side, going up: [Ch 24, sl st in leaf tip, ch 12, sl st in tulip picot] 5 times. That is 38 sts per motif, so 190 sts for the side.
- Top: Ch 16, sl st in the center picot of M5’s large tulip, ch 16. That is 33 sts.
- Left side, going down: [Sl st in tulip picot, ch 12, sl st in leaf tip, ch 24] 5 times. That is 190 sts.
- Bottom: Join with a sl st to the beginning sl st, which counts as 1 bottom-point st.
Total: 414 sts (190 + 33 + 190 + 1).
Rnd 2: Ch 1, then sc in each ch and each sl st around. That gives 190 sc per side, 33 sc across the top and 1 sc at the bottom point. Join. (414 sc)
Row 3 (hanging loops): Work across the 33 top sc only. Join cream at the first top sc, then:
– (sc, ch 12, sl st) in st 1
– sc in next 10 sts (sts 2–11)
– (sc, ch 12, sl st) in st 12
– sc in next 9 sts (sts 13–21)
– (sc, ch 12, sl st) in st 22
– sc in next 10 sts (sts 23–32)
– (sc, ch 12, sl st) in st 33
That gives 4 loops and 29 sc, which uses all 33 sts. Fasten off. Each loop hangs about 1.25 in (3.2 cm) deep.
Why the math works:
- Side frame: The ch 12 covers the 2.35 in (6.0 cm) from a leaf tip to the tulip picot above it, since ch 12 = 2.4 in (6.1 cm). The ch 24 covers the 4.7 in (11.9 cm) from a tulip picot to the next leaf tip, or from the bottom point to the first leaf, since ch 24 = 4.8 in (12.2 cm).
- Top: Each ch 16 covers the 3.2 in (8.1 cm) from the side picot to the center picot.
- Per-side count: 5 motifs × 38 sts = 190 sts, with nothing extra added at the joins.
- Rnd 2: It is worked 1-per-stitch, so the counts don’t change.
Final Blocking
- Weave in all ends, running each tail back through its own color.
- Lay the panel flat on blocking mats, RS up.
- Pin the stems in a straight line from the bottom point to the top.
- Pin the frame sides straight and parallel, 6.5 in (16.5 cm) apart.
- Pin each tulip point and leaf tip so it’s sharp.
- Mist evenly until damp, without soaking.
- Let the panel dry completely, for at least 12 hours.
- Unpin it and check the measurement: 6.5 in × 35 in (16.5 cm × 88.9 cm).
- Repeat for the second panel. Lay both panels side by side to make sure they match.
Final Quality-Control Checklist
- Each panel has 5 motifs, with 15 tulips and 10 leaves.
- All stems line up in one continuous vertical line.
- Every leaf tip and side tulip picot is caught in the frame.
- Rnd 2 of the frame has 414 sc.
- There are 4 evenly spaced hanging loops on each panel.
- Both panels measure 6.5 in × 35 in (16.5 cm × 88.9 cm).
- No sewing stitches show on the RS.
Troubleshooting
- Tulip curls up: Your hdc3L is too tight. Go up 0.5 mm for the tulips only, then block flat.
- Points look blunt: Pull each picot snug and pin the points during blocking.
- Leaves twist: Rnd 1 has uneven tension. Steam-block the leaf flat before you sew it on.
- Frame bows outward: Your chains are loose. Work Rnd 1 again with tighter chains, or skip 1 ch in each ch-24 segment.
- Frame pulls the motifs in: Your chains are tight. Go up one hook size for the frame only.
- Panel lengths differ: Re-block the shorter panel, easing it to 35 in (88.9 cm).
Care
Hand wash in cool water with a mild detergent and press out the water in a towel. Dry flat and re-pin the points if needed; don’t hang the panels to dry.
Final Notes
Each measurement builds on the previous one:
- Gauge controls the tulips (2.5 in / 6.4 cm and 1.5 in / 3.8 cm), the leaves (3.5 in / 8.9 cm) and the stem (7 in / 17.8 cm).
- These make a 6 in × 7 in (15.2 cm × 17.8 cm) motif.
- Five motifs make a 35 in (88.9 cm) strip.
- The 38-stitch-per-motif frame brings each panel to 6.5 in (16.5 cm) wide.
- The loops add 1.25 in (3.2 cm).
Check each stage and the next one will fit. Happy crocheting!