

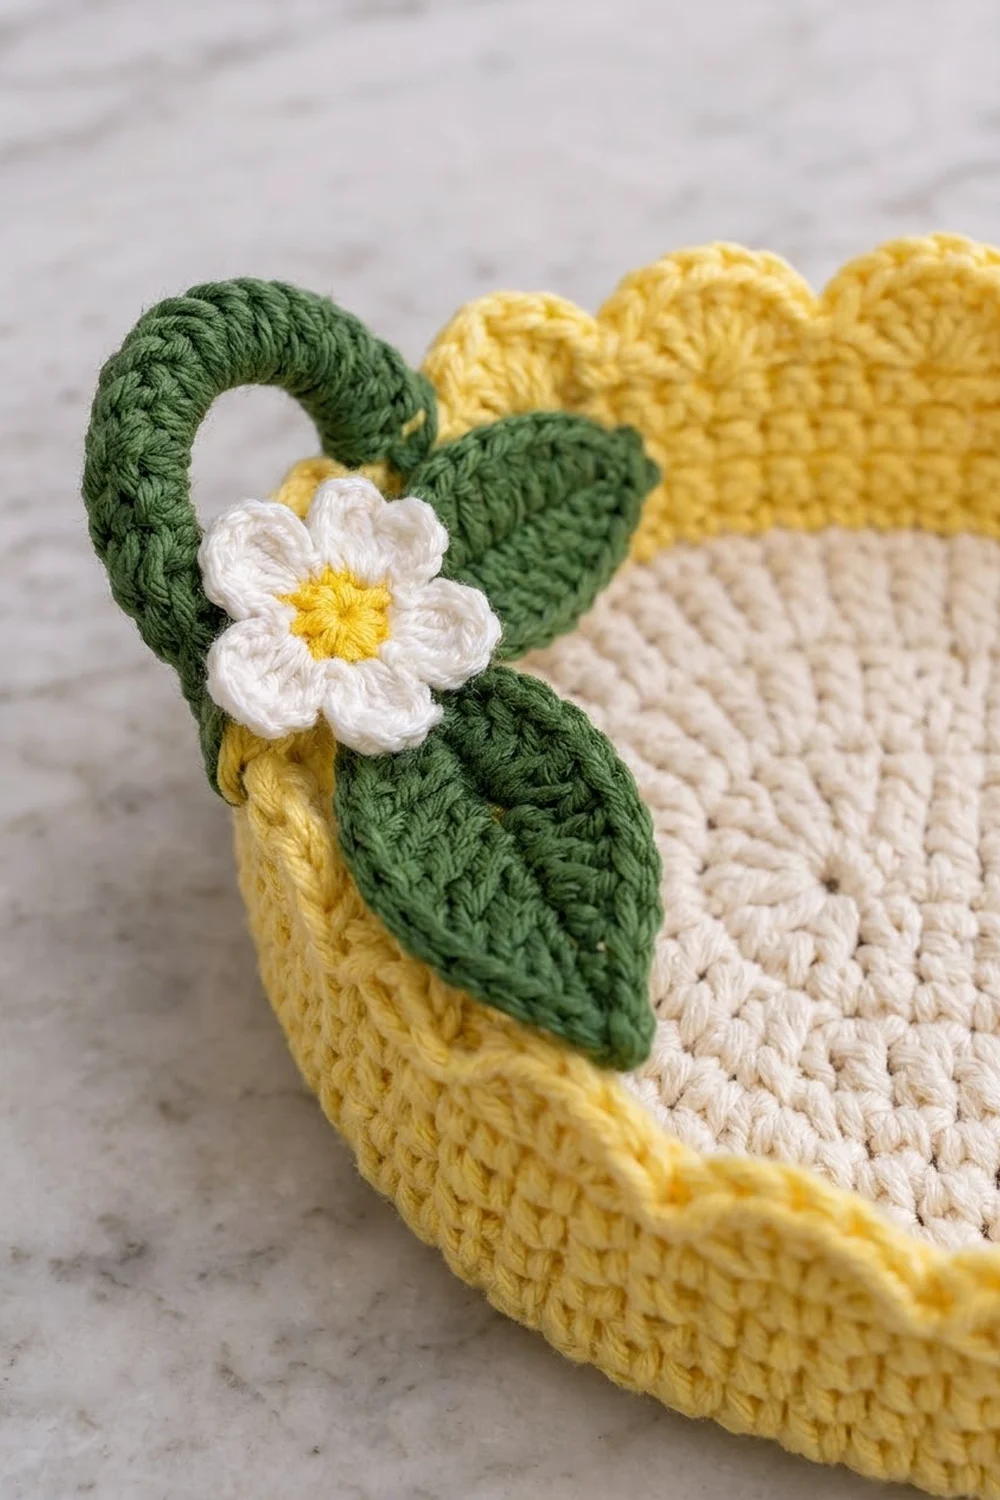
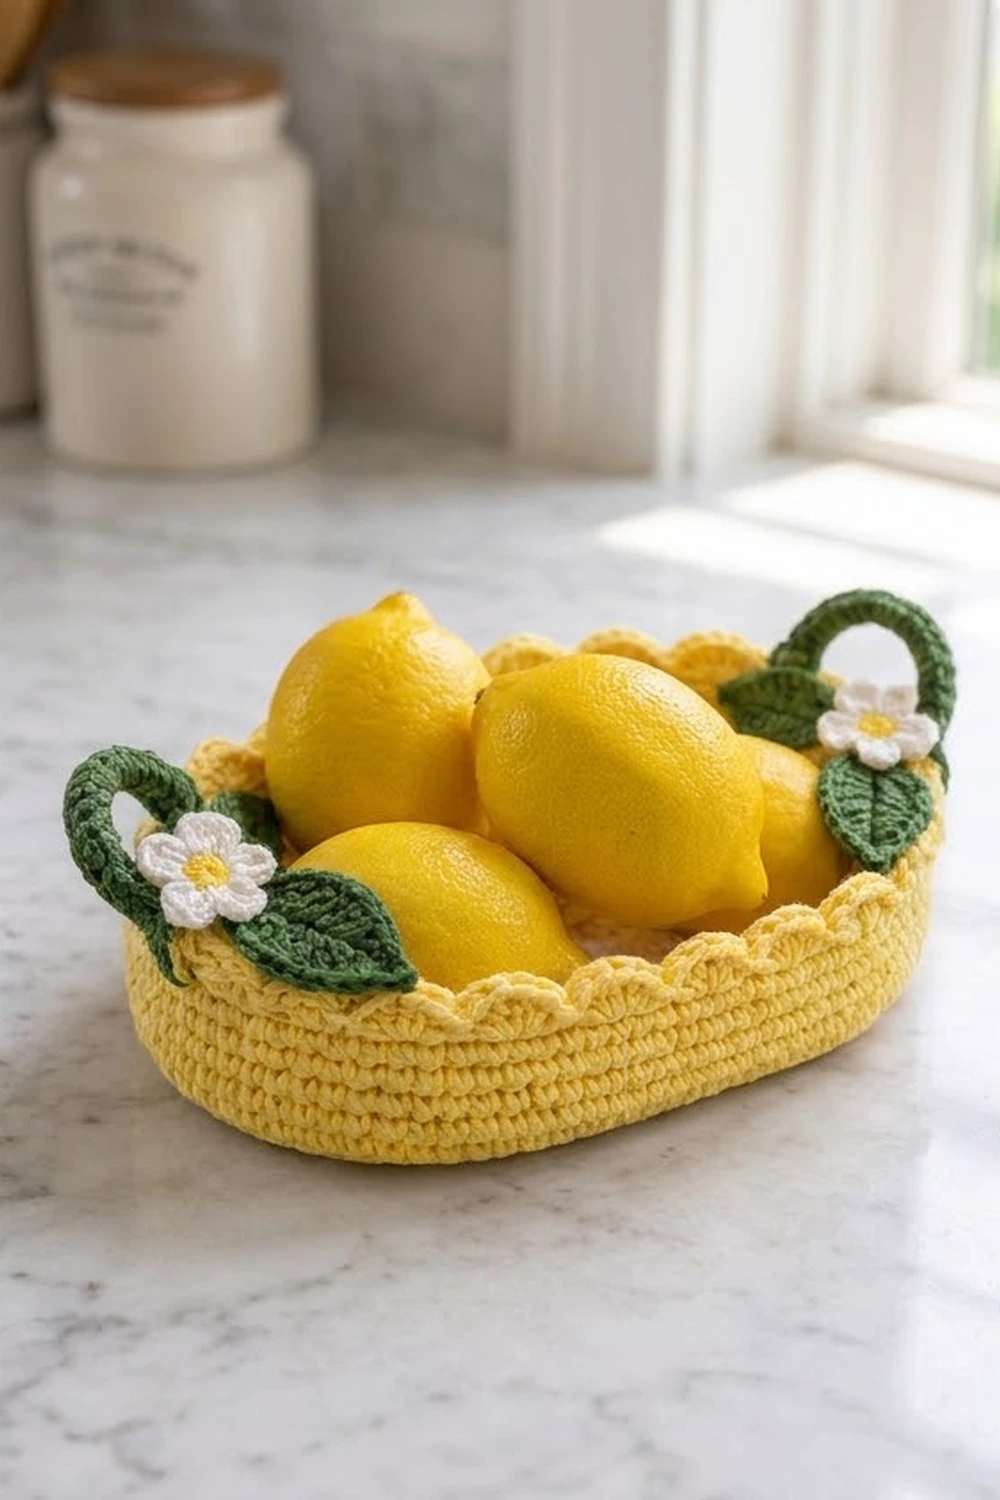
This oval basket is bright and sunny. It has a soft cream base, sturdy yellow walls and a scalloped rim that looks like the edge of a lemon slice. Each short end has an arched green handle, and two leaves and a small white blossom with a yellow center sit under each handle.
The colors are lemon yellow, cream, leaf green and white. The style is fresh farmhouse kitchen, so the basket works well for fruit, bread rolls, napkins or small craft supplies.
This pattern uses US crochet terms. The finished basket measures 11.5 in (29.2 cm) long, 4.75 in (12.1 cm) wide and 2.7 in (6.9 cm) tall at the rim. The handles rise to 4.2 in (10.7 cm).
Here is the construction in brief. You crochet the cream base in joined single crochet rounds around a chain. Then you change to yellow, turn the edge up with a back-loop round and work the walls straight up. A shell round makes the scalloped rim. Last, you make the handles, leaves and flowers separately and sew them on.
Finished Size and Construction
- Finished size: 11.5 in x 4.75 in (29.2 cm x 12.1 cm) base; 2.7 in (6.9 cm) tall at the rim; 4.2 in (10.7 cm) tall at the handles
- Skill level: Easy-intermediate
- Terminology: US
- Yarn weight: Worsted (#4) cotton
- Hook: 4.0 mm (G-6)
- Number of pieces: 1 basket body + 2 handles + 4 leaves + 2 flowers
- Layout: Single oval basket; the handles and decorations are centered on the 2 short ends
- Piece size (base): 11.5 in x 4.75 in (29.2 cm x 12.1 cm)
- Size before border: 2.2 in (5.6 cm) wall height
- Border depth: 0.5 in (1.3 cm) scallops
Materials
Use a smooth worsted-weight cotton or cotton blend. Cotton holds its shape well in a basket and is easy to wash. Acrylic also works, but the walls will be softer. The weights below assume about 1.7 m per gram, which is typical for worsted cotton.
- Cream (base): 60 g, about 102 m
- Lemon yellow (walls, rim, flower centers): 85 g, about 145 m
- Leaf green (handles, leaves): 20 g, about 34 m
- White (petals): 5 g, about 9 m
All quantities include a margin of about 15 percent for your gauge swatch and sewing tails.
Tools:
– 4.0 mm (G-6) crochet hook
– Tapestry needle
– Stitch markers (at least 4)
– 2 chenille stems or 2 lengths of covered floral wire, each 7 in (17.8 cm) long (optional, for stiffer handles)
– Scissors
– Measuring tape
– Rust-proof pins and a spray bottle for blocking
Abbreviations (US Terms)
- ch – chain
- sl st – slip stitch
- sc – single crochet
- hdc – half double crochet
- dc – double crochet
- inc – 2 sc in the same stitch
- BLO – back loop only
- sk – skip
- st(s) – stitch(es)
- rnd – round
Special stitch – Shell: 5 dc in the same stitch.
Gauge and Checkpoints
Gauge: 18 sc and 20 rnds = 4 in (10.2 cm) in sc. That is 4.5 sts and 5 rnds per inch.
Work the base first and treat it as your gauge test. Basket walls need a firm, dense fabric, so make sure your stitches are tight enough that light barely shows through.
Checkpoints:
– Foundation chain (30 working chains): about 6.7 in (17.0 cm)
– After Rnd 6: about 9.1 in x 2.4 in (23.1 cm x 6.1 cm)
– After Rnd 12: 11.5 in x 4.75 in (29.2 cm x 12.1 cm), with 128 sts
– Wall circumference: 28.4 in (72.1 cm)
– After Rnd 23: wall height 2.2 in (5.6 cm)
If your base is too big, go down to a 3.75 mm hook. If it is too small, go up to a 4.5 mm hook. Do not change the stitch counts, because the scallop math depends on 128 sts. A difference of 0.25 in (0.6 cm) is fine. If the base cups, your stitches are too tight; if it ruffles, they are too loose.
Basket Base (Cream)
Join each round with a sl st to the first sc. The beginning ch 1 does not count as a stitch. Place a marker in the middle stitch of each end so you can see the curves.
Foundation: With cream, ch 31.
Rnd 1: 3 sc in 2nd ch from hook (End A), sc in next 28 ch, 3 sc in last ch (End B). Rotate and work along the other side of the chain: sc in next 28 free loops. Join. (62 sts)
Each round from here has two 28-st straight sides and two curved ends. Every round adds 3 sts at each end, which makes 6 increases per round.
Rnd 2: Ch 1, [inc 3 times, sc 28] twice. Join. (68 sts)
Rnd 3: Ch 1, [(sc 1, inc) 3 times, sc 28] twice. Join. (74 sts)
Rnd 4: Ch 1, [(sc 2, inc) 3 times, sc 28] twice. Join. (80 sts)
Rnd 5: Ch 1, [(sc 3, inc) 3 times, sc 28] twice. Join. (86 sts)
Rnd 6: Ch 1, [(sc 4, inc) 3 times, sc 28] twice. Join. (92 sts)
Checkpoint: about 9.1 in x 2.4 in (23.1 cm x 6.1 cm).
Rnd 7: Ch 1, [(sc 5, inc) 3 times, sc 28] twice. Join. (98 sts)
Rnd 8: Ch 1, [(sc 6, inc) 3 times, sc 28] twice. Join. (104 sts)
Rnd 9: Ch 1, [(sc 7, inc) 3 times, sc 28] twice. Join. (110 sts)
Rnd 10: Ch 1, [(sc 8, inc) 3 times, sc 28] twice. Join. (116 sts)
Rnd 11: Ch 1, [(sc 9, inc) 3 times, sc 28] twice. Join. (122 sts)
Rnd 12: Ch 1, [(sc 10, inc) 3 times, sc 28] twice. Join. (128 sts)
Each end now has 36 sts and each straight side has 28 sts: 36 + 28 + 36 + 28 = 128. Fasten off cream and weave in the tail.
Checkpoint: 11.5 in x 4.75 in (29.2 cm x 12.1 cm). Lay the base flat. It should not cup or ripple.
Tip: If the curved ends look slightly hexagonal, you can move the increases around each end on Rnds 7–12. Keep the same number of increases.
Basket Walls (Yellow)
Rnd 13 (turning round): Join yellow in the first st of Rnd 12 (the start of End A). Ch 1, sc in BLO of each st around. Join. (128 sts)
This round leaves the cream front loops as a neat ridge on the outside and makes the walls turn upward.
Rnds 14–23: Ch 1, sc in each st around. Join. (128 sts per round)
From Rnd 14 on, keep the walls straight up and do not increase. Use firm, even tension. After Rnd 23 the wall has 11 yellow rounds, which makes it 2.2 in (5.6 cm) high. Do not fasten off; go straight on to the border.
Checkpoint: the circumference around the wall is 28.4 in (72.1 cm), and the walls stand up on their own.
Border: Scalloped Rim
Border gauge: Each scallop uses 4 wall stitches and is about 0.9 in (2.3 cm) wide and 0.5 in (1.3 cm) tall.
Rnd 24: Ch 1, sc in next st, sk 1, Shell in next st, sk 1. Repeat from * 32 times in total. Join to the first sc. Fasten off.
(32 scallops: 32 sc + 160 dc = 192 sts)
Count per side:
– End A: 36 sts ÷ 4 = 9 scallops
– First straight side: 28 sts ÷ 4 = 7 scallops
– End B: 36 sts ÷ 4 = 9 scallops
– Second straight side: 28 sts ÷ 4 = 7 scallops
– Total: 9 + 7 + 9 + 7 = 32 scallops
Why the math works: 128 divides evenly by 4, and so does each section (36 and 28). Rnd 13 started at the beginning of End A, so the first repeat starts exactly where the curve starts. Each end gets 9 matching scallops and each long side gets 7, and no partial scallop is left at the join. If the joins in your wall rounds have drifted, count 36 sts from your end marker before you start Rnd 24.
Handles (Make 2, Green)
Foundation: Ch 21.
Row 1: Sc in 2nd ch from hook and in each ch across. (20 sts)
Row 2: Ch 1, turn. (Sc 1, inc) 10 times. (30 sts)
Row 3: Ch 1, turn. If you are using wire, hold a chenille stem along the top edge and work over it. Sc in each st across. (30 sts)
Fasten off and leave a 12 in (30.5 cm) tail. The increases in Row 2 make the band curve into an arch. The inner edge is about 4.4 in (11.2 cm) and the outer edge is about 6.7 in (17.0 cm). The band is 0.6 in (1.5 cm) wide. Fold the wire ends back into the last stitches.
Leaves (Make 4, Green)
Foundation: Ch 9.
Rnd 1: Sc in 2nd ch from hook, hdc in next ch, dc in next 3 ch, hdc in next ch, sc in next ch, 3 sc in last ch (tip). Rotate and work along the other side of the chain: sc in next ch, hdc in next ch, dc in next 3 ch, hdc in next ch, sc in last ch. Sl st to the first sc. (17 sts)
Fasten off and leave an 8 in (20.3 cm) tail. Each leaf is about 2 in (5.1 cm) long and 1 in (2.5 cm) wide. The center chain forms a natural vein down the middle.
Flowers (Make 2)
Rnd 1 (yellow): Magic ring, 5 sc in ring. Pull the ring tight and sl st to the first sc. (5 sts) Fasten off yellow.
Rnd 2 (white): Join white in any st. In each st work (sc, hdc, dc, hdc, sc). Sl st to the first sc. (5 petals, 25 sts)
Fasten off and leave an 8 in (20.3 cm) tail. Each flower is about 1.25 in (3.2 cm) across.
Assembly
- Handles: Center one arch over each short end. Pin the handle ends to the inside of the wall, 3.5 in (8.9 cm) apart, so that 0.5 in (1.3 cm) of each end overlaps the wall below the scallops. Whipstitch each end in place through Rnds 21–23. The arch should rise about 1.5 in (3.8 cm) above the rim.
- Leaves: Lay two leaves on the outside of each short end, below the handle. Angle their tips outward and up, with the leaf bases touching at the center. Sew them down along the vein with small running stitches.
- Flowers: Stack one flower on top of the spot where the leaf bases meet. It should partly cover the leaves and slightly overlap the rim. Sew around the yellow center and tack each petal tip down.
- Weave in all the tails on the inside of the basket.
Final Blocking
- Lightly spray the whole basket with water until it is damp, but not soaked.
- Fill the basket with a folded towel or a plastic food container about 11 in x 4.5 in (27.9 cm x 11.4 cm) so the walls stay upright.
- Press the base flat on a hard surface and smooth out any ripples.
- Pin each scallop so it curves evenly and stands up.
- Shape the handles into even arches. A rolled paper tube under each arch helps.
- Pat the leaves and petals flat.
- Let the basket dry completely, which takes about 24 hours. Then take out the form and the pins.
Final Quality-Control Checklist
- The base measures 11.5 in x 4.75 in (29.2 cm x 12.1 cm) and sits flat.
- The cream ridge shows evenly all around the bottom edge.
- The walls are 2.2 in (5.6 cm) tall and stand up without help.
- There are 32 scallops: 9 on each end and 7 on each long side.
- Both handles are the same height and centered on the ends.
- The leaves and flowers mirror each other on the two ends.
- No tails show on the outside.
Troubleshooting
- The base cups: Your tension is too tight, or you missed increases. Count each round, or go up one hook size.
- The base ruffles: You added extra stitches, or your tension is too loose. Check that each end has 3n sts on Rnd n.
- The walls flare out: Your wall tension is looser than your base tension. Go down 0.25 mm for Rnds 14–23.
- The walls slump: Work tighter, or add one extra rnd of BLO sc on the inside at Rnd 23.
- The scallops come out uneven: The round did not start at the beginning of End A. Pull back and recount 36 / 28 / 36 / 28.
- The handles are floppy: Add the wire in Row 3, or spray them with fabric stiffener.
Care
Hand wash in cool water with mild soap. Reshape the basket over a form and let it dry flat. Do not put it in the dryer.
Final Notes
Here is the full measurement chain. Gauge is 18 sc and 20 rnds = 4 in (10.2 cm). The foundation chain is 6.7 in (17.0 cm). The 12-round base is 11.5 in x 4.75 in (29.2 cm x 12.1 cm) with 128 sts. That gives a wall circumference of 28.4 in (72.1 cm). The 11 wall rounds make 2.2 in (5.6 cm) of height. The 32 scallops add 0.5 in (1.3 cm), for a finished height of 2.7 in (6.9 cm). The arched handles bring the ends up to 4.2 in (10.7 cm). If each checkpoint matches, the finished basket will match too.
Happy crocheting!