

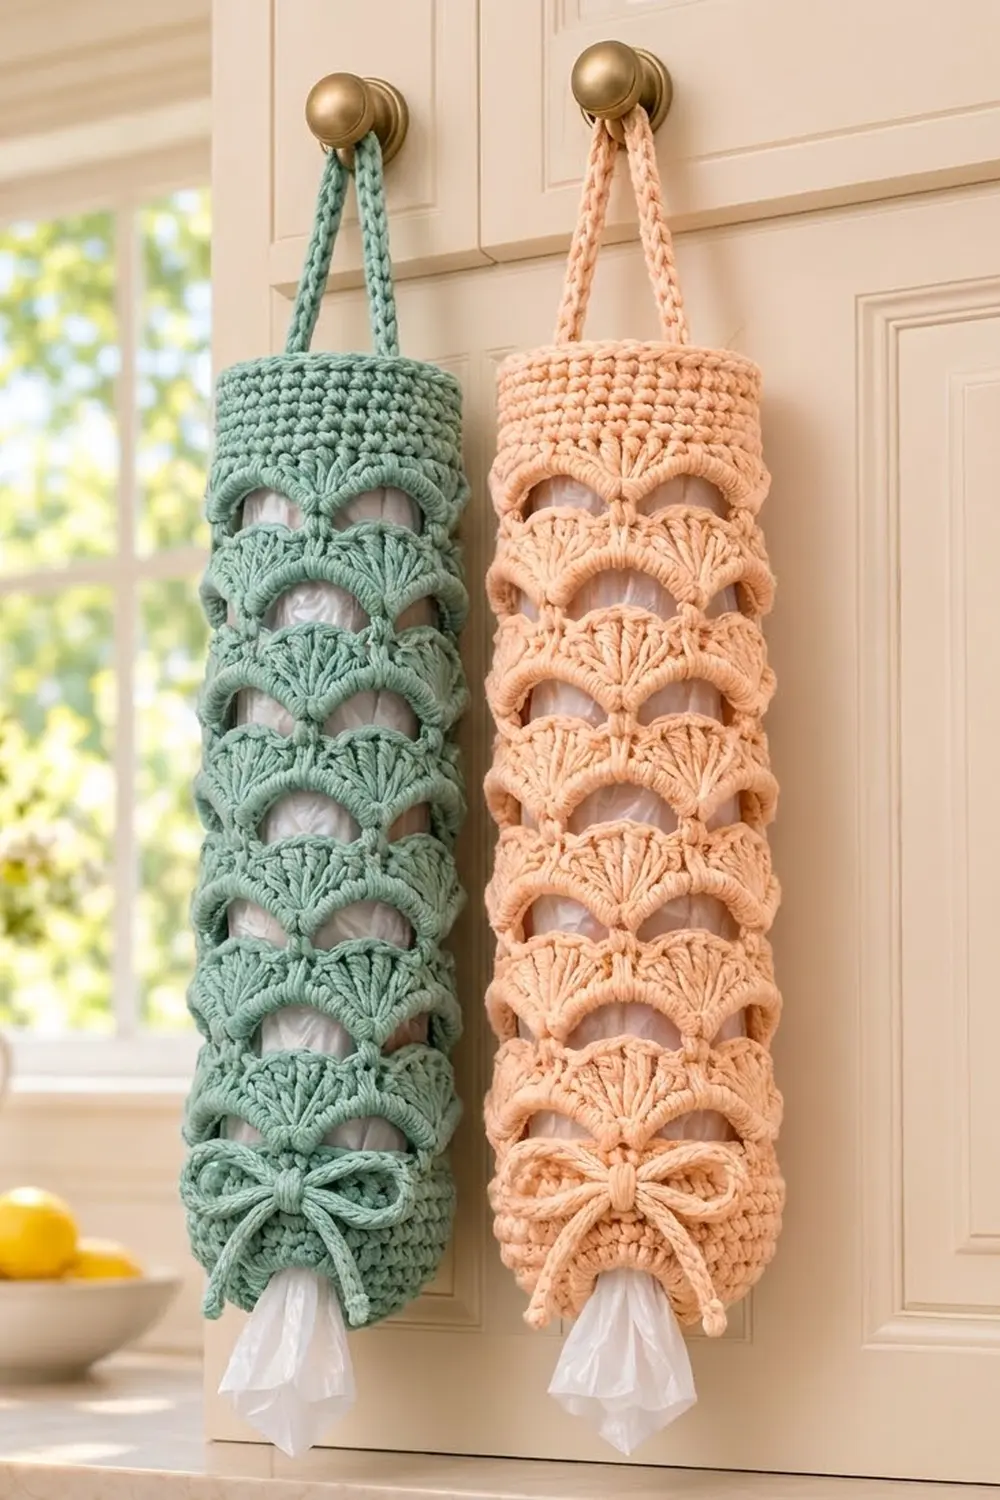
The Seaside Shell Bag Holder is a tall, lacy tube that keeps plastic grocery bags tidy and easy to grab. You push bags in at the top and pull them out one at a time through the small ring at the bottom. Stacked fans topped with rounded arches give it a soft, scalloped look, and a little bow at the base adds a sweet finishing touch.
The sample is worked in sage green worsted-weight cotton. It looks just as good in peach, cream or any kitchen color you like. Because the fan tiers are open, the white bags show through and add texture of their own.
This pattern uses US crochet terms. The finished holder measures about 14.5 in (36.8 cm) tall without the strap, about 13.75 in (34.9 cm) around the solid sections, and about 7 in (17.8 cm) wide laid flat across the lace tiers.
Construction is simple and seamless. You start at the bottom with a chain ring, increase into a domed base, work six fan-and-arch tiers in joined rounds, and decrease into a solid top band. Then you work a strap straight off the rim and attach it to the opposite side. Last, you make a chain tie cord, weave it through the base and tie it in a bow.
Finished Size and Construction
- Finished size: 14.5 in (36.8 cm) tall, plus an 8 in (20.3 cm) strap
- Circumference (solid sections): 13.75 in (34.9 cm), 6.75 in (17.1 cm) flat
- Width across lace tiers: about 7 in (17.8 cm) flat
- Skill level: Easy–Intermediate
- Terminology: US
- Yarn weight: Worsted (#4), cotton or cotton blend
- Hook: 5.0 mm (H-8)
- Number of pieces: 1 tube with an attached strap, plus 1 tie cord
- Layout: Single vertical tube, worked bottom-up in the round
- Piece size before top band: 12.5 in (31.8 cm) tall
- Top band depth: 2 in (5.1 cm)
- Bottom opening: about 1.5 in (3.8 cm) across
Materials
Choose a smooth, firm cotton or cotton blend. Cotton keeps the arches crisp and holds its shape when the tube is full of bags. Acrylic works too, but the holder will stretch more.
- Main color (sage green): 100 g / 160 m (175 yd) worsted-weight cotton
- Alternate colorway (optional, peach): another 100 g / 160 m (175 yd) if you make a second holder
The tube, strap and bow are all worked in one color. These amounts include about a 20% margin.
Tools:
– 5.0 mm (H-8) crochet hook
– Stitch marker
– Tapestry needle
– Scissors
– Measuring tape
– Rust-proof pins and a rolled towel or tall jar for blocking
Abbreviations (US Terms)
- ch – chain
- sl st – slip stitch
- sc – single crochet
- dc – double crochet
- sk – skip
- sp – space
- sc2tog – single crochet 2 together
- st(s) – stitch(es)
- rnd(s) – round(s)
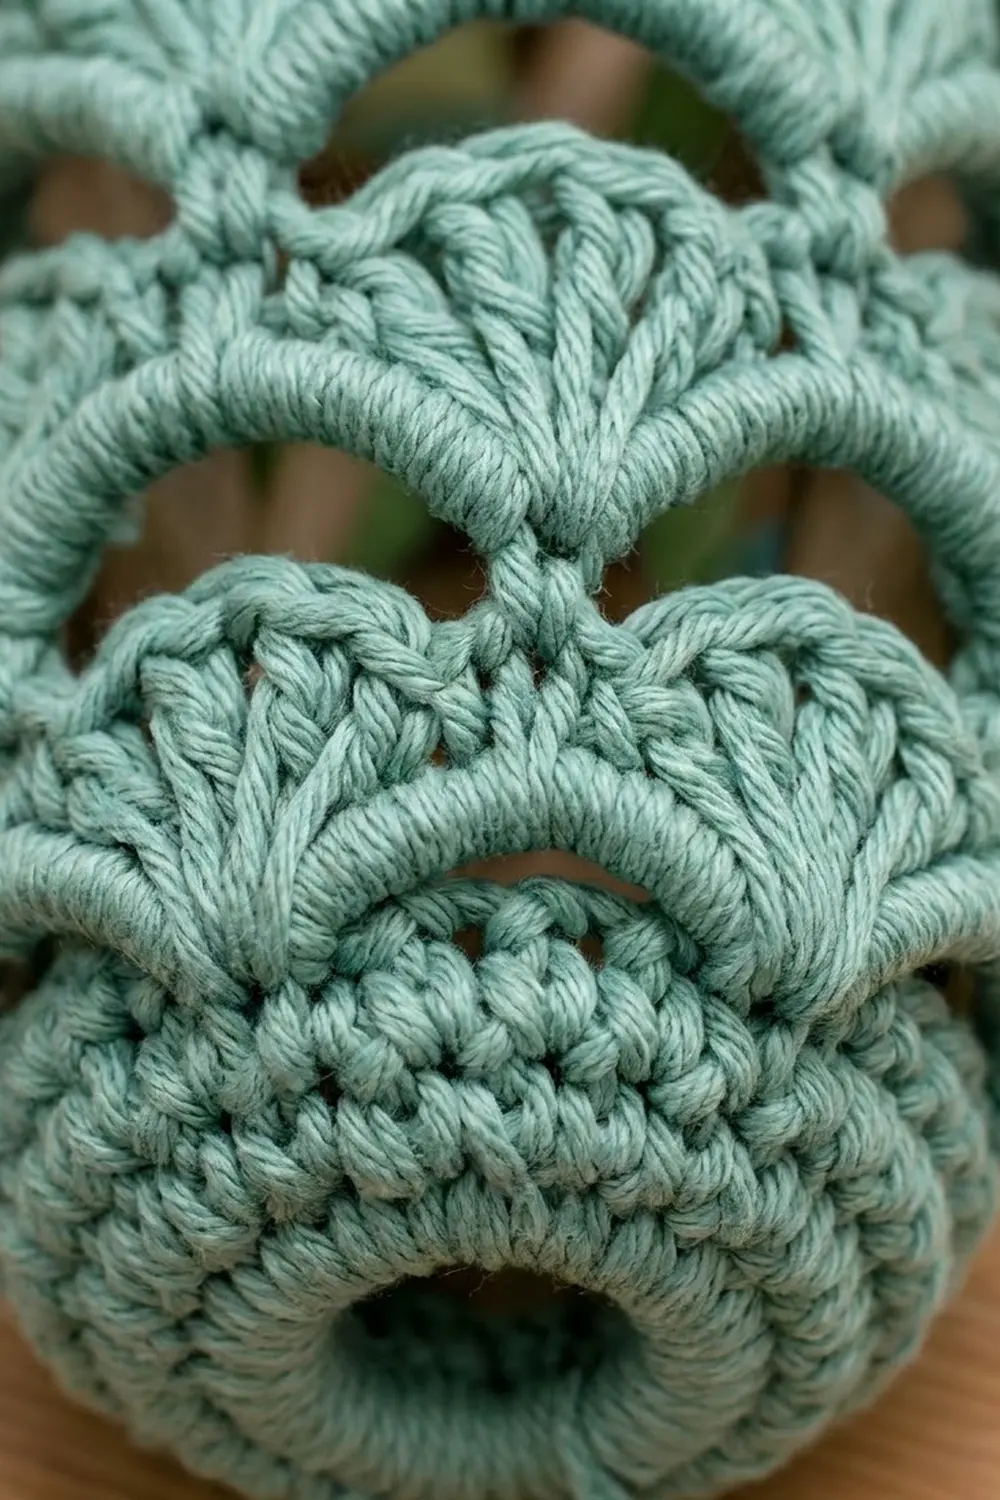
Special stitch – Fan: Work 9 dc in the same stitch.
Arch: An arch is a ch-9 space covered with 11 sc. It forms a thick, rounded band that curves over each fan.
Gauge and Checkpoints
Gauge: 14 sc and 16 rnds = 4 in (10.2 cm) in sc worked in the round.
Before you start the full holder, test it. Work the base through Rnd 8 and then one complete tier. This sample becomes the start of your holder, so nothing is wasted.
Checkpoints:
– After Rnd 5: the flat base measures about 4.25 in (10.8 cm) across.
– After Rnd 8: the base is a shallow cup, 13.75 in (34.9 cm) around and about 2 in (5.1 cm) tall.
– After each tier: the tier adds about 1.75 in (4.4 cm) of height.
– After Tier 6: the tube measures 12.5 in (31.8 cm) tall.
– After the top band: 14.5 in (36.8 cm) tall.
If your base is too big, go down to a 4.5 mm hook. If it is too small, go up to a 5.5 mm hook. For the lace tiers, measure height rather than width, since the arches naturally flare a little.
Pattern
Work in joined rounds. Do not turn unless told to. The beginning ch 1 never counts as a stitch. Place a marker in the first stitch of each round.
Base
Ring: Ch 16 and sl st to the first ch to form a ring. Keep the ring loose, because it becomes the dispensing opening.
Rnd 1: Ch 1, sc in each ch around, sl st to the first sc. (16 sts)
Rnd 2: Ch 1, sc in next st, 2 sc in next st; rep from * 7 more times, sl st to the first sc. (24 sts)
Rnd 3: Ch 1, sc in next 2 sts, 2 sc in next st; rep from * 7 more times, sl st to the first sc. (32 sts)
Rnd 4: Ch 1, sc in next 3 sts, 2 sc in next st; rep from * 7 more times, sl st to the first sc. (40 sts)
Rnd 5: Ch 1, sc in next 4 sts, 2 sc in next st; rep from * 7 more times, sl st to the first sc. (48 sts)
Rnds 6–8: Ch 1, sc in each st around, sl st to the first sc. (48 sts)
The even rounds turn the edge upward, so the flat circle becomes the domed base.
Tier 1 (worked from 48 sts)
Fan Rnd: Ch 1, sc in the first st, sk 3 sts, Fan in next st, sk 3 sts, sc in next st; rep from * 5 more times, but on the last repeat skip the final sc and sl st to the first sc instead.
(60 sts: 6 sc + 54 dc in 6 Fans)
Each repeat uses 8 base stitches: 1 sc + 3 skipped + 1 Fan + 3 skipped. Six repeats use all 48 stitches.
Chain Rnd: Ch 1, sc in the first sc, ch 9, sk the Fan, sc in next sc; rep from * 5 more times, but on the last repeat skip the final sc and sl st to the first sc instead.
(6 sc + 6 ch-9 sps)
Arch Rnd: Ch 1, sc in next sc, 11 sc in next ch-9 sp; rep from * 5 more times, sl st to the first sc.
(72 sts: 6 junction sc + 66 arch sc)
Push each arch up so it curves over its Fan.
Tiers 2–6 (worked from 72 sts)
Fan Rnd: Ch 1, sc in the first st (junction sc), sk 5 sts, Fan in next st, sk 5 sts, sc in next st (junction sc); rep from * 5 more times, but on the last repeat skip the final sc and sl st to the first sc instead.
(60 sts: 6 sc + 54 dc in 6 Fans)
Each repeat uses 12 stitches: the junction sc + 5 skipped + 1 Fan + 5 skipped. The Fan lands on the 6th of the 11 arch stitches, which is the exact center of the arch. That keeps the fans stacked in straight columns. The 5 skipped stitches on each side leave the open gaps you see between the arches and fans.
Chain Rnd: Work as in Tier 1. (6 sc + 6 ch-9 sps)
Arch Rnd: Work as in Tier 1. (72 sts)
Repeat these three rounds until you have 6 tiers in total, counting Tier 1.
Checkpoint: The tube now measures about 12.5 in (31.8 cm) from the bottom ring to the top of the last arches.
Top Band (Border)
The top band acts as this project’s border. It pulls the 72-stitch arch round back in to the base’s 48 stitches, so the tube hangs straight.
Border gauge: Same as the base, 14 sc and 16 rnds = 4 in (10.2 cm).
Rnd 1 (decrease round): Ch 1, sc in next st, sc2tog over next 2 sts; rep from * 23 more times, sl st to the first sc.
(72 sts worked as 24 sc + 24 sc2tog = 48 sts)
Rnds 2–8: Ch 1, sc in each st around, sl st to the first sc. (48 sts)
Counts per side: Laid flat, the band has 24 sts across the front and 24 sts across the back (24 + 24 = 48). Mark the front center by placing a marker in st 1. The back center then falls at st 25.
Why the math works: 48 sts ÷ 14 sts per 4 in = 13.7 in, which rounds to 13.75 in (34.9 cm) around. That matches the base exactly, so the top and bottom solid sections are the same width. The decrease round uses 3 stitches per repeat: 24 repeats × 3 = 72, the full arch count. Eight rounds at 16 rnds per 4 in give the 2 in (5.1 cm) band depth.
Strap
Do not fasten off.
Row 1: Ch 1, sc in the first 4 sts of Rnd 8 (sts 1–4), turn. (4 sts)
Rows 2–32: Ch 1, sc in each st across, turn. (4 sts)
The strap measures about 8 in (20.3 cm) long and 1.1 in (2.8 cm) wide. Fasten off, leaving a 10 in (25.4 cm) tail.
Count 24 sts around from st 1 to find sts 25–28 on the opposite side of the rim. Make sure the strap isn’t twisted, then whipstitch its end securely over sts 25–28. Knot the tail inside the band and weave it in.
Tie Cord and Bow
Ch 120, which should measure about 36 in (91.4 cm). Fasten off and trim the tails to 1 in (2.5 cm), then knot each end to keep it from unraveling.
Find the front center of Base Rnd 8, directly below the front strap attachment. Start there and weave the cord in and out around the post of every 4th sc of Rnd 8, so it passes over 12 groups. Bring both ends back out at the front center. Snug the cord gently, keeping the base the same width, and tie a neat bow with 1.5 in (3.8 cm) loops.
Final Blocking
- Weave in all remaining ends on the inside of the tube.
- Soak the holder in cool water for 10 minutes, then press out the water. Don’t wring it.
- Roll it in a towel to remove the extra moisture.
- Slide it over a tall jar or a rolled towel about 4.25 in (10.8 cm) across.
- Gently shape each arch into a smooth curve and fan out each shell evenly.
- Pin the top band straight and smooth the strap flat.
- Check that the height is 14.5 in (36.8 cm), then leave it to dry completely.
- Retie the bow once it’s dry.
Final Quality-Control Checklist
- The bottom ring is open and about 1.5 in (3.8 cm) across.
- The base has 48 sts and is 13.75 in (34.9 cm) around.
- There are 6 tiers, each with 6 Fans of 9 dc.
- The Fans line up in straight vertical columns.
- Each arch has 11 sc plus a junction sc, for 72 sts per Arch Rnd.
- The top band has 48 sts and is 2 in (5.1 cm) deep.
- The strap is 4 sts wide, untwisted, and attached directly opposite its starting point.
- The bow is centered at the front, in line with the strap.
- The total height is 14.5 in (36.8 cm).
Troubleshooting
The fans drift into a spiral. Fix: You placed a Fan off-center. Always skip exactly 5 sts, so the Fan goes in the 6th of the 11 arch sts.
The arches lie flat instead of curving. Fix: Your ch-9 is too tight. Chain more loosely or go up a hook size for the Chain Rnd only.
The top band ruffles. Fix: Check that Rnd 1 has 48 sts. A skipped sc2tog leaves extra stitches.
The bags fall out on their own. Fix: Your ring is too loose. Tighten the starting chain, or weave the tie cord one round lower.
The strap pulls to one side. Fix: Count 24 sts again from st 1 and reattach the strap at sts 25–28.
Care
Hand wash in cool water and lay flat or hang to dry. Reshape the arches while damp. If you used cotton, a cool machine-wash cycle in a laundry bag is fine.
Final Notes
The measurement chain is straightforward. A 16-st ring increases to a 48-st base that is 13.75 in (34.9 cm) around and 2 in (5.1 cm) tall. Six fan-and-arch tiers of 1.75 in (4.4 cm) each bring the tube to 12.5 in (31.8 cm). The top band returns to 48 sts and adds 2 in (5.1 cm), for a finished height of 14.5 in (36.8 cm) plus an 8 in (20.3 cm) strap. If your gauge matches at the base, every checkpoint after that follows.
Happy crocheting!