

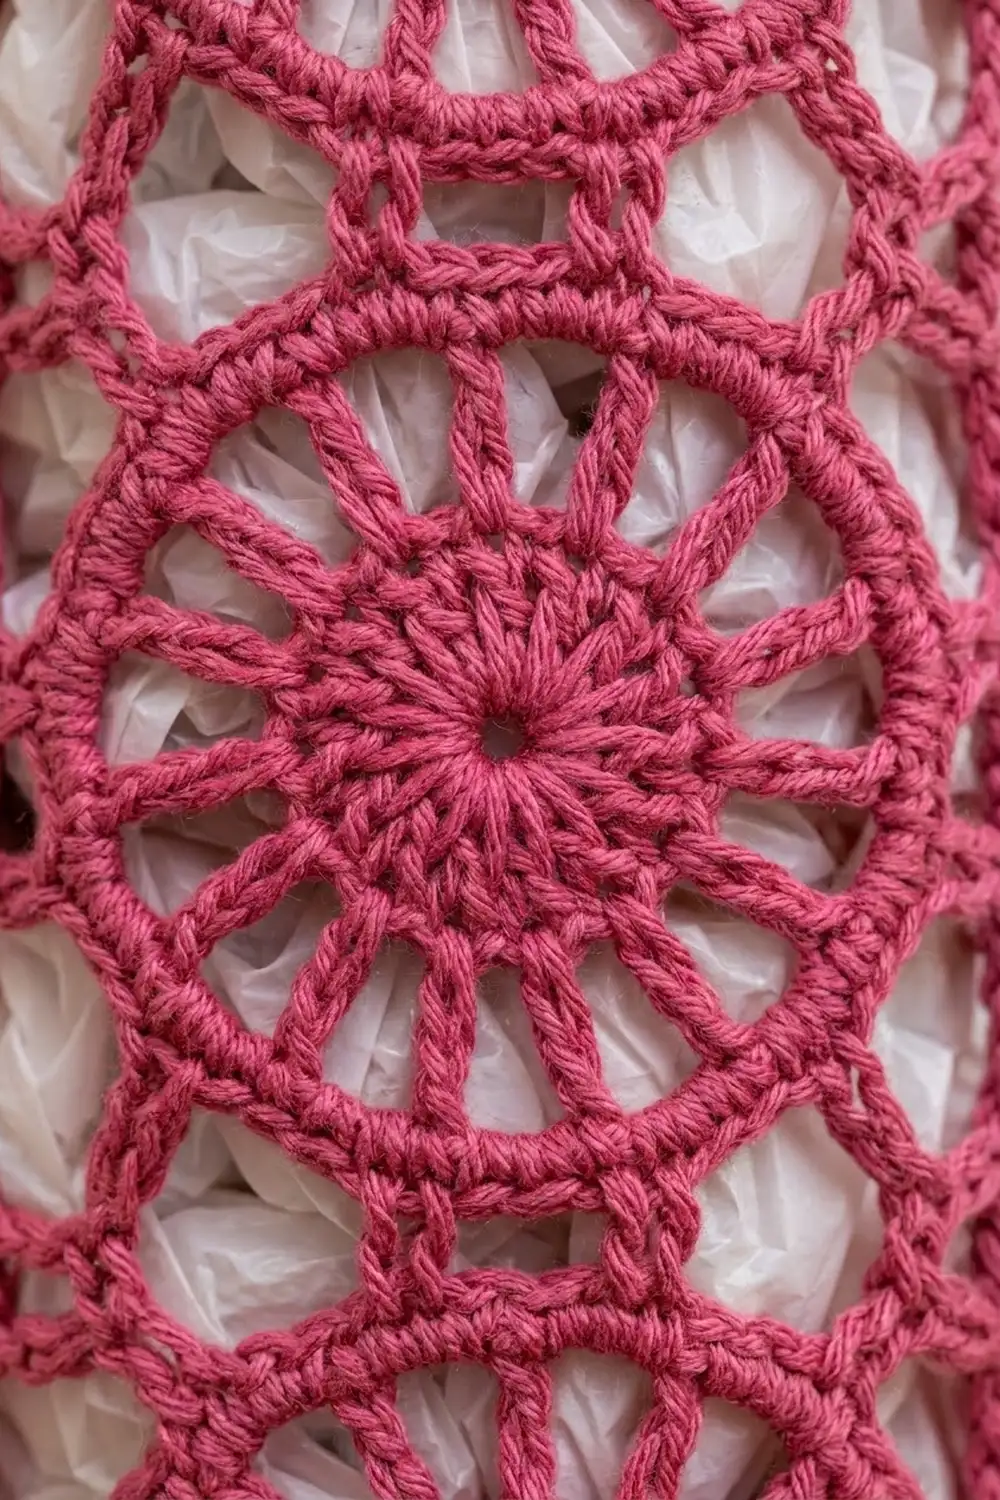
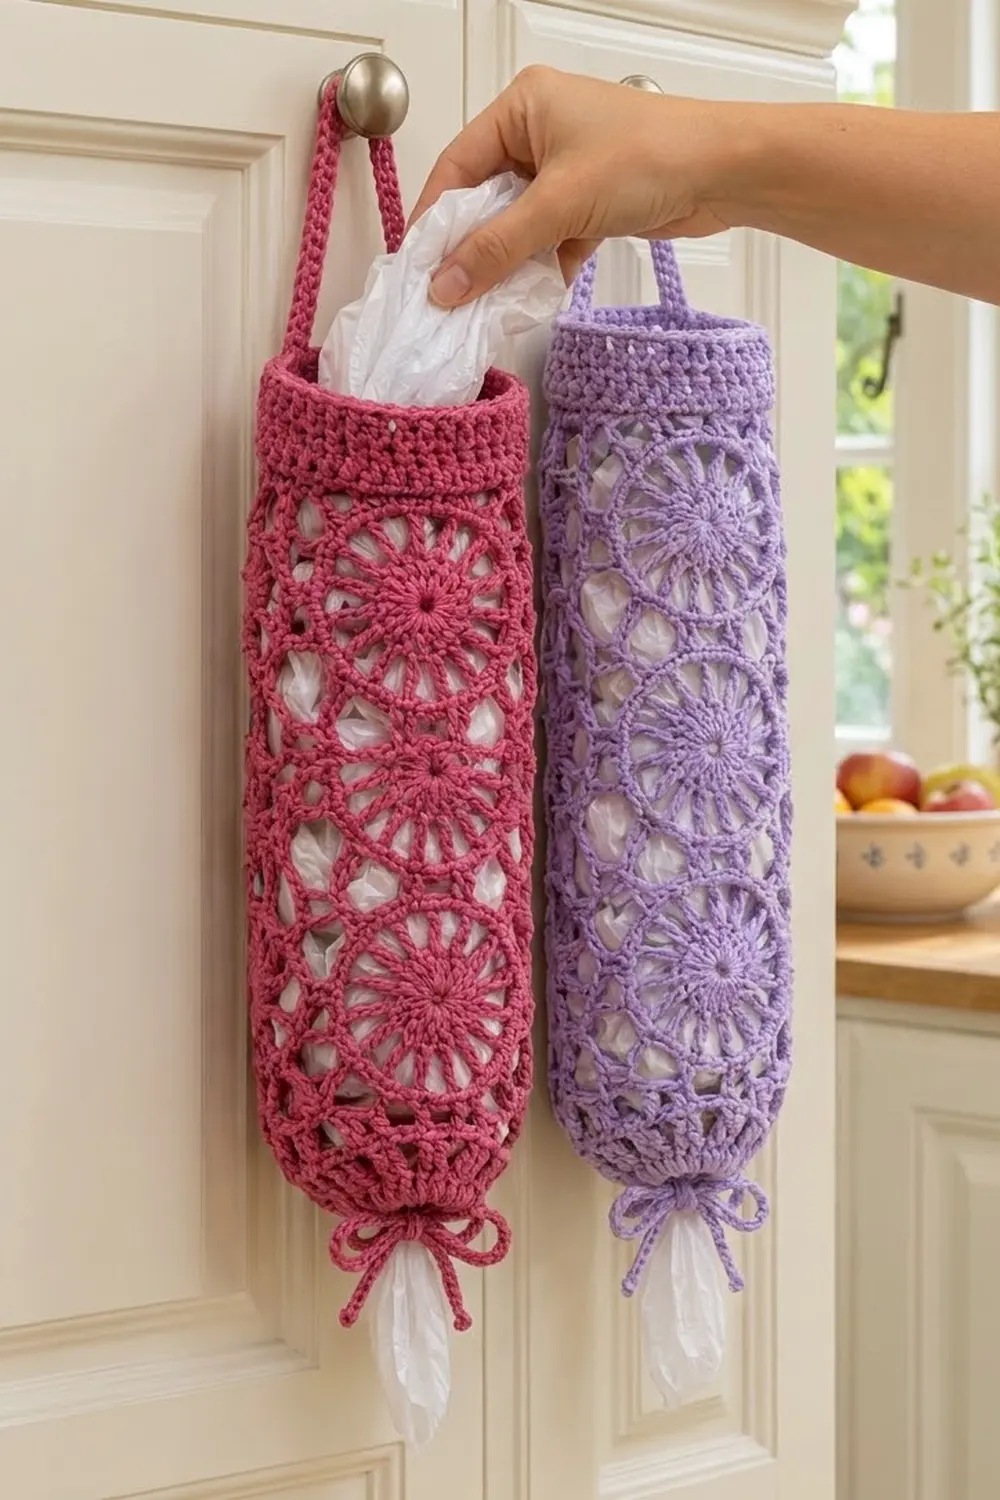
This bag holder is an open, lacy tube made of round wheel motifs. It hangs from a cabinet knob or hook and holds a whole bundle of plastic grocery bags. Push bags in at the top and pull them out, one at a time, through the gathered opening at the bottom.
The sample is made in raspberry-pink cotton, and the same pattern also works well in lavender. Each motif has a solid center, a ring of spokes, a smooth single crochet ring, and a frame of small chain loops. Between the motifs are open diamond-shaped gaps, so the white bags show through and the holder looks light.
The pattern uses US crochet terms. The finished holder is 5.6 in (14.2 cm) wide laid flat, which is 11.25 in (28.6 cm) around, and 14.25 in (36.2 cm) long. The hanging loop adds about 4 in (10.2 cm).
Construction overview: You make nine round motifs, joining each one to its neighbors as you work its last round, until they form a tube 3 motifs around and 3 motifs tall. Next, you work a leveling round and a solid band across the top, then a short, narrowing section with eyelets across the bottom. Finally, you add a strap and a drawstring.
Finished Size and Construction
- Finished size: 5.6 in (14.2 cm) wide flat × 14.25 in (36.2 cm) long, plus a loop of about 4 in (10.2 cm)
- Skill level: Intermediate
- Terminology: US crochet terms
- Yarn weight: Worsted (#4) cotton
- Hook: 5 mm (H-8)
- Number of pieces: 9 motifs, plus 1 drawstring
- Layout: 3 motifs around × 3 motifs tall, joined into a tube
- Motif size: 3.75 in (9.5 cm) across
- Size before border: 11.25 in (28.6 cm) around × 11.25 in (28.6 cm) tall
- Border depth: top band 1.5 in (3.8 cm), bottom section 1.5 in (3.8 cm)
Materials
Use a smooth 100% cotton or cotton-blend worsted yarn. Cotton keeps its shape when loaded with bags and makes crisp stitches. Avoid fuzzy or very stretchy yarns, because the holder will sag.
- Main color, raspberry pink: 100 g (about 190 m)
- Optional lavender version: another 100 g (about 190 m) to make a second holder
Tools:
– 5 mm (H-8) crochet hook
– Tapestry needle
– 4 locking stitch markers
– Scissors
– Measuring tape
– Pins and a blocking surface
These quantities include a margin of about 20% for swatching and joining.
Abbreviations (US Terms)
- ch – chain
- sl st – slip stitch
- sc – single crochet
- hdc – half double crochet
- dc – double crochet
- tr – treble crochet
- sc2tog – single crochet 2 together
- rev sc – reverse single crochet (crab stitch)
- sp – space
- st(s) – stitch(es)
Special stitch – join loop: In place of a ch-3 loop, ch 1, sl st into the matching ch-3 loop of the finished neighboring motif, then ch 1. The new loop is the same size as a normal loop and is locked to its neighbor.
Clock positions: Every motif has 12 outer loops. Lay the motif right side up with one loop at the top, and name the loops like the hours on a clock face: 12, 1, 2 … 11. Joins only ever happen at the 3, 6, 9, and 12 o’clock loops.
Gauge and Checkpoints
Single crochet gauge: 16 sc × 16 rounds = 4 in (10.2 cm), worked in the round.
Make one complete motif to test your gauge before you start. Measure it laid flat and lightly pressed:
- After Round 1: 1.5 in (3.8 cm)
- After Round 2: 2.5 in (6.4 cm)
- After Round 3: 3 in (7.6 cm)
- After Round 4: 3.75 in (9.5 cm)
If your motif is larger than 3.75 in (9.5 cm), switch to a 4.5 mm hook. If it is smaller, switch to a 5.5 mm hook. Even a difference of 0.25 in (0.6 cm) per motif adds up to 0.75 in (1.9 cm) around the tube, which changes the stitch fit of the top band.
Motif (Make 9)
Round 1: Make a magic ring. Ch 3 (counts as dc), work 11 dc into the ring. Pull the ring closed and sl st to the top of the ch-3. (12 dc)
Round 2: Ch 5 (counts as dc + ch 2). Dc in the next st, ch 2. Repeat from * 10 more times, then sl st to the 3rd ch of the ch-5. (12 dc spokes, 12 ch-2 sps)
Round 3: Sl st into the first ch-2 sp. Ch 1, then work 3 sc in each ch-2 sp around. Sl st to the first sc. (36 sc)
This round makes the smooth, solid ring around the spokes.
Round 4 (first motif only): Ch 1, sc in the same st. Ch 3, skip 2 sc, sc in the next sc. Repeat from * 10 more times, then ch 3 and sl st to the first sc. (12 sc, 12 ch-3 loops) Fasten off.
For every other motif, work Round 4 as join-as-you-go, as explained in the Joining section. Weave in the center tail on each motif. You can leave the outer tails until the tube is finished.
Make All Pieces
- Raspberry pink: 9 motifs (about 5 g each, so about 45 g in total)
- Drawstring: 1, made after the tube is finished
Layout grid, 3 around × 3 tall. Columns A–C wrap around, so column C joins back to column A.
        Col A   Col B   Col C
Top:     M1  –   M2  –   M3  – (back to M1)
          |       |       |
Middle:  M4  –   M5  –   M6  – (back to M4)
          |       |       |
Bottom:  M7  –   M8  –   M9  – (back to M7)
Each “–” is a side join, 3 o’clock to 9 o’clock. Each “|” is a vertical join, 6 o’clock to 12 o’clock.
Joining
Join each motif while you work its Round 4. Work Rounds 1–3 as usual. During Round 4, whenever you reach a loop that must join, work a join loop in place of a ch-3 loop.
Join order:
- M1: Work it as normal, with no joins.
- M2: Join its 9 o’clock loop to M1’s 3 o’clock loop.
- M3: Join its 9 o’clock loop to M2’s 3 o’clock loop, and its 3 o’clock loop to M1’s 9 o’clock loop. The top row now closes into a ring. Check that the right side faces out and that the ring is not twisted.
- M4: Join its 12 o’clock loop to M1’s 6 o’clock loop.
- M5: Join its 12 o’clock loop to M2’s 6 o’clock loop, and its 9 o’clock loop to M4’s 3 o’clock loop.
- M6: Join its 12 o’clock loop to M3’s 6 o’clock loop, its 9 o’clock loop to M5’s 3 o’clock loop, and its 3 o’clock loop to M4’s 9 o’clock loop.
- M7–M9: Repeat steps 4–6 below M4–M6.
Stitch-to-stitch logic: Each join replaces one ch-3 loop with ch 1, sl st, ch 1. Every motif therefore keeps exactly 12 loops and 12 sc, so its size does not change. Each side join is a single point of contact, which is what creates the open diamond gaps.
Tension: Work the sl st loosely enough that the two loops lie flat side by side, but firmly enough that you can’t see a gap at the join. Do not pull the joining loop tight. If you do, the circles bunch up and the tube gets shorter around.
Size checkpoint: The joined tube should measure 11.25 in (28.6 cm) around, which is 5.6 in (14.2 cm) laid flat. It should be 11.25 in (28.6 cm) tall.
Border: Top Band and Bottom Edging
Border gauge: 16 sc = 4 in (10.2 cm), so 45 sc = 11.25 in (28.6 cm). This matches the circumference of the tube exactly.
Top Band
The top row has dips between the circles, so the first round fills them in to make a level edge. For each top-row motif, use these loops: 11, 12, and 1 o’clock across the top of the circle, plus 2 o’clock on one side of each dip and 10 o’clock on the other.
Round 1 (leveling): Join the yarn to the 11 o’clock loop of M1 and ch 2 (counts as hdc). Then work the repeat below on each top-row motif. M1 starts from “ch 2” because the joining ch-2 is its hdc. M2 and M3 start from “hdc in 11 o’clock loop.”
Repeat for each motif: hdc in the 11 o’clock loop, ch 2, sc in the 12 o’clock loop, ch 2, hdc in the 1 o’clock loop, ch 2, tr in the 2 o’clock loop, ch 2, tr in the next motif’s 10 o’clock loop, ch 2.
After M3, the last tr goes into M1’s 10 o’clock loop. Sl st to the top of the beginning ch-2.
Per motif: 5 sts + 5 ch-2 sps. Round total: 15 sts + 15 ch-2 sps.
The tr stitches rise out of the dips, the hdc stitches sit on the shoulders of each circle, and the sc sits on its highest point. Together they bring the edge level.
Round 2 (conversion): Ch 1. Work 1 sc in each st and 2 sc in each ch-2 sp. Sl st to the first sc.
Count: 15 (1 per st) + 30 (2 per sp) = 45 sc.
Rounds 3–7: Ch 1, sc in each st around, sl st to the first sc. (45 sc each round)
The band is now 1.5 in (3.8 cm) deep: Rounds 2–7 are 6 rounds at 4 rounds per in. Do not fasten off; continue with the strap.
Why the math works: Each motif contributes exactly 15 sc, and 3 motifs × 15 = 45 sc. Since 45 sc at 16 sc per 4 in measures 11.25 in (28.6 cm), the band fits the tube without ruffling or pulling in.
Hanging Strap
Row 1: Ch 1, sc in the next 4 sts of Round 7. (4 sc)
Rows 2–40: Ch 1, turn, sc in each st. (4 sc each row)
The strap is now 10 in (25.4 cm) long. Fasten off and leave a 10 in (25.4 cm) tail. Count 22 sts on from the strap’s last stitch and sew the end of the strap over the next 4 sts. This places it directly opposite the start, because the band has 45 sts. The arch rises about 4 in (10.2 cm).
Bottom Edging
For each bottom-row motif, use these loops: 5, 6, and 7 o’clock across the bottom of the circle, plus 4 and 8 o’clock in the dips.
Round 1 (leveling): Join the yarn to M7’s 7 o’clock loop and ch 2 (counts as hdc). Work the same repeat as the top band’s Round 1, using the 7, 6, and 5 o’clock loops in place of 11, 12, and 1, and the 4 o’clock loop and the next motif’s 8 o’clock loop for the two tr. As at the top, M7 starts from “ch 2” because the joining ch-2 is its hdc.
Round total: 15 sts + 15 ch-2 sps.
Round 2 (conversion): Work the same as the top band’s Round 2.
Count: 15 + 30 = 45 sc.
Round 3 (decrease): Ch 1. Sc in the next 3 sts, sc2tog. Repeat from * 8 more times. (36 sc)
Round 4 (eyelets): Ch 4 (counts as dc + ch 1), skip 1 st. Dc in the next st, ch 1, skip 1 st. Repeat from * 16 more times. Sl st to the 3rd ch of the ch-4. (18 dc, 18 ch-1 sps)
Round 5 (conversion): Ch 1. Work 1 sc in each dc and 1 sc in each ch-1 sp.
Count: 18 + 18 = 36 sc.
Round 6: Ch 1, rev sc in each st around. (36 rev sc) Fasten off.
The bottom section is 1.5 in (3.8 cm) deep.
Drawstring
Ch 97, then sl st in the 2nd ch from the hook and in each ch across. (96 sl st) The drawstring is 24 in (61.0 cm) long. Tie an overhand knot at each end.
Start at the center front and weave the drawstring in and out through the 18 eyelet spaces of Round 4, so both ends come out at the front. Pull it until the opening is about 1.5 in (3.8 cm) across, then tie a bow.
Final Blocking
- Weave in all remaining ends along the sc rings and band stitches.
- Spritz the holder with water until it is damp, not soaked.
- Slide a rolled towel or a 3.5 in (8.9 cm) diameter cylinder into the tube.
- Gently open out each motif until it is round and measures 3.75 in (9.5 cm) across.
- Smooth the top band and check that it measures 11.25 in (28.6 cm) around.
- Lay the strap flat and straight.
- Let it dry completely before you remove the form.
Final Quality-Control Checklist
- 9 motifs, each 3.75 in (9.5 cm) across with 12 loops
- Every side join is at 3 o’clock to 9 o’clock, and every vertical join is at 6 o’clock to 12 o’clock
- The tube is not twisted, and the right side faces out
- The top band has 45 sc in every round and is 1.5 in (3.8 cm) deep
- The bottom section goes from 45 sc to 36 sc, with 18 eyelets
- The strap is attached exactly opposite its starting point
- The drawstring runs through all 18 eyelets and ties in a bow at the front
- Flat width is 5.6 in (14.2 cm), and length without the strap is 14.25 in (36.2 cm)
Troubleshooting
- Motifs cup: Your Round 3 is too tight. Go up one hook size for Rounds 3–4 only.
- Motifs ruffle: Your chain spaces are too long. Tighten your ch-2 and ch-3 tension, or go down one hook size.
- The tube is twisted: Undo the joins on M3 and check that all three motifs have the right side facing out before you close the ring.
- The top band flares: You worked 3 sc into some ch-2 sps. Recount Round 2; it should have exactly 45 sc.
- The top edge is wavy: Make sure the tr stitches are in the 2 o’clock and 10 o’clock loops and not in the joined 3 o’clock and 9 o’clock loops.
- Bags fall out of the bottom: Pull the drawstring tighter or double-knot the bow.
Care
Hand wash in cool water with mild soap. Press out the water in a towel and dry flat, reshaped over a rolled towel.
Final Notes
Everything in this pattern follows one chain of measurements. Each motif is 3.75 in (9.5 cm). Three motifs around make 11.25 in (28.6 cm). Each motif gives 15 sc to the band, for 45 sc in total, and 45 sc at gauge also measures 11.25 in (28.6 cm). The 1.5 in (3.8 cm) band at the top and the 1.5 in (3.8 cm) section at the bottom bring the holder to 14.25 in (36.2 cm). As long as your test motif matches, everything else will fit.
Happy crocheting!