

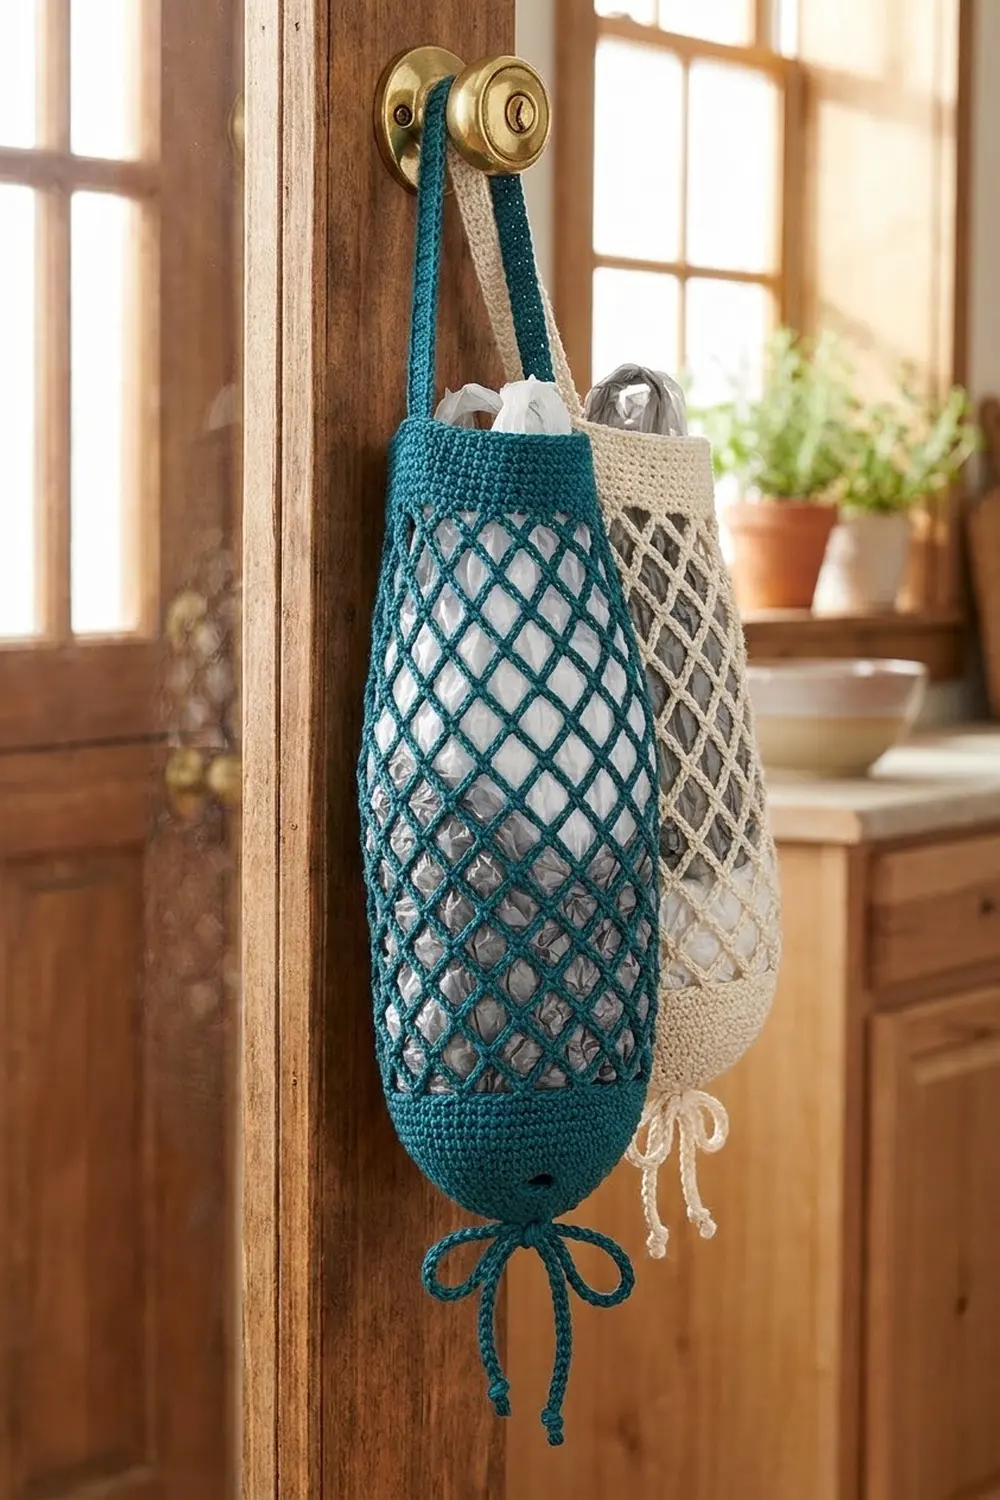
The Seaglass Diamond Net Bag Holder turns a messy pile of plastic grocery bags into a neat, useful kitchen piece. You push bags in through the top and pull them out one at a time through a small hole at the bottom. The open diamond netting shows the bags inside and uses much less yarn than a solid holder.
The sample is worked in deep teal worsted-weight cotton. Cream is a great alternative, and both colors look good on a white cabinet door. The design has three textures: a solid single-crochet cone at the base, a tall section of chain-loop diamond mesh, and a firm single-crochet rim. A short strap loop hangs it from a knob or hook. A knotted drawstring is tied in a bow at the bottom.
This pattern uses US crochet terms. The finished holder measures about 6.9 in (17.5 cm) wide flat at the base and rim, about 8 in (20.3 cm) wide flat at the fullest part of the mesh, and 16.3 in (41.4 cm) long without the strap. It is about 20.3 in (51.6 cm) long including the strap loop.
The body is one seamless piece worked in joined rounds from the bottom up. You begin with a chain ring that becomes the dispensing hole, build a solid cone, change to mesh rounds, and close with a solid rim band. The strap and drawstring are made separately and attached at the end.
Finished Size and Construction
- Finished size: 6.9 in (17.5 cm) wide flat at base and rim, about 8 in (20.3 cm) at the fullest mesh, 16.3 in (41.4 cm) long; 20.3 in (51.6 cm) including the strap
- Skill level: Easy / advanced beginner
- Terminology: US crochet terms
- Yarn weight: Worsted (#4) cotton
- Hook: 5.0 mm (H-8)
- Number of pieces: 1 body, plus 1 strap and 1 drawstring cord
- Layout: Single tube, worked in the round from the bottom up
- Piece size: 13.7 in (34.8 cm) around at the base and rim
- Size before border (rim band): 14.8 in (37.6 cm) long
- Border (rim band) depth: 1.5 in (3.8 cm), 6 rounds
Materials
Choose a smooth, firm worsted-weight cotton or cotton blend. Cotton holds the mesh open, doesn’t stretch much under the weight of the bags, and can be machine washed. Avoid splitty or very soft acrylic, because the chain loops will sag.
- Teal (main color): about 60 g / 115 m
- Alternative cream colorway: the same amount, about 60 g / 115 m
These quantities include a margin of about 25 percent, so one standard 100 g ball is more than enough.
Tools:
– 5.0 mm (H-8) crochet hook
– Stitch marker
– Tapestry needle
– Scissors
– Tape measure
– Rust-proof pins and a spray bottle for blocking
Abbreviations (US Terms)
- ch – chain
- sc – single crochet
- 2 sc inc – 2 sc in the same stitch
- dc – double crochet
- sl st – slip stitch
- sk – skip
- sp – space
- st(s) – stitch(es)
- rnd(s) – round(s)
Special technique: mesh join. Use this to close a mesh round with your hook already in the middle of the last loop. For a 5-chain mesh round, work ch 2, then dc in the first sc of the round. This (ch 2 + dc) counts as one ch-5 loop. For a 6-chain mesh round, work ch 3, then dc in the first sc. This (ch 3 + dc) counts as one ch-6 loop. The next round starts by working around the post of that dc.
Gauge and Checkpoints
Gauge: 14 sc and 16 rnds = 4 in (10.2 cm) in single crochet worked in the round. One sc round is about 0.25 in (0.6 cm) tall. One mesh round is about 0.8 in (2.0 cm) tall when lightly stretched.
Test the base first, since it’s the best gauge swatch. Work through Rnd 6 and check:
- After Rnd 6: 48 sts, about 13.7 in (34.8 cm) around, or 6.9 in (17.5 cm) when the cone is flattened.
- After Rnd 8: the base is about 2 in (5.1 cm) tall.
- After Rnd 13: the holder is about 6 in (15.2 cm) long.
- After Rnd 20: the holder is about 11.6 in (29.5 cm) long.
- After Rnd 24: the holder is about 14.8 in (37.6 cm) long.
- After Rnd 30: the holder is about 16.3 in (41.4 cm) long.
If the base is too big: go down to a 4.5 mm hook. If it’s too small: go up to a 5.5 mm hook. Keep the stitch counts the same. Mesh length is forgiving. If your holder is short at the Rnd 20 checkpoint, add one more ch-6 round before moving on.
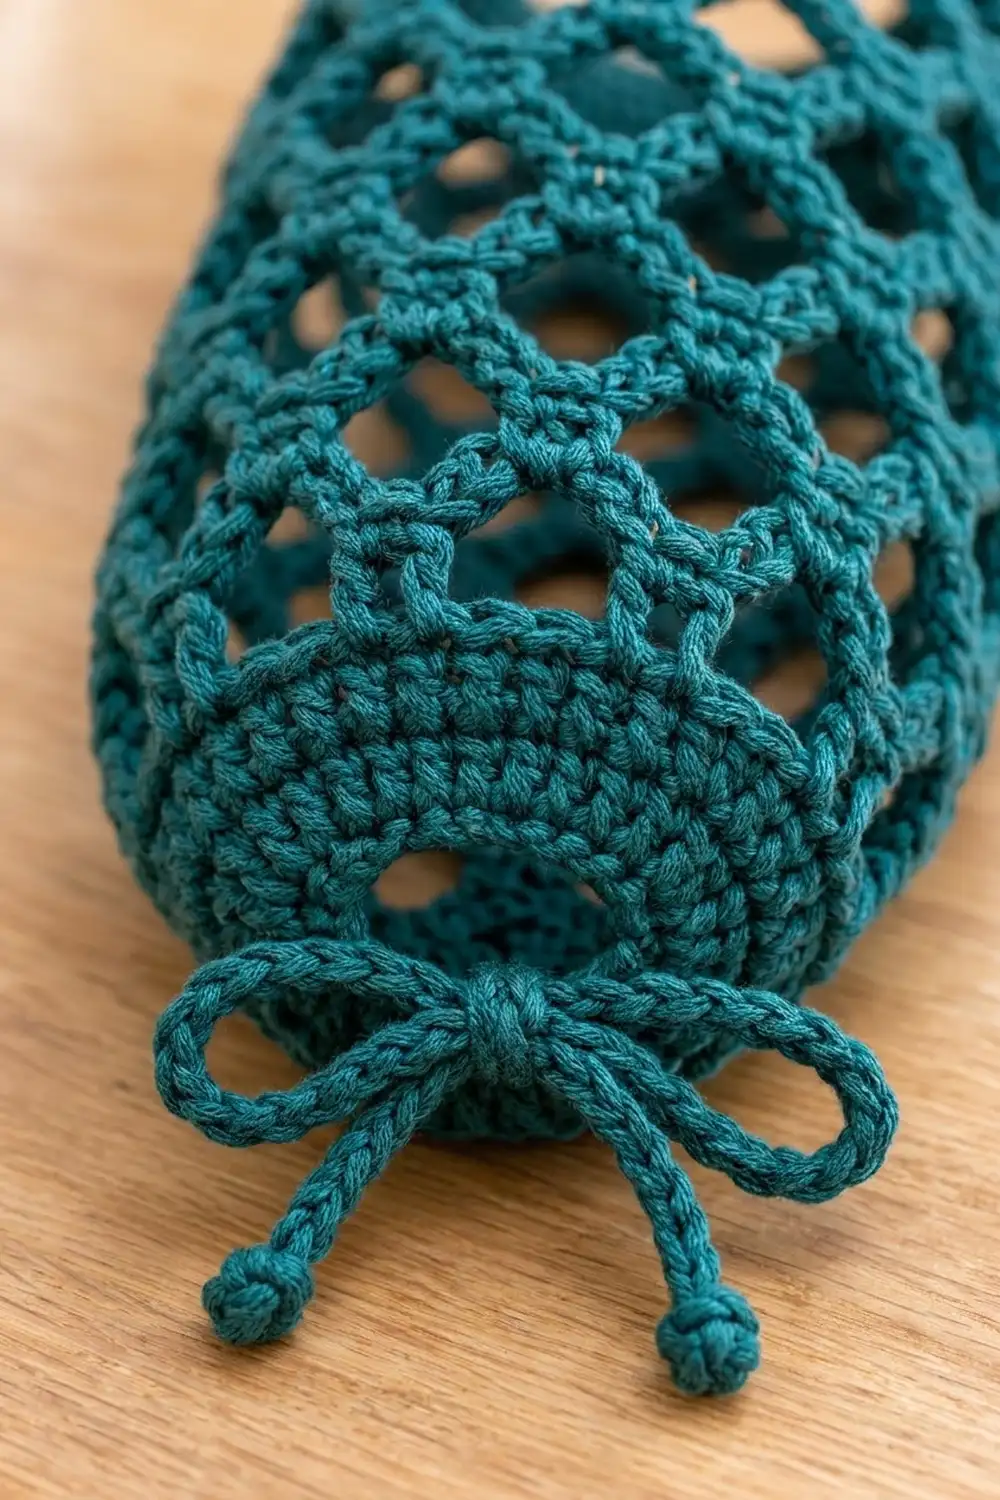
Body: Solid Base Cone
Mark the first stitch of every solid round with the stitch marker.
Foundation: Ch 20 and sl st in the first ch to form a ring. Don’t twist the chain. This ring becomes the dispensing hole, about 5.7 in (14.5 cm) around and 1.8 in (4.6 cm) across.
Rnd 1: Ch 1, sc in each ch around, then sl st in the first sc. (20 sts)
Rnd 2: Ch 1, sc in next 3 sts, 2 sc inc in next st 5 times, then sl st in the first sc. (25 sts)
Rnd 3: Ch 1, sc in next 4 sts, 2 sc inc in next st 5 times, then sl st. (30 sts)
Rnd 4: Ch 1, sc in next 4 sts, 2 sc inc in next st 6 times, then sl st. (36 sts)
Rnd 5: Ch 1, sc in next 5 sts, 2 sc inc in next st 6 times, then sl st. (42 sts)
Rnd 6: Ch 1, sc in next 6 sts, 2 sc inc in next st 6 times, then sl st. (48 sts)
Rnds 7–8: Ch 1, sc in each st around, then sl st. (48 sts)
The increases are spaced so the base forms a gentle cone instead of a flat disk. The sides should curve upward, as in the progress photos. Base height is about 2 in (5.1 cm).
Body: Diamond Net Mesh
Rnd 9 (transition): Ch 1, sc in the first st. Ch 5, sk 3 sts, sc in next st. Repeat from * 10 more times. Ch 2, then dc in the first sc to close (mesh join). (12 loops, 12 sc)
Check the math: each repeat uses 4 base stitches (1 sc + 3 skipped), and 48 ÷ 4 = 12 loops. The final ch 2 + dc covers the last 3 skipped stitches.
Rnds 10–13: Ch 1, sc around the post of the joining dc. Ch 5, sc in next ch-5 sp. Repeat from * 10 more times. Ch 2, dc in the first sc. (12 loops per rnd)
Each sc sits in the center of a loop from the round below. This offset creates the diamonds.
Rnds 14–20 (fuller middle): Ch 1, sc around the post of the joining dc. Ch 6, sc in next sp. Repeat from * 10 more times. Ch 3, dc in the first sc. (12 loops per rnd)
The longer loops make the middle of the holder fuller without changing the number of diamonds.
Rnds 21–23: Ch 1, sc around the post of the joining dc. Ch 5, sc in next sp. Repeat from * 10 more times. Ch 2, dc in the first sc. (12 loops per rnd)
Rnd 24 (closing mesh round): Ch 1, sc around the post of the joining dc. Ch 5, sc in next sp. Repeat from * 10 more times. Ch 5, sl st in the first sc. (12 full ch-5 loops, 12 sc)
This round ends on top of a sc instead of in the middle of a loop, which sets up the rim. That makes 16 mesh rounds (Rnds 9–24), about 12.8 in (32.5 cm) when lightly stretched.
Border: Solid Rim Band
The rim band works as this holder’s border. It firms up the opening, holds the top round, and gives the strap a solid base to attach to.
Border gauge: Same as the base, 14 sc and 16 rnds = 4 in (10.2 cm). For 48 sts, that means 13.7 in (34.8 cm) around, or 24 sts on each side of the flattened tube.
Rnd 25 (conversion round): Ch 1, sc in the same sc as the join. Work 3 sc in the next ch-5 sp, then sc in the next sc. Repeat from * around, ending with 3 sc in the last sp. Sl st in the first sc.
Count: 12 sc worked one per existing sc + 36 sc added in the loops (3 × 12 loops) = 48 sts. When flattened, that is 24 sts on each side.
Rnds 26–30: Ch 1, sc in each st around, then sl st in the first sc. (48 sts; 24 per flattened side)
Fasten off and weave in the end on the inside.
Why the math works: The base finishes with 48 sts, and the mesh turns those into 12 loops (48 ÷ 4). The rim turns each loop-and-junction group back into 4 sts (3 + 1), and 12 × 4 = 48. The top and base have the same circumference, 13.7 in (34.8 cm), so the holder hangs straight and evenly balanced. The rim’s 6 rounds × 0.25 in = 1.5 in (3.8 cm) deep.
Hanging Strap
Foundation: Ch 36.
Row 1: Sc in 2nd ch from hook and in each ch across. (35 sts)
Row 2: Ch 1, turn, sc in each st across. (35 sts)
Fasten off, leaving a 12 in (30.5 cm) tail. The strap measures about 10 in (25.4 cm) long and 0.5 in (1.3 cm) wide.
Attach: Flatten the holder so the beginning-of-round seam is at the center back. Fold the strap into a U. Lay 1 in (2.5 cm) of each strap end against the inside of the back rim, overlapping all 6 rim rounds. Space the ends 0.5 in (1.3 cm) apart. Whipstitch each end firmly on all four edges, going through both strap rows and the rim stitches. That leaves 8 in (20.3 cm) of strap showing, which forms a loop about 4 in (10.2 cm) tall above the rim.
Drawstring Cord
Foundation: Ch 110.
Row 1: Sl st in the back bump of the 2nd ch from hook and in each ch across. (109 sl sts)
Fasten off. The cord measures about 28 in (71.1 cm). Tie an overhand knot about 0.5 in (1.3 cm) from each end, then trim the tails close to make the small knotted ends.
Thread: Start at the center front of the base. Weave the cord through Rnd 3 (30 sts), going over 3 sts and under 3 sts all the way around. That gives 5 over-and-under pairs, so both ends come out at the front. Even out the tails, cinch lightly so the hole is about 1.5 in (3.8 cm) across, and tie a bow with loops and tails of about 3 in (7.6 cm).
Final Blocking
- Weave in all remaining ends on the inside, through solid stitches only, never along mesh chains.
- Spray the whole holder until it is damp but not dripping.
- Stuff it loosely with a rolled towel or a plastic bag filled with other bags so the tube rounds out.
- Gently pull the mesh lengthwise until it reaches 12.8 in (32.5 cm), and center each sc junction so the diamonds look even.
- Pin the rim and base to the stuffing so each one is round and 13.7 in (34.8 cm) around.
- Pin the strap flat, at 0.5 in (1.3 cm) wide.
- Let it dry completely, then remove the pins and stuffing.
Final Quality-Control Checklist
- Base, rim, and every solid round have exactly 48 sts.
- Every mesh round has 12 loops, and none are skipped or doubled.
- The diamonds line up in a straight column from base to rim, without spiraling.
- The holder is 16.3 in (41.4 cm) long, 6.9 in (17.5 cm) wide flat at the rim, and about 8 in (20.3 cm) wide at the fullest point.
- The strap is centered at the back, stitched securely, and forms a 4 in (10.2 cm) loop.
- The cord is woven through Rnd 3, with both ends coming out at the front.
- The bottom hole lets one bag pull out without the whole bundle falling through.
Troubleshooting
The base ruffles or lies flat instead of forming a cone. Your tension is loose, or there are extra increases. Recount Rnds 2–6, or go down one hook size.
The base cups too sharply. You worked too tightly. Go up one hook size for Rnds 1–8 only.
The mesh spirals around the tube. You’re probably working the first sc into the wrong space. Always start each round around the post of the joining dc.
The joining loop looks shorter than the others. Pull up a taller dc, or swap the dc for a hdc plus 1 extra ch, so the join matches the full loop length.
The holder sags when full. The cotton is too soft or the chains are loose. Use the ch-5 setting for all mesh rounds, and keep each chain snug.
The bags fall out the bottom. Cinch the drawstring tighter, or weave it through Rnd 2 instead.
The strap stretches. Add a third sc row, or line the strap with a matching ribbon.
Care
Machine wash cool on a gentle cycle in a mesh laundry bag, then reshape while damp and lay flat or hang to dry. Avoid hot tumble drying, which can shrink cotton and tighten the mesh.
Final Notes
The measurement chain is straightforward. A 20-chain ring gives a 1.8 in (4.6 cm) hole. Six rounds of increases bring the base to 48 sts, or 13.7 in (34.8 cm) around, and the solid base is 2 in (5.1 cm) tall. The mesh turns those 48 sts into 12 loops. Sixteen mesh rounds add 12.8 in (32.5 cm), and the ch-6 middle rounds widen the holder to about 8 in (20.3 cm) flat. The rim turns each loop back into 4 sts, returning to 48 sts and adding 1.5 in (3.8 cm), for a body of 16.3 in (41.4 cm). The strap adds a 4 in (10.2 cm) loop, so the finished holder hangs about 20.3 in (51.6 cm) long.
If the base checkpoint is right, the rest of the holder will follow. Make one in teal, another in cream, and keep a tidy supply of bags by the door.
Happy crocheting!