

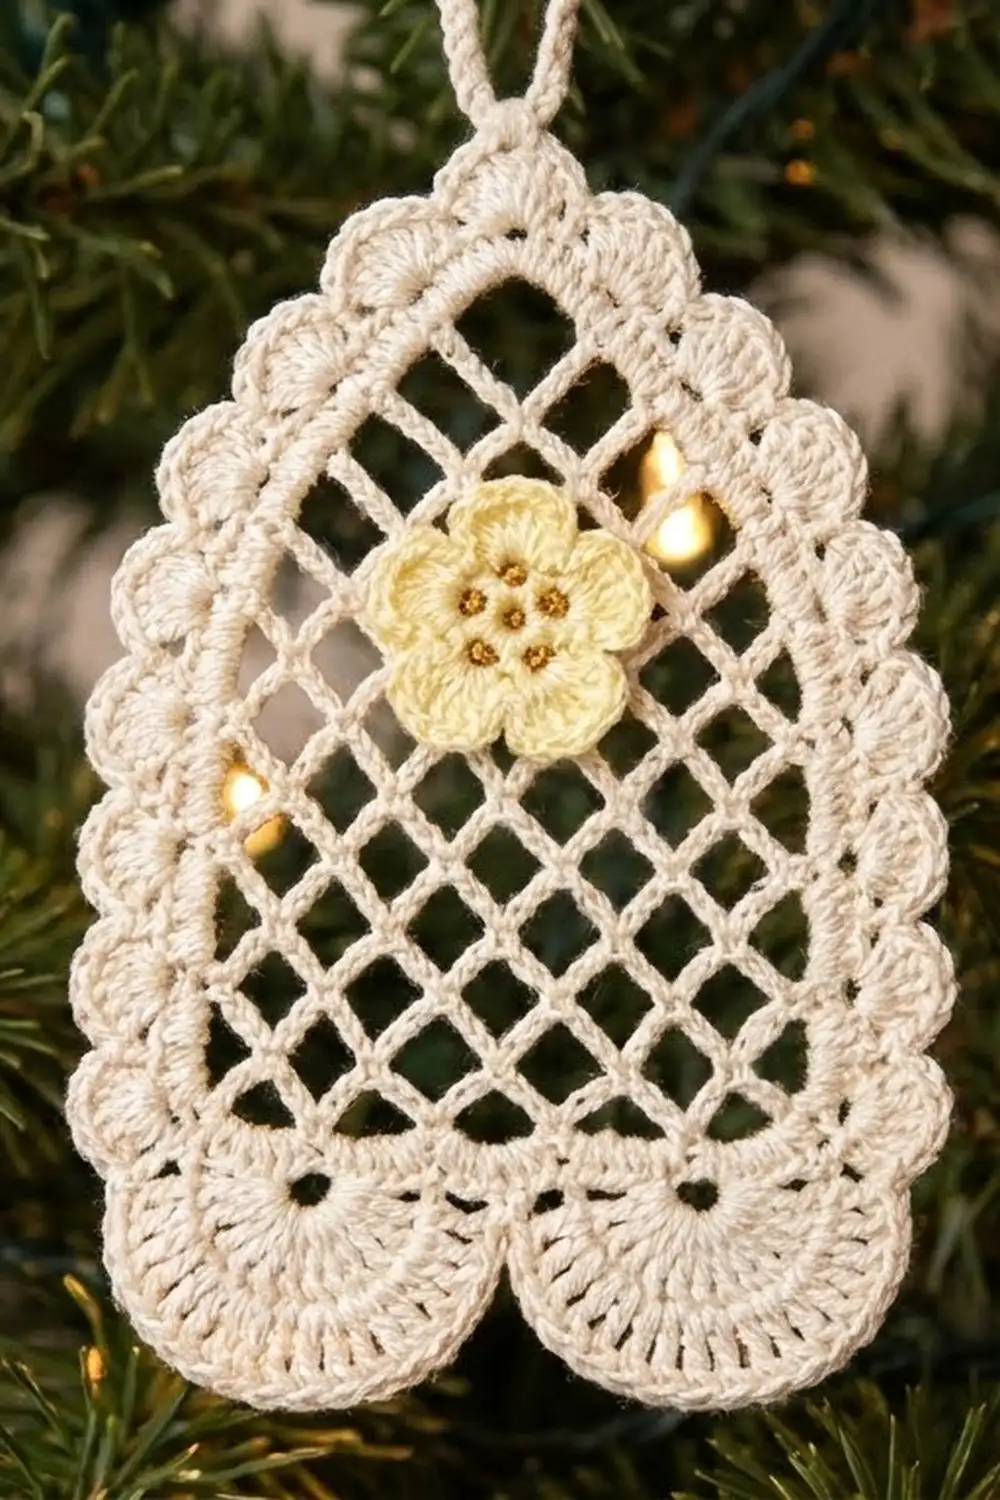
The Chapel Window Lace Ornament is a small piece of thread lace shaped like a gothic window. Two shell fans sit along its base and an open diamond lattice fills the middle. The lattice narrows into a pointed arch topped by a spray of long spokes, and a scalloped shell edge frames the whole outline.
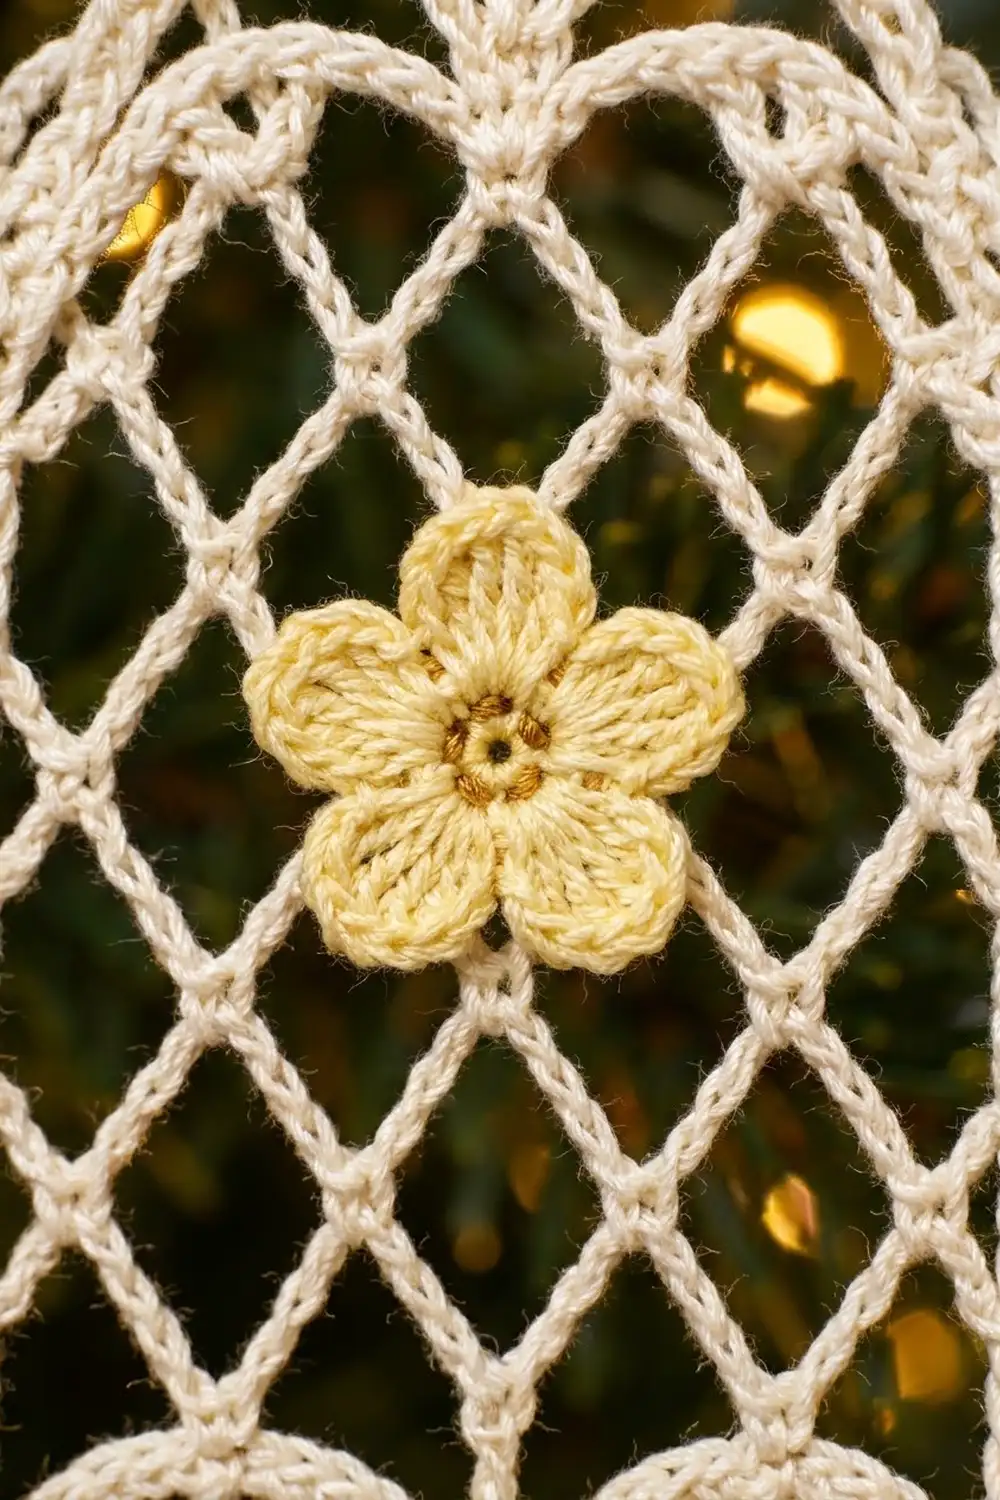
All the lace is worked in cream cotton thread. A small pale yellow flower with a golden-brown center sits in the middle of the lattice like a pressed blossom behind glass. The style is vintage and heirloom, and the ornament looks right on a tree, in a window, or tied to a gift.
This pattern uses US crochet terms. The finished ornament measures 3.7 in (9.4 cm) wide by 6.1 in (15.5 cm) tall, not counting the hanging loop, which adds about 1.25 in (3.2 cm).
The ornament is worked flat in rows from the bottom up:
– foundation row
– small arches
– two fans
– lattice
– decrease rows that shape the arch
– the spray cluster at the apex
After that, two border rounds go all the way around the piece, and the hanging loop is added last. The flower is made separately and sewn on.
Finished Size and Construction
- Finished size: 3.7 in × 6.1 in (9.4 cm × 15.5 cm), plus a 1.25 in (3.2 cm) loop
- Skill level: Intermediate
- Terminology: US
- Yarn weight: Size 3 cotton crochet thread
- Hook: 2.25 mm (US B-1)
- Number of pieces: 1 main piece + 1 flower appliqué
- Layout: Single ornament; no joining
- Piece size before border: 3.1 in × 5.5 in (7.9 cm × 14.0 cm)
- Border depth: 0.3 in (0.8 cm) per side
- Flower diameter: 0.9 in (2.3 cm)
Materials
Use a smooth, mercerized cotton thread in size 3. Mercerized thread shows the stitches crisply and blocks well. For these amounts, assume roughly 400 m per 100 g.
- Cream (main): 12 g / 48 m
- Pale yellow (flower): 2 g / 8 m
- Golden brown (flower center): 1 g / 4 m
All quantities include a margin of about 20% for your gauge swatch and weaving in ends.
Tools:
– 2.25 mm (US B-1) crochet hook
– Tapestry needle with a small eye
– Rustproof pins and a blocking board or foam mat
– Spray bottle
– Fabric stiffener or spray starch (optional)
– Small scissors
– Ruler or tape measure
Abbreviations (US Terms)
- ch – chain
- sl st – slip stitch
- sc – single crochet
- dc – double crochet
- dtr – double treble crochet (yo 3 times)
- trtr – triple treble crochet (yo 4 times)
- sk – skip
- sp(s) – space(s)
- yo – yarn over
- RS – right side
Special stitch – partial leg: Wrap the yarn the number of times the stitch calls for, insert the hook into the stitch, yo and pull up a loop. Then [yo, draw through 2 loops] until 1 loop of this stitch remains on the hook. This loop is added to whatever loops were already on the hook.
7-dc fan: (dc, [ch 1, dc] 6 times) in the same space. This makes 7 dc and 6 ch-1 spaces.
Gauge and Checkpoints
Gauge: 10 sc = 1 in (2.5 cm). In the lattice, 10 ch-5 loops measure 3.1 in (7.9 cm) wide, and 2 lattice rows measure 0.6 in (1.5 cm) tall.
Work Rows 1–5 as your test piece. You can keep it if it measures correctly.
Checkpoints:
– After Row 1: 3.1 in (7.9 cm) wide
– After Row 5: 1.1 in (2.8 cm) tall
– After Row 12: 3.2 in (8.1 cm) tall
– After Row 18: 5.0 in (12.7 cm) tall
– After Row 19: 5.5 in (14.0 cm) tall
– After Border Round 1: 3.3 in × 5.7 in (8.4 cm × 14.5 cm)
– After Border Round 2: 3.7 in × 6.1 in (9.4 cm × 15.5 cm)
If Row 1 is wider than 3.1 in (7.9 cm) by more than 1/8 in (0.3 cm), change to a 2.0 mm hook. If it is narrower by more than that, change to a 2.5 mm hook. Small differences can be fixed during blocking. Lattice loops stretch a lot, so judge your gauge from the sc rows.
Main Ornament
With cream, ch 32.
Row 1 (RS): Sc in the 2nd ch from hook and in each ch across. (31 sc)
Row 2 (small arches): Ch 1, turn. Sc in the first sc, ch 4, sk 2 sc, sc in next sc 10 times. (11 sc, 10 ch-4 loops)
Row 3 (fan base): Ch 1, turn. Sc in the first sc, ch 4, sk next 2 loops, work a 7-dc fan in the next loop, ch 4, sk next 2 loops, sc in next sc twice.
(3 sc, 2 fans of 7 dc each, 4 ch-4 spaces)
Each fan sits in the 3rd loop of its group of five. The middle sc is anchored in the exact center of the row.
Row 4 (fan rays): Ch 1, turn. Sc in the first sc, ch 3, dc in the first dc of the fan, [ch 2, dc in next dc] 6 times, ch 3, sc in next sc twice.
(3 sc, 14 dc, 4 ch-3 spaces, 12 ch-2 spaces)
Row 5 (fan cap): Ch 1, turn. Sc in the first sc, sc in the next ch-3 sp, 2 sc in each of the next 6 ch-2 sps, sc in the next ch-3 sp, sc in the next sc twice.
(1 + 2 × 15 = 31 sc)
This row puts a smooth arc over each fan and brings the count back to 31, which is the same as Row 1.
Row 6 (lattice set-up): Ch 1, turn. Sc in the first sc, ch 5, sk 2 sc, sc in next sc 10 times. (11 sc, 10 ch-5 loops)
Row 7 (half row): Ch 5 (counts as a dc + ch 2), turn. Sc in the first loop, [ch 5, sc in next loop] 9 times, ch 2, dc in the last sc.
(9 full loops + 2 half loops)
Row 8 (full row): Ch 1, turn. Sc in the dc, [ch 5, sc in next loop] 9 times, ch 5, sc in the 3rd ch of the turning ch. (11 sc, 10 ch-5 loops)
Rows 9–12: Repeat Rows 7–8 twice. Row 12 is a full row. (11 sc, 10 loops)
The half rows keep the side edges straight. This makes the diamond lattice between the two upright sides of the window.
Arch Shaping
Every arch row starts with a decrease turn: ch 1, turn, sl st into the first loop until you reach its center (about 3 sl sts). Ch 1 more, then sc in that same loop. The row then ends with a sc in the last loop. Each arch row therefore loses one loop and steps in by half a loop on each side.
- Row 13: Decrease turn, [ch 5, sc in next loop] 8 times. (9 loops, 10 sc)
- Row 14: Decrease turn, [ch 5, sc in next loop] 7 times. (8 loops, 9 sc)
- Row 15: Decrease turn, [ch 5, sc in next loop] 6 times. (7 loops, 8 sc)
- Row 16: Decrease turn, [ch 5, sc in next loop] 5 times. (6 loops, 7 sc)
- Row 17: Decrease turn, [ch 5, sc in next loop] 4 times. (5 loops, 6 sc)
- Row 18: Decrease turn, [ch 5, sc in next loop] 3 times. (4 loops, 5 sc)
Spray Cluster
Row 19 (spray): Ch 1, turn, and sl st in the first sc. Ch 8; this counts as the first trtr leg. Then work these partial legs:
– 1 dtr partial leg in the 2nd sc
– 1 dtr partial leg in the 3rd sc
– 1 dtr partial leg in the 4th sc
– 1 trtr partial leg in the 5th sc
You now have 5 loops on the hook. Yo and draw through all 5 loops, then ch 1 to close.
(1 cluster of 5 spokes; the closing ch is the apex)
The outer legs are longer so all five spokes meet at one point. The spaces between them form the spray at the top of the window. Fasten off.
Flower Appliqué
Round 1: With pale yellow, make a magic ring. Ch 1, work 5 sc into the ring, and sl st to the first sc. Pull the ring closed. (5 sc)
Round 2: (Sl st, ch 2, 3 dc, ch 2, sl st) in the next sc 5 times. (5 petals)
Fasten off, leaving a 6 in (15.2 cm) tail for sewing.
With golden brown, work 3 small French knots in the center of the ring. The flower should measure 0.9 in (2.3 cm) across.
Border
Border gauge: Round 1 adds 0.1 in (0.3 cm) on each side. The shells of Round 2 add 0.2 in (0.5 cm) more. The total border depth is 0.3 in (0.8 cm).
Round 1 (sc frame): With the RS facing, join cream at the apex. Ch 1 and work the round in this order, sl st to the first sc at the end. (152 sc)
- Apex: 3 sc into the apex. (3)
- First spray side: 8 sc evenly along the outer trtr leg. (8)
- First slope: 3 sc in each row-end of Rows 18–13. (18)
- First straight side: 3 sc in each row-end of Rows 12–6, then 1 sc in Row 5, 3 in Row 4, 3 in Row 3, 2 in Row 2 and 1 in Row 1. (21 + 10 = 31)
- Bottom: Working into the foundation ch: 3 sc in the first ch, sc in the next 29 ch, 3 sc in the last ch. (35)
- Second straight side: Work the same row-ends in reverse order. (31)
- Second slope: 3 sc in each row-end of Rows 13–18. (18)
- Second spray side: 8 sc along the trtr leg. (8)
Count check: 3 + 8 + 18 + 31 + 35 + 31 + 18 + 8 = 152.
Round 2 (scallops): Sl st into the center apex sc. Ch 1 and sc in the same st. Then work sk 1 sc, 5 dc in the next sc, sk 1 sc, sc in the next sc 38 times. On the final repeat, replace the last sc with a sl st into the first sc. (38 shells, 38 sc)
Why the math works: Each shell repeat uses exactly 4 stitches, and 152 ÷ 4 = 38, so the repeat comes out even with no fudging. The shape is also symmetrical. Round 2 starts on the center apex sc, which is stitch 2 of the round, and the bottom center stitch is stitch 78. Since 78 − 2 = 76 is a multiple of 4, a sc lands on the bottom center as well as the apex, and the shells mirror from left to right. At the bottom corners, shells land beside the 3-sc corner groups and fan neatly around them.
Hanging loop: At the apex sc, ch 24 and sl st into the same apex sc. Work 32 sc over the chain loop, then sl st to the apex. Fasten off. The loop should measure 1.25 in (3.2 cm) tall.
Final Blocking
- Weave in all ends along solid sc sections, not through the lattice.
- Soak the ornament in cool water for 5 minutes, then press it gently in a towel.
- Pin it out to 3.7 in × 6.1 in (9.4 cm × 15.5 cm).
- Pin the two straight sides parallel first, then the flat bottom.
- Pin the arch so it comes to a sharp, centered point.
- Pin each of the 38 shells individually, and stretch the lattice so every diamond opens evenly.
- Use stiffener or starch now if you want a firmer ornament.
- Leave it to dry completely, which takes at least 12 hours.
- Sew the flower over the center sc of Row 10 (the 6th of its 11 sc), stitching through the flower’s center and petal bases only.
Final Quality-Control Checklist
- [ ] The piece is 3.7 in × 6.1 in (9.4 cm × 15.5 cm), and the loop is 1.25 in (3.2 cm).
- [ ] Row 5 has 31 sc, and both fans have 7 dc spokes.
- [ ] The lattice has 10 loops across Row 12.
- [ ] The arch steps evenly from 9 loops down to 4.
- [ ] All 5 spray spokes meet at a single apex.
- [ ] Border Round 1 has 152 sc.
- [ ] Round 2 has 38 shells, with a sc at the apex and at the bottom center.
- [ ] The flower is centered on the lattice and lies flat.
- [ ] No ends are visible from the RS.
Troubleshooting
Fans ruffle or cup. Your ch-3 spaces in Row 4 are too tight. Make the chains a little looser, or block the fans flat.
Sides lean inward. You probably left out the half-loop dc at the end of a half row. Each odd lattice row must start with ch 5 and end with ch 2, dc.
Arch is lopsided. Count your sl sts on each decrease turn. Every arch row must start at the center of the first loop.
Spokes don’t meet. Check the leg heights. The outer legs are trtr and the inner three are dtr.
Shell count is off. Recount Border Round 1. It must be exactly 152 sc.
Lattice is too loose. Change to a 2.0 mm hook for Rows 6–18 only.
Care
Hand wash in cool water with a mild soap, press gently in a towel, and lay flat or pin to dry. If you used stiffener, reapply it after washing and store the ornament flat.
Final Notes
Each stage of this ornament builds on the one before:
– Row 1’s 31 sc set the width at 3.1 in (7.9 cm).
– Row 5 brings the count back to 31 so the lattice is just as wide.
– Row 12 reaches 3.2 in (8.1 cm), and the arch rows take the piece to 5.0 in (12.7 cm).
– The spray finishes the body at 5.5 in (14.0 cm).
– The 152-stitch frame divides into exactly 38 shells, giving a finished ornament of 3.7 in × 6.1 in (9.4 cm × 15.5 cm).
If you check your measurements at each stage, your window will come out even and symmetrical.
Happy crocheting!