

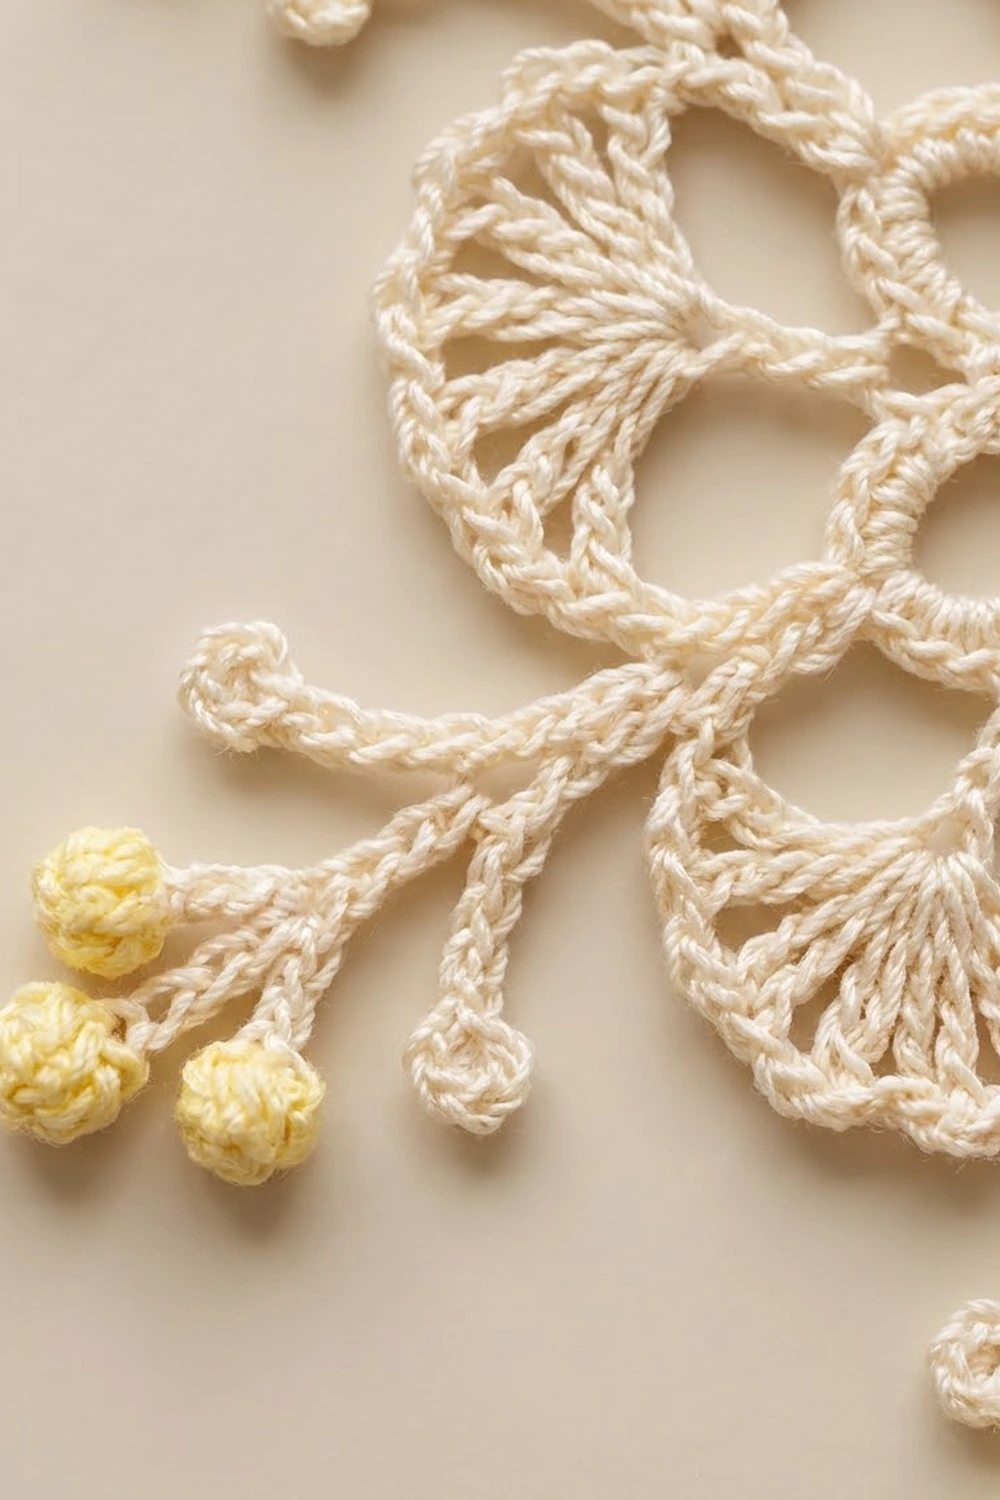
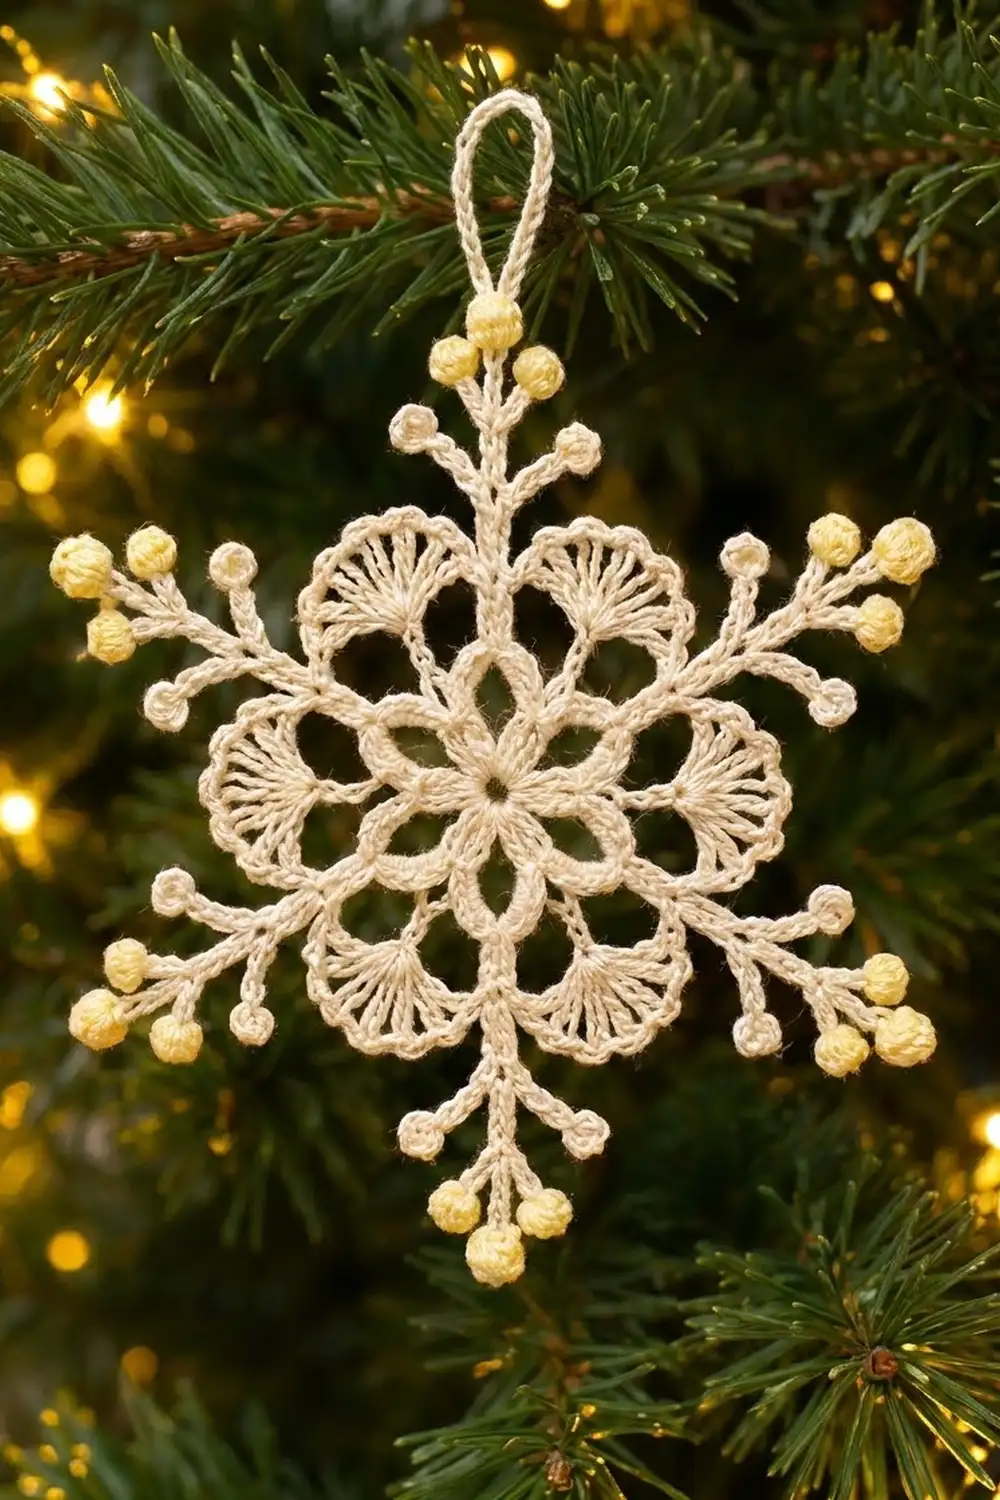
The Honeyed Frost Snowflake is a lacy six-point ornament. A tiny flower sits at its center, open fans circle around it, and six branched arms end in clusters of soft pale yellow bobbles. The cream thread gives it a vintage, frosted look. The yellow tips catch tree lights like little drops of honey.
The finished snowflake measures 6 in (15.2 cm) from arm tip to opposite arm tip. A 1.25 in (3.2 cm) hanging loop at the top brings the total hanging height to 7.25 in (18.4 cm). This pattern uses US crochet terms throughout.
Construction is simple and fully in the round. You work a magic ring, a petal round, a bridge of chain arcs, and a round of fans. A final cream round adds the scalloped fan edge and all six branched arms, including the hanging loop. Last, you work the pale yellow bobbles into the tip loops of each arm, one arm at a time.
You only make one piece. There is no joining and no sewing, just a few ends to weave in and a careful blocking.
Finished Size and Construction
- Finished size: 6 in (15.2 cm) tip to tip; 7.25 in (18.4 cm) including the hanging loop
- Skill level: Intermediate (chain-and-slip-stitch arms, bobbles)
- Terminology: US crochet terms
- Yarn weight: Size 3 cotton crochet thread (light fingering)
- Hook: 2.25 mm (US B-1)
- Number of pieces: 1
- Layout: Single six-point snowflake motif
- Piece size after Round 5: 3.5 in (8.9 cm) fan to opposite fan
- Size before border: 3.5 in (8.9 cm)
- Border depth: 1.25 in (3.2 cm) per side (arms extend past the fans), giving 3.5 + 1.25 + 1.25 = 6 in (15.2 cm)
Materials
Thread: Use mercerized cotton crochet thread in size 3. Mercerized cotton gives crisp stitch definition, holds starch well, and won’t fuzz on the tree. Avoid acrylic, because it won’t hold a blocked shape.
- Cream (main color): 8 g, about 22 m (24 yd)
- Pale yellow (bobbles): 2 g, about 6 m (6.5 yd)
These quantities include a margin of roughly 30% for your gauge swatch and tails.
Tools:
- 2.25 mm (US B-1) crochet hook
- Tapestry needle (small eye) or fine steel hook for weaving in ends
- Scissors
- Blocking board or foam mat
- Rustproof pins
- Fabric stiffener or spray starch
- Plastic wrap (to protect the board)
Abbreviations (US Terms)
- ch – chain
- sl st – slip stitch
- sc – single crochet
- hdc – half double crochet
- dc – double crochet
- sk – skip
- sp – space
- st(s) – stitch(es)
- rep – repeat
Special stitches:
- Picot: Ch 3, sl st in 3rd ch from hook.
- Bobble (made in yellow): Ch 2 (counts as first leg). Yarn over, insert hook in loop, yarn over and pull up a loop, yarn over and pull through 2 loops. Work from * to * twice, which leaves 3 loops on the hook. Yarn over and pull through all 3 loops, then ch 1 to close.
- Tip trefoil: (Ch 3, sl st in the last stem ch worked) 3 times. This makes three ch-3 loops that all share one anchor chain.
Gauge and Checkpoints
Gauge is not critical for an ornament, but it controls the final size. Before you commit, work Rounds 1–3 as your test piece.
- Chain gauge: 10 ch = 1 in (2.5 cm), chains relaxed and not stretched.
- After Round 1: the ring measures 0.5 in (1.3 cm) across.
- After Round 3: the flower measures 2.25 in (5.7 cm) from petal point to opposite petal point.
- After Round 5: the piece measures 3.5 in (8.9 cm) from fan to opposite fan.
- Finished: 6 in (15.2 cm) from arm tip to opposite arm tip.
If your Round 3 test is too big (over 2.5 in / 6.4 cm), go down to a 2.0 mm hook. If it is too small (under 2 in / 5.1 cm), go up to a 2.5 mm hook. A change of one hook size moves the final snowflake about 0.5 in (1.3 cm) either way.
Pattern: The Snowflake Center
Work with cream thread, right side facing throughout. Do not turn.
Round 1 (center ring): Make a magic ring. Ch 1, then work 12 sc in the ring. Pull the ring tight and sl st to the first sc. (12 sc)
Checkpoint: 0.5 in (1.3 cm) across.
Round 2 (petal loops): Ch 1, sc in the first sc, ch 8, sk next sc. Sc in next sc, ch 8, sk next sc. Rep from * 4 more times. Sl st to the first sc. (6 sc, 6 ch-8 loops)
Round 3 (pointed petals): Sl st into the first ch-8 loop. In each ch-8 loop, work (sc, hdc, 2 dc, ch 2, 2 dc, hdc, sc). Sl st to the first sc. (60 sts: 10 per petal, plus 6 ch-2 tip spaces)
The ch-2 at the top of each petal makes the sharp point you see in the photo. Each arm will grow from one of these points.
Checkpoint: 2.25 in (5.7 cm) point to point.
Round 4 (fan arcs): Sl st in the next hdc, in the next 2 dc, and into the ch-2 tip sp. Ch 1. Sc in the ch-2 tip sp, ch 7. Rep from * 5 more times. Sl st to the first sc. (6 sc, 6 ch-7 arcs)
Each ch-7 arc bridges from one petal point to the next and sits above the valley between two petals.
Round 5 (fans): Ch 1. Sc in the sc at the petal point, then 11 dc in the next ch-7 arc. Rep from * 5 more times. Sl st to the first sc. (72 sts: 6 sc + 66 dc)
The 11 dc open into a half-circle fan with clearly radiating posts. Spread each fan evenly along its arc before moving on.
Checkpoint: 3.5 in (8.9 cm) fan to opposite fan. This is your “size before border.”
Border: Scalloped Fan Edge and Branched Arms
This outer round is the border of the snowflake. It adds the picot scallops to every fan and builds all six arms in one pass. The first arm you work becomes the top arm, with the hanging loop.
Border gauge: 10 ch = 1 in (2.5 cm). Each arm uses a 16-ch stem (10 lower + 6 upper). With the tip trefoil and bobbles, that comes to 1.75 in (4.4 cm) beyond the petal-point sc. Because the petal points sit 0.5 in (1.3 cm) inside the fan edge, each arm extends 1.25 in (3.2 cm) past the fans.
Arm Instructions (work as directed in Round 6)
- Lower stem: Ch 10.
- Left branch: Ch 6, picot. Working back along the branch chains, sl st in each of the next 3 ch, picot. Then sl st in each of the last 2 branch ch and in the 10th stem ch.
- Upper stem: Ch 6.
- Tip: Work a tip trefoil, which gives 3 ch-3 loops.
- Top arm only: Instead, (ch 3, sl st in the last stem ch), ch 20, sl st in the same stem ch, (ch 3, sl st in the same stem ch). This gives 2 ch-3 loops with the ch-20 hanging loop between them.
- Back down the upper stem: Sl st in each of the next 6 ch (5 upper-stem ch plus the 10th lower-stem ch).
- Right branch: Ch 6, picot. Sl st in each of the next 3 branch ch, picot. Then sl st in each of the last 2 branch ch and in the same 10th lower-stem ch.
- Back down the lower stem: Sl st in each of the remaining 9 lower-stem ch.
Work the sl sts through the back bump of each chain so the stem stays straight and gets a neat twisted-cord look on the front.
Round 6
Ch 1.
In the sc at the petal point, work: sc, Arm, sc.
Fan edge: Sc in the first dc of the fan. Then (ch 3, sk next dc, sc in next dc) 5 times. You have now worked sc in dc 1, 3, 5, 7, 9 and 11.
Rep from the first * 5 more times, working the first repeat as the top arm. Sl st to the first sc and fasten off. Leave a 6 in (15.2 cm) tail.
Count per sixth (“per side”): 2 sc at the petal point + 1 arm + 6 sc and 5 ch-3 scallops on the fan.
Full round: 12 petal-point sc + 36 fan sc = 48 sc. You also have 30 ch-3 scallops, 6 arms, 24 cream picots (4 per arm) and 17 tip loops (3 × 5 arms + 2 on the top arm).
Why the math works: Each fan has 11 dc, an odd number. Working sc into every other dc puts a sc on both outer dc (1 and 11), so each fan edge is symmetrical, with 5 scallops. Each branch has 6 chains with picots after chains 6 and 3, so the left and right branches mirror each other exactly. Both branches anchor in the same 10th stem chain, so they sit level.
Pale Yellow Bobble Tips
Work each arm separately so the yellow never travels over cream stitches.
- Join yellow with a sl st in the first ch-3 tip loop of an arm.
- Work a bobble in this loop, then sl st in the same loop.
- Sl st directly into the next ch-3 loop. The loops share an anchor chain, so this slip stitch hides at the junction.
- Work a bobble, then sl st in the same loop.
- Rep steps 3–4 for the third loop.
- Fasten off and leave 4 in (10.2 cm) tails.
Rep on the remaining four standard arms. On the top arm, work one bobble in each of the 2 ch-3 loops beside the hanging loop. Do not work into the ch-20 loop. (17 bobbles total)
Weave in all ends along the back of the stems, following the slip-stitch path, and trim them.
Final Blocking
- Cover your blocking board with plastic wrap.
- Mix fabric stiffener as directed, or have spray starch ready.
- Soak the snowflake in the stiffener and gently squeeze out the excess. Don’t wring it.
- Lay it flat, right side up. Pin the center ring first, keeping it round at 0.5 in (1.3 cm).
- Pin each of the six petal points, evenly spaced at 2.25 in (5.7 cm) point to point.
- Pin the arm tips straight out from each petal point, 6 in (15.2 cm) tip to opposite tip. Use a ruler to check that all three tip-to-tip lines are equal.
- Pin each side branch open at an even angle. Pin the middle ch-3 scallop of each fan so the fans sit as round half-circles.
- Thread the hanging loop over a pin and pull it straight up so it dries at 1.25 in (3.2 cm).
- Use a pin tip to press any visible holes out of the stiffener film.
- Let it dry completely, usually 12–24 hours. Unpin only when the piece is stiff.
Final Quality-Control Checklist
- [ ] The center ring is closed, with no gap.
- [ ] All 6 petals have a sharp ch-2 point.
- [ ] All 6 fans show 11 radiating dc and 5 even scallops.
- [ ] Each arm has 2 mirrored branches with 2 picots each.
- [ ] 17 yellow bobbles: 3 on each standard arm, 2 on the top arm.
- [ ] The hanging loop is centered over the top arm.
- [ ] Tip-to-tip size is 6 in (15.2 cm) on all three axes.
- [ ] No ends show from the front.
- [ ] The piece hangs flat without curling.
Troubleshooting
The center ruffles or cups. Your ch-8 loops are too long for your tension. Try ch 7 in Round 2 and recheck the 2.25 in (5.7 cm) checkpoint.
The fans cup upward. You are crowding them. Spread the 11 dc evenly along the ch-7 arc, or go up half a hook size for Round 5 only.
The arms curve sideways. Your slip stitches are too tight. Work the sl sts back down the stem a little more loosely, and always into the back bump.
The branches don’t line up. Make sure both branches anchor in the same 10th lower-stem chain.
The bobbles look flat. Pull each leg up to full dc height before closing, and don’t skip the closing ch 1.
Yellow shows on the cream stem. You slipped down the stem in yellow. Move between tip loops only at the shared anchor chain.
The finished piece is too small or too large. Recheck your chain gauge. The 16-ch stems magnify any tension difference.
Care
Hand wash gently in cool water only if needed, then re-stiffen and re-block to 6 in (15.2 cm). Store flat in tissue paper so the arms and hanging loop don’t crush.
Final Notes
The whole snowflake builds on a short chain of measurements:
- 10 ch = 1 in (2.5 cm) chain gauge
- 0.5 in (1.3 cm) center ring
- 2.25 in (5.7 cm) petal flower
- 3.5 in (8.9 cm) across the fans
- 1.25 in (3.2 cm) of arm beyond the fans on each side, giving 6 in (15.2 cm) tip to tip
- 1.25 in (3.2 cm) hanging loop, for 7.25 in (18.4 cm) overall
Check each step as you go and the final size will take care of itself. Make one in cream and honey, then try other combinations, like white with silver bobbles or ivory with pale blue.
Happy crocheting!