
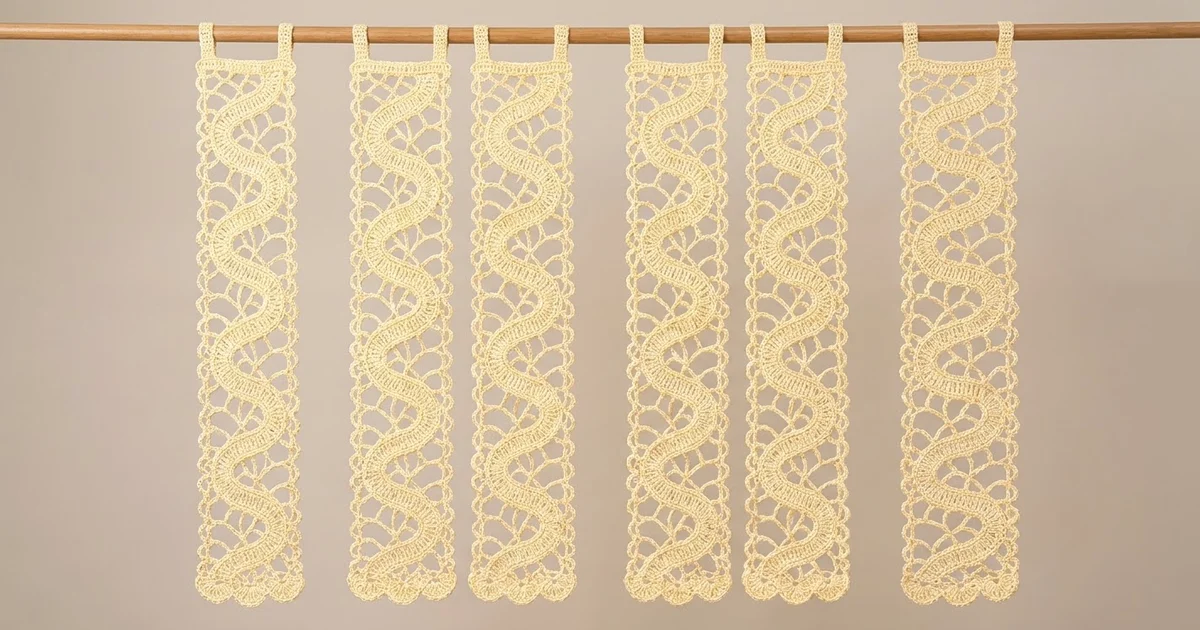
This curtain is made of four long, narrow lace panels in soft buttercream cotton. A ribbed Bruges-style tape winds down the center of each panel in a smooth S-curve. Open chain spokes fan out from the tape to two straight side rails, a small loop edging runs down the long sides, a row of shells scallops the bottom, and two tabs at the top hold the panel on a curtain rod.
The panels are not sewn together. Each one hangs from its own tabs, so light comes through the lace and through the narrow gaps between panels. The look is vintage and airy, and it suits a glass door, a pantry opening, or a tall window.
All instructions use US crochet terms. Each finished panel measures 9 in (22.9 cm) wide by 73.25 in (186.1 cm) long, not counting the tabs. The tab loops add about 3.5 in (8.9 cm) above the top edge.
Construction is done in four stages for each panel: crochet the serpentine tape, make two straight foundation-double-crochet rails, join the rails to the tape with chain spokes, then work a two-round border and add the tabs.
Finished Size and Construction
- Finished panel size: 9 in x 73.25 in (22.9 cm x 186.1 cm), plus tabs
- Skill level: Experienced
- Terminology: US
- Yarn weight: DK (#3) cotton
- Hook: 3.5 mm (E-4)
- Number of pieces: 4 identical panels, hung side by side and not joined
- Layout: 4 panels in one row, about 1 in (2.5 cm) apart on the rod
- Panel body before border: 8 in x 72 in (20.3 cm x 182.9 cm)
- Border depth: 0.5 in (1.3 cm) on the long sides and top, 0.75 in (1.9 cm) at the bottom
Materials
Use a smooth mercerized or combed cotton in DK weight. Cotton holds the curves after blocking and won’t sag like acrylic on a long hanging panel. Choose a yarn with good stitch definition so the tape ribs show clearly.
- Buttercream: 350 g / 805 m total (about 80 g / 184 m per panel), based on 50 g / 115 m balls
- 3.5 mm (E-4) crochet hook
- Tapestry needle
- Rustproof pins and a large blocking surface (foam mats or a carpet covered with a sheet)
- Spray bottle; light starch is optional
- Locking stitch markers
- Tape measure
The quantities above include a margin of about 10% for swatching and blocking adjustments.
Abbreviations (US Terms)
- ch – chain
- sl st – slip stitch
- sc – single crochet
- dc – double crochet
- fdc – foundation double crochet
- sk – skip
- st(s) – stitch(es)
- sp – space
- rep – repeat
- HW – half-wave (one 24-row bend of the tape)
Special stitches
- Tape Row (TR): Ch 5, turn, dc in each of the 6 dc. The ch-5 does not count as a stitch. It forms a free side loop on the turning edge.
- Inner-Curve Row (IC): Ch 2, sl st in the gather loop on this edge (defined in the tape section), ch 2, turn, dc in each of the 6 dc. This pulls the inner edge in so the tape bends.
- Spoke (N, S): Ch N, sl st in the next free tape loop, ch N, sk S rail sts, sc in the next rail st. One spoke uses S + 1 rail stitches.
Gauge and Checkpoints
- Dc / fdc: 20 sts and 10 rows = 4 in (10.2 cm)
- Sc (tabs): 20 sts and 24 rows = 4 in (10.2 cm)
Before you start the curtain, make a 12-row tape sample. It should measure 1.2 in (3.0 cm) across the dc and 2.2 in (5.6 cm) across including the side loops. Its length should be 4.8 in (12.2 cm). Then make 20 fdc. That strip should measure 4 in (10.2 cm).
If your sample comes out too big, go down a hook size. If it’s too small, go up one. The tape width matters most, because the spoke lengths are calculated from the gaps it leaves.
Checkpoints for each panel:
- One half-wave (24 rows) advances 8 in (20.3 cm) down the panel.
- The finished tape (216 rows) spans 72 in (182.9 cm) from top to bottom.
- Each rail measures 72 in (182.9 cm).
- The body after the spoke rows is 8 in x 72 in (20.3 cm x 182.9 cm).
- The bordered panel is 9 in x 73.25 in (22.9 cm x 186.1 cm).
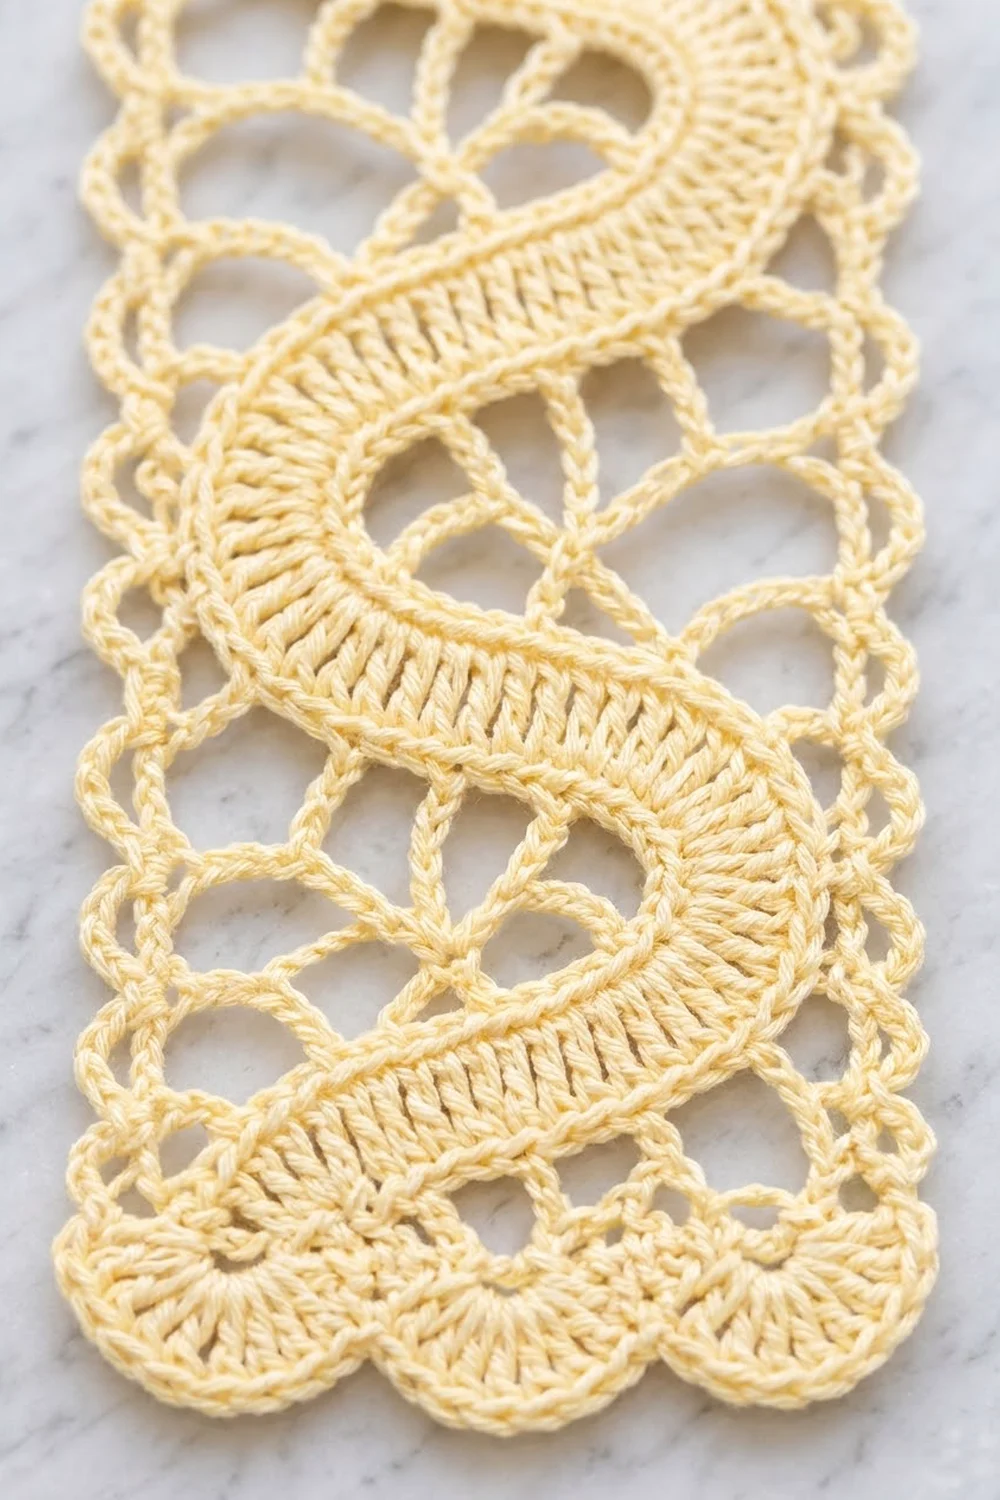
Part 1: Serpentine Tape (make 1 per panel)
The tape is worked in short rows across its width. Ch-5 loops form on alternating edges. Call the edge holding the Row 1 loop Edge A and the other edge Edge B. Odd rows place their loop on Edge A. Even rows place theirs on Edge B.
Row 1: Ch 11, dc in 6th ch from hook and in each of next 5 ch. You have 6 dc, and the 5 skipped ch form the first Edge A loop.
Row 2: TR. (6 dc)
The tape is made of 9 half-waves of 24 rows each, so 216 rows in total including Row 1. Within each half-wave, number the rows 1–24. Because 24 is even, HW odd rows always fall on Edge A.
Odd half-waves (HW 1, 3, 5, 7, 9) – bulge toward Edge A, inner edge B:
- Rows 1–6: TR (for HW 1, Rows 1 and 2 are already made, so work Rows 3–6). The Edge B loop made in Row 6 is the gather loop.
- Rows 7–18: Alternate TR and IC: TR on odd rows (Edge A loops stay free) and IC on even rows (8, 10, 12, 14, 16, 18). That gives 6 IC rows, all joined into the Row 6 gather loop.
- Rows 19–24: TR.
Even half-waves (HW 2, 4, 6, 8) – bulge toward Edge B, inner edge A:
- Rows 1–6: TR. The Edge A loop made in Row 5 is the gather loop.
- Rows 7–18: IC on odd rows (7, 9, 11, 13, 15, 17), joined into the Row 5 gather loop. TR on even rows.
- Rows 19–24: TR.
Every row has 6 dc. Fasten off after HW 9, Row 24 (global Row 216).
Free loop count per half-wave:
- Outer (bulging) edge: 12 free loops
- Inner edge: 6 free loops (Rows 2/1, 4/3, 6/5 and 20/19, 22/21, 24/23), with the gather loop third in line
Totals:
- Edge A: 5 × 12 + 4 × 6 = 84 free loops
- Edge B: 4 × 12 + 5 × 6 = 78 free loops
Pin the tape out flat on a 72 in (182.9 cm) line as you go. Each curve should swing the tape’s center line 2.2 in (5.6 cm) to either side of the panel center, which makes 4.4 in (11.2 cm) peak to peak. Measured across the outer loops, the full wave is 6.6 in (16.8 cm) wide. If a bend turns too sharply, replace the last IC of that half-wave with a TR, and do the same on every half-wave so the bends stay matched.
Part 2: Side Rails (make 2 per panel)
Rail: Work 360 fdc and fasten off. That gives 360 sts and 72 in (182.9 cm).
The chain edge of the fdc is the inner edge and takes the spokes. The dc tops face outward and take the border.
Part 3: Spoke Rows (join tape to rails)
Lay the tape centered between the two rails. The rails’ inner edges should sit 7.2 in (18.3 cm) apart. That leaves 0.3 in (0.8 cm) between each rail and the tape’s outer loops at the peaks, and up to 4.7 in (11.9 cm) at the deepest hollows.
Work each side from the top down. Join yarn with sc in the first chain-edge st of the rail. Then work spokes half-wave by half-wave.
Peak half-wave (12 loops, 40 rail sts):
| Spoke | 1 | 2 | 3 | 4 | 5 | 6 | 7 | 8 | 9 | 10 | 11 | 12 |
|---|---|---|---|---|---|---|---|---|---|---|---|---|
| N (ch) | 10 | 8 | 6 | 4 | 3 | 2 | 2 | 3 | 4 | 6 | 8 | 10 |
| S (sk) | 3 | 3 | 2 | 2 | 2 | 2 | 2 | 2 | 2 | 2 | 3 | 3 |
Rail sts used: 4 × 4 + 8 × 3 = 40.
Hollow half-wave (6 loops, 40 rail sts):
| Spoke | 1 | 2 | 3 (gather) | 4 | 5 | 6 |
|---|---|---|---|---|---|---|
| N (ch) | 12 | 16 | 22 | 22 | 16 | 12 |
| S (sk) | 6 | 6 | 5 | 5 | 6 | 6 |
Rail sts used: 4 × 7 + 2 × 6 = 40.
Edge A side: Work Peak, Hollow, Peak, Hollow, Peak, Hollow, Peak, Hollow, Peak. That uses all 84 loops.
Edge B side: Work Hollow, Peak, Hollow, Peak, Hollow, Peak, Hollow, Peak, Hollow. That uses all 78 loops.
Nine half-waves use 9 × 40 = 360 rail sts. The first sc already sits in st 1, so on the final spoke of each side, sk 1 fewer st so that the last sc lands in st 360. Fasten off.
The long spokes in each hollow converge on the gather loop and its neighbors, which makes the open fan shapes. Spokes should lie flat without pulling the tape off its center line.
Checkpoint: The body measures 8 in x 72 in (20.3 cm x 182.9 cm).
Make All Pieces
Make 4 panels. Each panel needs 1 tape, 2 rails, 2 spoke rows, the border, and 2 tabs, which is about 80 g / 184 m of Buttercream per panel.
Layout on the rod (front view):
[Panel 1] gap [Panel 2] gap [Panel 3] gap [Panel 4]
  9 in   1 in   9 in   1 in   9 in   1 in   9 in
Total width: 4 × 9 in + 3 × 1 in = 39 in (99.1 cm).
Joining (Hanging Layout)
The panels are not sewn together. Each one hangs from its own two tabs, and the 1 in (2.5 cm) gaps let the panels move separately when the door is used.
To keep the row even:
- Thread all 8 tabs onto the rod in order.
- Slide the panels until the gaps measure 1 in (2.5 cm).
- Check that all four bottom scallop lines sit at the same height.
If one panel hangs lower, re-block it rather than tugging it level on the rod.
Size checkpoint: The hung curtain covers 39 in (99.1 cm) wide and 73.25 in (186.1 cm) below the rod loops.
Border
Border gauge matches the main gauge: 5 sts per inch. The corner ch-sps are not counted as sts. Each side count runs from corner space to corner space.
Rnd 1: Join at the top right corner.
- Each long side: 1 sc in each fdc top, 360 sc.
- Top: 2 sc over the rail end, ch 12, then 12 sc across the tape top (3 sc in the corner loop, 6 sc in the foundation ch, 3 sc in the Row 2 loop), ch 12, 2 sc over the other rail end. That makes 2 + 12 + 12 + 12 + 2 = 40 sts.
- Bottom: Work it the same way, with 3 sc in the Row 215 loop, 6 sc in the Row 216 dc, and 3 sc in the Row 216 loop. That is also 40 sts.
- Corners: Ch 2 at each corner.
Rnd 1 total: 800 sts plus 4 ch-2 sps. Each ch counts as 1 st on Rnd 2.
Rnd 2:
- Each long side: sc in next st, ch 3, sk 1, rep 180 times. That makes 180 ch-3 loops and uses all 360 sts.
- Bottom: sk 3, 9 dc in next st, sk 3, sc in next st, rep 5 times. That makes 5 shells and uses all 40 sts.
- Top: sc in each st, 40 sc.
- Each corner sp: (sc, ch 3, sc).
Join and fasten off.
Why the math works:
- The rail’s 360 sts divide by 2 into 180 loops.
- The 40-st ends divide by 8 into 5 shells.
- The 40 top sts match the 8 in (20.3 cm) body width at 5 sts per inch.
- The 360 long-side sts match 72 in (182.9 cm).
Tabs (make 2): Join at Rnd 2 top st 1 (and later st 35).
- Row 1: Sc in 6 sts. (6 sc)
- Rows 2–42: Ch 1, turn, sc in each sc. (6 sc)
The tab measures 1.2 in x 7 in (3.0 cm x 17.8 cm). Fold it to the back and sew Row 42 to the back of Rnd 1. That forms a loop 3.5 in (8.9 cm) deep.
Final Blocking
- Soak the panel in cool water for 10 minutes and press out the water in a towel. Don’t wring it.
- Pin a straight 73.25 in (186.1 cm) line and a 9 in (22.9 cm) width.
- Pin both rails straight first, then the top and bottom.
- Pin the tape’s center line to its 2.2 in (5.6 cm) swings at each peak.
- Open each shell and each hollow fan with pins.
- Mist with light starch if you like, and let it dry completely before unpinning.
Final Quality-Control Checklist
- Every tape row has 6 dc.
- There are 216 tape rows in total.
- There are 84 free loops on Edge A and 78 on Edge B, all caught by spokes.
- Rails are 360 sts each.
- Rnd 1 has 360 / 40 / 360 / 40 sts.
- Each long side has 180 loops, and the bottom has 5 shells.
- Tabs are matched in length and placed at sts 1–6 and 35–40.
- The panel measures 9 in x 73.25 in (22.9 cm x 186.1 cm).
Troubleshooting
- Tape bends too far: Swap the last IC for a TR in every half-wave.
- Tape bends too little: Make the IC chains ch 1 instead of ch 2.
- Spokes pucker the tape: Add 1–2 ch to that spoke’s N on both arms.
- Spokes sag: Remove 1–2 ch from N.
- Panel too long: Check the rail gauge, and remake the rail if it’s over 72 in (182.9 cm).
- Bottom flares: Use 7 dc shells instead of 9.
- Panels hang unevenly: Re-block to the same length rather than shortening the tabs.
Care
Hand wash in cool water with mild soap, press dry in a towel, and re-block flat. Don’t tumble dry, because it distorts the curves.

Final Notes
The measurement chain is simple:
- 6-dc tape rows at 0.4 in (1.0 cm) each
- 24 rows per half-wave, giving an 8 in (20.3 cm) advance
- 9 half-waves, giving 72 in (182.9 cm)
- Rails of 360 fdc, matching 72 in (182.9 cm)
- Spokes using 40 rail sts per half-wave
- Body of 8 in (20.3 cm) wide
- Border adding 0.5 in (1.3 cm) per side, 0.5 in (1.3 cm) at the top, and 0.75 in (1.9 cm) at the bottom
- Finished panel of 9 in x 73.25 in (22.9 cm x 186.1 cm)
Check each link before moving on, and the four panels will hang as one matched curtain.
Happy crocheting!