

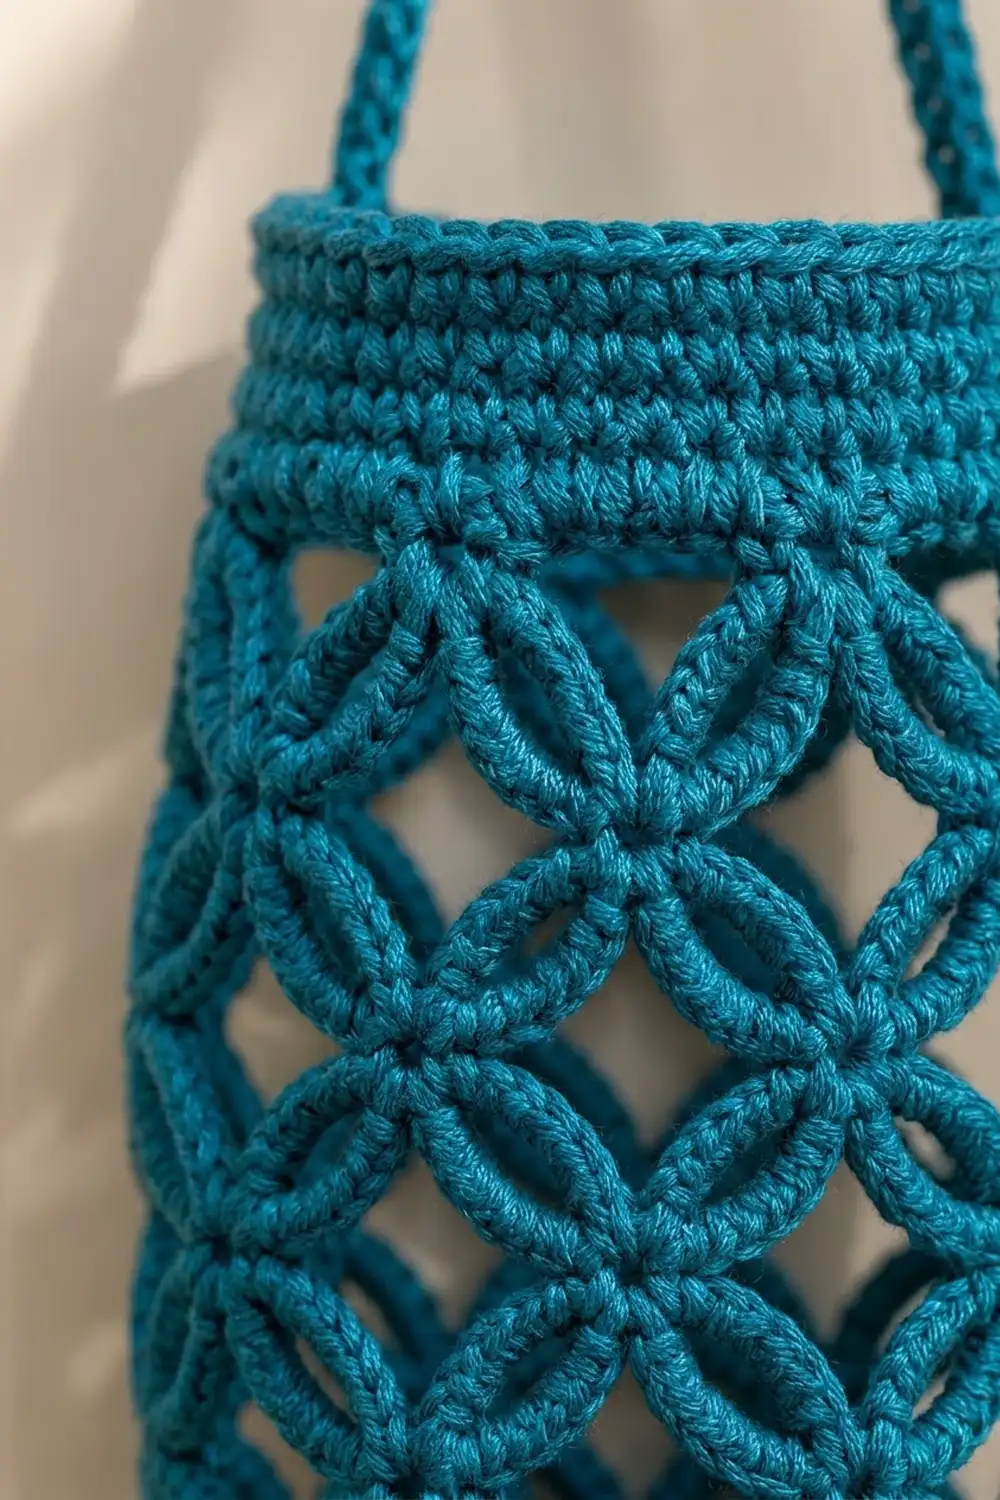
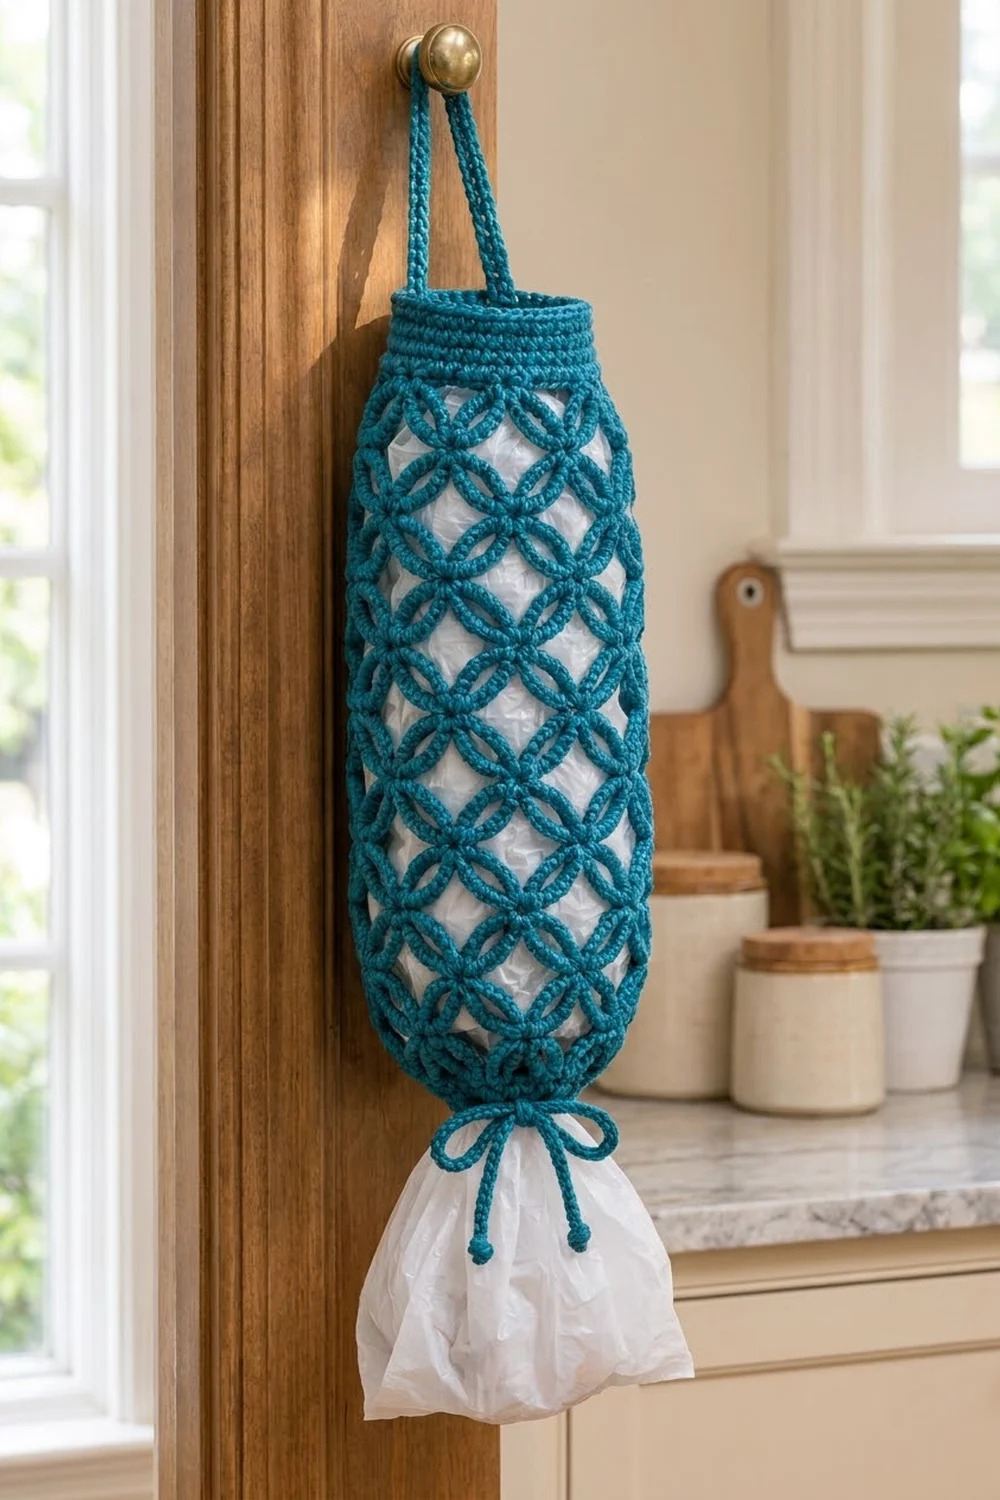
The Ringlet Lattice Bag Holder is a tall, slim tube that keeps plastic grocery bags out of sight but easy to reach. The body is an open lattice of overlapping chain arches. Every arch crosses half of its neighbor, so the fabric reads as rows of interlocking rings, almost like a wedding-ring quilt done in rope.
The sample is a deep teal worsted cotton with a slight sheen. A dusty pink version works the same way, and any smooth, firm cotton will show the rings clearly. The pattern uses US crochet terms throughout.
The finished holder is 6 in (15.2 cm) wide laid flat, 12 in (30.5 cm) around, and 16 in (40.6 cm) long, not counting the strap and ties. A 16 in (40.6 cm) cord strap hangs it from a doorknob or cabinet knob.
You work the holder in one piece from the bottom up. First comes a solid bottom band with a drawstring eyelet round. Next is the ring lattice, made with two balls of yarn that take turns. After that comes a solid top band. Last, you add a slip-stitch cord strap and a drawstring that ties in a bow. Stuff bags in through the top and pull them out through the gathered bottom.
Finished Size and Construction
- Finished size: 6 in (15.2 cm) wide flat, 12 in (30.5 cm) around, 16 in (40.6 cm) long
- Skill level: Intermediate (easy stitches, but you need to manage two working yarns)
- Terminology: US crochet terms
- Yarn weight: Worsted (#4) cotton
- Hook: 5.0 mm (H-8)
- Number of pieces: 1 tubular body, plus 1 strap and 1 drawstring
- Layout: Worked in joined rounds from the bottom up, never turned
- Body size before top band: 14.5 in (36.8 cm) long
- Top band (border) depth: 1.5 in (3.8 cm)
- Strap: 16 in (40.6 cm) cord, sewn inside the top band
- Drawstring: 20 in (50.8 cm) cord, threaded through the bottom band
Materials
Yarn: Use a smooth, tightly plied worsted-weight cotton or cotton blend. Cotton holds the arches open and doesn’t stretch out under the weight of the bags. Avoid fuzzy or very soft acrylic, because the rings blur and the tube sags.
- Teal (main and only color): 150 g / 285 m, sold as three 50 g / 95 m balls
Before you start, wind the yarn into two balls of about the same size, labeled Ball A and Ball B. The lattice uses both at once. Quantities include about a 15% margin for your gauge swatch and small tension differences.
Tools:
- 5.0 mm (H-8) crochet hook
- 2 removable stitch markers in different colors
- Tapestry needle
- Scissors
- Measuring tape
- Rust-proof pins and a rolled towel for blocking
Abbreviations (US Terms)
- ch – chain
- sc – single crochet
- sl st – slip stitch
- sk – skip
- st(s) – stitch(es)
- sp – space
- rnd – round
Special stitch – Arch sc: Insert the hook under the whole ch-10 arch named in the instructions, right at its center (between the 5th and 6th chains), yarn over, pull up a loop, then yarn over and pull through both loops. Working under the arch instead of into a chain lets you slide the stitch so it sits exactly at the midpoint.
Ball swap: At the end of a pass, take the hook out, put the live loop on that ball’s marker, and leave the yarn hanging inside the tube. Pick up the other ball’s loop to work the next pass.
Gauge and Checkpoints
Gauge: 16 sc and 16 rnds = 4 in (10.2 cm) in sc worked in the round.
Lattice gauge: One ch-10 arch spans 8 base stitches, or 2 in (5.1 cm). One full lattice round (Pass A plus Pass B) adds about 1.5 in (3.8 cm) of height when lightly stretched.
Treat the bottom band as your test piece. Work Rounds 1–4, then lay the band flat and measure it.
Checkpoints:
- After the bottom band: 48 sts, 6 in (15.2 cm) flat, 1 in (2.5 cm) tall.
- After Lattice Round 3: total length 5.5 in (14.0 cm).
- After Lattice Round 6: total length 10 in (25.4 cm).
- After Lattice Round 9: total length 14.5 in (36.8 cm).
- After the top band: total length 16 in (40.6 cm), still 6 in (15.2 cm) flat.
If the band is too big (more than 6.25 in or 15.9 cm flat), go down to a 4.5 mm hook. If it is too small (less than 5.75 in or 14.6 cm flat), go up to a 5.5 mm hook. Don’t change the stitch count. The 48-stitch base must stay a multiple of 8 for the arches to line up.
If the lattice rounds come out shorter than 1.5 in (3.8 cm), chain a little looser. If they’re longer, add one extra Lattice Round only if you also want a longer holder.
Bottom Band
The bottom band uses Ball A only. Leave Ball B aside for now.
Foundation: Ch 48 and sl st to the first ch to form a ring. Make sure the chain isn’t twisted.
Rnd 1: Ch 1, sc in each ch around. Sl st to the first sc. (48 sts)
Rnd 2 (eyelet round): Ch 1, sc in each of the next 3 sts, ch 1, sk 1 st; repeat from * 12 times total. Sl st to the first sc. (36 sc + 12 ch-1 sps = 48 sts)
Rnd 3: Ch 1, sc in each sc and in each ch-1 sp around. Sl st to the first sc. (48 sts)
Rnd 4: Ch 1, sc in each st around. Sl st to the first sc. (48 sts)
Place a marker in the first sc of Rnd 4 and call it st 1. Count around, so st 5 is the fifth stitch after the marker, counting st 1. Check Checkpoint 1 now.
Ring Lattice
Each Lattice Round has two passes. Pass A makes 6 arches with Ball A. Pass B makes 6 arches with Ball B, shifted half an arch (4 sts) to the left, so each B arch crosses the second half of one A arch and the first half of the next. Work every B arch in front of the A arches. That crossing is what turns plain loops into interlocking rings.
Lattice Round 1
Pass A (Ball A): Ch 1, sc in st 1, ch 10, sk 7 sts, sc in next st; repeat from * 4 more times, ch 10, sk the last 7 sts, sl st to the first sc. (6 sc + 6 ch-10 arches = 66 sts)
The sc anchors sit on sts 1, 9, 17, 25, 33, and 41. Put Ball A’s loop on its marker.
Pass B (Ball B): Join Ball B with a sc in st 5. Ch 10, sk 7 sts, sc in next st; repeat from * 4 more times, ch 10, sk the last 7 sts, sl st to the first sc of this pass. (6 sc + 6 ch-10 arches = 66 sts)
The B anchors sit on sts 5, 13, 21, 29, 37, and 45, halfway between the A anchors. Lay each B chain over the front of the A arches as you go.
Round total: 12 arches, 132 sts.
Lattice Round 2
Pass A (Ball A): Pick up Ball A’s loop. Ch 1, Arch sc around the center of the nearest A arch from the previous round. Ch 10, Arch sc around the center of the next A arch; repeat from * 4 more times, ch 10, sl st to the first sc. (6 sc + 6 arches = 66 sts)
Pass B (Ball B): Pick up Ball B’s loop. Ch 1, Arch sc around the center of the nearest B arch from the previous round. Ch 10, Arch sc around the center of the next B arch; repeat from * 4 more times, ch 10, sl st to the first sc. (6 sc + 6 arches = 66 sts)
Round total: 12 arches, 132 sts.
Each new arch hangs from the midpoints of two arches below it, and the other layer’s midpoint sits right between them. That staggered overlap closes each circle at the top and bottom.
Lattice Rounds 3–9
Repeat Lattice Round 2 seven more times, for 9 Lattice Rounds total. Each round has 132 sts: 66 in Pass A and 66 in Pass B. Keep B arches in front every time.
Check your length at Checkpoints 2, 3, and 4. At the end of Round 9, fasten off Ball B and weave in the end. Keep Ball A’s loop live.
Top Band (Border)
Border gauge: The same as the base, 16 sc = 4 in (10.2 cm), worked with Ball A on the 5.0 mm hook.
When you flatten the tube, the 48 stitches split into 24 on the front and 24 on the back. The two side folds land at st 1 and st 25.
Rnd T1 (conversion round): Pick up Ball A. Ch 1. Arch sc around the center of the next arch from Round 9, ch 3; repeat from * for all 12 arches, alternating A and B arches as they come around. Sl st to the first sc. (12 sc worked into arches + 36 ch added = 48 sts; 24 per flat side)
Rnd T2: Ch 1, sc in each sc and in each ch around. Do not work into the ch-3 spaces. Sl st to the first sc. (48 sts; 24 per side)
Rnds T3–T6: Ch 1, sc in each st around. Sl st to the first sc. (48 sts each round; 24 per side)
Fasten off, leaving a 12 in (30.5 cm) tail to sew on the strap.
Why the math works: The 12 arches sit evenly around the tube, with one arch center every 4 base stitches. One sc plus 3 ch per arch puts back exactly 4 stitches per arch, so 12 × 4 = 48. That matches the bottom band stitch for stitch, and at 16 sc per 4 in (10.2 cm), 48 sts measure 12 in (30.5 cm) around, or 6 in (15.2 cm) flat. The top and bottom openings end up the same width, so the tube hangs straight with no flare. Six rounds at 4 rnds per inch give the 1.5 in (3.8 cm) band.
Hanging Strap
With Ball A, ch 65. Sl st in the 2nd ch from the hook and in each ch across. (64 sl sts, about 16 in / 40.6 cm)
Using the top-band tail, sew one strap end to the inside of the band at st 1 and the other end at st 25. Overlap each end 1 in (2.5 cm) down the band. The strap now makes an 8 in (20.3 cm) hanging loop.
Drawstring
With Ball A, ch 81. Sl st in the 2nd ch from the hook and in each ch across. (80 sl sts, about 20 in / 50.8 cm)
Starting at the center front, weave the drawstring in and out through the 12 eyelets of bottom band Rnd 2 so both ends come out side by side. Tie an overhand knot 0.5 in (1.3 cm) from each end to make the small bead-like tips, then trim. Pull the drawstring to gather the bottom opening to about 2 in (5.1 cm) across and tie a bow.
Final Blocking
- Weave in all ends along the solid bands, not through the lattice, so they stay hidden.
- Untie the bow and let the bottom open fully.
- Soak the holder in cool water for 10 minutes, then press out the water gently. Don’t wring it.
- Roll it in a towel to remove extra moisture.
- Slide a rolled towel or a 12 in (30.5 cm) circumference bottle into the tube.
- Gently stretch the length to 16 in (40.6 cm) and shape each ring so the arches are even and round.
- Check that every B arch still lies in front of its A arches.
- Let it dry completely, then retie the bow.
Final Quality-Control Checklist
- Bottom band and top band each have 48 sts and measure 6 in (15.2 cm) flat.
- Every Lattice Round has 12 arches: 6 from Ball A and 6 from Ball B.
- All B arches cross in front, so the rings interlock the same way all around.
- There are 9 Lattice Rounds and the body is 14.5 in (36.8 cm) before the top band.
- The top band is 6 rounds and 1.5 in (3.8 cm) deep.
- Total length is 16 in (40.6 cm).
- Strap ends sit on opposite folds (st 1 and st 25), so the holder hangs flat.
- The drawstring runs through all 12 eyelets and gathers evenly.
Troubleshooting
The rings look like plain diamonds. The B arches are tucked behind the A arches. Undo Pass B and bring each B chain to the front before you anchor it.
The tube twists into a spiral. Your arch sc is drifting off center. Slide each Arch sc so it sits exactly between chains 5 and 6.
The yarns tangle. Always drop the finished ball to the inside of the tube and pick up the other from the inside. Untwist the balls every two rounds.
The top band ruffles. You worked into the ch-3 spaces on Rnd T2. Work into each chain itself so you get exactly 48 sts.
The top band pulls in. You skipped chains on Rnd T2. Recount to 48.
The holder is too short. Your chain tension is tight. Loosen your chains or add a tenth Lattice Round.
The bags fall out the bottom. Pull the drawstring tighter and double-knot the bow.
Care
Hand wash in cool water with mild soap and lay flat to dry, reshaping the rings while the holder is damp. Don’t tumble dry, because heat can shrink the cotton and close up the lattice.
Final Notes
The measurement chain is short and easy to check. You start with 48 sts at 16 sc per 4 in (10.2 cm), which gives a 6 in (15.2 cm) flat width. The bottom band adds 1 in (2.5 cm). Nine Lattice Rounds of 12 arches each add 13.5 in (34.3 cm), for a body of 14.5 in (36.8 cm). A 48-stitch conversion round and a 6-round top band add 1.5 in (3.8 cm), for a finished 16 in (40.6 cm) holder. A 16 in (40.6 cm) strap and a 20 in (50.8 cm) drawstring finish it off. If you hit each checkpoint, the rings will line up and the tube will hang straight from top to bottom.
Happy crocheting!