
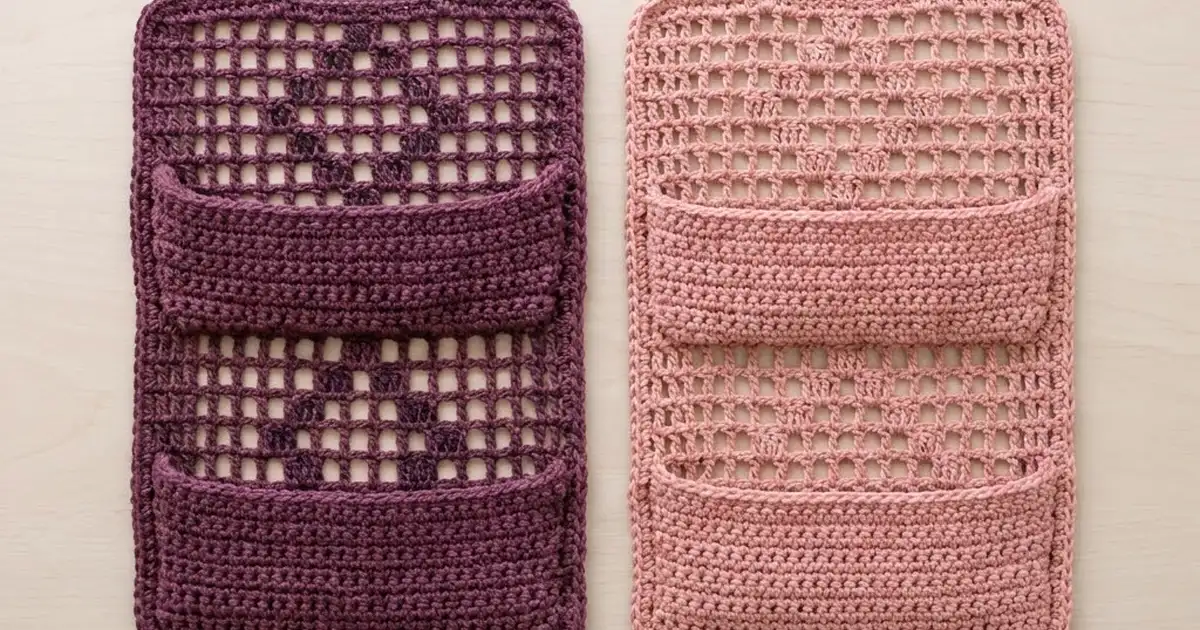
This wall pocket organizer pairs an airy filet mesh back with two sturdy pockets for envelopes. A strap at the top hangs it on a hook, and two tabs at the bottom hold your keys. Two outlined diamonds give the mesh a simple pattern, and each diamond sits just above a pocket.
The sample uses one solid color, deep plum. The design also works well in dusty pink, sage or any other solid shade. Variegated yarn hides the diamonds, so a solid color is best.
This pattern uses US crochet terms. The finished panel measures 9 in × 13.8 in (22.9 cm × 35.1 cm). With the strap and tabs, the total height is about 18.7 in (47.5 cm).
Construction is simple. You crochet one filet panel and two flat single crochet pockets. The pockets are attached to the panel, and a two-round border goes around everything, closing the pocket sides as it goes. The key tabs are worked off the border, and the strap is sewn on last.
Finished Size and Construction
- Finished size: 9 in × 13.8 in (22.9 cm × 35.1 cm), not including the strap and tabs
- Skill level: Easy–Intermediate
- Terminology: US
- Yarn weight: DK (#3), cotton or cotton blend
- Hook: 4.0 mm (G-6)
- Number of pieces: 1 back panel, 2 pockets and 1 strap; the 2 key tabs are worked directly onto the border
- Layout: lower pocket at the bottom, upper pocket over the middle, a diamond showing above each pocket
- Piece size: back panel 8 in × 12.8 in (20.3 cm × 32.5 cm); pockets 8 in (20.3 cm) wide
- Size before border: 8 in × 12.8 in (20.3 cm × 32.5 cm)
- Border depth: 0.5 in (1.3 cm) on each side, 2 rounds
Materials
Yarn: Choose a smooth, firm DK cotton so the mesh looks crisp and the pockets hold their shape when they’re full. Soft acrylic stretches under the weight of keys, so avoid it if you can.
- Plum (main color): 80 g, about 190 m (208 yd)
These quantities include a safety margin of roughly 25%.
Tools:
– 4.0 mm (G-6) crochet hook
– Tapestry needle
– 4–6 locking stitch markers
– Rust-proof pins, a blocking mat and a spray bottle
– Measuring tape and scissors
– 2 split key rings (optional)
Abbreviations (US Terms)
- ch – chain
- sl st – slip stitch
- sc – single crochet
- dc – double crochet
- sc2tog – single crochet 2 together
- sp – space
- st(s) – stitch(es)
- RS / WS – right side / wrong side
Filet mesh rules (each mesh is 3 sts wide):
– Space (open mesh): ch 2, skip the next 2 sts or the ch-2 sp, dc in the next dc.
– Block (filled mesh): dc in the next 2 sts, or 2 dc in the ch-2 sp, then dc in the next dc.
– Starting space: ch 5 (counts as dc + ch 2), skip the next 2 sts or the ch-2 sp, dc in the next dc.
Every filet row has 40 sts: 14 “post” dc plus 13 meshes of 2 sts each. Every row starts and ends with a space (meshes 1 and 13), which keeps the side edges straight.
Gauge and Checkpoints
- Filet/dc gauge: 20 sts and 10 rows = 4 in (10.2 cm). Each mesh is 0.6 in (1.5 cm) wide and 0.4 in (1.0 cm) tall.
- Sc gauge: 20 sts and 16 rows = 4 in (10.2 cm). Each sc is 0.2 in (0.5 cm) wide and each row is 0.25 in (0.6 cm) tall.
Test one piece first. Make the upper pocket before anything else, because it’s small and uses the same width as everything else. After Row 1 it must measure 8 in (20.3 cm) across. After Row 12 it must be 3 in (7.6 cm) tall.
Checkpoints:
– After panel Row 10: 4 in (10.2 cm) tall and 8 in (20.3 cm) wide
– After panel Row 16: 6.4 in (16.3 cm) tall
– After panel Row 32: 12.8 in (32.5 cm) tall
– After Border Round 2: 9 in × 13.8 in (22.9 cm × 35.1 cm)
If your piece is too big, go down 0.5 mm in hook size. If it’s too small, go up 0.5 mm. Never add or remove stitches, because the pocket and border counts depend on 40 sts across and 32 rows.
Back Panel
The rows are counted from the bottom edge. The meshes are numbered 1–13 across the row. Because the diamond is symmetrical, it doesn’t matter which direction you count from.
Foundation: Ch 42.
Row 1 (solid): Dc in the 4th ch from the hook (the skipped 3 ch count as a dc), then dc in each ch across. Turn. (40 sts)
Row 2 (all spaces): Work a starting space, then ch 2, skip 2 dc, dc in the next dc. Repeat from * across, working the last dc in the top of the turning chain. Turn. (14 dc + 13 ch-2 sps = 40 sts)
Rows 3–9: Work a starting space, then ch 2, dc in the next dc. Repeat from * across, working the last dc in the 3rd ch of the turning ch-5. Turn. (40 sts per row)
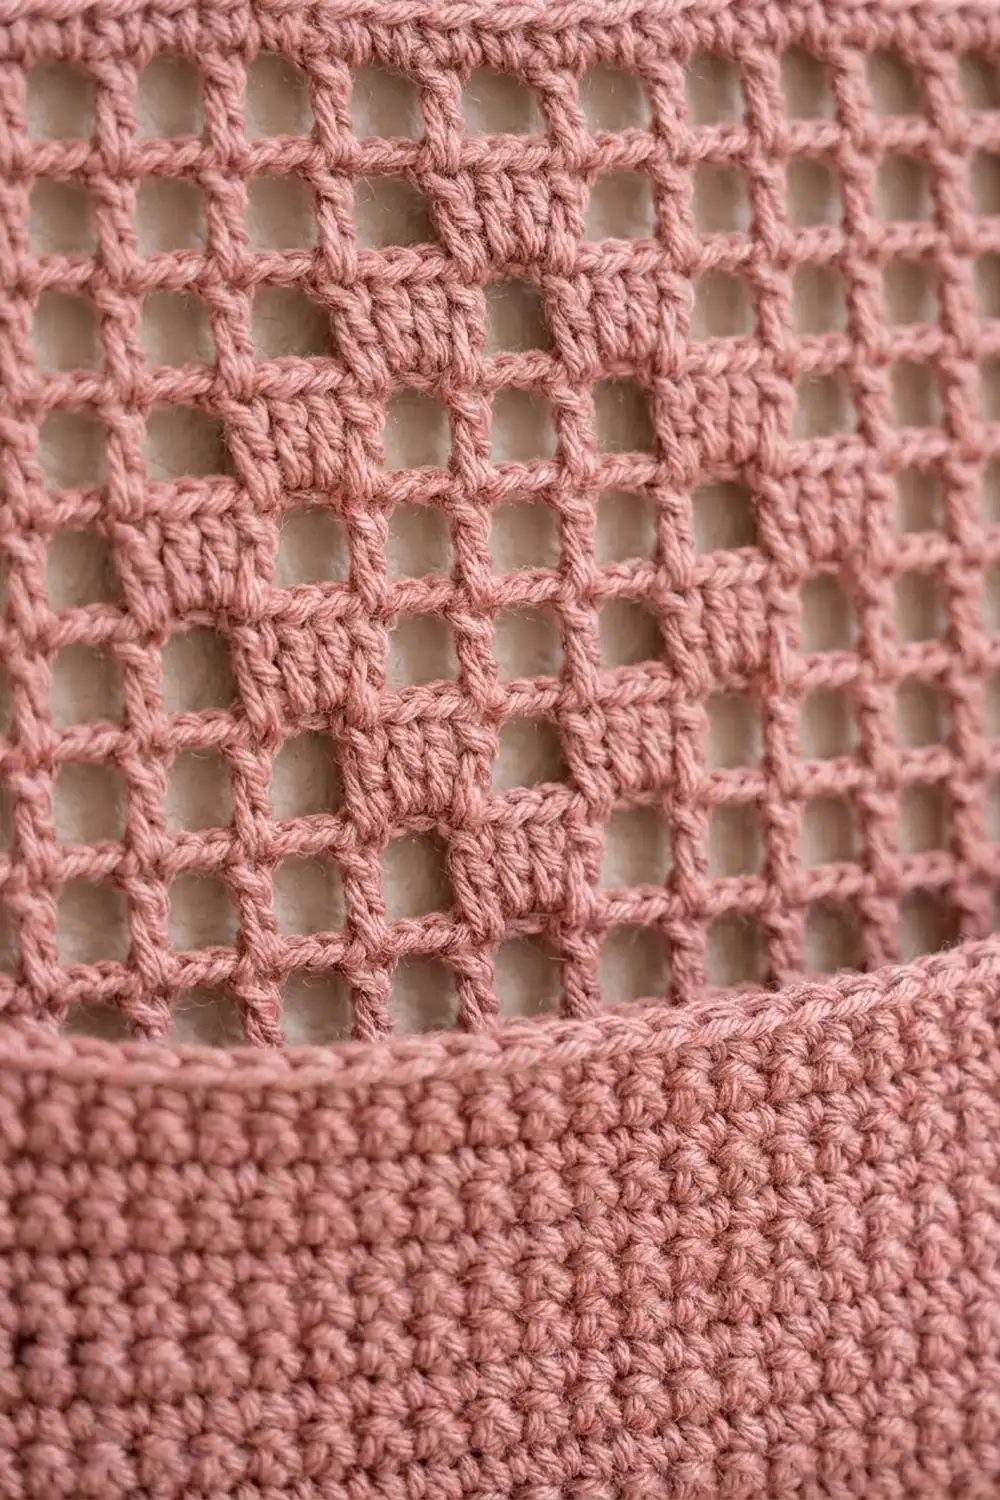
Rows 10–16 (lower diamond): Work every mesh as a space except the blocks listed below:
– Row 10: block in mesh 7 (16 dc + 12 sps = 40 sts)
– Row 11: blocks in meshes 6 and 8 (18 dc + 11 sps = 40 sts)
– Row 12: blocks in meshes 5 and 9 (18 dc + 11 sps = 40 sts)
– Row 13: blocks in meshes 4, 7 and 10 (20 dc + 10 sps = 40 sts)
– Row 14: blocks in meshes 5 and 9 (18 dc + 11 sps = 40 sts)
– Row 15: blocks in meshes 6 and 8 (18 dc + 11 sps = 40 sts)
– Row 16: block in mesh 7 (16 dc + 12 sps = 40 sts)
When a space sits above a block, ch 2, skip 2 dc, and dc in the next dc. Rows 10–16 together make an outlined diamond with one filled block in the center.
Checkpoint: After Row 16 the panel measures 6.4 in (16.3 cm) tall.
Rows 17–24: Work all spaces, as in Row 3. (40 sts per row)
Rows 25–31 (upper diamond): Repeat Rows 10–16. (40 sts per row)
Row 32 (solid): Ch 3 (counts as a dc), then 2 dc in the ch-2 sp, dc in the next dc. Repeat from * 13 times, working the last dc in the 3rd ch of the turning chain. (1 + 39 = 40 sts) Fasten off.
The panel now measures 8 in × 12.8 in (20.3 cm × 32.5 cm). The solid rows at the top and bottom give the border a firm base to work into.
Pockets
Lower pocket: Ch 41.
– Row 1: Sc in the 2nd ch from the hook and in each ch across. Turn. (40 sc)
– Rows 2–14: Ch 1, sc in each st across. Turn. (40 sc)
Fasten off, leaving a 6 in (15.2 cm) tail. The lower pocket measures 8 in × 3.5 in (20.3 cm × 8.9 cm).
Upper pocket: Work as for the lower pocket, ending after Row 12. (40 sc) Leave a 24 in (61.0 cm) tail for sewing. The upper pocket measures 8 in × 3 in (20.3 cm × 7.6 cm).
The last row of each pocket becomes its open top edge. Keep that row as even as possible, because it’s the most visible edge on the finished organizer.
Make All Pieces
All pieces are plum:
– 1 back panel
– 1 lower pocket and 1 upper pocket
– 1 strap (made after the border)
– 2 key tabs (worked onto the border)
Layout (front view):
[ strap ]
[ Row 32 solid ]
[ upper diamond, Rows 25–31 ]
[ UPPER POCKET over Rows 17–24 ]
[ lower diamond, Rows 10–16 ]
[ LOWER POCKET over Rows 1–9 ]
[ tab ]            [ tab ]
Joining
Lower pocket: Lay the panel flat with the RS facing up. Place the lower pocket on top so its foundation edge lines up with the panel foundation and its sides sit flush with the panel sides. Pin it in place. The pocket top lands at 3.5 in (8.9 cm), just below Row 10, so the whole lower diamond stays visible. Don’t sew it yet. Border Round 1 attaches the pocket’s bottom and sides.
Upper pocket: Place the foundation edge of the upper pocket along the top of panel Row 16, with its sides flush with the panel sides. Whipstitch the 40 free foundation loops of the pocket to the 40 sts of Row 16, one to one. Each dc and each chain in Row 16 gets exactly one stitch, so the seam can’t pucker. Pin the sides. The pocket covers Rows 17–24, and its top edge sits just below the upper diamond.
Tension: Keep your whipstitches as loose as the fabric itself. If you pull them tight, the panel will draw in across Row 16.
Size checkpoint: The panel should still measure 8 in × 12.8 in (20.3 cm × 32.5 cm) and lie completely flat.
Border
Border gauge: 1 sc = 0.2 in (0.5 cm). One dc row is 0.4 in (1.0 cm) tall, which is exactly the width of 2 sc.
Round 1: With the RS facing, join the yarn in the top right corner. Make 1 sc in each st across the top. (40 sc) Ch 1 for the corner.
Work down the side with 2 sc in each dc row-end. (64 sc) Wherever a pocket covers the side, insert the hook through both the pocket edge and the panel edge.
Ch 1 for the corner, then make 1 sc in each foundation ch across the bottom, going through the lower pocket’s foundation chain and the panel’s foundation chain together, one to one. (40 sc)
Ch 1 for the corner and work up the second side as before. (64 sc) Ch 1, then sl st to the first sc. (208 sc + 4 ch-1 corner sps)
Round 2: Ch 1. Make 1 sc in each sc and (sc, ch 1, sc) in each corner sp. Sl st to the first sc. (Top 42, sides 66 each, bottom 42 = 216 sc + 4 ch-1 sps) Fasten off.
Why the math works: Round 1 puts 1 sc in each stitch of the 40-st rows, and 2 sc per row-end on the sides, so the sides get 64 sc for 12.8 in (32.5 cm). The border lies flat because those counts match the panel at 0.2 in (0.5 cm) per sc. Round 2 adds 2 sc per side at the corners. That covers the 0.25 in (0.6 cm) of growth at each end of every side. The ch-1 corners stay soft and slightly rounded.
Key tabs: With the RS facing, count the 42 sts along the bottom of Round 2 from left to right. Mark sts 6–9 and sts 34–37, which leaves 5 sts outside each tab. For each tab, join the yarn in the first marked st and work downward.
– Rows 1–5: Ch 1, sc in each of the 4 sts. Turn. (4 sc)
– Row 6: Ch 1, sc, ch 2, skip 2 sts, sc. Turn. (2 sc + ch-2 eyelet)
– Row 7: Ch 1, sc, 2 sc in the ch-2 sp, sc. Turn. (4 sc)
– Row 8: Ch 1, sc2tog twice. (2 sts) Fasten off.
Each tab is 0.8 in (2.0 cm) wide and 2 in (5.1 cm) long. Thread a split key ring through each eyelet.
Strap: Ch 36.
– Row 1: Sc in the 2nd ch from the hook and in each ch across. Turn. (35 sc)
– Row 2: Ch 1, sc in each st across. (35 sc) Fasten off.
The strap is 7 in × 0.5 in (17.8 cm × 1.3 cm). Whipstitch one short end over sts 11–12 of the top border and the other end over sts 31–32. That places the ends 4 in (10.2 cm) apart, so the strap rises about 2.9 in (7.4 cm) above the top edge.
Final Blocking
- Weave in all ends through the solid stitches, not through the mesh.
- Spray the organizer until it’s evenly damp.
- Pin it to 9 in × 13.8 in (22.9 cm × 35.1 cm), placing pins at the corners first and then every 1 in (2.5 cm).
- Square up the mesh so every column of post dc runs straight up and down.
- Flatten the pockets and pin the tabs straight down.
- Let it dry completely, for at least 12 hours.
Final Quality-Control Checklist
- [ ] The panel is 40 sts wide and 32 rows tall.
- [ ] Both diamonds are centered on mesh 7 and fully visible.
- [ ] The lower pocket has 14 rows and the upper pocket has 12 rows, and both are 40 sc wide.
- [ ] The Row 16 seam is one-to-one, with no puckers.
- [ ] Border Round 2 has 42 / 66 / 42 / 66 sc.
- [ ] The tabs are symmetrical, 5 sts in from each corner.
- [ ] The strap ends are 4 in (10.2 cm) apart.
- [ ] The finished panel is 9 in × 13.8 in (22.9 cm × 35.1 cm).
Troubleshooting
- The mesh leans or slants: Keep each ch-2 the same size, then block firmly.
- The diamond is off-center: Recount the meshes. The center block is always mesh 7.
- A row has 39 or 41 sts: You probably missed or doubled the dc in the turning chain. Check the last dc of the previous row.
- The pocket is wider than the panel: Your sc tension is looser than your dc tension. Remake the pocket one hook size smaller.
- The border ruffles: You may have worked 3 sc into some row-ends. Recount each side to 64.
- The border cups: Loosen your tension instead of adding stitches.
- The tabs twist: Pin them flat while they’re wet.
Care
Hand wash in cool water, press out the excess water, and dry flat in shape. Re-pin the organizer if the mesh needs straightening.

Final Notes
The measurement chain is short. Each mesh is 0.6 in (1.5 cm) wide and each row is 0.4 in (1.0 cm) tall, so the 40-st × 32-row panel measures 8 in × 12.8 in (20.3 cm × 32.5 cm). The pockets are the same 40 sts wide, so they fit exactly. The two-round border brings the panel to 9 in × 13.8 in (22.9 cm × 35.1 cm). Once your gauge is right, every seam and border count falls into place.
Happy crocheting!