

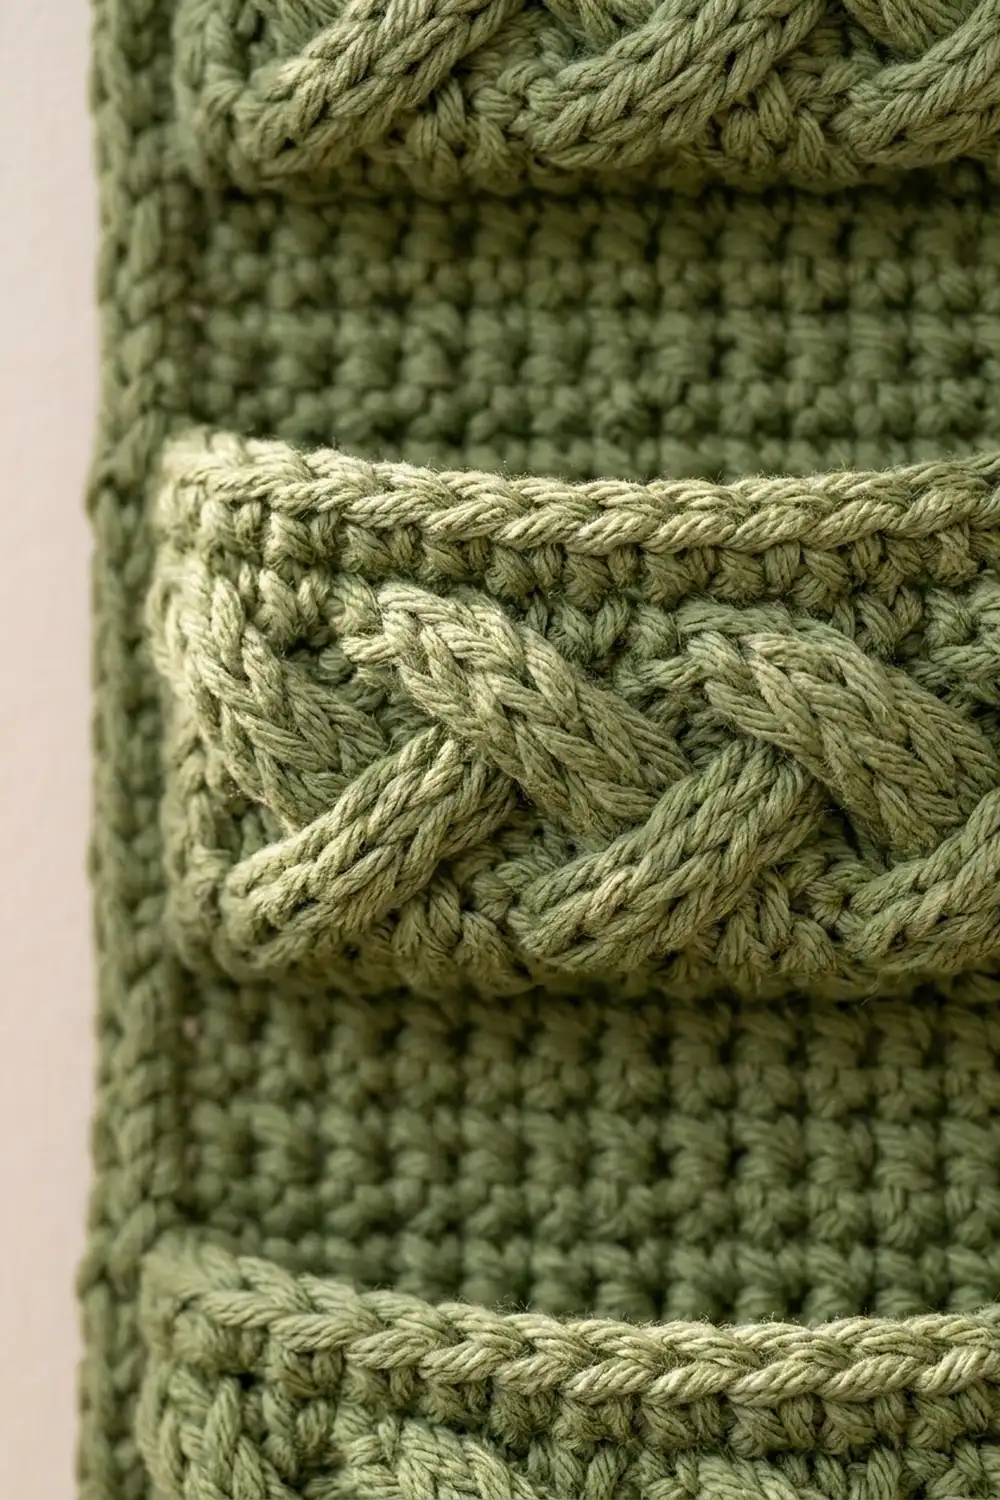
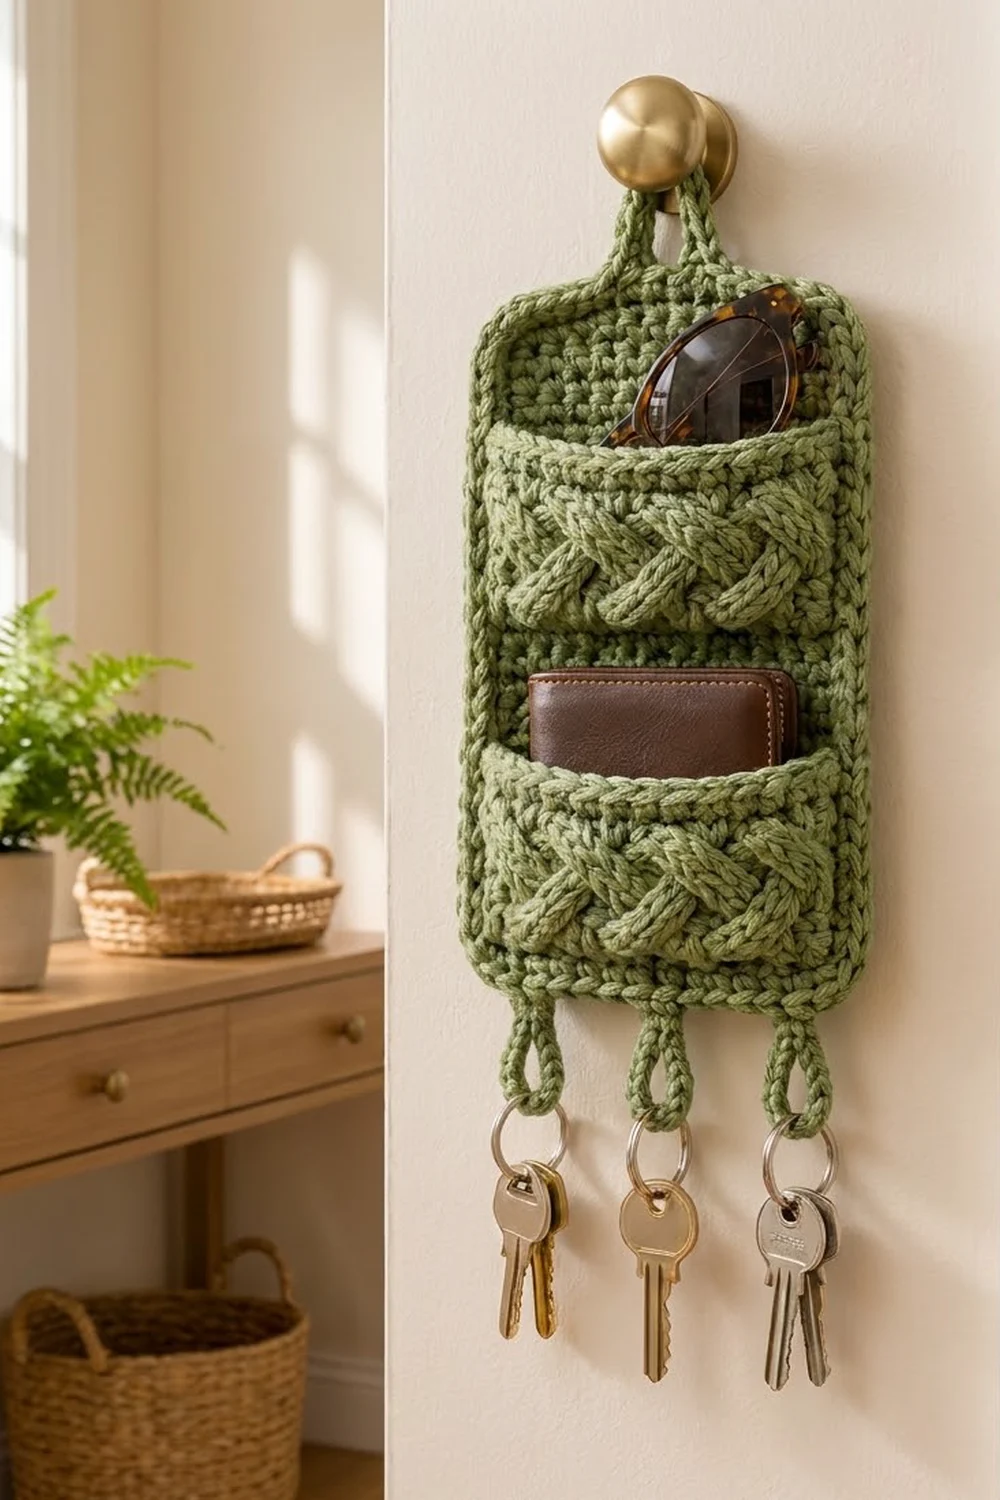
This wall-hanging key organizer is a small, practical piece with a lot of texture. A firm single crochet back panel holds two pockets, and each pocket front has a chunky three-strand braid across it. One loop at the top hangs it from a knob or hook. Three loops at the bottom hold your keys.
The sample is worked in a soft sage green. It also looks good in cream, oatmeal or any calm neutral that suits an entryway. The style is simple and a little Scandinavian: one color and plain fabric, with the braids providing all the texture.
The pattern uses US crochet terms. The finished organizer measures 5.5 in (14.0 cm) wide and 10.5 in (26.7 cm) tall. With both sets of loops it is about 13.5 in (34.3 cm) tall overall.
You will make a rectangular back panel and give it a two-round corded border. Next you make two pockets and six short cords. You braid the cords, sew one braid onto each pocket, and then sew the pockets onto the panel. Finally you add the hanging loop and the three key loops.
Finished Size and Construction
- Finished size: 5.5 in x 10.5 in (14.0 cm x 26.7 cm), about 13.5 in (34.3 cm) tall including loops
- Skill level: Easy / Advanced Beginner
- Terminology: US crochet terms
- Yarn weight: Worsted (#4), cotton or cotton blend
- Hook: 4.5 mm (US 7)
- Number of pieces: 1 back panel, 2 pockets, 6 braid cords
- Layout: pockets stacked vertically on the panel
- Panel body (before border): 5 in x 10 in (12.7 cm x 25.4 cm)
- Border depth: 0.25 in (0.6 cm) per edge
- Pocket size (with edging): 5 in x 3.4 in (12.7 cm x 8.6 cm)
Materials
Choose a smooth worsted cotton or cotton blend. Cotton holds its shape when the pockets are loaded and gives clean, rounded braid cords. Avoid very soft acrylics, because the panel can stretch under the weight of keys.
- Sage green worsted cotton: 100 g, about 170 m (186 yd)
- 4.5 mm (US 7) crochet hook
- Tapestry needle
- Scissors
- Stitch markers (4 to 6)
- Rustproof pins
- Measuring tape or ruler
- Blocking mat
These quantities include a margin of roughly 15% for your gauge swatch and for sewing.
Abbreviations (US Terms)
- ch – chain
- sc – single crochet
- sl st – slip stitch
- st(s) – stitch(es)
- rev sc – reverse single crochet (crab stitch)
- RS / WS – right side / wrong side
Reverse single crochet (rev sc): Work from left to right (right-handed). Insert the hook into the next stitch to the right, yarn over, pull up a loop, yarn over and pull through both loops on the hook. The result is a twisted, corded edge.
Gauge and Checkpoints
Gauge: 16 sc x 18 rows = 4 in (10.2 cm) in rows of sc.
That works out to 4 sts per inch and 4.5 rows per inch. Work tightly. The fabric should feel firm, with very little light showing through.
Make one pocket body first and use it as your test piece. Check it at each of these stages:
- After Row 1 of the pocket: 18 sts should measure 4.5 in (11.4 cm).
- After Row 13 of the pocket: the height should be 2.9 in (7.4 cm).
- After the pocket edging: 5 in x 3.4 in (12.7 cm x 8.6 cm).
- After Row 1 of the panel: 20 sts should measure 5 in (12.7 cm).
- After Row 45 of the panel: 5 in x 10 in (12.7 cm x 25.4 cm).
- After the panel border: 5.5 in x 10.5 in (14.0 cm x 26.7 cm).
If your piece is too big, go down to a 4 mm hook. If it is too small, go up to a 5 mm hook. Do not change the stitch counts, because the pocket fit depends on them.
Back Panel
Ch 21.
Row 1 (RS): Sc in 2nd ch from hook and in each ch across, turn. (20 sts)
Rows 2–45: Ch 1 (does not count as a st), sc in each st across, turn. (20 sts)
Checkpoint: the panel should measure 5 in x 10 in (12.7 cm x 25.4 cm). Place a marker in the row end of Row 2 and another in the row end of Row 25 on the same side. You will use these to place the pockets.
Do not fasten off. Continue straight into the border, described in the Border section below.
Pockets (Make 2)
Ch 19.
Row 1: Sc in 2nd ch from hook and in each ch across, turn. (18 sts)
Rows 2–13: Ch 1, sc in each st across, turn. (18 sts)
The pocket body measures 4.5 in x 2.9 in (11.4 cm x 7.4 cm).
Pocket edging round: Ch 1. Work along the last row: 3 sc in the first st, sc in the next 16 sts, 3 sc in the last st. Down the side: sc in each of the 11 row ends between the corner sts. Along the foundation: 3 sc in the first st, sc in the next 16 sts, 3 sc in the last st. Up the other side: sc in each of the 11 row ends. Join with a sl st to the first sc.
The count for this conversion round is 62 sts worked one per existing stitch or row end (18 + 11 + 18 + 11 + 4 corner sts) plus 8 extra corner sts, for 70 sts. Each corner’s 3-sc group puts 2 extra sts into what was 1 st, so 4 corners add 8.
Fasten off with a long tail of about 24 in (61.0 cm) for sewing.
Checkpoint: the pocket measures 5 in x 3.4 in (12.7 cm x 8.6 cm). Mark the edge you finished on (the top of Row 13) as the pocket opening.
Braid Cords (Make 6)
Ch 29.
Row 1: Sc in 2nd ch from hook and in each ch across, turn. (28 sts)
Row 2: Ch 1, sc in each st across. (28 sts)
Fold the strip in half lengthwise with the RS outside. Sl st through both long edges along the whole length so the strip closes into a rounded cord. Fasten off and leave a 6 in (15.2 cm) tail.
Each cord is about 7 in (17.8 cm) long and 0.4 in (1.0 cm) thick.
Braiding and Attaching the Braids
- Lay three cords side by side and stitch them together at one end.
- Braid them firmly but without squeezing: right over center, then left over center, and repeat. Keep the seam lines of the cords facing down.
- The finished braid should measure about 5 in (12.7 cm). If it comes out longer, braid a little tighter.
- Stitch the loose ends together. Tuck both ends 0.25 in (0.6 cm) to the back so the braid spans the pocket’s 4.5 in (11.4 cm) body.
- Center the braid across the RS of the pocket, over Rows 4–11. Its width will be about 1.25 in (3.2 cm).
- Using the cord tails, tack the braid down. Stitch under each crossing and at both ends, catching only the front layer of the pocket.
Repeat for the second pocket.
Make All Pieces
All pieces are in sage green:
- 1 back panel (20 sts x 45 rows, plus border)
- 2 pockets (18 sts x 13 rows, plus edging)
- 6 braid cords (3 per braid)
Layout (front view, top to bottom):
[  hanging loop  ]
[ panel top area ]
[ POCKET 2 + braid ]
[ panel gap band ]
[ POCKET 1 + braid ]
[ loop  loop  loop ]
Joining (Pockets to Panel)
Pin each pocket to the panel body inside the border, with its opening facing up. The pocket’s width with edging is 5 in (12.7 cm), which equals the panel body width, so the pocket sides sit right against the inside of the border.
- Pocket 1 (lower): align its bottom edge with the Row 2 marker, 0.25 in (0.6 cm) above the base of the panel body.
- Pocket 2 (upper): align its bottom edge with the Row 25 marker, about 5.3 in (13.5 cm) above the base of the panel body.
Stitch-to-stitch logic: whipstitch through the back loop of each pocket edging stitch into the panel beneath it.
- Bottom edge: the 18 edging sts between the corner groups fall over 18 of the panel’s 20 body columns. Leave one column free at each side.
- Sides: each side has 13 sts from corner center to corner center (the corner st, 11 side sts and the next corner st). Sew 1 edging st to each panel row: rows 2–14 for Pocket 1 and rows 25–37 for Pocket 2.
- Top edge: leave it open.
Tension: pull each stitch just snug. If you sew too tightly, the panel puckers behind the pocket. If you sew too loosely, the pocket gapes at the corners.
Checkpoint: there should be about 1.9 in (4.8 cm) of plain panel between the two pockets. Above Pocket 2 there should be about 1.1 in (2.8 cm) of panel body, plus the border.
Border
Border gauge: each border round adds about 0.125 in (0.3 cm) per edge, so the two rounds add 0.25 in (0.6 cm) on every side.
Round 1 (sc): After Row 45, ch 1 and work along the top: 3 sc in the first st, sc in the next 18 sts, 3 sc in the last st. (24 sts across the top)
Down the side: sc in each of the 45 row ends. (45 sts)
Along the foundation: 3 sc in the first ch, sc in the next 18 ch, 3 sc in the last ch. (24 sts)
Up the other side: sc in each of the 45 row ends. (45 sts) Join with a sl st to the first sc.
The total is 130 sts worked one per existing stitch or row end (20 + 45 + 20 + 45) plus 8 extra corner sts, for 138 sts. The 24 sts on each short side already include both 3-sc corner groups. The 45 sts on each long side are only the row ends, so no corner sts are counted twice: 24 + 45 + 24 + 45 = 138.
Round 2 (rev sc): Ch 1. Work rev sc in each st around and join. (138 sts) This round makes the rope-like edge. It adds no stitches, so the corners stay neatly rounded.
Why the math works: across the width, 20 body sts give 5 in (12.7 cm). The 0.25 in (0.6 cm) border on each side brings it to 5.5 in (14.0 cm). Across the height, 45 rows at 4.5 rows per inch give 10 in (25.4 cm), and the border brings that to 10.5 in (26.7 cm).
Hanging loop: Count the 24 sts along the top and join the yarn in the 12th st, at the center. Ch 16, then sl st in the same st. Work 24 sc into the chain loop and sl st to the base. Fasten off. The loop stands about 1.5 in (3.8 cm) tall.
Key loops (make 3): Count the 24 sts along the bottom. Join in the 4th st, ch 12, sl st in the same st, work 18 sc into the loop and sl st to the base. Fasten off. Repeat in the 12th st and the 20th st. That spaces the loops 8 sts apart, about 2 in (5.1 cm). Each loop hangs about 1.5 in (3.8 cm).
Final Blocking
- Weave in all tails along the sc seams, then trim.
- Mist the organizer evenly with water.
- Pin the panel to 5.5 in x 10.5 in (14.0 cm x 26.7 cm), placing pins at the corners first.
- Lay a rolled washcloth inside each pocket so the pockets keep a little depth.
- Pat the braids into rounded shapes. Do not flatten them.
- Let everything dry completely, which usually takes 12–24 hours.
- Unpin and measure again before hanging.
Final Quality-Control Checklist
- The panel measures 5.5 in x 10.5 in (14.0 cm x 26.7 cm).
- Border Round 1 has 138 sts, with 24 on each short side and 45 on each long side.
- Each pocket edging has 70 sts and measures 5 in x 3.4 in (12.7 cm x 8.6 cm).
- The braids are centered and tacked at every crossing.
- The pocket openings are open and the side seams are secure.
- The hanging loop is centered on the 12th top st.
- The key loops are on bottom sts 4, 12 and 20.
- No tails show on the front.
Troubleshooting
- The panel stretches when loaded: your gauge is too loose. Remake it with a smaller hook, or use cotton yarn instead of acrylic.
- The braid is too long: braid more tightly. You can also take 1 st off each end of the cords before folding.
- The corners cup: check that each corner has exactly 3 sc in Round 1. Then block the corners flat.
- The border ruffles along the sides: you worked more than 1 sc per row end. Recount to 45.
- The pocket corners gape: add an extra tack stitch at each top corner.
- The rev sc looks messy: keep your loops loose and always work to the right.
Care
Hand wash in cool water and press the water out gently in a towel. Lay the organizer flat to dry, reshaping the braids while it is still damp.
Final Notes
The measurements build on each other. Gauge of 4 sts and 4.5 rows per inch gives a 5 in x 10 in (12.7 cm x 25.4 cm) panel body. The two-round border brings it to 5.5 in x 10.5 in (14.0 cm x 26.7 cm). Each pocket body is 4.5 in x 2.9 in (11.4 cm x 7.4 cm), and its edging makes it exactly 5 in (12.7 cm) wide to fit inside the border. The loops bring the overall height to about 13.5 in (34.3 cm). If you check your gauge first, everything else will fit.
Happy crocheting!