

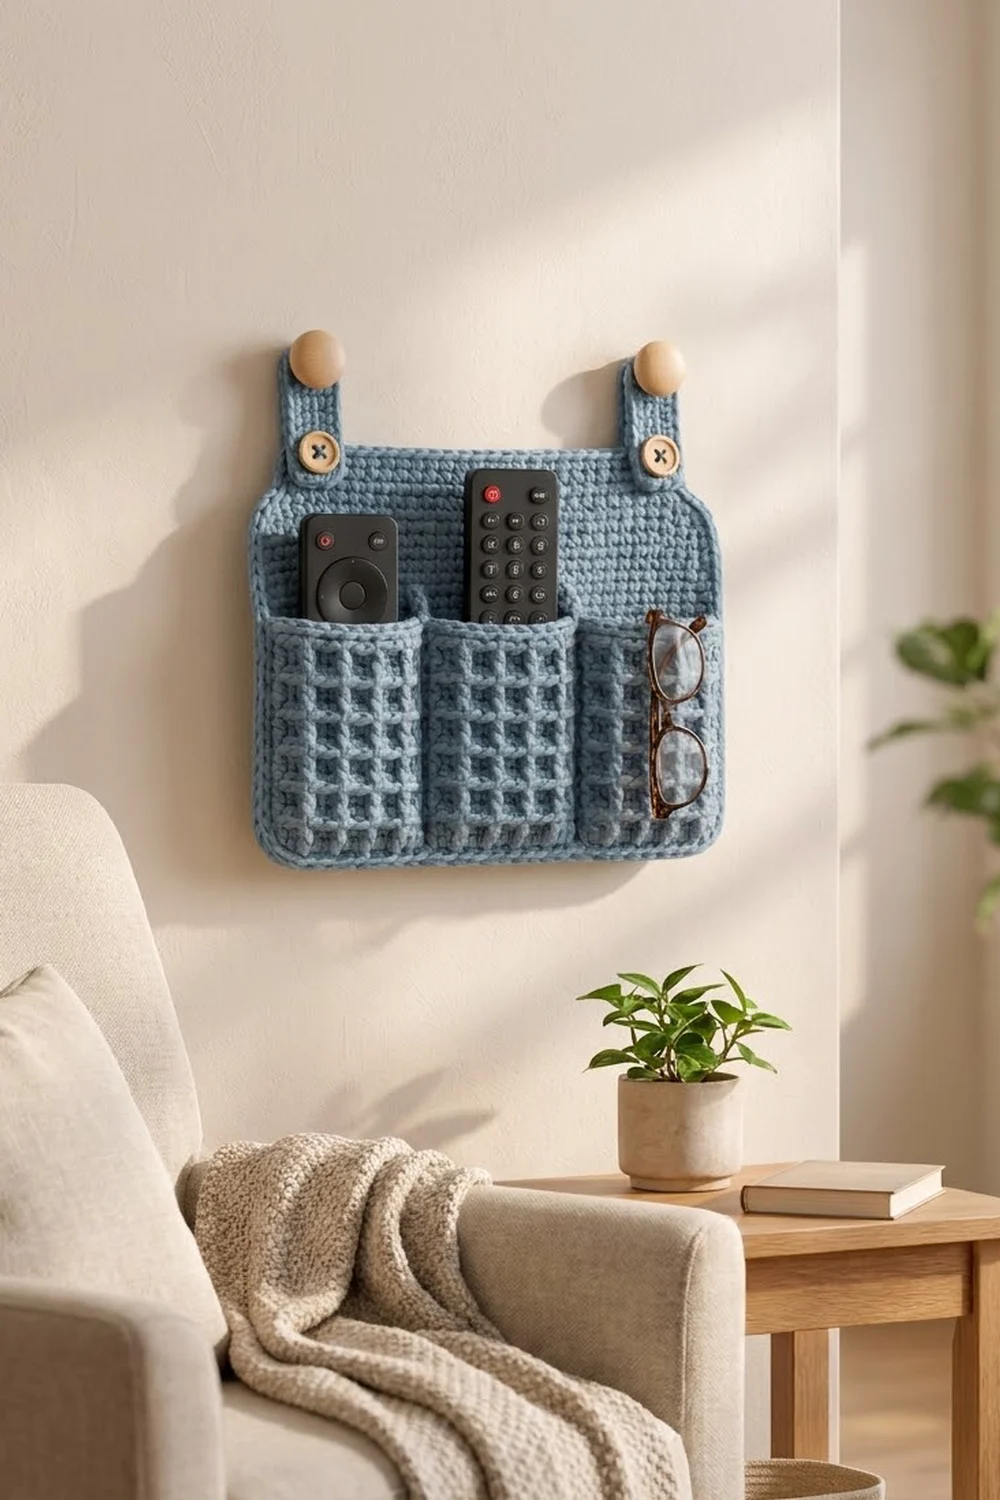
Keep remotes, glasses and chargers off the sofa cushions with this wall-hung organizer. It has a smooth, flat back panel with a deep pocket across the lower half. The pocket is divided into three compartments and covered in a raised waffle grid.
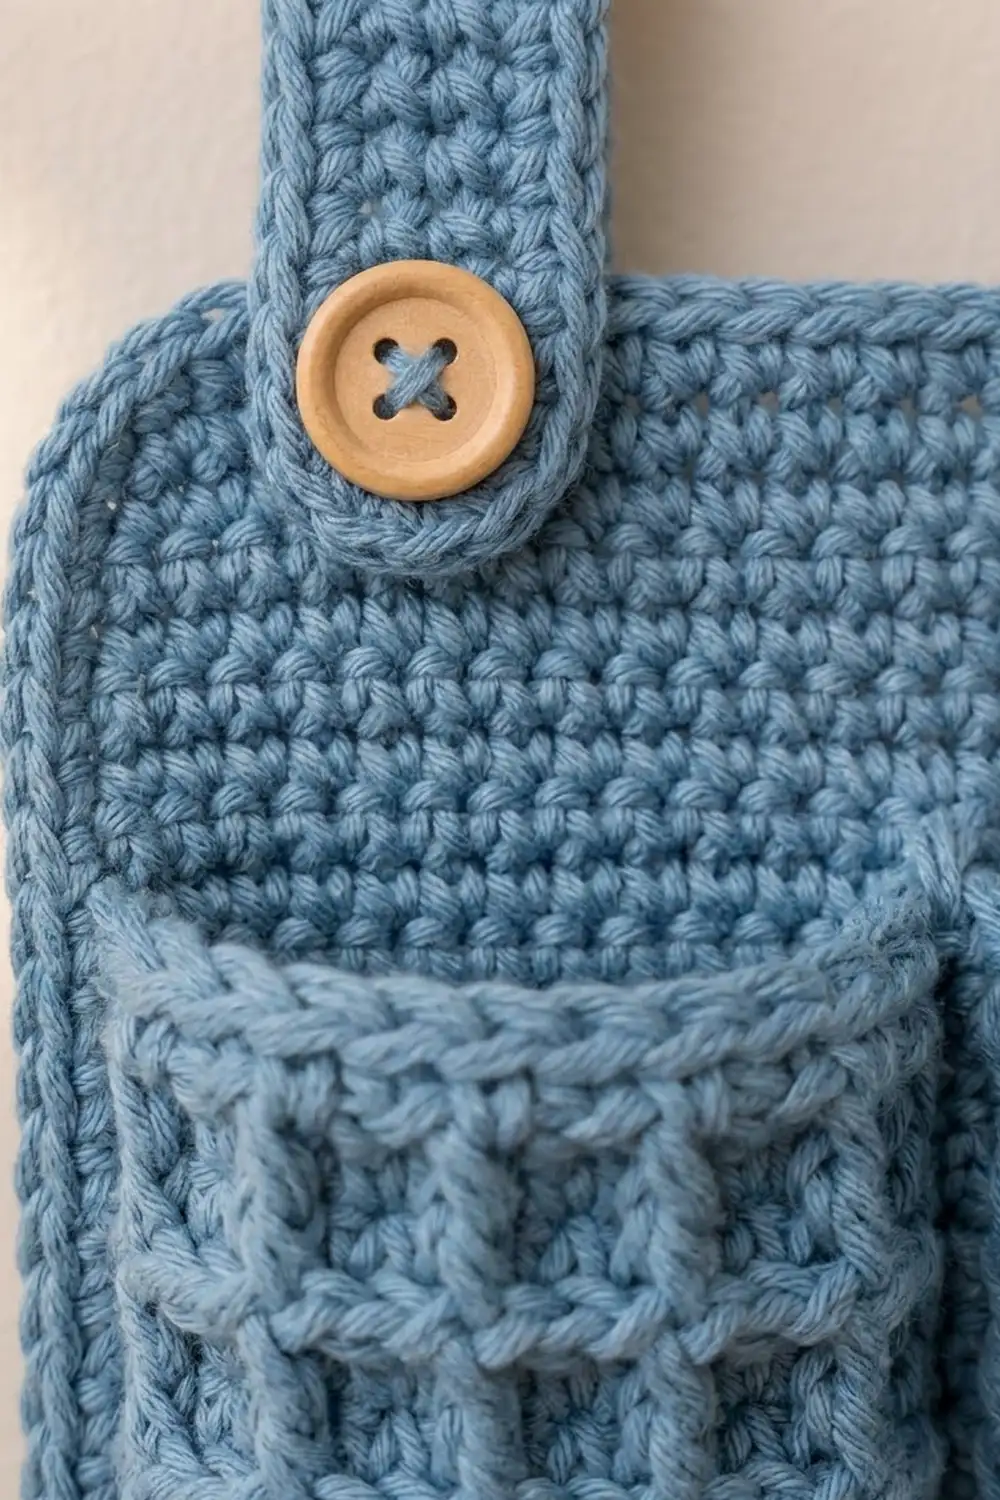
The sample is worked in a soft dusty blue, and it looks just as good in warm beige. Two short tabs rise from the top edge. Each tab has a buttonhole that slips over a wall knob, and a small wooden button with an X stitch is sewn at the base of each tab for decoration.
The pattern uses US crochet terms. The finished organizer measures about 11 in (27.9 cm) wide and 8 in (20.3 cm) tall without the tabs, or 10.25 in (26.0 cm) tall with the tabs.
You start with a flat oval base worked in rounds. You then turn the walls up in waffle stitch to make a tube-shaped pocket and continue in rows from the back wall to make the flat panel. Next you add a two-row border, work the tabs directly from the border and stitch the two divider seams. It is all one piece, so there is nothing to join.
Finished Size and Construction
- Finished size: 11 in x 8 in (27.9 cm x 20.3 cm), plus 2.25 in (5.7 cm) tabs
- Skill level: Intermediate (front post stitches, working in rounds and rows)
- Terminology: US
- Yarn weight: Worsted (#4)
- Hooks: 5 mm (H-8) and 5.5 mm (I-9)
- Number of pieces: 1 (base, pocket, panel, border and tabs worked as one continuous piece)
- Layout: One pocket across the lower half, split into 3 compartments
- Pocket: about 11 in (27.9 cm) wide, 4.5 in (11.4 cm) tall and 1.5 in (3.8 cm) deep
- Size before border: panel 10 in (25.4 cm) wide; total height 7.5 in (19.1 cm)
- Border depth: about 0.5 in (1.3 cm)
Materials
Choose a smooth worsted-weight cotton or cotton blend. Cotton holds the pocket shape and keeps the waffle grid crisp. Acrylic also works but gives a softer, slightly floppier pocket.
- Dusty blue (main color): 180 g, about 360 m
- Optional alternative: the same amount in beige for a neutral version
These quantities include a margin of roughly 15 percent. Waffle stitch uses a lot of yarn, so don’t cut it close.
Tools:
– 5 mm (H-8) hook for the base, panel, border and tabs
– 5.5 mm (I-9) hook for the waffle rounds
– 4 stitch markers
– Tapestry needle
– 2 wooden buttons, 0.75 in (1.9 cm), with four holes
– Matching sewing thread or a length of yarn split to 2 plies
– 2 wall knobs or peg hooks for hanging
– Rust-proof pins and a spray bottle for blocking
Abbreviations (US Terms)
- ch – chain
- sl st – slip stitch
- sc – single crochet
- dc – double crochet
- BLO – back loop only
- st(s) – stitch(es)
- rnd – round
- sp – space
- rep – repeat
Special stitch: FPdc (front post double crochet). Yarn over and insert your hook from front to back to front around the post of the stitch below. Yarn over and pull up a loop, then [yarn over, pull through 2 loops] twice. A FPdc uses up the stitch behind it, just like a regular dc.
Gauge and Checkpoints
- Single crochet (5 mm hook): 16 sc and 18 rows = 4 in (10.2 cm)
- Waffle pattern in the round (5.5 mm hook): 16 sts and 9 rnds = 4 in (10.2 cm)
Waffle stitch pulls in sideways. The larger hook keeps it at the same width as the sc base so the pocket walls stand straight. Make a small sc swatch first. Then crochet the base and the first 4 waffle rounds as your “test piece” before going further.
Checkpoints:
– After the base (Rnd 3): about 11 in x 1.5 in (27.9 cm x 3.8 cm)
– After the pocket (Rnd 14): walls about 4.5 in (11.4 cm) tall, with the flattened pocket about 11 in (27.9 cm) wide
– After the panel (Row 14): 10 in (25.4 cm) wide, with the panel rising 3 in (7.6 cm) above the rim
– After the border: 11 in x 8 in (27.9 cm x 20.3 cm)
If your piece is too big, go down half a hook size. If it’s too small, go up half a size. If only the waffle walls flare or pull in, change only the waffle hook.
Pattern
Ch 2 at the start of a round does not count as a stitch. Join each round with a sl st to the first stitch.
Base (5 mm hook)
Rnd 1: Ch 43. Sc in the 2nd ch from the hook and in the next 40 ch, then work 3 sc in the last ch. Rotate the work and, working into the free loops on the other side of the chain, sc in the next 40 ch. Work 2 sc in the same ch as the first sc and join. (86 sts)
Rnd 2: Ch 1, 2 sc in the first st, sc in the next 40 sts, 2 sc in each of the next 3 sts, sc in the next 40 sts, 2 sc in each of the last 2 sts, join. (92 sts)
Rnd 3: Ch 1, sc in the first st, 2 sc in the next st, sc in the next 40 sts, [sc in the next st, 2 sc in the next st] 3 times, sc in the next 40 sts, [sc in the next st, 2 sc in the next st] 2 times, join. (98 sts)
The base is a flat oval with two straight sides of 40 sts each and rounded ends.
Pocket Walls
Rnd 4 (turning round): Ch 1. Working in the BLO, sc in each st around, with 2 sc in the last st, then join. This is a conversion round: 98 sts worked one per stitch + 1 extra stitch = 99 sts. The BLO ridge makes a clean edge so the walls stand up.
Mark sts 4 and 43 (the back long side, 40 sts) and sts 53 and 92 (the front long side, 40 sts). The ends hold 9 sts (sts 44–52) and 10 sts (sts 93–99 plus sts 1–3). Every round from here on keeps 99 sts, worked one stitch into each stitch, so these positions stay in line.
Change to the 5.5 mm hook.
Rnd 5: Ch 2, dc in each st around, join. (99 sts)
Rnd 6: Ch 2, FPdc around the next st, dc in the next 2 sts; rep from * around, join. (99 sts: 33 FPdc, 66 dc)*
Rnd 7: Ch 2, dc in the next st (the FPdc), FPdc around each of the next 2 sts; rep from * around, join. (99 sts: 33 dc, 66 FPdc)*
Rnds 8–13: Repeat Rnds 6 and 7 three more times. (99 sts)
You now have 8 waffle rounds. The raised posts form a grid of small square recesses, as on the sample.
Change to the 5 mm hook.
Rnd 14 (rim): Ch 1, sc in each st around, join. (99 sts) Fasten off.
The walls measure about 4.5 in (11.4 cm) from the base edge to the rim.
Back Panel (5 mm hook)
Hold the pocket with the back long side toward you and the opening at the top. Leave the markers in Rnd 14.
Row 1: Join yarn in st 4 of Rnd 14. Ch 1, then sc in the same st and the next 39 sts, ending in st 43. Turn. (40 sts)
Rows 2–14: Ch 1, sc in each st across, turn. (40 sts)
The panel is 10 in (25.4 cm) wide and rises 3 in (7.6 cm) above the rim. Fasten off.
Border
The border uses the sc gauge: 4 sts per inch along the top. Along the sides, use 12 sc for 14 rows, because 14 rows measure 3.1 in (7.9 cm), and 3.1 in x 4 sts per inch = about 12 sts.
Border Row 1: Join yarn at the rim on the right side edge of the panel. Ch 1, then work 12 sc up the side (one in each row-end, skipping the row-ends of Rows 5 and 10). Work 3 sc in the first st of Row 14, sc in the next 38 sts and 3 sc in the last st. Work 12 sc down the second side, skipping the same rows. Turn.
Count: 12 + 3 + 38 + 3 + 12 = 68 sts. The top edge counts 44 sts, including both 3-st corner groups.
Border Row 2: Ch 1, sc in the next 13 sts, 3 sc in the center st of the corner, sc in the next 40 sts, 3 sc in the next center corner st, sc in the next 13 sts.
Count: 13 + 3 + 40 + 3 + 13 = 72 sts.
Why the math works: Each corner’s center stitch gets 3 sc, so each corner adds 2 stitches per row: 68 + 4 = 72. The 40 straight top stitches in Row 2 are the 38 top stitches plus the outer stitch of each Row 1 corner group. Two rows of sc add about 0.25 in (0.6 cm) per row, so the border depth is about 0.5 in (1.3 cm). That makes the panel 10 + 0.5 + 0.5 = 11 in (27.9 cm) wide, the same as the pocket.
Fasten off. Use the yarn tails to tack the border ends neatly to the rim.
Tabs (make 2, worked directly from Border Row 2)
Find the 40 straight sts on the top edge of Border Row 2. Work the tabs on sts 4–8 and sts 33–37, which leaves 3 sts outside each tab.
Row 1: Join yarn in the first tab st. Ch 1, then sc in the same st and the next 4 sts. Turn. (5 sts)
Rows 2–6: Ch 1, sc in each st across, turn. (5 sts)
Row 7 (buttonhole): Ch 1, sc in the first st, ch 3, skip 3 sts, sc in the last st. Turn. (2 sc + ch-3 sp)
Row 8: Ch 1, sc in the first sc, 3 sc in the ch-3 sp, sc in the last sc. Turn. This is a conversion row: 2 sc worked one per stitch + 3 sc in the space = 5 sts.
Rows 9–10: Ch 1, sc in each st across, turn. (5 sts)
Fasten off. Each tab is 1.25 in (3.2 cm) wide and 2.25 in (5.7 cm) tall. Repeat on the second set of 5 sts.
Finishing: Dividers and Buttons
Dividers: Flatten the pocket so the front and back walls line up. On the front long side, count 13 sts from st 53 and mark the gap between the 13th and 14th sts. Then mark the gap between the 27th and 28th sts. That splits the front into compartments of 13, 14 and 13 sts.
Thread a 24 in (61.0 cm) length of yarn. Backstitch straight down each marked line from the rim to the base, going through both the front and back walls. Keep the stitches firm but not puckered. Fasten off on the back.
Buttons: Sew one wooden button to each tab, centered over tab Rows 2–3. Stitch an X through the four holes.
Final Blocking
- Spray the whole piece lightly until it is damp but not soaked.
- Lay it face up on a blocking mat with the panel flat.
- Pin the panel to 11 in (27.9 cm) wide and 8 in (20.3 cm) tall, including the border.
- Fill each compartment with a folded washcloth or rolled towel so the pocket holds a 1.5 in (3.8 cm) depth.
- Pin the tabs straight up, each 2.25 in (5.7 cm) long.
- Let it dry fully, which takes 24 hours. Leave the pocket stuffing in until it is completely dry.
Final Quality-Control Checklist
- [ ] Base ends at 98 sts; Rnd 4 and every pocket round count 99 sts
- [ ] Waffle grid is even, with 8 waffle rounds and no twisted columns
- [ ] Panel is 40 sts wide and 14 rows tall
- [ ] Border Row 1 = 68 sts, Row 2 = 72 sts
- [ ] Tabs sit 3 sts in from each corner and are 5 sts wide
- [ ] Both buttonholes fit over your wall knobs
- [ ] Divider seams are straight and split the front 13/14/13
- [ ] Finished size is 11 in x 8 in (27.9 cm x 20.3 cm)
- [ ] All ends are woven in on the back
Troubleshooting
The pocket walls flare outward. The waffle is too loose. Use a 5 mm hook for the waffle rounds.
The pocket walls pull in, narrower than the base. Go up to a 6 mm (J-10) hook for the waffle rounds only.
The waffle columns drift sideways. Make sure the ch 2 doesn’t count as a stitch, and work the first stitch into the same stitch as the join.
The border ripples along the sides. You worked too many row-end stitches. Keep it to 12 per side.
The border cups along the sides. Work 13 per side instead, and add 1 st to every count that includes a side.
The tabs lean outward. Block them straight. If needed, run a sl st line up the back of each tab.
The buttonhole is too tight for your knob. In Row 7, chain 4 instead of 3, still skipping 3 sts. In Row 8, work 3 sc in the ch-4 sp so the count stays at 5.
Care
Hand wash in cool water with mild soap, press out the water in a towel and reshape to dry flat. Stuff the pockets again while drying so they keep their depth.
Final Notes
The measurement chain is simple. The 11 in x 1.5 in (27.9 cm x 3.8 cm) base sets the pocket width. The 99-st waffle tube rises 4.5 in (11.4 cm). The 40-st panel adds 3 in (7.6 cm) at 10 in (25.4 cm) wide. The 0.5 in (1.3 cm) border brings the body to 11 in x 8 in (27.9 cm x 20.3 cm). Finally, the 2.25 in (5.7 cm) tabs give an overall height of 10.25 in (26.0 cm). If each checkpoint matches, the finished organizer will hang straight and hold your remotes neatly.
Happy crocheting!