
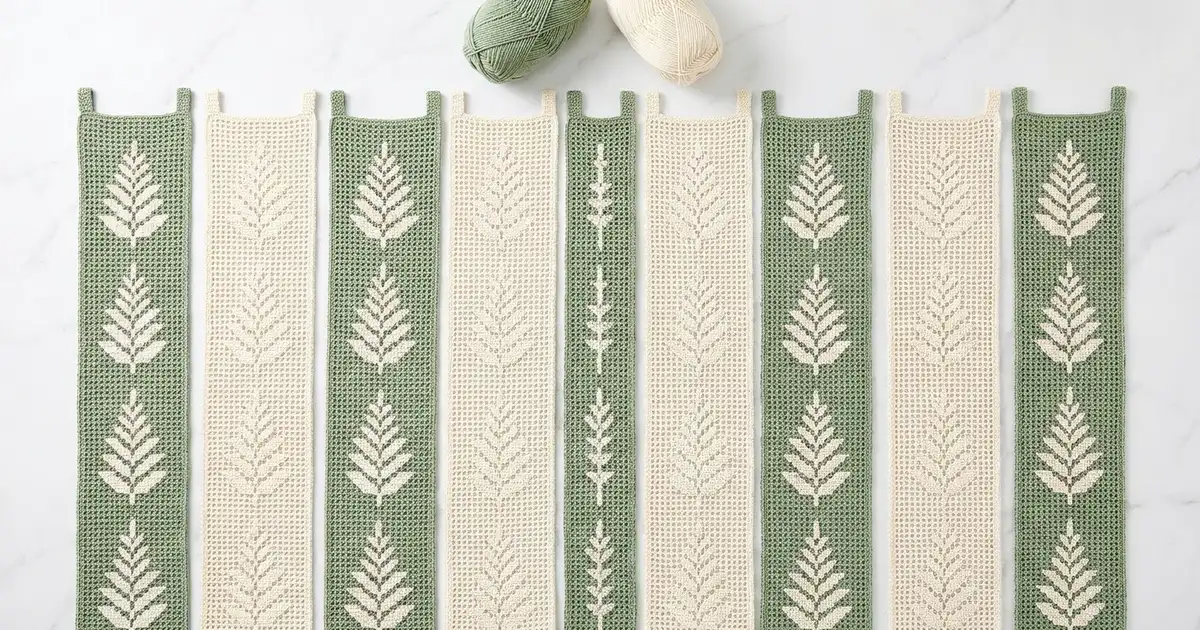
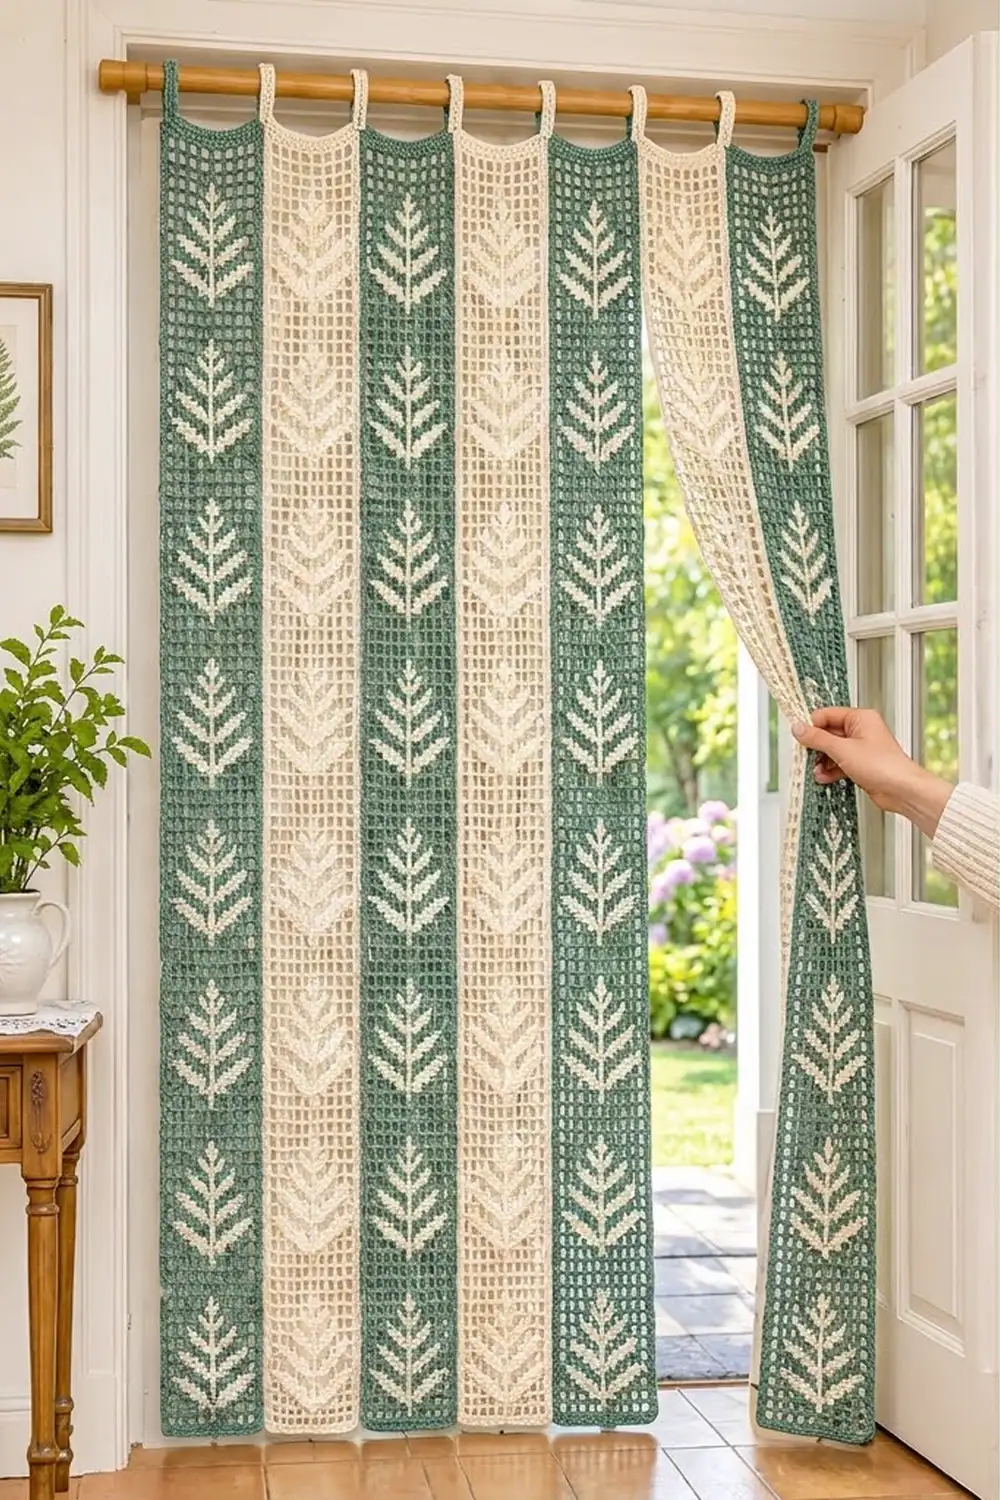
This door curtain is made of seven slim filet-crochet strips that hang side by side from a rod. Each strip is an open grid of square meshes with one column of tall, tapered ferns running down the middle. Light comes through the mesh, and the solid fern blocks stand out against it.
The colorway alternates sage green and cream. The four green strips have cream ferns worked with small bobbins, and the three cream strips have tone-on-tone ferns in solid blocks. The look is calm and botanical, and it works well in a cottage or Scandinavian-style room.
The pattern uses US crochet terms. Each finished strip measures 6.5 in (16.5 cm) wide by 71.5 in (181.6 cm) long, and the hanging loops add about 2.5 in (6.4 cm). Hung with 0.5 in (1.3 cm) gaps, all seven strips span 48.5 in (123.2 cm).
You work each strip flat in rows of filet mesh from the bottom up. Then you add a two-round single crochet border and two tabs. The strips are never sewn together. They simply hang in order on the rod.
Finished Size and Construction
- Finished strip size: 6.5 in x 71.5 in (16.5 cm x 181.6 cm)
- Skill level: Intermediate (filet mesh plus simple intarsia on the green strips)
- Terminology: US
- Yarn weight: Sport (2), mercerized cotton
- Hook: 3.5 mm (E-4)
- Number of pieces: 7 separate strips (4 green, 3 cream)
- Layout: One row of 7 strips, alternating colors, not joined
- Strip size before border: 6 in x 71 in (15.2 cm x 180.3 cm), which is 11 meshes x 142 rows
- Border depth: 0.25 in (0.6 cm) on every side, from 2 rounds of sc
- Overall hanging length: about 74 in (188.0 cm), including the loops
Materials
Mercerized cotton is a good choice here. It has crisp stitch definition, keeps the grid square, and doesn’t stretch much when it hangs. The quantities below assume about 170 yd (155 m) per 50 g ball.
- Color A, Sage Green: 200 g, about 680 yd (622 m)
- Color B, Cream: 250 g, about 850 yd (777 m)
All quantities include a margin of roughly 20%, which covers your gauge swatch, bobbin tails, and small differences in tension.
Tools:
– 3.5 mm (E-4) crochet hook
– 3 yarn bobbins, or small butterflies of yarn
– Tapestry needle
– Scissors
– Locking stitch markers
– Tape measure
– Blocking mats, rust-proof pins, and a spray bottle
– A curtain rod at least 50 in (127.0 cm) long
Abbreviations (US Terms)
- ch – chain
- sl st – slip stitch
- sc – single crochet
- dc – double crochet
- st(s) – stitch(es)
- sp – space
- sk – skip
- yo – yarn over
- MC – main color of the strip
- CC – contrast color (Color B on green strips)
Special stitches:
– Open mesh (OM): ch 2, sk 2 sts, dc in next st.
– Block (BL): dc in next 3 sts. Over an open mesh below, work 2 dc in the ch-2 sp, then dc in the next dc.
– Post: the dc that closes each mesh. A row of 11 meshes has 12 posts and always totals 34 sts.
– CC run (green strips only): a group of side-by-side blocks worked in CC, including both of the posts that frame it. A run of r blocks is 3r + 1 sts. On the last yo of the stitch or chain before the run, drop MC and pull through with the CC bobbin. Work the run, and pull the final yo of its last post through with MC. Leave the bobbins hanging on the wrong side, and never carry them across open meshes.
Gauge and Checkpoints
Gauge: 34 sts (11 meshes) = 6 in (15.2 cm) wide, and 12 rows of filet = 6 in (15.2 cm) tall. Each row is 0.5 in (1.3 cm) high.
Start one green strip first and treat it as your test piece.
- Checkpoint 1, after Row 12: the piece should measure 6 in x 6 in (15.2 cm x 15.2 cm).
- Checkpoint 2, after Row 17 (end of the first fern): the piece should be 8.5 in (21.6 cm) tall.
- Checkpoint 3, after Row 142: the piece should be 71 in (180.3 cm) tall, measured lightly stretched.
If your piece is too wide or too tall, go down half a hook size. If it is too small, go up half a size. If only the height is off, change how high you pull up the first loop of each dc. Don’t add or remove rows, because the motif spacing depends on the row count.
Strip Pattern (Make 7)
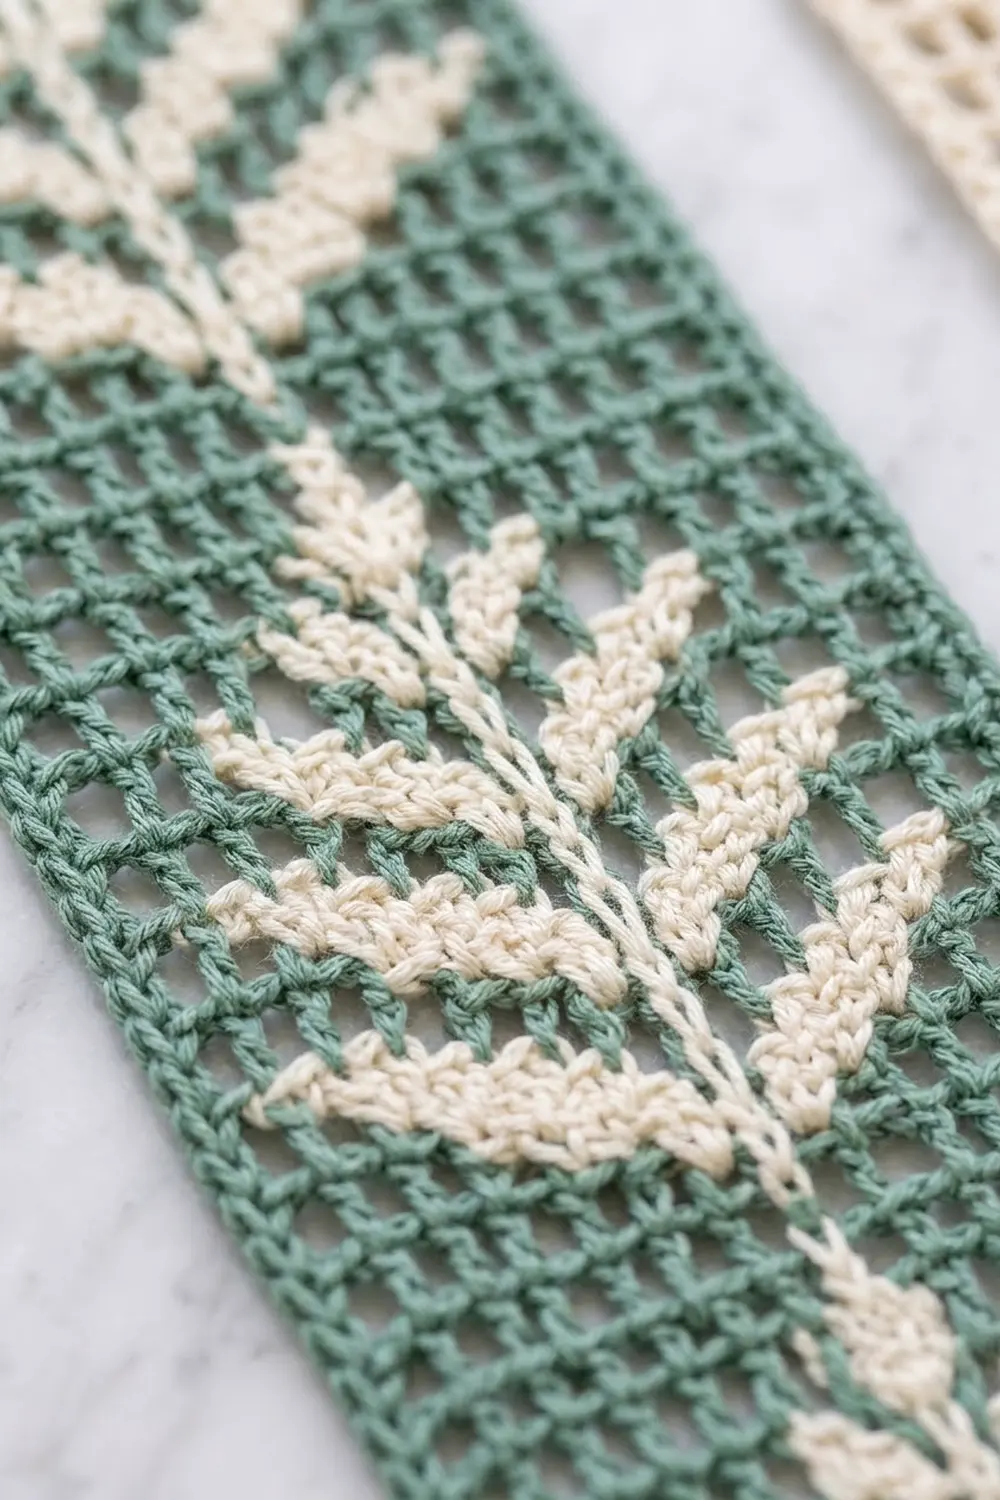
Work each strip in the main color (MC): Color A for green strips and Color B for cream strips. On cream strips, work every block in B and skip the bobbins. On green strips, work every fern block as a CC run in Color B.
The fern motif is symmetrical, so each motif row reads the same in both directions.
Row 1 (solid base): With MC, ch 36. Dc in the 4th ch from the hook and in each ch across. The skipped ch-3 counts as a dc. (34 sts)
Row 2 (open row): Ch 5 (counts as dc + ch 2), sk 2 sts, dc in next st, then work [OM] 10 times. Make the last dc in the top of the turning ch. (11 meshes = 12 dc + 11 ch-2 sps = 34 sts)
Rows 3–6: Repeat Row 2. Make the last dc of each row in the 3rd ch of the turning ch-5. (34 sts)
Start every row from here on with ch 5, because the first and last meshes are always open.
Fern Motif (11 rows)
Read each line from mesh 1 to mesh 11.
- M1: 5 OM, 1 BL, 5 OM
- M2: 5 OM, 1 BL, 5 OM
- M3: 1 OM, 2 BL, 2 OM, 1 BL, 2 OM, 2 BL, 1 OM
- M4: 3 OM, 5 BL, 3 OM
- M5: 5 OM, 1 BL, 5 OM
- M6: 2 OM, 2 BL, 1 OM, 1 BL, 1 OM, 2 BL, 2 OM
- M7: 4 OM, 3 BL, 4 OM
- M8: 5 OM, 1 BL, 5 OM
- M9: 3 OM, 1 BL, 1 OM, 1 BL, 1 OM, 1 BL, 3 OM
- M10: 4 OM, 3 BL, 4 OM
- M11: 5 OM, 1 BL, 5 OM
Every motif row has 34 sts. There are 29 blocks per fern. M3, M6, and M9 are the lower edges of the three tiers, with the outer tips set one row below the inner blocks, so each tier forms a chevron. The tiers span 9, 7, and then 5 meshes, which is what tapers the fern into a point.
Bobbins for green strips: Wind one 3 yd (2.7 m) bobbin of B for the stem (mesh 6). It runs through all 11 motif rows. For each side run in M3, M6, and M9, cut an 18 in (45.7 cm) length of B. Fasten it off after its row, and work over its starting tail inside the run’s dc. Cut the stem bobbin after M11.
Strip Body Layout
- Rows 7–17: Fern 1 (M1–M11)
- Rows 18–23: 6 open rows (gap of 3 in / 7.6 cm)
- Rows 24–142: Repeat the 17-row unit (11 motif rows + 6 open rows) seven more times. Fern n begins on Row 7 + 17 x (n – 1), so Fern 8 runs from Row 126 to Row 136.
- Rows 137–141: 5 open rows.
- Row 142 (solid top): Ch 3 (counts as dc). Work 2 dc in each ch-2 sp and 1 dc in each dc across. (34 sts) Don’t fasten off.
Check: 1 + 5 + (8 x 11) + (7 x 6) + 5 + 1 = 142 rows. At 0.5 in (1.3 cm) per row, that is 71 in (180.3 cm). The bottom and top margins are both 5 open rows, so the ferns sit centered on the strip.
Make All Strips
| Color | Strips | Mesh color | Fern color |
|---|---|---|---|
| A (Sage Green) | 4 | A | B |
| B (Cream) | 3 | B | B |
Layout, seen from the room side, left to right:
[ A ][ B ][ A ][ B ][ A ][ B ][ A ]
  1    2    3    4    5    6    7
Joining and Hanging
The strips are not joined. Each strip hangs freely on its own two tabs, so the curtain parts easily when someone walks through.
The strips have no shared seams, so the border math is worked one strip at a time. Every strip has the same per-side counts.
Spacing: Thread the strips onto the rod in the order of the layout grid, leaving a 0.5 in (1.3 cm) gap between neighboring strips. That gives 7 strips x 6.5 in = 45.5 in (115.6 cm), plus 6 gaps x 0.5 in = 3 in (7.6 cm), for a total of 48.5 in (123.2 cm).
Size checkpoint: Before you hang them, lay all seven blocked strips side by side. Their lengths should match within 0.5 in (1.3 cm).
Border and Tabs
Border gauge: Along the top and bottom edges, you work 1 sc in each body stitch, which matches 34 sts = 6 in (15.2 cm). Along the sides, you work 14 sc over every 5 rows, or 2.8 sc per 0.5 in row. The body gauge would call for about 2.83 sc per row. That difference is about 1%, so the edge stays firm without cupping or ruffling.
Round 1: Continue from Row 142 with ch 1. Work 1 sc in each of the 34 sts across the top, then ch 2 for the corner.
For the first side, work [3 sc in each of the next 4 row-ends, 2 sc in the next row-end] 28 times. That covers 140 rows with 392 sc. Then work 3 sc in each of the last 2 row-ends, for 398 sc on the side. Ch 2 for the corner.
Across the bottom, work 1 sc in each of the 34 foundation loops, then ch 2. Work the second side the same way as the first, for 398 sc, then ch 2. Sl st to the first sc.
Round 1 totals: top 34 + side 398 + bottom 34 + side 398 = 864 sc, plus 4 ch-2 corner sps. The corner sps are not counted in any side total.
Round 2: Ch 1. Work 1 sc in each sc, and (sc, ch 2, sc) in each corner sp. Sl st to the first sc.
Each side count is the stitches worked 1 per existing stitch plus the 2 stitches added at the corners. The top and bottom are each 34 + 2 = 36 sc, and each side is 398 + 2 = 400 sc. The total is 36 + 400 + 36 + 400 = 872 sc, plus 4 ch-2 sps.
Why the math works: 36 sc at 34 sts per 6 in gives 6.35 in (16.1 cm). Each ch-2 corner adds a little, so the width comes to 6.5 in (16.5 cm). On the sides, 400 sc at 2.8 sc per 0.5 in gives 71.4 in (181.4 cm), and with the corners that comes to 71.5 in (181.6 cm). Both numbers match the body plus 0.25 in (0.6 cm) of border on each side.
Tabs (make 2 per strip): Number the 36 top sc of Round 2 from right to left. Place the tabs on sts 4–8 and sts 29–33. That leaves 3 sts at each outer end and 20 sts between the tabs, so the tabs are centered.
Row 1: Join MC in st 4. Ch 1, then sc in the same st and the next 4 sts. (5 sc, about 0.9 in / 2.3 cm wide)
Following rows: Ch 1, turn, then sc in each sc across. (5 sc) Repeat until the tab measures 5 in (12.7 cm). That is usually 28–32 rows.
Fasten off, leaving a 12 in (30.5 cm) tail. Fold the tab to the back and whipstitch its last row to the back of Round 1, behind the same 5 sts. This makes a 2.5 in (6.4 cm) loop. Repeat on sts 29–33.
Final Blocking
- Weave in all ends, running them along the solid blocks or the border, never across open meshes.
- Soak each strip in cool water for 10 minutes. Press the water out gently, without wringing.
- Roll each strip in a towel to remove the excess water.
- Pin each strip flat to 6.5 in x 71.5 in (16.5 cm x 181.6 cm). Pin the border every 2 in (5.1 cm).
- Square the meshes by eye along the fern column and keep the stem straight.
- Let the strips dry completely, then unpin.
- Before hanging, lay all seven strips side by side and compare their lengths.
Final Quality-Control Checklist
- [ ] Every row has 34 sts and 11 meshes.
- [ ] Each strip has 142 rows, 8 ferns, and 5 open rows at the top and bottom.
- [ ] Each fern has 29 blocks, and all three tiers form chevrons.
- [ ] There are no MC posts inside cream runs and no CC strands crossing open meshes.
- [ ] Border Round 2 has 36 / 400 / 36 / 400 sc.
- [ ] The tabs sit on sts 4–8 and 29–33 and are firmly sewn.
- [ ] Each strip measures 6.5 in x 71.5 in (16.5 cm x 181.6 cm).
Troubleshooting
The meshes are tall rectangles: Your dc are too tall. Pull up shorter loops, or go down half a hook size.
The fern leans: A block landed one mesh off. Count the posts from the edge on every motif row, and place a marker on the stem post.
Green shows inside the cream blocks: You changed color too late. Pull the final yo of the previous stitch or chain through with CC.
The side border ripples: Use the full 2-sc rest in each group of 5 row-ends. If it still ripples, go down a hook size for the border only.
The strips hang at different lengths: Re-block the longer strip, or the shorter one, to 71.5 in (181.6 cm). Cotton responds well to wet blocking.
Care
Hand wash cool and dry flat, then reshape the strips to their blocked size. Hang them out of strong direct sun to limit fading of the sage green.
Final Notes
The size of this curtain depends on a few numbers carrying through the whole pattern. 34 stitches make 6 in (15.2 cm) of width, and 142 rows at 0.5 in (1.3 cm) each make 71 in (180.3 cm) of length. Two rounds of border bring each strip to 6.5 in x 71.5 in (16.5 cm x 181.6 cm), and seven strips with small gaps span 48.5 in (123.2 cm). Check your piece at Rows 12, 17, and 142 and the strips should hang evenly.
Happy crocheting!