

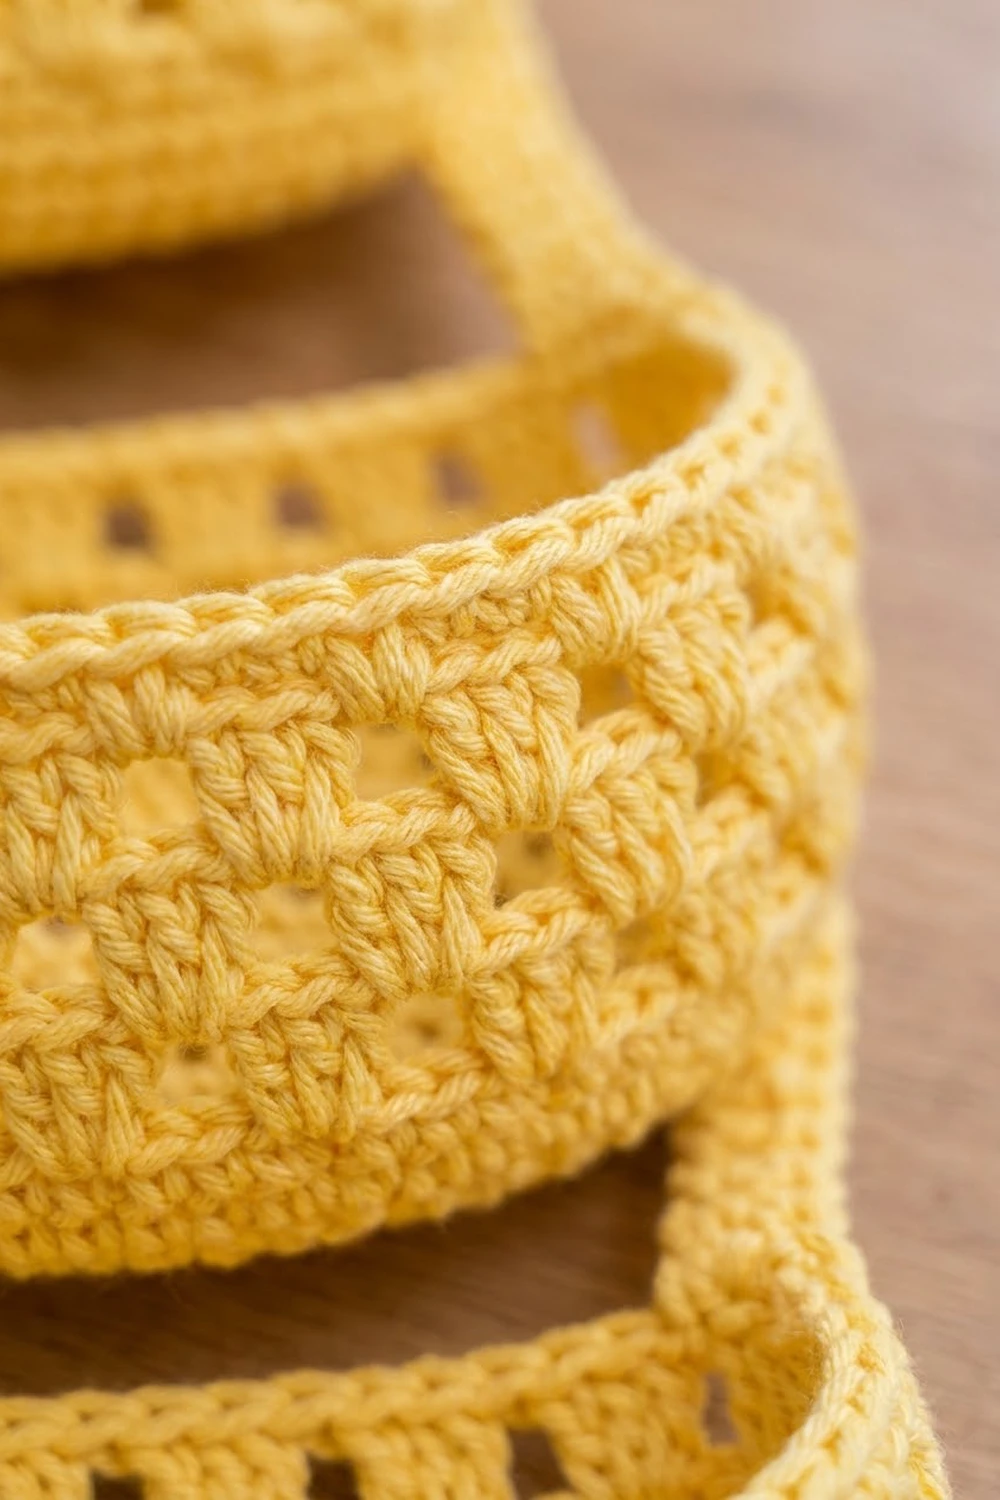
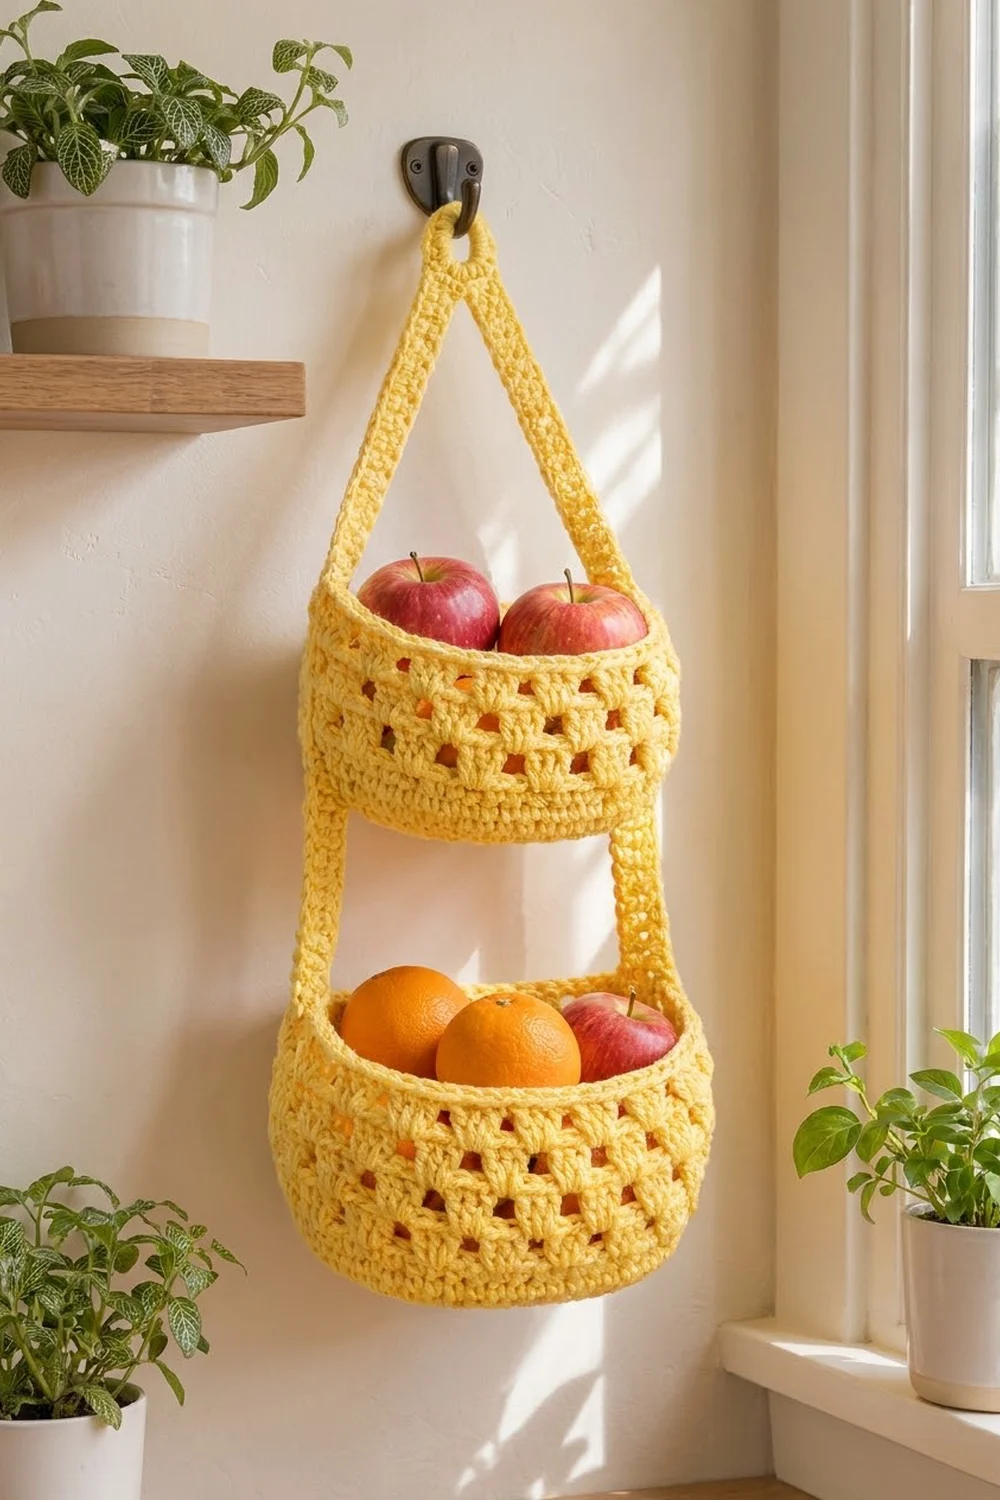
The Lemon Grove basket gets apples and oranges off your counter and onto the wall. It has two oval baskets stacked one above the other, joined by two slim straps that meet in a hanging loop. The walls are made of open granny clusters, so air moves around the fruit, and solid single-crochet bands keep the shape firm.
The sample is made in a single sunny butter yellow. It is also lovely in olive green, as shown in the matching basket hanging beside it. The style is simple and farmhouse-bright, and the texture shows best in a smooth cotton.
The pattern uses US crochet terms. The finished piece hangs about 21 in (53.3 cm) tall. The lower basket measures about 10 x 5 x 5 in (25.4 x 12.7 x 12.7 cm) and the upper basket about 7.25 x 3.75 x 3.6 in (18.4 x 9.5 x 9.1 cm).
You’ll make two oval bases in the round and turn the walls up with a back-loop round. Next you work the cluster bands, then make two straps in rows. You sew the straps to the short ends of both baskets and join the strap tops into a loop. Last, you add a rim border to each basket.
Finished Size and Construction
- Finished size: about 21 in (53.3 cm) tall including the loop
- Skill level: Easy+ / confident beginner
- Terminology: US
- Yarn weight: Bulky (#5) cotton or cotton blend
- Hook: 6 mm (US J-10)
- Number of pieces: 4 (lower basket, upper basket, 2 straps)
- Layout: vertical stack, with the upper basket centered 3 in (7.6 cm) above the lower basket
- Lower basket: 10 x 5 x 5 in (25.4 x 12.7 x 12.7 cm)
- Upper basket: 7.25 x 3.75 x 3.6 in (18.4 x 9.5 x 9.1 cm)
- Wall height before border: lower 4.25 in (10.8 cm), upper 2.9 in (7.4 cm)
- Border depth: 0.7 in (1.8 cm)
Materials
Yarn: Use a smooth, firm bulky cotton or cotton blend. Cotton holds its shape under weight and is easy to wipe clean. Acrylic works, but the baskets will sag more when full.
- Butter yellow: 160 g, about 190 m (208 yd)
If you want the olive green version, use the same amount in green. The quantities include a margin of about 25% for your gauge swatch and for differences in tension.
Tools:
– 6 mm (US J-10) hook
– 6 stitch markers
– Tapestry needle
– Locking pins or clips
– Measuring tape
– Scissors
Abbreviations (US Terms)
- ch – chain
- sl st – slip stitch
- sc – single crochet
- dc – double crochet
- BLO – back loop only
- sp – space
- st(s) – stitch(es)
- rep – repeat
Special stitch – cluster: work 3 dc into the same stitch or space. Clusters are always followed by ch 1. One cluster plus its ch-1 counts as 4 sts.
Gauge and Checkpoints
Gauge in sc: 12 sts and 13 rnds = 4 in (10.2 cm). One sc round is about 0.3 in (0.8 cm).
Gauge in clusters: 3 cluster repeats (12 sts) = 4 in (10.2 cm). Two cluster rounds = 1 in (2.5 cm).
Make the upper basket first. It is the smaller test piece and shows you your gauge quickly.
Checkpoints:
– Upper base after Rnd 6: 7 x 3.75 in (17.8 x 9.5 cm)
– Lower base after Rnd 8: 9.75 x 5 in (24.8 x 12.7 cm)
– Upper wall after Rnd 13: 2.9 in (7.4 cm) tall
– Lower wall after Rnd 18: 4.25 in (10.8 cm) tall
– Strap: 1.3 in (3.3 cm) wide, 16.9 in (42.9 cm) long
If your piece is too big, go down 0.5 mm in hook size. If it is too small, go up 0.5 mm. Don’t change the stitch counts, because the cluster repeats depend on them.
Lower Basket
Base
Ch 17.
Rnd 1: 3 sc in 2nd ch from hook, sc in next 14 ch, 3 sc in last ch. Rotate and work along the other side of the chain: sc in next 14 ch. Join with sl st to first sc. (34)
Each round now has four sections: end 1, straight side, end 2, straight side. The straight sides always stay at 14 sts. All the increases happen in the two ends, with 3 increases per end in every round.
Rnd 2: Ch 1. [2 sc in each of next 3 sts, sc in next 14] twice. Join. (40)
Rnd 3: Ch 1. [(sc in next st, 2 sc in next) 3 times, sc in next 14] twice. Join. (46)
Rnd 4: Ch 1. [(sc in next 2, 2 sc in next) 3 times, sc in next 14] twice. Join. (52)
Rnd 5: Ch 1. [(sc in next 3, 2 sc in next) 3 times, sc in next 14] twice. Join. (58)
Rnd 6: Ch 1. [(sc in next 4, 2 sc in next) 3 times, sc in next 14] twice. Join. (64)
Rnd 7: Ch 1. [(sc in next 5, 2 sc in next) 3 times, sc in next 14] twice. Join. (70)
Rnd 8: Ch 1. [(sc in next 6, 2 sc in next) 3 times, sc in next 14] twice. Join. (76)
The sections are now 24 sts per end and 14 sts per straight side: 24 + 14 + 24 + 14 = 76. Place a marker in the 11th and 14th sts of each end section. These four stitches are the end-center sts.
Checkpoint: 9.75 x 5 in (24.8 x 12.7 cm).
Walls
Rnd 9 (turning round): Ch 1, sc in BLO of each st around. Join. (76) The unused front loops make a crisp fold, and the wall stands up.
Rnd 10: Ch 1, sc in each st. Join. (76)
Rnd 11 (clusters): Ch 3 (counts as dc), 2 dc in same st, ch 1, skip next 3 sts. 3 dc in next st, ch 1, skip next 3 sts; rep from * 17 more times. Join to top of ch-3. (19 clusters = 76 sts)*
Rnd 12 (offset clusters): Sl st in next 2 dc and into ch-1 sp. Ch 3, 2 dc in same sp, ch 1. 3 dc in next ch-1 sp, ch 1; rep from * 17 more times. Join. (19 clusters = 76 sts)*
Rnd 13 (sc band): Ch 1, sc in each dc and each ch-1 sp around. Join. (76)
Rnds 14–15: Rep Rnds 11–12. (76)
Rnd 16: Rep Rnd 13. (76)
Rnds 17–18: Rep Rnds 11–12. (76)
Fasten off and weave in the tail. This gives three cluster bands, separated by sc rounds. Move the end-center markers straight up to Rnd 18.
Checkpoint: wall 4.25 in (10.8 cm) tall.
Upper Basket
Base
Ch 14.
Rnd 1: 3 sc in 2nd ch from hook, sc in next 11 ch, 3 sc in last ch. Rotate, then sc in next 11 ch along the other side. Join. (28)
The straight sides stay at 11 sts. As in the lower basket, each end gets 3 increases per round.
Rnd 2: Ch 1. [2 sc in each of next 3, sc in next 11] twice. Join. (34)
Rnd 3: Ch 1. [(sc 1, 2 sc in next) 3 times, sc in next 11] twice. Join. (40)
Rnd 4: Ch 1. [(sc 2, 2 sc in next) 3 times, sc in next 11] twice. Join. (46)
Rnd 5: Ch 1. [(sc 3, 2 sc in next) 3 times, sc in next 11] twice. Join. (52)
Rnd 6: Ch 1. [(sc 4, 2 sc in next) 3 times, sc in next 11] twice. Join. (58)
58 is not a multiple of 4, so you need to remove 2 sts.
Rnd 6 correction: Work Rnd 6 with sc 4 in place of the last “sc 4, 2 sc” in each end. That means each end has 2 increases instead of 3. (56)
The sections are now 17 sts per end and 11 sts per straight side: 17 + 11 + 17 + 11 = 56. Mark the 7th and 10th sts of each end section as the end-center sts.
Checkpoint: 7 x 3.75 in (17.8 x 9.5 cm).
Walls
Rnd 7: Ch 1, sc in BLO around. Join. (56)
Rnd 8: Ch 1, sc around. Join. (56)
Rnd 9: Ch 3, 2 dc in same st, ch 1, skip 3. 3 dc in next st, ch 1, skip 3; rep from * 12 more times. Join. (14 clusters = 56 sts)*
Rnd 10: Sl st to the first ch-1 sp. Ch 3, 2 dc in same sp, ch 1. 3 dc in next ch-1 sp, ch 1; rep from * 12 more times. Join. (56)*
Rnd 11: Ch 1, sc in each dc and ch-1 sp. Join. (56)
Rnds 12–13: Rep Rnds 9–10. (56)
Fasten off. This gives two cluster bands. Move the markers up to Rnd 13.
Checkpoint: wall 2.9 in (7.4 cm) tall.
Straps (make 2)
Ch 5.
Row 1: Sc in 2nd ch from hook and in each ch across. Turn. (4)
Rows 2–55: Ch 1, sc in each st across. Turn. (4)
Fasten off one strap. Leave the second strap on the hook for joining.
Checkpoint: each strap is 1.3 x 16.9 in (3.3 x 42.9 cm).
The strap rows have these jobs:
– Rows 1–6 lie against the lower wall.
– Rows 7–18 pass the lower border and cross the 3 in (7.6 cm) gap.
– Rows 19–27 lie against the upper wall.
– Rows 28–29 sit beside the upper border.
– Rows 30–55 hang free and form one side of the V.
Make All Pieces
Butter yellow:
– 1 lower basket (76 sts at rim)
– 1 upper basket (56 sts at rim)
– 2 straps (4 sts x 55 rows)
Layout:
            [ LOOP ]
               /\
   Strap A    /  \    Strap B
   rows 30-55      rows 30-55
     |  [  UPPER BASKET  ]  |   rows 19-29
     |                      |   rows 7-18 (gap)
  [       LOWER BASKET        ] rows 1-6
Joining
Method: Whipstitch with the yarn tail and a tapestry needle on the outside of each basket’s short ends.
- Pin strap A over the 4 end-center sts of one lower end. Row 1 sits at the bottom of Rnd 15, and Row 6 sits at the top of Rnd 18. The 4 strap sts line up exactly with the 4 marked wall sts.
- Whipstitch both long edges of the strap. Make 1 stitch per strap row end. On sc wall rounds, the rows match 1:1. On dc rounds, catch the dc post twice, because 1 dc round is about 1.6 strap rows.
- Repeat on the opposite end with strap B.
- Pin the upper basket centered above the lower one. Strap Row 19 sits at the base fold (Rnd 7), and Row 27 sits at the top of Rnd 13. Line the strap up over the 4 end-center sts, then whipstitch as before. Repeat on the other end.
- Size checkpoint: the distance from the top of lower Rnd 18 to the upper base fold should be 3.7 in (9.4 cm). That is 0.7 in (1.8 cm) for the future border plus a 3 in (7.6 cm) gap.
Tension advice: Pull each whipstitch snug, but not tight. Tight seams pucker the cluster walls and make the straps shorter.
Top join and loop: Bring Row 55 of both straps together with the right sides facing. Using the strap still on the hook:
- Row 56: Sl st through both layers across. (4)
- Rows 57–70: Ch 1, sc 4. Turn. (4)
Fold Row 70 back to Row 56 and whipstitch it in place. This makes a loop about 2 in (5.1 cm) tall.
Border
Border gauge: 2 sc rounds plus 1 sl st round = 0.7 in (1.8 cm).
Work each rim with the straps already attached. The new rounds build up behind the strap, which simply lies against the outside.
Lower rim:
– Rnd B1: Join at any st. Ch 1, sc in each st around. Join. (76) That is 24 per end + 14 per straight side + 24 + 14.
– Rnd B2: Ch 1, sc around. Join. (76)
– Rnd B3: Sl st loosely in each st around. Fasten off. (76)
Upper rim:
– Work Rnds B1–B3 the same way. (56) That is 17 + 11 + 17 + 11 per section.
Tack strap Rows 7–8 and Rows 28–29 to their borders with 2–3 hidden stitches.
Why the math works: Each rim has exactly as many stitches as its base: 76 for the lower basket and 56 for the upper. With one stitch per stitch and no increases, the rim can’t flare or pull in. It stays the same size as the base, so the walls stand straight.
Final Blocking
- Lightly spray the whole piece with water until it is damp.
- Stuff each basket with a rolled towel or a food container that fits snugly.
- Pat the bases flat and square up the fold at the turning round.
- Smooth the straps flat and straight, and check that both measure the same length.
- Hang it from a hook so the loop sets centered.
- Let it dry completely, which takes about 24 hours.
Final Quality-Control Checklist
- Lower rim has 76 sts and upper rim has 56 sts
- Each straight side is flat and each end is evenly rounded
- Cluster columns line up in every band
- Straps are centered on the 4 end-center sts
- The gap between the baskets is 3 in (7.6 cm)
- Both strap V-sides are the same length
- The loop is secure with no gaps
- All tails are woven in on the inside
Troubleshooting
- Base cups or ripples: Check your increase placement. Cupping means too few stitches and ripples mean too many. Recount against the round totals.
- Walls lean outward: Your clusters are too loose. Go down a hook size for the cluster rounds only.
- Wrong cluster count: Your sc round before it is off. Recount to 76 or 56 before you start the clusters.
- Basket tilts when hanging: One strap is longer. Count the rows on both straps and match the sewing positions.
- Straps stretch under fruit: Use firmer yarn or a smaller hook for the straps, or add a sl st row up each long edge.
Care
Hand wash in cool water, press out the water in a towel, and reshape over a container to dry flat. Don’t wring the baskets or put them in the dryer.
Final Notes
Here is the measurement chain for the whole basket:
– 12 sc = 4 in (10.2 cm)
– Lower base 9.75 x 5 in (24.8 x 12.7 cm) at 76 sts
– Upper base 7 x 3.75 in (17.8 x 9.5 cm) at 56 sts
– Walls 4.25 in (10.8 cm) and 2.9 in (7.4 cm) before the border
– Border adds 0.7 in (1.8 cm)
– Straps 16.9 in (42.9 cm), with a 3 in (7.6 cm) gap between the baskets
– Total hanging height about 21 in (53.3 cm)
If each checkpoint matches, your fruit basket will hang level and hold its shape.
Happy crocheting!