

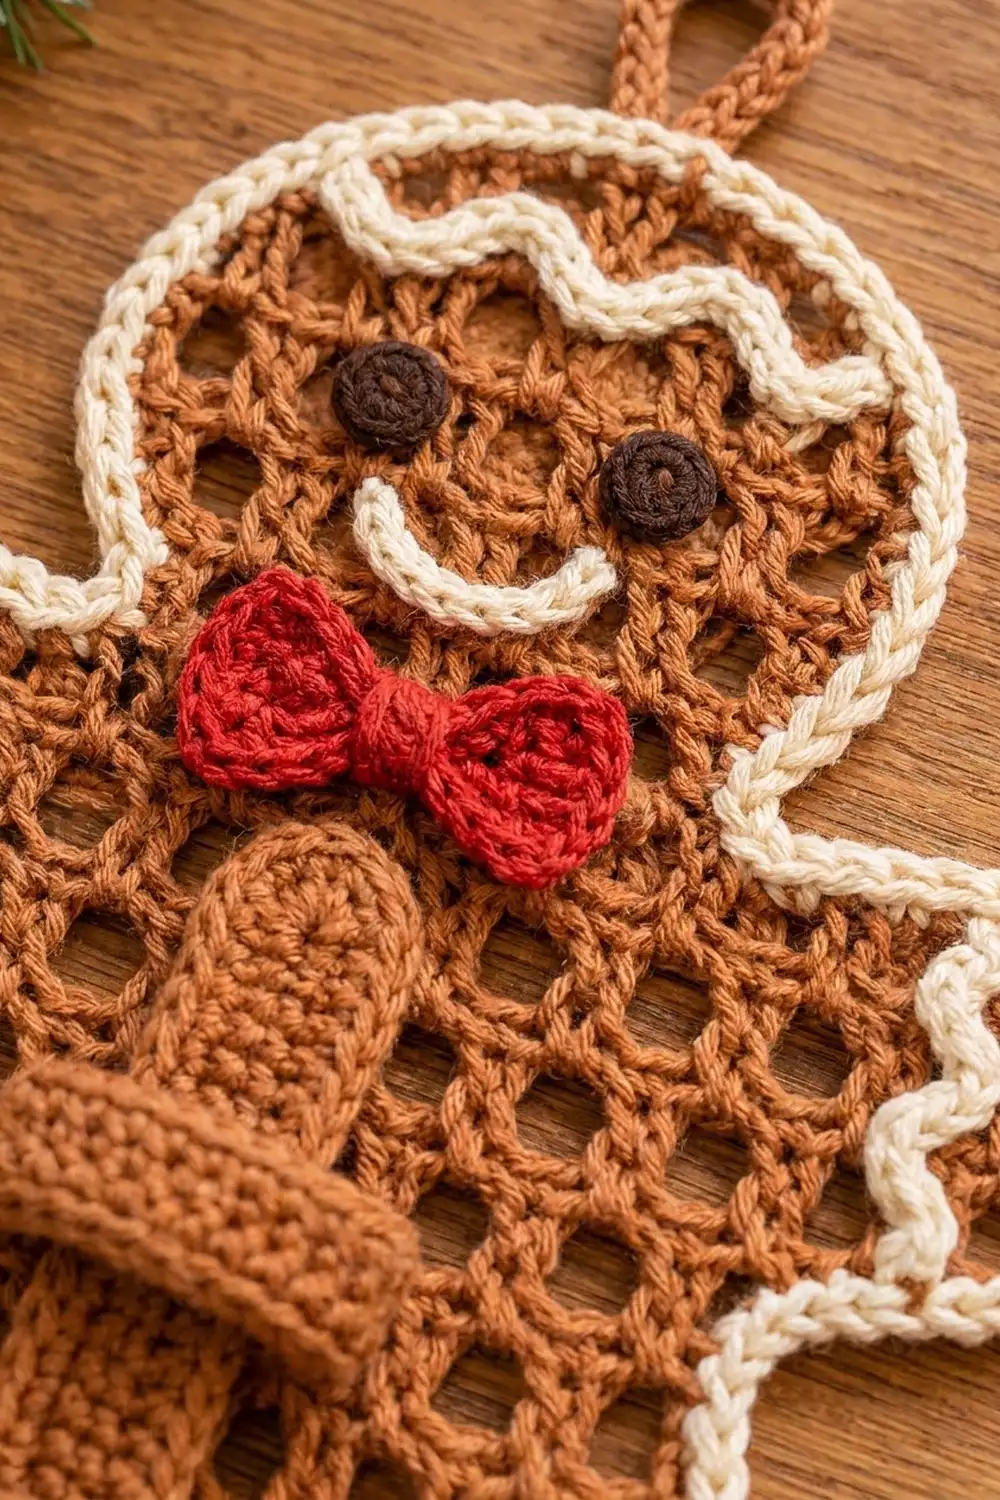
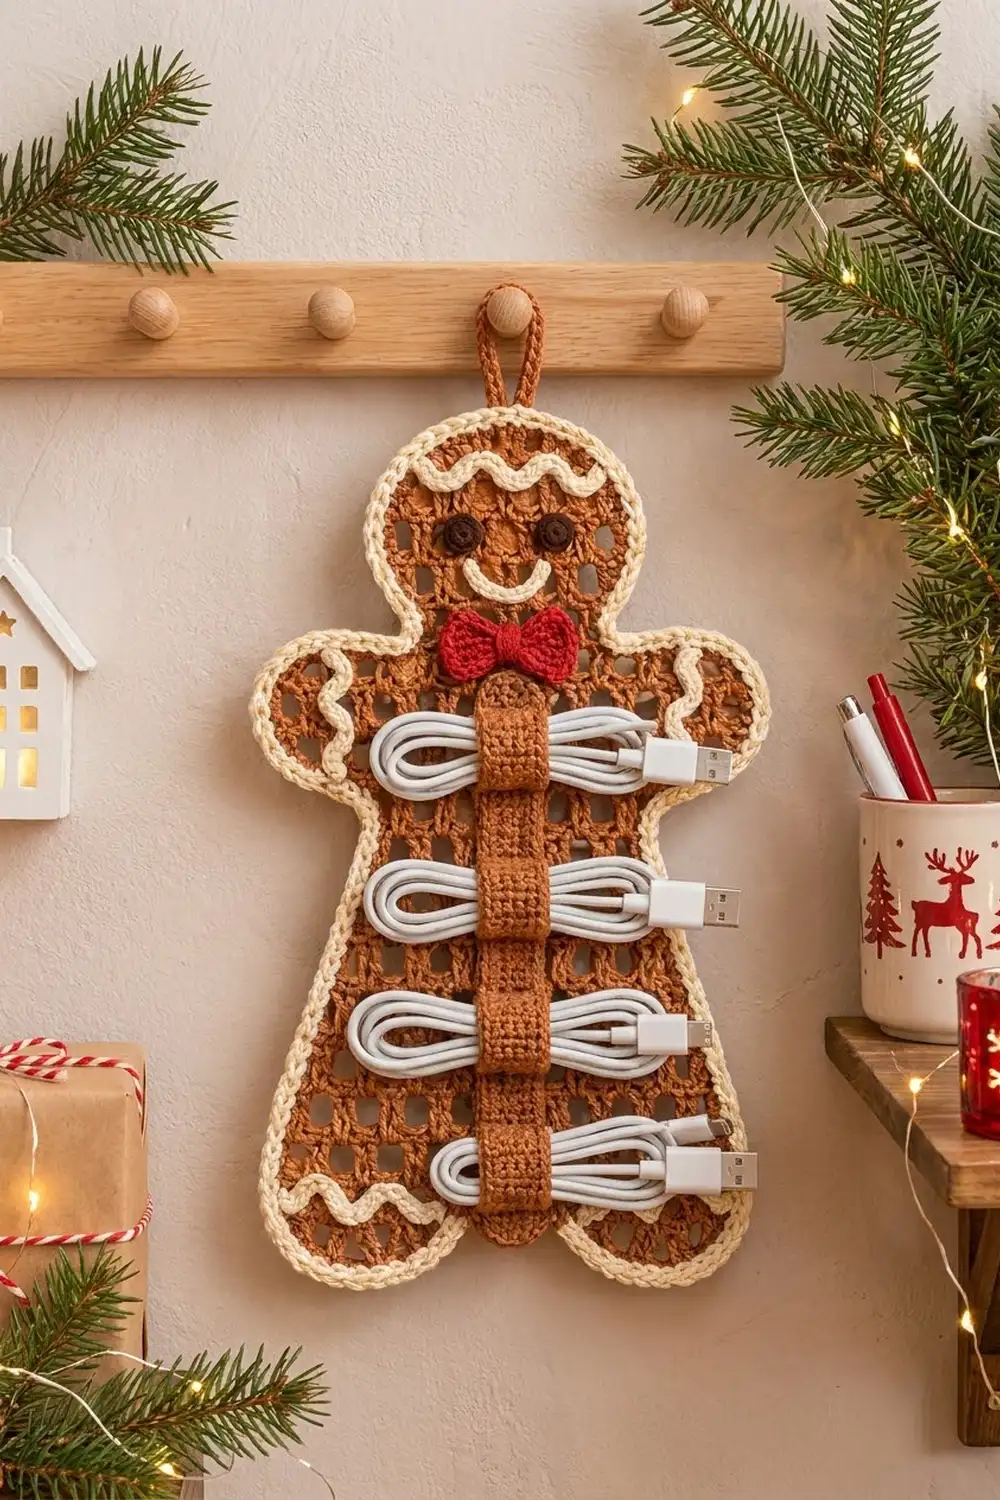
This gingerbread man earns his place on the wall. His caramel mesh body is a cheerful holiday decoration, and the strap down his front holds four coiled charging cables neatly in place.
The color palette is classic cookie: caramel brown for the body, strap and loops; cream for the border, icing and smile; dark brown for the eyes; and a bright red bow tie. The open mesh looks like a lattice cookie and keeps the piece light enough to hang from a single peg.
This pattern uses US crochet terms. The finished organizer measures 11.0 in (27.9 cm) wide by 14.6 in (37.1 cm) tall, plus a 1.5 in (3.8 cm) hanging loop.
The body is worked flat from the top of the head down in filet-style mesh, with increases and decreases at the row ends. It splits into two legs at the bottom. A two-round cream border smooths the stepped edges into curves. Then you add the icing, face, bow tie, strap, bands and loop.
Finished Size and Construction
- Finished size: 11.0 in × 14.6 in (27.9 cm × 37.1 cm), plus the loop
- Skill level: Intermediate (filet mesh shaping)
- Terminology: US
- Yarn weight: Worsted (#4) cotton
- Hook: US H-8 (5.0 mm)
- Number of pieces: 1 main body plus small appliqués, 1 strap and 4 bands
- Layout: single shaped piece, worn vertically as a wall hanging
- Mesh body before border: 10.2 in × 13.8 in (25.9 cm × 35.1 cm)
- Border depth: 0.4 in (1.0 cm) on every edge
Materials
Use a smooth, mercerized or combed worsted cotton. Cotton holds the mesh crisp and keeps the bands from stretching under the cables. Avoid fuzzy yarns, because they hide the holes.
- Caramel brown: 80 g / 150 m (body, strap, bands, loop)
- Cream: 20 g / 38 m (border, icing, smile, buttons)
- Red: 5 g / 10 m (bow tie)
- Dark brown: 2 g / 4 m (eyes)
All quantities include a margin of about 15%.
Tools: US H-8 (5.0 mm) hook, tapestry needle, rust-proof pins, stitch markers, measuring tape, blocking mat and spray bottle.
Abbreviations (US Terms)
- ch – chain
- sl st – slip stitch
- sc – single crochet
- dc – double crochet
- dtr – double treble crochet (yo 3 times, insert hook, pull up a loop, [yo, pull through 2] 4 times)
- sc2tog – single crochet 2 together
- rev sc – reverse single crochet (crab stitch), worked left to right
- sp – space
- st(s) – stitch(es)
- RS / WS – right side / wrong side
Mesh: dc, ch 2, with each dc worked into the dc below. A row of N mesh has N + 1 dc.
Normal row start: ch 5 (counts as dc + ch 2), turn, dc in next dc.
Normal row end: dc in 3rd ch of the turning ch-5.
Inc 1 at start: ch 8, turn, dc in first dc.
Inc 2 at start: ch 11, turn, dc in 9th ch from hook, ch 2, dc in first dc.
End-inc (1 mesh): ch 2, dtr in the base of the last st made. Repeat as directed.
Dec at start: turn, sl st in each of the next 3 sts for every mesh decreased, then work a normal row start.
Dec at end: leave the stated number of mesh unworked.
Gauge and Checkpoints
- Mesh gauge: 5 mesh and 5 rows = 3 in (7.6 cm), so 1 mesh = 0.6 in (1.5 cm) wide and tall.
- Sc gauge: 20 sc and 24 rows = 4 in (10.2 cm), which is 5 sc per inch.
Test first. Ch 20, work Row 1 below, then 4 more rows of 5 mesh, and measure. If your swatch is larger than 3 in (7.6 cm), go down one hook size. If it is smaller, go up one. Mesh that is too large makes a floppy organizer that sags under the cables.
Checkpoints:
- After Row 8 (head and neck): 4.8 in (12.2 cm) tall, with the head 5.4 in (13.7 cm) wide.
- After Row 12 (arms): 7.2 in (18.3 cm) tall and 10.2 in (25.9 cm) wide.
- After Row 20: 12.0 in (30.5 cm) tall and 9.0 in (22.9 cm) wide at the hem.
- After Row 23: 13.8 in (35.1 cm) tall.
Mesh Body (Caramel Brown)
Row 1 (RS): Ch 20, dc in 8th ch from hook, ch 2, sk 2 ch, dc in next ch 4 times. (5 mesh, 6 dc)
Row 2: Inc 1 at start, ch 2, dc in next dc 4 times, ch 2, normal row end, end-inc once. (7 mesh, 8 dc)
Row 3: Inc 1 at start, work 7 mesh across, end-inc once. (9 mesh, 10 dc)
Rows 4–6: Normal row start, work across. (9 mesh, 10 dc)
Row 7: Dec 1 at start, work across to the last mesh, dec 1 at end. (7 mesh, 8 dc)
Row 8 (neck): Dec 1 at start, work across, dec 1 at end. (5 mesh, 6 dc)
Checkpoint: the head is 5.4 in (13.7 cm) wide and the piece is 4.8 in (12.2 cm) tall.
Row 9: Inc 2 at start, work 5 mesh across, end-inc twice. (9 mesh, 10 dc)
Row 10: Inc 2 at start, work 9 mesh across, end-inc twice. (13 mesh, 14 dc)
Row 11: Inc 2 at start, work 13 mesh across, end-inc twice. (17 mesh, 18 dc)
Row 12: Normal row start, work across. (17 mesh, 18 dc)
Row 13: Dec 3 at start (sl st across 9 sts), work across, dec 3 at end. (11 mesh, 12 dc)
Rows 14–15: Work even. (11 mesh, 12 dc)
Row 16: Inc 1 at start, work 11 mesh across, end-inc once. (13 mesh, 14 dc)
Row 17: Work even. (13 mesh, 14 dc)
Row 18: Inc 1 at start, work 13 mesh across, end-inc once. (15 mesh, 16 dc)
Rows 19–20: Work even. (15 mesh, 16 dc)
First leg:
- Row 21 (RS): Normal row start, ch 2, dc in next dc 5 times. (6 mesh, 7 dc) Leave the remaining sts unworked.
- Rows 22–23: Work even. (6 mesh, 7 dc) Fasten off.
Second leg:
- Row 21: With RS facing, skip the next 3 mesh of Row 20 after the first leg. Join with a sl st in the next dc (the 10th dc), then work a normal row start and ch 2, dc in next dc 5 times. (6 mesh, 7 dc)
- Rows 22–23: Work even. (6 mesh, 7 dc) Fasten off.
The 3 skipped mesh form the gap between the legs: 1.8 in (4.6 cm) wide and 1.8 in (4.6 cm) tall.
Checkpoint: 10.2 in × 13.8 in (25.9 cm × 35.1 cm). Weave in ends along the dc posts.
Border (Cream)
Border gauge: 5 sc per inch along every edge. Each mesh edge measures 0.6 in, so it gets 3 sc in both directions.
Round 1: With RS facing, join cream at the top-center dc of Row 1. Sc around the entire outline as follows:
- Along top and bottom edges: 2 sc in each ch-2 sp and 1 sc in each dc, so each mesh edge gets 3 sc.
- Along row ends: 3 sc around each row-end post.
- Outer corners (26 total): work 2 extra sc in the corner st.
- Inner corners (22 total): sc2tog over the last sc of one edge and the first sc of the next.
Count: 102 mesh edges × 3 = 306 sc, plus 52 for the outer corners, minus 22 for the inner corners, gives 336 sc.
Per side, the count is the same on both halves. One stitch sits at the top center and one at the center of the gap top, and each side between them has 167 sts:
- 7 along the top of the head
- 45 along the shaping steps
- 69 down the outer row ends
- 18 under the foot
- 9 up the inner leg edge
- 4 along the gap top
- 26 added at 13 outer corners
- minus 11 at inner corners
That makes 167 × 2 + 2 = 336. Join with a sl st to the first sc.
Round 2: Ch 1, rev sc in each sc around. (336 rev sc; 167 per side + 2 center sts) Join and fasten off.
Why the math works: each mesh edge is 0.6 in, and 3 sc at 5 sc per inch also measure 0.6 in, so the border neither gathers nor ruffles. The extra stitches at outer corners turn the filet steps into curves, and the sc2tog at inner corners keeps the concave curves from cupping. The two rounds add 0.4 in (1.0 cm) on each edge, taking the piece from 10.2 × 13.8 in to 11.0 × 14.6 in (27.9 × 37.1 cm).
Appliqués and Details
Icing cords (cream): For each cord, ch the stated number, then sl st in the back bump of each ch from the 2nd ch from hook.
- Head: ch 30, giving 29 sl st. Pin it as a wave about 4 in (10.2 cm) wide across Rows 2–3.
- Hands (make 2): ch 14, giving 13 sl st. Pin each as a vertical wave 1.8 in (4.6 cm) tall near the tip of the arm.
- Feet (make 2): ch 26, giving 25 sl st. Pin each as a wave 3.5 in (8.9 cm) wide just inside the bottom of a foot.
Sew each cord down with matching cream yarn.
Eyes (dark brown, make 2): Magic ring, 6 sc, join. (6 sts, about 0.5 in / 1.3 cm across) Sew to Row 4, two mesh apart.
Smile: With cream, backstitch a curve 1.25 in (3.2 cm) wide across Row 6.
Bow tie (red):
- Ch 11. Row 1: sc in 2nd ch from hook and in each ch across. (10 sc)
- Rows 2–6: ch 1, turn, sc across. (10 sc) The rectangle is 2.0 in × 1.0 in (5.1 cm × 2.5 cm).
- Wrap red yarn tightly around the center 6 times and sew the bow over Rows 8–9.
Buttons (cream, optional, make 2):
- Magic ring, 6 sc. (6 sts)
- Round 2: 2 sc in each st around. (12 sts, about 0.8 in / 2.0 cm across)
- Sew both buttons down the center front.
The strap covers the buttons in the finished organizer.
Strap (caramel):
- Ch 7. Row 1: sc in 2nd ch from hook and across. (6 sc)
- Rows 2–40: ch 1, turn, sc across. (6 sc)
- Row 41: sc2tog, sc 2, sc2tog. (4 sc)
- Row 42: sc2tog twice. (2 sc) Fasten off.
The finished strap measures 1.2 in × 7.0 in (3.0 cm × 17.8 cm). Center it with the rounded end just below the bow tie. Whipstitch both long edges and the top to the mesh. The bottom ends right at the top of the leg gap.
Bands (caramel, make 4):
- Ch 16. Row 1: sc in 2nd ch from hook and across. (15 sc)
- Rows 2–4: ch 1, turn, sc across. (15 sc)
Each band measures 3.0 in × about 0.7 in (7.6 cm × 1.8 cm).
Place band centers at 1.0, 2.75, 4.5 and 6.25 in (2.5, 7.0, 11.4 and 15.9 cm) from the bottom of the strap. That spaces them 1.75 in (4.4 cm) apart. Sew each short end to the edge of the strap and through the mesh. The extra 1.8 in (4.6 cm) of band forms a bridge for the cable.
Hanging loop (caramel):
- Join at the top-center st of the border and ch 14.
- Sl st in the same st, then turn.
- Work 20 sc into the ch-14 loop and sl st to the border.
The loop stands 1.5 in (3.8 cm) tall.
Final Blocking
- Weave in all ends before blocking.
- Pin the organizer face up on the mat to 11.0 in × 14.6 in (27.9 cm × 37.1 cm).
- Pin the curves of the head, hands and feet so they are smooth, and pin the leg gap open to 1.8 in (4.6 cm).
- Spray until the piece is damp but not soaked.
- Use your fingers to open each mesh hole into an even round shape.
- Lift each band so it arches and doesn’t dry flat against the strap.
- Let it dry completely, at least 12 hours, before unpinning.
Final Quality-Control Checklist
- Body measures 11.0 in × 14.6 in (27.9 cm × 37.1 cm).
- Left and right halves are mirror images.
- Border Round 1 has 336 sc and lies flat with no ruffles.
- The rev sc edge is even all the way around.
- Icing waves are symmetrical on the hands and feet.
- Eyes are level, and the smile is centered.
- Strap is straight and centered with every edge sewn down.
- All 4 bands are evenly spaced and accept a coiled cable.
- Hanging loop is secure and centered.
Troubleshooting
Mesh holes are uneven: keep every ch-2 the same size. Pull up each dc to full height before chaining.
Arms flare or curl: check that you used dtr at the end-increases. A shorter stitch pulls the edge up.
Border ripples: you have too many sc. Recount 3 sc per mesh edge and check the 22 sc2tog.
Border cups: you have too few sc, or you missed the extra stitches at the outer corners.
Legs are uneven: count 3 skipped mesh before joining the second leg, and check that each leg has 6 mesh.
Bands sag: make each band 1 row deeper, or reduce the slack to 1.5 in (3.8 cm).
Care
Spot clean with mild soap and cool water, or hand wash and dry flat. Re-pin to 11.0 in × 14.6 in while damp.
Final Notes
Everything in this pattern follows from one measurement chain. Each mesh is 0.6 in (1.5 cm), so 17 mesh by 23 rows gives 10.2 in × 13.8 in (25.9 cm × 35.1 cm). Three sc per mesh edge at 5 sc per inch keeps the border flat. Two border rounds add 0.4 in (1.0 cm) per edge, for a finished organizer of 11.0 in × 14.6 in (27.9 cm × 37.1 cm). If your gauge matches, every count will fall into place.
Happy crocheting!