

This lace bell works as holiday decor and as a cable organizer. It hangs on a hook, and four burgundy bands along a center strap hold coiled charging cables neatly in place.
The bell body is deep burgundy, made of staggered rows of tall fans separated by chain arches, with a scalloped hem. Two rounded lobes form the shoulders. A gold corded border runs around the whole outline. A burgundy bow trimmed in gold, with a small gold flower in the center, covers the crown, and a gold loop above it is for hanging.
The pattern uses US crochet terms. The finished bell measures 7.75 in (19.7 cm) wide by 10.25 in (26.0 cm) tall, not counting the hanging loop.
You work the body flat from the top down, adding fans at the edges to make the bell flare. Then you add the lobes along the foundation chain and a two-round gold border. Last, you sew on the strap, the bands, the bow and the hanging loop.
Finished Size and Construction
- Finished size: 7.75 in x 10.25 in (19.7 cm x 26.0 cm), excluding the loop
- Skill level: Intermediate
- Terminology: US
- Yarn weight: Sport (#2) cotton
- Hook: 3.5 mm (E-4)
- Number of pieces: 1 lace body plus 11 small parts (2 bow loops, 2 bow tails, 1 flower, 1 hanging loop, 1 strap, 4 bands), all sewn into one item
- Layout: single panel, hung vertically
- Body size before border: 7.25 in x 9.75 in (18.4 cm x 24.8 cm)
- Border depth: 0.25 in (0.6 cm) on every edge
Materials
Use mercerized sport-weight cotton. It keeps the fans crisp, holds the scallops after blocking, and stays firm enough to carry cables. Avoid fuzzy or very stretchy yarn.
- Burgundy: 50 g / 155 m (body, lobes, strap, bands, bow loops, bow tails)
- Gold: 20 g / 62 m (border, bow trim, flower, hanging loop)
These quantities include a small safety margin.
Tools: 3.5 mm hook, tapestry needle, stitch markers, rust-proof pins, blocking mat, spray bottle, measuring tape, scissors.
Abbreviations (US Terms)
- ch – chain
- sl st – slip stitch
- sc – single crochet
- hdc – half double crochet
- tr – treble crochet
- sp(s) – space(s)
- BLO – back loop only
- rev sc – reverse single crochet (crab stitch), worked left to right
- RS – right side
Special stitches
- Fan: 7 tr in the same space. The 4th tr is the center tr.
- Half fan: 4 tr at the edge of a row. This is either ch 4 (counts as a tr) plus 3 tr, or 3 tr plus 1 tr in the turning chain.
Gauge and Checkpoints
- Solid gauge: 20 sc and 24 rows = 4 in (10.2 cm)
- Lace gauge: one fan repeat is 1.0 in (2.5 cm) wide; one fan row is 0.6 in (1.5 cm) tall; one arch row is 0.4 in (1.0 cm) tall
Make the strap first. It is a 35-sc piece and works as a solid gauge swatch. Then work Rows 1–3 of the body and measure before going on.
Checkpoints (body only, no border):
- After Row 3: 3.25 in (8.3 cm) wide, 1.25 in (3.2 cm) tall
- After Row 7: 3.25 in (8.3 cm) wide, 3.25 in (8.3 cm) tall
- After Row 11: 5.25 in (13.3 cm) wide, 5.25 in (13.3 cm) tall
- After Row 15: 5.25 in (13.3 cm) wide, 7.25 in (18.4 cm) tall
- After Row 19: 7.25 in (18.4 cm) wide, 9.25 in (23.5 cm) tall
- After the lobes: 9.75 in (24.8 cm) tall
If your piece is too big, switch to a 3.25 mm hook. If it is too small, switch to a 3.75 mm hook. If only the height is off, change how tall you pull up your tr loops instead. The border counts depend on these row heights.
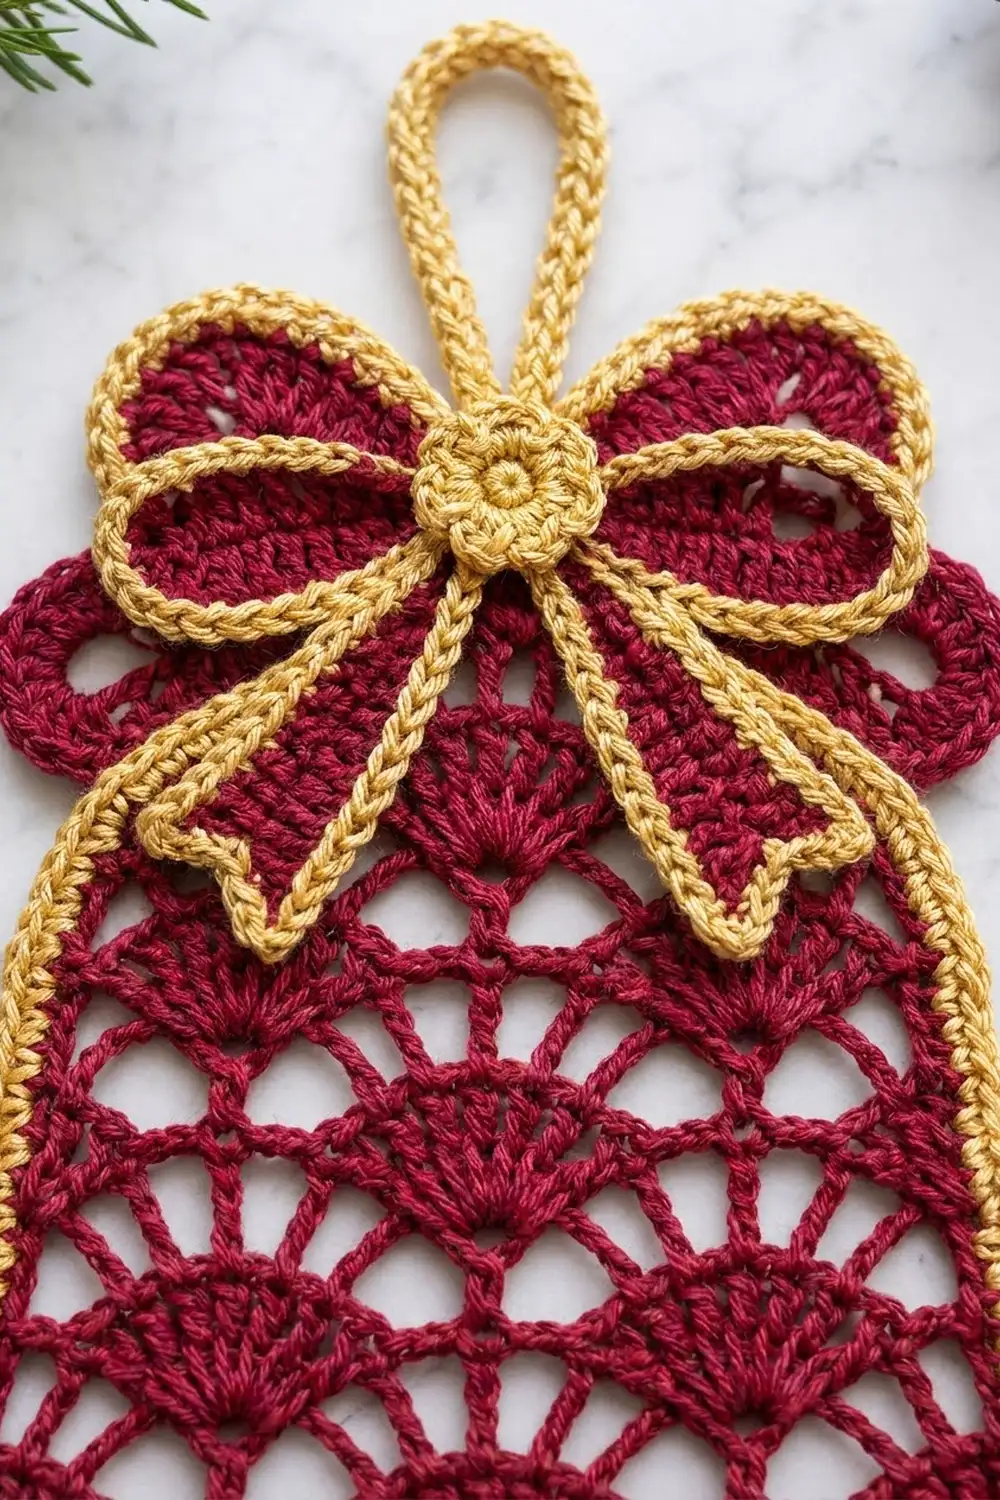
Bell Body
Use burgundy. Turn at the end of every row.
Foundation: Ch 14.
Row 1 (RS): Sc in 2nd ch from hook and in each ch across. (13 sc)
Row 2 (plain arch row): Ch 1, sc in first sc, ch 5, skip 3 sc, sc in next sc; rep from * 2 more times. (4 sc, 3 ch-5 sps)*
Row 3 (fan row): Ch 1, sc in first sc, Fan in next ch-5 sp, sc in next sc; rep from * 2 more times. (3 fans, 4 sc = 25 sts)*
Row 4 (hold arch row): Ch 6 (counts as tr + ch 2), sc in center tr of first fan, ch 5, sc in center tr of next fan; rep from * once more, ch 2, tr in last sc. (2 tr, 3 sc, 2 ch-2 sps, 2 ch-5 sps)*
Row 5 (hold fan row): Ch 4 (counts as tr), 3 tr in first ch-2 sp, sc in next sc, Fan in next ch-5 sp, sc in next sc; rep from * once more, 3 tr in last ch-2 sp, tr in 4th ch of beginning ch-6. (2 half fans, 2 fans, 3 sc = 25 sts)*
Rows 4 and 5 keep the width the same and shift the fans half a repeat, so the fans stay staggered.
Row 6 (plain arch row): Ch 1, sc in first tr, ch 5, sc in center tr of next fan; rep from * once more, ch 5, sc in top of turning ch-4. (4 sc, 3 ch-5 sps)*
Row 7: Repeat Row 3. (3 fans, 25 sts)
Row 8 (grow arch row): Ch 1, sc in first sc, ch 3, sc in center tr of first fan, ch 5, sc in center tr of next fan; rep from * to last fan, ch 3, sc in last sc. (5 sc, 2 ch-3 sps, 2 ch-5 sps)*
Row 9 (grow fan row): Ch 1, sc in first sc, Fan in next sp, sc in next sc; rep from * across. Work Fans in both the ch-3 and ch-5 sps. (4 fans, 5 sc = 33 sts)*
Row 10: Repeat Row 8. (6 sc, 2 ch-3 sps, 3 ch-5 sps)
Row 11: Repeat Row 9. (5 fans, 6 sc = 41 sts)
Row 12: Repeat Row 4, working the repeat 3 more times instead of once. (2 tr, 5 sc, 2 ch-2 sps, 4 ch-5 sps)
Row 13: Repeat Row 5, working the repeat 3 more times instead of once. (2 half fans, 4 fans, 5 sc = 41 sts)
Row 14: Repeat Row 6, working the repeat 3 more times instead of once. (6 sc, 5 ch-5 sps)
Row 15: Repeat Row 3, working the repeat 4 more times instead of 2. (5 fans, 6 sc = 41 sts)
Row 16: Repeat Row 8. (7 sc, 2 ch-3 sps, 4 ch-5 sps)
Row 17: Repeat Row 9. (6 fans, 7 sc = 49 sts)
Row 18: Repeat Row 8. (8 sc, 2 ch-3 sps, 5 ch-5 sps)
Row 19 (hem): Repeat Row 9. (7 fans, 8 sc = 57 sts) These seven fans make the scalloped hem. Fasten off.
Count check: every fan row has 8 sts per fan plus 1 (25, 33, 41, 49, 57). The hold fan rows have the same totals, because 2 half fans (8 tr) take the place of one Fan plus one sc.
Top Lobes
Rotate the piece so you can work across the other side of the foundation chain (13 loops). With RS facing, join burgundy with sc in first loop, skip 1 loop, 9 tr in next loop, skip 1 loop, sc in next loop, sl st in each of next 3 loops, sc in next loop, skip 1 loop, 9 tr in next loop, skip 1 loop, sc in last loop. Fasten off. (4 sc, 18 tr, 3 sl st)
The loops add up to 5 + 3 + 5 = 13. The two rounded fans form the bell’s shoulders.
Border
Use gold. Work at 5 sc per inch, which matches the solid gauge.
Rnd 1: With RS facing, join gold with sc in the first sc of the right lobe.
- Top: For each lobe, work sc in the first 4 tr, 2 sc in the center tr, sc in the last 4 tr, then sc in the end sc. Work sc in each of the 3 sl sts between the lobes. (12 + 3 + 12 = 27 sc, counting the joining sc)
- Side: Working in row ends, work 1 sc in Row 1, 2 sc in each arch row end and 3 sc in each fan row end. (1 + 9 x 2 + 9 x 3 = 46 sc)
- Hem: Sc in first sc of Row 19. For each Fan, work sc in the first 3 tr, 3 sc in the center tr, sc in the last 3 tr. Work a sl st in each sc between Fans. Sc in last sc. (1 + 7 x 9 + 1 = 65 sc, plus 6 sl sts)
- Second side: Work as the first side. (46 sc)
Join with a sl st to the first sc. (184 sc and 6 sl sts)
Rnd 2: Ch 1. Working from left to right, rev sc in each sc around. Skip the sl sts so the valleys between scallops stay deep. Join and fasten off. (184 rev sc: 27 top, 46 per side, 65 hem)
Why the math works: A tr row is 0.6 in tall, the same as 3 sc at 5 per inch. An arch row is 0.4 in, the same as 2 sc. The sc row is 0.2 in, the same as 1 sc. So 46 sc cover 9.2 in, which fits the 9.25 in side. On the hem, the outer curve of each scallop is about 1.8 in, exactly 9 sc. The 3 sc in each center tr let the border turn the curve without cupping. Adding 0.25 in (0.6 cm) on each edge takes the bell from 7.25 in x 9.75 in to 7.75 in x 10.25 in.
Block the bell now, before you attach anything.
Cable Strap and Bands
Strap (burgundy): Ch 36.
- Row 1: Sc in 2nd ch from hook and each ch across. (35 sc)
- Rows 2–6: Ch 1, sc in BLO of each st. (35 sc)
The strap should measure 7.0 in x 1.0 in (17.8 cm x 2.5 cm), with ridges running along its length. Fasten off, leaving a long tail.
Bands (make 4, burgundy): Ch 13.
- Row 1: Sc in 2nd ch from hook and each ch across. (12 sc)
- Rows 2–4: Ch 1, sc in BLO of each st. (12 sc)
Each band should measure 2.4 in x 0.7 in (6.1 cm x 1.8 cm). Fasten off, leaving a tail.
Attach the bands: Mark the band centers on the strap at 1.75 in, 3.25 in, 4.75 in and 6.25 in (4.4 cm, 8.3 cm, 12.1 cm, 15.9 cm) from the top. That spaces them 1.5 in (3.8 cm) apart. Lay each band across the strap and sew its short ends to the strap’s long edges. The band is 2.4 in long and the strap is 1.0 in wide, which leaves 1.4 in (3.6 cm) of slack for a coiled cable.
Attach the strap: Center the strap vertically on the bell, with its top end 1.0 in (2.5 cm) below the top border. Whipstitch both long edges to the stitches underneath, and keep the bands free.
Bow, Flower and Hanging Loop
Bow loop (make 2): With burgundy, ch 9.
- Rnd 1: 2 sc in 2nd ch from hook, sc in next 6 ch, 4 sc in last ch. Working along the other side of the chain, sc in next 6 ch, then 2 sc in the same ch as the first sts. Join. (20 sc) Fasten off.
- Rnd 2 (gold): Join gold. Ch 1, 2 sc in each of the first 2 sts, sc in next 6, 2 sc in each of next 4, sc in next 6, 2 sc in each of last 2. Join. (28 sc)
Each loop should measure 2.25 in x 1.0 in (5.7 cm x 2.5 cm).
Bow tail (make 2): With burgundy, ch 4.
- Row 1: Sc in 2nd ch from hook and in next 2 ch. (3 sc)
- Rows 2–10: Ch 1, sc in each st. (3 sc) Fasten off.
- Edging (gold): Join in the last st of Row 10. Work 3 sc in first st, sc in next, 3 sc in last st (7). Work 1 sc in each row end of Rows 9–2 (8). Work 3 sc in first foundation ch, sc in next, 3 sc in last (7). Work 1 sc in each row end of Rows 2–9 (8). Join. (30 sc)
Each tail should measure 1.0 in x 2.0 in (2.5 cm x 5.1 cm).
Flower (gold): Make a magic ring.
- Rnd 1: 10 sc in ring. Join.
- Rnd 2: Sl st in next st, 3 hdc in next st; rep from * 4 more times. Join. (5 petals)*
The flower should be 0.75 in (1.9 cm) across.
Hanging loop (gold): Ch 31.
- Row 1: Sc in 2nd ch from hook and each ch across. (30 sc)
The strip should be 6.0 in (15.2 cm) long.
Assemble:
- Sew the tails in an inverted V just below the top center, covering the top end of the strap.
- Sew one loop on each side, angled up over the lobes.
- Sew the flower over the center.
- Fold the hanging strip into a loop and sew both ends to the back of the top border at the center. It should stand about 2 in (5.1 cm) above the bell.
Final Blocking
- Lightly mist the bordered body.
- Pin it face up to 7.75 in x 10.25 in (19.7 cm x 26.0 cm).
- Pin each scallop at its 3-sc point.
- Pin each lobe into a smooth curve.
- Spread each Fan so the tr open evenly.
- Let it dry completely.
- After assembly, steam the bow from above without pressing.
Final Quality-Control Checklist
- Fan rows total 25, 25, 25, 33, 41, 41, 41, 49, 57.
- The fans alternate position from row to row.
- The lobes match, with 9 tr each.
- The border has 27 / 46 / 65 / 46 sc, with flat sides and clear valleys.
- The strap is centered and straight, with the bands 1.5 in (3.8 cm) apart.
- The bow is centered and both loops are the same size.
- The hanging loop is sewn through several stitches.
- All ends are woven in.
Troubleshooting
- The sides ripple: You worked too many sc in the row ends. Recheck the 2-and-3 rule.
- The sides pull in: Your tr rows are taller than 0.6 in. Add 1 sc per fan row end, and do the same on both sides.
- The fans don’t stagger: You missed the hold rows (Rows 4–5 and 12–13).
- The hem cups: Work 3 sc in each center tr, and keep the sl sts in Rnd 1.
- The bands are too tight: Sew the band ends closer to the center of the strap.
- The strap sags: Add a tack stitch between the bands.
Care
Remove the cables, then hand wash in cool water. Roll the bell in a towel and dry it flat, pinning the scallops back into shape.
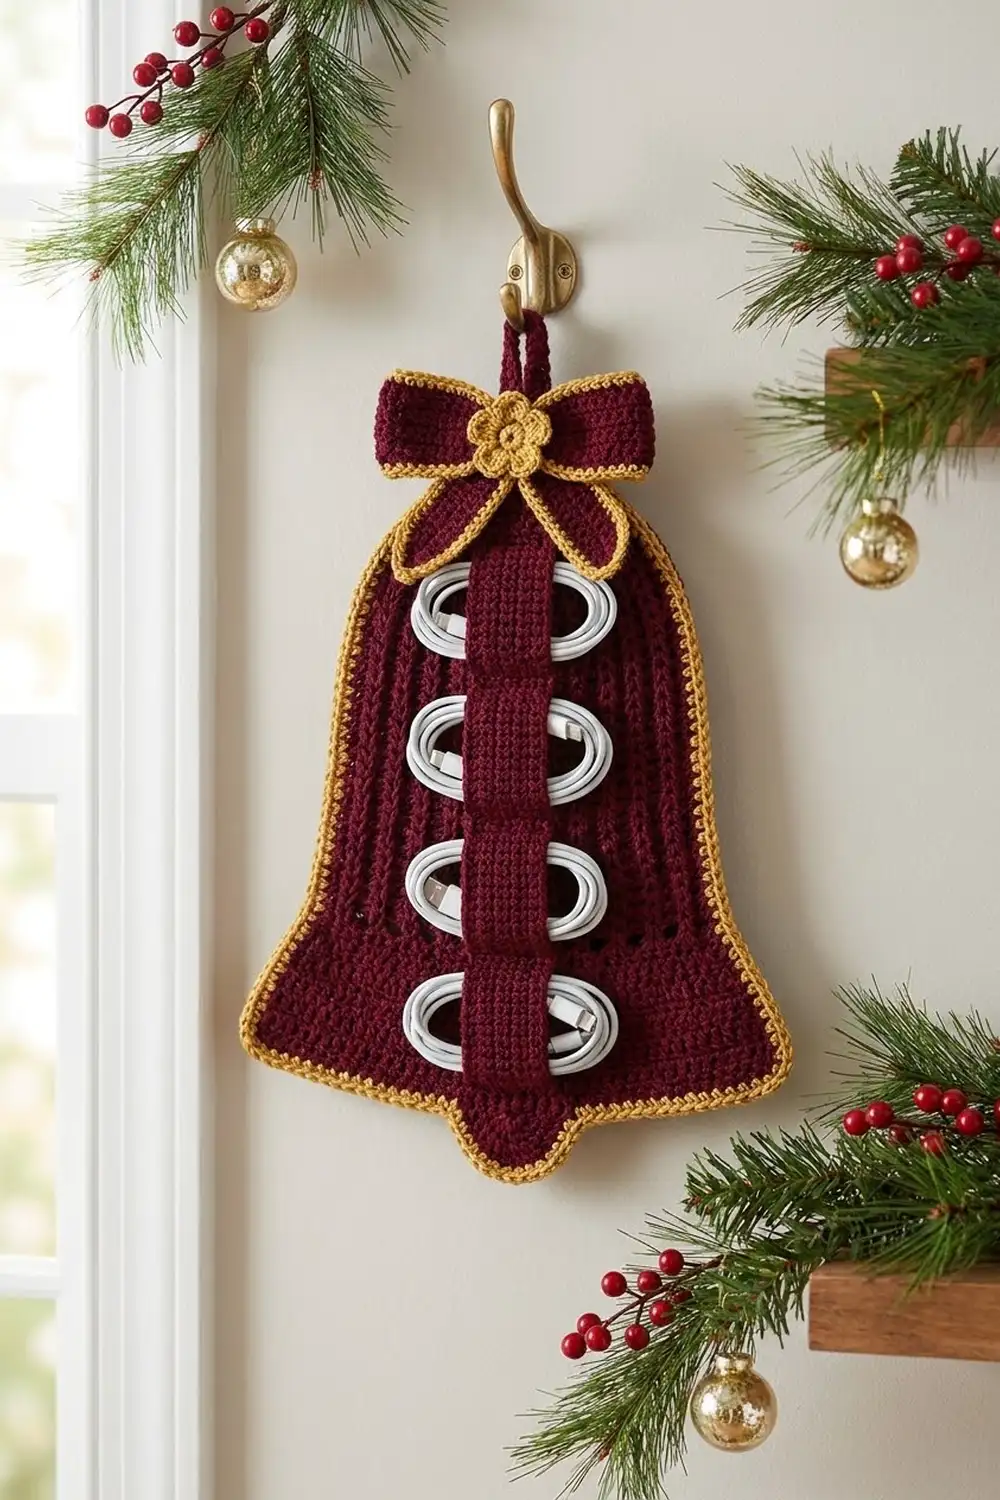
Final Notes
The measurements build in this order:
- Gauge is 20 sc = 4 in (10.2 cm), and one fan repeat is 1.0 in (2.5 cm).
- Over 19 rows, the body grows from 3.25 in (8.3 cm) to 7.25 in (18.4 cm) wide.
- The lobes bring the height to 9.75 in (24.8 cm).
- The 184-stitch border adds 0.25 in (0.6 cm) all around, for a finished bell of 7.75 in x 10.25 in (19.7 cm x 26.0 cm).
- The 7.0 in (17.8 cm) strap, its four bands and the bow finish the piece.
Happy crocheting!