

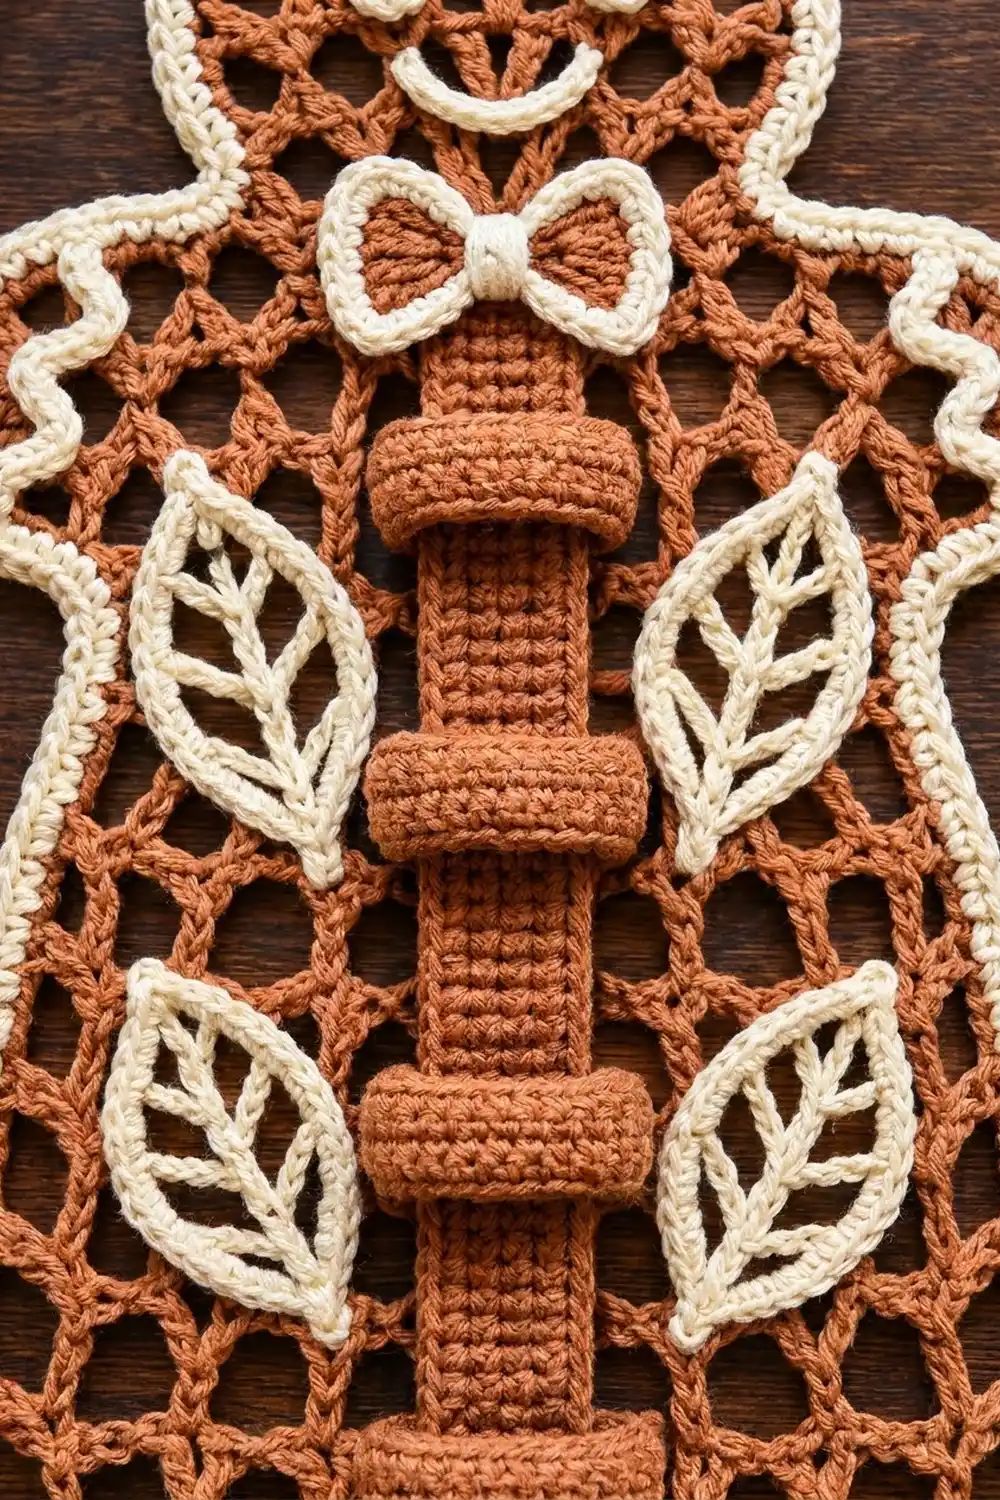
This gingerbread man is a wall organizer for your charging cables. The body is an airy rust-brown V-stitch mesh. A rope-textured cream border and cream “icing” appliqués finish the cookie look. A dense brown strap with four cuffs runs down the middle, and each cuff holds one coiled cable.
The palette is two colors: warm gingerbread brown and soft cream. It works for a desk, an entryway, or a dorm wall over the holidays, and the cables stay useful all year.
This pattern uses US crochet terms. The finished organizer measures 13 in (33.0 cm) wide across the arms and 15 in (38.1 cm) tall. The hanging loop adds 2 in (5.1 cm).
The body is one flat panel worked in rows from the legs up to the head. Shaping is done by adding or removing whole V-stitches. You add a three-round cream border with a hanging loop, then sew on the appliqués, and finally attach the strap with its four cuffs.
Finished Size and Construction
- Finished size: 13 in (33.0 cm) wide x 15 in (38.1 cm) tall, plus a 2 in (5.1 cm) loop
- Skill level: Intermediate
- Terminology: US
- Yarn weight: Worsted (#4) cotton
- Hooks: 5.0 mm (H-8) for the body and border; 4.5 mm (7) for the strap, cuffs and appliqués
- Number of pieces: 1 body panel, 1 strap, 4 cuffs, 16 small appliqués
- Layout: Single panel; no joining of motifs
- Panel size before border: 12 in (30.5 cm) wide x 14 in (35.6 cm) tall
- Border depth: 0.5 in (1.3 cm), 3 rounds
Materials
Choose a smooth, mercerized or matte worsted cotton. Cotton keeps the mesh crisp and blocks flat, and it won’t stretch under the weight of the cables. Avoid fuzzy acrylics, which blur the open V pattern.
- Color A, Gingerbread Brown: 140 g / about 240 m (262 yd)
- Color B, Cream: 60 g / about 105 m (115 yd)
The quantities include a margin of about 15% for your swatch and for any rows you rip back.
Tools:
– 5.0 mm (H-8) and 4.5 mm (7) crochet hooks
– Tapestry needle
– Rustproof pins and stitch markers
– Blocking mat and spray bottle
– Measuring tape
Abbreviations (US Terms)
- ch – chain
- sl st – slip stitch
- sc – single crochet
- hdc – half double crochet
- dc – double crochet
- tr – treble crochet
- sc2tog / sc3tog – single crochet 2 (or 3) together
- rev sc – reverse single crochet (crab stitch)
- sk – skip
- sp – space
- tch – turning chain
- RS – right side
Special stitch:
V-st (V-stitch): (dc, ch 2, dc) in the same stitch or space.
V-unit: one V-st plus its share of the open space. One V-unit is 1 in (2.5 cm) wide.
Gauge and Checkpoints
Body gauge (5.0 mm hook): 4 V-units x 4 rows = 4 in (10.2 cm) wide x 2 in (5.1 cm) tall. Each row is 0.5 in (1.3 cm).
Strap gauge (4.5 mm hook): 16 sc x 18 rows = 4 in (10.2 cm).
Test with a swatch first. Ch 21 and work Row 1 of the leg instructions with 4 V-sts instead of 3. Then work 3 more rows of plain V-st rows and measure.
- If the swatch is too big, go down 0.5 mm.
- If it’s too small, go up 0.5 mm.
Every measurement in this pattern depends on the 1 in V-unit and the 0.5 in row, so don’t skip the swatch.
Checkpoints:
– Each leg after Row 1: 3 in (7.6 cm) wide
– Row 3: 10 in (25.4 cm) wide
– After Row 12: 6 in (15.2 cm) tall
– Arm rows: 12 in (30.5 cm) wide
– After Row 20: 10 in (25.4 cm) tall
– After Row 28: 14 in (35.6 cm) tall
Body Panel (Color A, 5.0 mm hook)
Row pattern rules. Every V-st row begins with ch 3, which counts as the edge dc. Every row ends with a dc in the top of the tch. Counts below are V-sts only; each row also has 2 edge dc.
Plain row: Ch 3, turn. V-st in the ch-2 sp of each V-st across. Dc in top of tch.
Increase row (+1 V-st each side): Ch 3, turn. V-st in the edge dc at the base of the ch 3. V-st in each ch-2 sp across. V-st in top of tch, then dc in the same tch.
Decrease row (−1 V-st each side): Turn. Sl st in the next dc and into the first ch-2 sp. Ch 3 (counts as edge dc). V-st in each ch-2 sp across until 1 V-st remains. Dc in that last ch-2 sp. Leave the rest unworked.
Legs (make 2)
Row 1 (RS): Ch 17. V-st in 6th ch from hook (the first 5 ch count as edge dc plus 2 skipped ch). Sk 3 ch, V-st in next ch; repeat from * once more. Sk 2 ch, dc in last ch. (3 V-sts)
Row 2: Work an increase row. (5 V-sts)
Fasten off Leg 1. Keep Leg 2 on the hook.
Body
Row 3 (joining row): Ch 3, turn. V-st in each of the 5 V-sts of Leg 2. Skip the inner edge dc of both legs. V-st in each of the 5 V-sts of Leg 1, then dc in top of Leg 1’s tch. (10 V-sts)
The skipped inner edges form the small notch between the legs. Width check: 10 in (25.4 cm).
Rows 4–7: Work 4 plain rows. (10 V-sts)
Row 8: Work a decrease row. (8 V-sts)
Rows 9–12: Work 4 plain rows. (8 V-sts)
The panel is now 6 in (15.2 cm) tall and 8 in (20.3 cm) wide at the waist.
Arms and Shoulders
Row 13: Work an increase row. (10 V-sts)
Row 14: Work an increase row. (12 V-sts)
Rows 15–16: Work 2 plain rows. (12 V-sts)
The arm span is 12 in (30.5 cm).
Row 17: Decrease row. (10 V-sts)
Row 18: Decrease row. (8 V-sts)
Row 19: Decrease row. (6 V-sts)
Row 20: Decrease row. (4 V-sts)
This is the neck, 4 in (10.2 cm) wide. Height check: 10 in (25.4 cm).
Head
Row 21: Increase row. (6 V-sts)
Rows 22–26: Work 5 plain rows. (6 V-sts)
Row 27: Decrease row. (4 V-sts)
Row 28: Decrease row. (2 V-sts)
Fasten off. The panel measures 12 in (30.5 cm) x 14 in (35.6 cm). Weave in the ends, then pin the panel flat and lightly steam it before you add the border.
Strap and Cuffs (Color A, 4.5 mm hook)
Strap: Ch 8.
Row 1: Sc in 2nd ch from hook and in each ch across. (7 sc)
Rows 2–36: Ch 1, turn. Sc in each sc across. (7 sc)
Fasten off. The strap measures 1.75 in (4.4 cm) x 8 in (20.3 cm).
Cuffs (make 4): Ch 23.
Row 1: Sc in 2nd ch from hook and in each ch across. (22 sc)
Rows 2–4: Ch 1, turn. Sc in each sc across. (22 sc)
Fasten off and leave a 10 in (25.4 cm) tail. Each cuff measures 5.5 in (14.0 cm) x about 0.9 in (2.3 cm).
Wrap each cuff around the strap and seam its short ends together at the back. A 5.5 in cuff around a strap that’s 1.75 in wide leaves about 1.5 in (3.8 cm) of slack at the front for a cable coil.
Place the cuffs 2 in (5.1 cm) apart, centered on Rows 5, 14, 23 and 32 of the strap. Tack the back of each cuff to the strap so it can’t slide.
Appliqués (Color B, 4.5 mm hook)
Leave a 10 in (25.4 cm) sewing tail on every piece.
Wave cords (make 5): Ch 28 for the head cord, ch 14 for each of the 2 wrist cords, and ch 22 for each of the 2 hem cords. Hdc in the 3rd ch from hook and in each ch across.
| Cord | Count | Length |
|---|---|---|
| Head | 26 hdc | 6.5 in (16.5 cm) |
| Wrist (x2) | 12 hdc | 3 in (7.6 cm) |
| Hem (x2) | 20 hdc | 5 in (12.7 cm) |
Eyes and bow knot (make 3): Work 6 sc in a magic ring, pull it tight, and sl st to join. Each one is 0.5 in (1.3 cm).
Smile: Ch 9. Sc in 2nd ch from hook and in each ch across. (8 sc, 2 in / 5.1 cm)
Bow tie:
– Foundation: Ch 10 and sl st in the first ch to form the first wing loop. Ch 9 and sl st in the same ch to form the second wing loop.
– Rnd 1: Work 14 sc in each loop and sl st to join. (28 sc)
– Sew a knot (see above) over the center. The bow is 3 in (7.6 cm) wide.
Leaves (make 4): Ch 14.
Rnd 1:
1. Sc in 2nd ch from hook, hdc in next ch, dc in next ch.
2. [Ch 1, sk 1 ch, tr in next ch] 3 times.
3. Ch 1, sk 1 ch, dc in next ch, hdc in next ch.
4. (Sc, ch 2, sc) in the last ch for the tip.
5. Working along the other side of the foundation chain: hdc in next ch, dc in next ch.
6. [Ch 1, sk 1 ch, tr in next ch] 3 times.
7. Ch 1, sk 1 ch, dc in next ch, hdc in next ch, sc in the same ch as the first sc.
8. Sl st to the first sc.
Rnd 1 count: 18 sts, 8 ch-1 sps, 1 tip sp.
Rnd 2:
1. Ch 1. Sc in each st and in each ch-1 sp up to the tip.
2. (Sc, ch 2, sc) in the tip sp.
3. Continue sc in each st and ch-1 sp down the second side.
4. Ch 4. Sl st in 2nd ch from hook and in the next 2 ch for the stem.
5. Sl st to the first sc.
Rnd 2 count: 12 sc per side + 2 tip sc = 26 sc.
The center chain becomes the midrib, the tr posts become the side veins, and the ch-1 gaps let the brown mesh show through. Each leaf is 3.5 in (8.9 cm) x 2 in (5.1 cm).
Flower:
– Rnd 1: Work 10 sc in a magic ring and sl st to join. (10 sc)
– Rnd 2: (Hdc, 2 dc, hdc) in next sc, sl st in next sc; repeat from * 4 more times. (5 petals)
The flower is 2 in (5.1 cm) across.
Border (Color B, 5.0 mm hook)
Border gauge: 4 sc = 1 in (2.5 cm) along every edge. To keep that gauge:
– Work 2 sc in each row-end (each row is 0.5 in).
– Work 4 sc across each 1 in V-unit along the foundation and top edges.
– Work 2 extra sc where each increase or decrease creates a step.
Round 1: With RS facing, join B at the leg notch and sc2tog across the junction (1 st). Work around the edge in this order.
Per half (mirror for the second half):
| Section | Stitches |
|---|---|
| Inner leg edge (Rows 1–2 + step) | 6 sc |
| Inner bottom corner | 3 sc in one spot |
| Leg foundation | 12 sc |
| Outer bottom corner | 3 sc in one spot |
| Outer leg edge (Rows 1–2 + step) | 6 sc |
| Hip (Rows 3–7) | 10 sc |
| Waist step (Row 8) | 4 sc |
| Waist (Rows 9–12) | 8 sc |
| Arm steps (Rows 13–14) | 8 sc |
| Arm (Rows 15–16) | 4 sc |
| Shoulders (Rows 17–20) | 16 sc |
| Head step (Row 21) | 4 sc |
| Head side (Rows 22–26) | 10 sc |
| Head top steps (Rows 27–28) | 8 sc |
| Half of the head top | 4 sc |
| Half total | 106 |
Round 1 total: 106 + 106 + 1 notch st = 213 sts. Sl st to join.
Round 2: Ch 1. Sc in each st around, except:
– Work 2 sc in the center st of each of the 4 corner groups (+4).
– Work sc3tog over the notch st and its two neighbors (−2).
– At the top center of the head, ch 16 for the hanging loop, then continue in the next st.
Count: 213 + 4 − 2 = 215 sc, plus the ch-16 loop. Sl st to join.
Round 3: Ch 1. Rev sc in each sc around. When you reach the loop, work 24 regular sc into the ch-16 loop to pad it, then return to rev sc. Count: 215 rev sc + 24 loop sc. Join and fasten off.
Why the math works: Each row is 0.5 in tall and gets 2 sc, and each V-unit is 1 in wide and gets 4 sc, so the border stays at 4 sc per inch. The step stitches cover the extra edge length at each shaping point, so the border lies flat. Three rounds add 0.5 in (1.3 cm) on every side, so 12 x 14 in becomes 13 x 15 in (33.0 x 38.1 cm).
Assembly
Pin each appliqué in place, check the layout, and then whipstitch it down with the matching yarn tail.
- Head and face: Curve the head cord into 5 gentle crests across the forehead, spanning 4.5 in (11.4 cm). Place the eyes 1.5 in (3.8 cm) apart, with the smile centered below them.
- Bow tie: Set it at the neck, overlapping Row 20.
- Wrists: Shape each wrist cord into 3 crests near the end of the arm.
- Strap: Center it vertically, with its lower end 1.5 in (3.8 cm) above the leg notch and its top tucked under the bow. Whipstitch both long edges between the cuffs and across both short ends.
- Leaves: Place them in mirrored pairs on each side of the strap, tips angled outward. The upper pair goes over Rows 10–16 and the lower pair over Rows 4–9.
- Hem and flower: Shape each hem cord into 4 crests across a leg. Sew the flower over the notch.
Final Blocking
- Spray the whole organizer until it’s evenly damp.
- Pin it to 13 x 15 in (33.0 x 38.1 cm) on a blocking mat.
- Pin the V-st columns straight and open up the leaf veins.
- Shape the hanging loop upright with one pin.
- Leave it to dry completely, about 24 hours.
- Unpin it and check that it hangs straight from a peg.
Final Quality-Control Checklist
- [ ] The panel is 12 x 14 in (30.5 x 35.6 cm) before the border
- [ ] The border has 213, 215 and 215 sts in Rounds 1–3
- [ ] The finished piece is 13 x 15 in (33.0 x 38.1 cm)
- [ ] The left and right halves mirror each other
- [ ] All 4 cuffs are evenly spaced with front slack
- [ ] The leaves, waves and face sit symmetrically
- [ ] All ends are woven in on the WS
Troubleshooting
- The mesh slants: You’re probably missing the edge dc in the tch. Count both edge stitches on every row.
- The border ruffles: Use fewer step stitches on gentle curves, keeping the totals stated above.
- The border cups: Your border hook is too small; go up 0.5 mm.
- Cables slip out: Tighten the cuff seams by 1 sc on each side.
- The panel sags on the peg: Add a second line of stitching along the strap edges.
Care
Hand-wash in cool water with mild soap and press out the water in a towel. Lay it flat and reshape it to 13 x 15 in (33.0 x 38.1 cm) to dry.

Final Notes
Everything comes back to two measurements: a 1 in V-unit and a 0.5 in row. Those give you a 12 x 14 in (30.5 x 35.6 cm) panel. A 4-sc-per-inch border then brings it to 13 x 15 in (33.0 x 38.1 cm). The strap is 8 in (20.3 cm), and its four 5.5 in (14.0 cm) cuffs each hold one cable. Check each checkpoint before moving on.
Happy crocheting!