

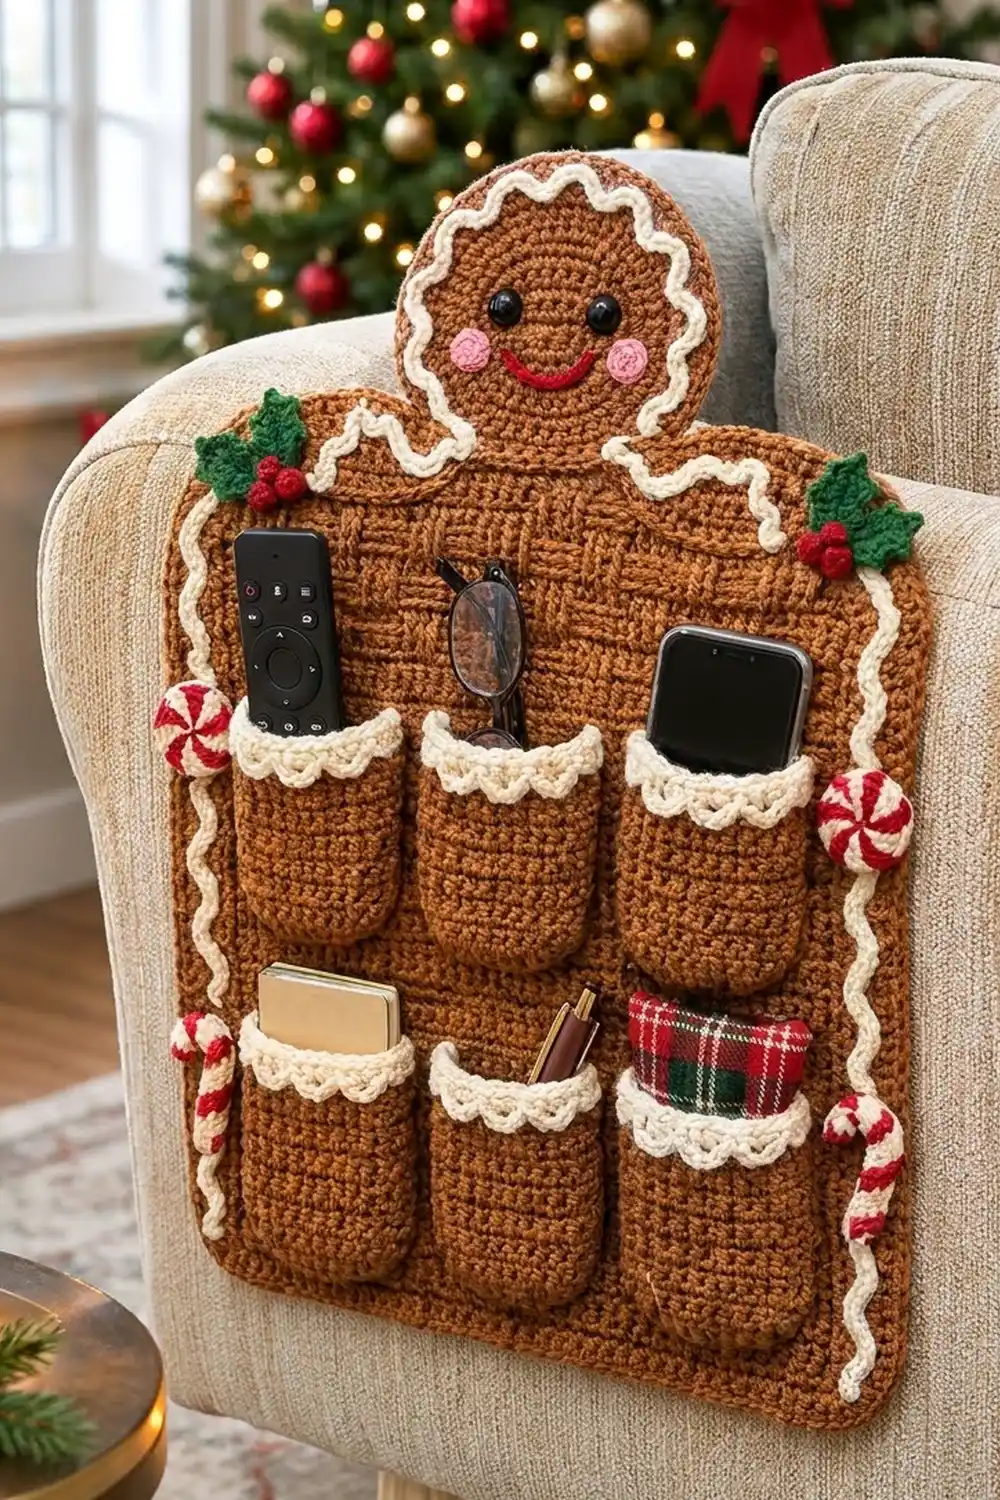
Meet the Gingerbread Hug Armrest Organizer. A cheerful gingerbread man peeks over a textured back panel and holds six handy pockets for your remote, phone, glasses and pens. It drapes over a sofa or armchair arm, so everything stays within reach all season.
The palette is classic cookie: caramel brown for the gingerbread, cream for the frilly icing, red and green for the holly, peppermints and candy canes, and soft pink for the cheeks. The back panel uses a raised basketweave that looks like a woven cookie tin. The pockets are smooth single crochet, so the texture contrast stays crisp.
This pattern uses US crochet terms. The finished organizer measures 11.5 in (29.2 cm) wide and 17.75 in (45.1 cm) tall including the head.
You’ll crochet one basketweave panel and add a two-round border. Then you’ll make six pockets, the head and arms topper, and the small appliqués. Finally, you’ll sew everything in place, stitch by stitch.
Finished Size and Construction
- Finished size: 11.5 in x 17.75 in (29.2 cm x 45.1 cm)
- Skill level: Intermediate (post stitches, working in rounds, sewing)
- Terminology: US
- Yarn weight: Worsted (#4)
- Hook: 4.5 mm (US 7)
- Number of pieces: 1 panel, 6 pockets, 1 head, 1 arms band, 2 cheeks, 4 holly leaves, 6 berries, 2 peppermints, 2 candy canes, 5 icing cords
- Layout: pockets in 2 rows of 3, sitting edge to edge
- Pocket size: 3.5 in x 4.5 in (8.9 cm x 11.4 cm)
- Panel size before border: 10.5 in x 13 in (26.7 cm x 33.0 cm)
- Border depth: 0.5 in (1.3 cm) per side, so the bordered panel is 11.5 in x 14 in (29.2 cm x 35.6 cm)
Materials
Choose a smooth worsted-weight acrylic or cotton blend. Firm, low-halo yarn shows the basketweave clearly and holds its shape on an armrest.
- Caramel brown: 220 g (about 400 m)
- Cream: 40 g (about 72 m)
- Red: 15 g (about 27 m)
- Green: 10 g (about 18 m)
- Pink: 3 g (about 5 m)
- Black: 2 g (about 4 m) if you embroider the eyes
Tools:
- 4.5 mm (US 7) hook
- Two 10 mm black safety eyes (optional)
- Tapestry needle
- Stitch markers
- Rustproof pins
- Measuring tape
- Blocking mat
- Spray bottle
All quantities include a margin of about 15% for swatching and seaming.
Abbreviations (US Terms)
- ch: chain
- sl st: slip stitch
- sc: single crochet
- hdc: half double crochet
- dc: double crochet
- sc2tog: single crochet 2 together
- MR: magic ring
- st(s): stitch(es)
- RS / WS: right side / wrong side
- rep: repeat
Special stitches:
- FPdc (front post double crochet): Yo, insert your hook from front to back to front around the post of the stitch, and complete a dc.
- BPdc (back post double crochet): Yo, insert your hook from back to front to back around the post, and complete a dc.
- Picot: Ch 3, sl st in 3rd ch from hook.
Gauge and Checkpoints
There are two gauges:
- Basketweave: 16 sts x 8 rows = 4 in (10.2 cm)
- Single crochet: 16 sts x 16 rows = 4 in (10.2 cm)
Test one piece first. For the basketweave, ch 20 and work Rows 1–9 of the panel with 2 repeats instead of 5. That gives 18 sts. Measure 16 sts across the center. Then make one complete pocket as your sc swatch.
Checkpoints:
- Pocket body after Row 15: 3 in x 3.75 in (7.6 cm x 9.5 cm)
- Pocket after edging: 3.5 in x 4 in (8.9 cm x 10.2 cm)
- Panel after Row 9: 4.5 in (11.4 cm) tall and 10.5 in (26.7 cm) wide
- Panel after Row 26: 13 in (33.0 cm) tall
- Bordered panel: 11.5 in x 14 in (29.2 cm x 35.6 cm)
- Head: 4.5 in (11.4 cm) across
If your piece is too big, go down 0.5 mm in hook size. If it is too small, go up 0.5 mm. Post stitches pull in, so check the panel width separately from the pocket width.
Back Panel (Basketweave)
With brown, ch 44.
Row 1: Dc in 4th ch from hook (the skipped ch count as the first dc) and in each ch across. Turn. (42 sts)
Row 2 (RS): Ch 3 (counts as dc throughout). FPdc around next 4 sts, BPdc around next 4 sts; rep from * 4 more times. Dc in top of turning ch. Turn. (42 sts)*
Row 3: Ch 3. FPdc around next 4 sts, BPdc around next 4 sts; rep from * 4 more times. Dc in top of turning ch. Turn. (42 sts)*
Working the same sequence from the WS keeps each block of 4 sts raised on the RS for 2 rows.
Rows 4–5: Ch 3. BPdc around next 4 sts, FPdc around next 4 sts; rep from * 4 more times. Dc in top of turning ch. Turn. (42 sts each row)*
This shifts the blocks to make the offset, brick-like weave.
Rows 6–25: Rep Rows 2–5 five more times. That makes 6 repeats in total. (42 sts each row)
Row 26: Ch 3, dc in each st across. (42 sts) Fasten off.
The panel measures 10.5 in x 13 in (26.7 cm x 33.0 cm). Each dc row is 0.5 in (1.3 cm), which you’ll use to place the pockets.
Pockets (Make 6)
With brown, ch 13.
Row 1: Sc in 2nd ch from hook and each ch across. Turn. (12 sts)
Rows 2–15: Ch 1, sc in each st across. Turn. (12 sts each row)
The pocket body measures 3 in x 3.75 in (7.6 cm x 9.5 cm).
Edging (sides and bottom): Don’t turn. Ch 1, then rotate the piece so you work down the left side.
- Sc in each row-end down the side (15).
- Work 2 sc in the first foundation ch (2).
- Sc in the next 10 foundation ch (10).
- Work 2 sc in the last foundation ch (2).
- Sc in each row-end up the other side (15).
Fasten off. Total: 15 + 2 + 10 + 2 + 15 = 44 sts.
The bottom edge now has 14 sts and measures 3.5 in (8.9 cm). The 2-sc corners make the soft rounded bottom.
Cream Trim, Row 1: With RS facing, join cream in the row-end of the edging at the top right corner. Ch 1 and work:
- Sc in the same row-end (1)
- Sc in the next 5 sts of Row 15 (5)
- Sc2tog over the next 2 sts (1)
- Sc in the next 5 sts (5)
- Sc in the edging row-end at the other corner (1)
Turn. Total: 13 sts.
The sc2tog makes an odd count, so the scallops end evenly at both edges.
Cream Trim, Row 2: Ch 1, sc in first st. 3 hdc in next st, sc in next st; rep from * 5 more times. Fasten off. Total: 1 + (6 x 4) = 25 sts, which makes 6 frilly scallops.*
The finished pocket measures 3.5 in x 4.5 in (8.9 cm x 11.4 cm).
Gingerbread Head
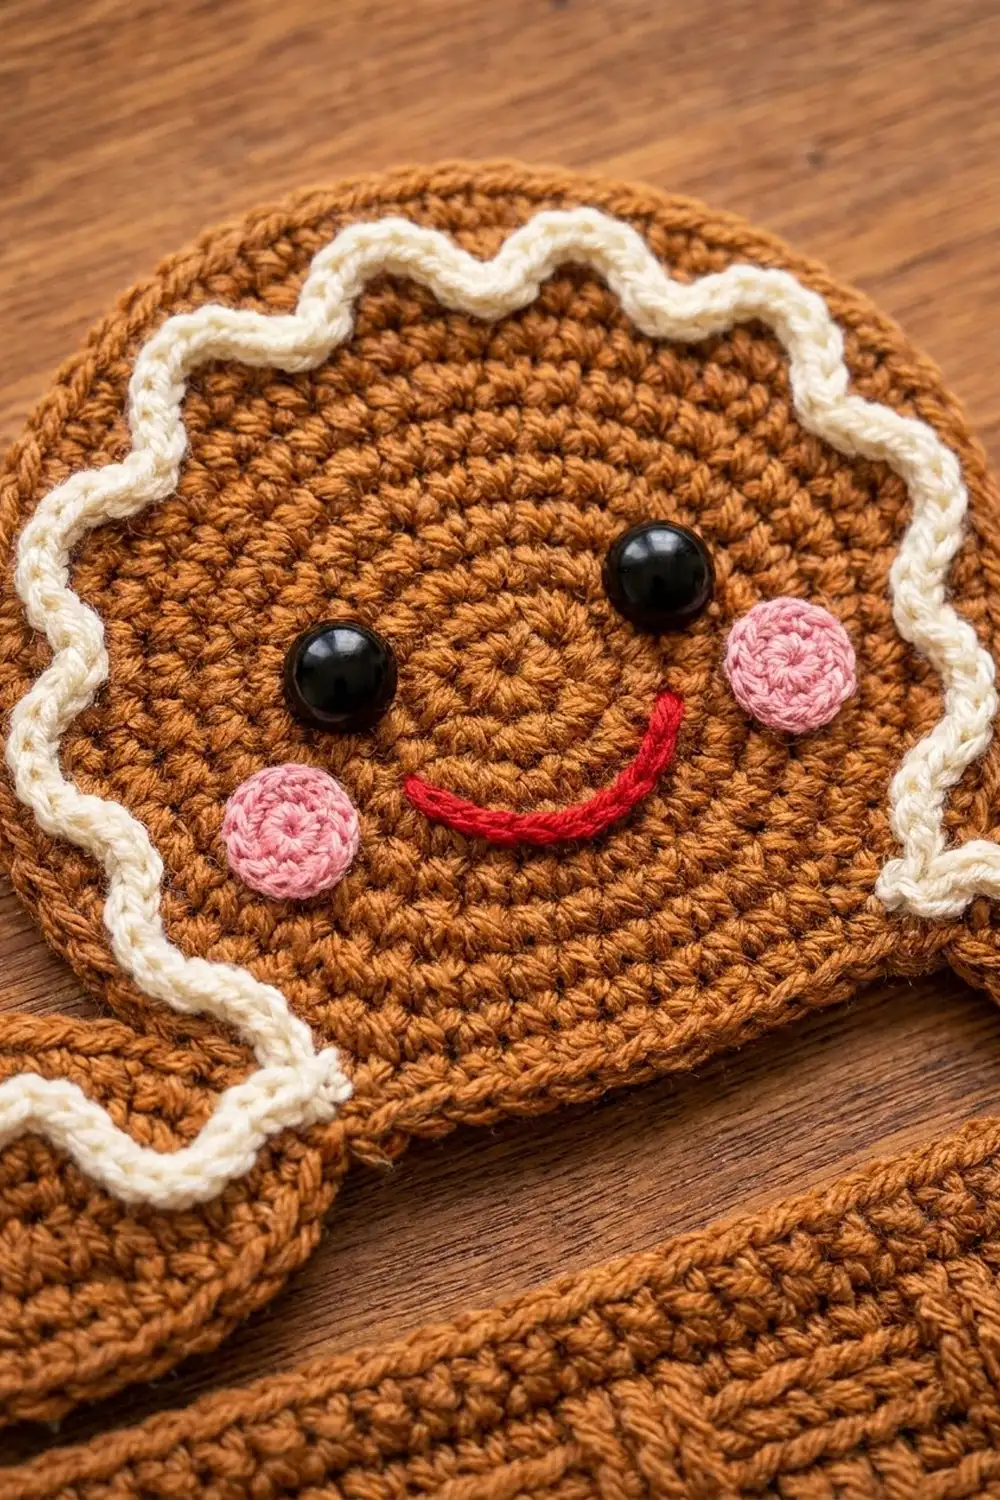
With brown, start with a MR. Join each round with a sl st to the first sc and ch 1 to begin the next round.
- Rnd 1: 6 sc in MR. (6)
- Rnd 2: 2 sc in each st. (12)
- Rnd 3: Sc, 2 sc in next; rep around. (18)
- Rnd 4: Sc in next 2, 2 sc in next; rep around. (24)
- Rnd 5: Sc in next 3, 2 sc in next; rep around. (30)
- Rnd 6: Sc in next 4, 2 sc in next; rep around. (36)
- Rnd 7: Sc in next 5, 2 sc in next; rep around. (42)
- Rnd 8: Sc in next 6, 2 sc in next; rep around. (48)
- Rnd 9: Sc in next 7, 2 sc in next; rep around. (54)
Fasten off. The head measures 4.5 in (11.4 cm) across.
Face:
- Insert the safety eyes between Rnds 5 and 6, 7 sts apart. For a child’s home, embroider black French knots instead.
- Cheeks (make 2): With pink, work 6 sc in a MR, join, and fasten off. Each is 0.5 in (1.3 cm). Sew one just below and outside each eye.
- Smile: Backstitch a smile in red between the cheeks.
Arms Band
With brown, ch 37.
Rnd 1:
- 2 sc in 2nd ch from hook
- Sc in next 34 ch
- 4 sc in last ch
- Working along the opposite side of the chain, sc in next 34 ch
- 2 sc in the first ch
Join. Total: 2 + 34 + 4 + 34 + 2 = 76 sts.
Rnd 2: Ch 1.
- 2 sc in next st twice
- Sc in next 34
- 2 sc in next st 4 times
- Sc in next 34
- 2 sc in next st twice
Join. Total: 4 + 34 + 8 + 34 + 4 = 84 sts.
Rnd 3: Ch 1.
- Sc, 2 sc in next twice
- Sc in next 34
- Sc, 2 sc in next 4 times
- Sc in next 34
- Sc, 2 sc in next twice
Join. Total: 6 + 34 + 12 + 34 + 6 = 92 sts. Fasten off.
The band measures about 10.25 in x 1.75 in (26.0 cm x 4.4 cm).
Appliqués
Icing cords: Use cream for all five. Ch the number listed, then sl st in the back bump of the 2nd ch from hook and each ch across. Chains run about 5 ch per inch (2.5 cm).
- Head cord (make 1): Ch 61. (60 sl st) Measures 12 in (30.5 cm).
- Arm cords (make 2): Ch 16. (15 sl st) Each measures 3 in (7.6 cm).
- Side cords (make 2): Ch 81. (80 sl st) Each measures 16 in (40.6 cm).
Holly leaves (make 4): With green, ch 9. Work into the 2nd–9th ch from hook. Call them ch 1–8, counting from the hook.
- Side 1: sl st in ch 1, sc in ch 2, hdc in ch 3, dc in ch 4, picot, dc in ch 5, hdc in ch 6, picot, sc in ch 7.
- Tip: (sc, picot, sc) in ch 8.
- Side 2: Working along the opposite side, sc in ch 7, picot, hdc in ch 6, dc in ch 5, picot, dc in ch 4, hdc in ch 3, sc in ch 2, sl st in ch 1.
Fasten off. Each leaf is about 2 in (5.1 cm) long.
Berries (make 6): With red, work 6 sc in a MR. Next round: sc2tog 3 times (3). Stuff the tails inside and close.
Peppermints (make 2): With cream, start with a MR.
- Rnd 1: 6 sc in MR. (6)
- Rnd 2: 2 sc in each st. (12)
- Rnd 3: Sc, 2 sc in next; rep around. (18)
- Rnd 4: Change to red. Sl st in each st. (18)
Embroider 6 curved red wedges from the center out. Each peppermint is 1.5 in (3.8 cm) across.
Candy canes (make 2): With cream, ch 21.
- Row 1: Sc in 2nd ch from hook and across. (20)
- Row 2: Ch 1, turn, sc across. (20)
The strip is 5 in (12.7 cm) long. Wrap red yarn diagonally around it every 0.5 in (1.3 cm). Curve the top 1.5 in (3.8 cm) into a hook and tack it in place.
Make All Pieces
Brown pieces:
- 1 panel
- 6 pockets
- 1 head
- 1 arms band
Cream pieces (plus cream trim on all 6 pockets):
- 5 icing cords
- 2 peppermint centers
- 2 candy canes
Red pieces (plus the peppermint rims):
- 6 berries
Green pieces:
- 4 leaves
Pink pieces:
- 2 cheeks
Pocket layout on the panel body (by panel rows):
Rows 20–26:  [ basketweave visible, top of topper overlaps ]
Rows 11–19:  [ P4 ][ P5 ][ P6 ]
Row 10:      [ gap ]
Rows 1–9:    [ P1 ][ P2 ][ P3 ]
Joining
Work the border (next section) on the panel first. The pockets sit inside it.
Pockets: Use brown and a whipstitch. Sew through the pocket edging sts and the panel sts.
- Bottom edge: Each pocket’s bottom has 14 sts. Sew 1 pocket st to 1 panel st. Three pockets need 3 x 14 = 42 sts, which is exactly the panel width, so the pockets sit edge to edge.
- Sides: Each pocket side is 4 in (10.2 cm) of brown, which equals 8 panel rows. Sew 2 pocket sts to each panel row.
- Top: Leave the cream trim free. It forms the pocket opening.
- Bottom row (P1–P3): The bottom edge sits on Row 1. The brown section ends at the top of Row 8, and the trim reaches Row 9.
- Top row (P4–P6): The bottom edge sits at the base of Row 11. The brown section ends at Row 18, and the trim reaches Row 19.
Keep your tension relaxed so the panel doesn’t pucker. Pins every 1 in (2.5 cm) help.
Topper:
- Center the arms band along the top so its lower edge overlaps the panel by 0.75 in (1.9 cm). Sew it along the band’s outer edge.
- Sew the head centered over the band so it rises 3.75 in (9.5 cm) above the panel top.
- Wave the head cord inside the head edge, from arm to arm, and sew it down.
- Curve one arm cord around each arm end and sew it down.
Side decorations:
- Wave each side cord along a side border and sew it down.
- Sew a peppermint on each side at the height of the top pocket row.
- Sew a candy cane on each side at the height of the bottom pocket row.
- Sew 2 leaves and 3 berries at each top corner, next to the arms.
Size check: The organizer should measure 11.5 in x 17.75 in (29.2 cm x 45.1 cm).
Border
Border gauge: 16 sc = 4 in (10.2 cm). Each round adds 0.25 in (0.6 cm) per side.
Round 1: With RS facing, join brown in the first st of Row 26. Ch 1 and work:
- 3 sc in the same st (corner)
- Sc in next 40 sts
- 3 sc in last st (corner)
- Down the side: sc in the row-end of Row 26, 2 sc in each row-end of Rows 25–2, sc in the row-end of Row 1 (50 sts)
- Along the foundation: 3 sc in first ch, sc in next 40, 3 sc in last ch
- Up the second side: work 50 sts the same way
Join. Total: 192 sts.
Counting each corner’s center sc on both sides it touches:
- Top and bottom: 44 sts each (1 + 1 + 40 + 1 + 1)
- Sides: 54 sts each
Check: 2 x 44 + 2 x 54 − 4 = 192.
Round 2: Ch 1, sc in each st, working 3 sc in each corner center st. Join and fasten off. Total: 200 sts. Top and bottom are 46 sts each, and the sides are 56 sts each.
Why the math works:
- Width: 46 sc ÷ 4 = 11.5 in (29.2 cm). That’s the 10.5 in body plus 0.5 in of border on each side.
- Height: 56 sc ÷ 4 = 14 in (35.6 cm). That’s the 13 in body plus 0.5 in at the top and bottom.
- Sides: Each dc row is 0.5 in, so 2 sc per row matches the sc gauge. Using 1 sc at Rows 1 and 26 makes room for the corner sts.
Final Blocking
- Pin the organizer face up to 11.5 in x 17.75 in (29.2 cm x 45.1 cm).
- Check that the panel is a true 11.5 in x 14 in (29.2 cm x 35.6 cm) rectangle, and ease the four corners into soft curves.
- Spray until damp, but not soaked.
- Pat the pocket scallops and icing waves into shape.
- Let it dry completely, at least 24 hours, before unpinning.
Final Quality-Control Checklist
- The panel has 42 sts per row and 26 rows.
- The border has 200 sts: 46 on the top and bottom, 56 on each side.
- All 6 pockets measure 3.5 in x 4.5 in (8.9 cm x 11.4 cm).
- Each pocket trim has 6 even scallops.
- The pocket rows are level, with the gap at Row 10.
- The head is centered and the face is symmetrical.
- The safety eye backs are secure.
- All tails are woven in on the WS.
Troubleshooting
- Panel narrower than 10.5 in (26.7 cm): Post stitches pulled too tight. Go up a hook size for the panel only.
- Weave doesn’t offset: Check that Rows 4–5 start with BPdc.
- Pocket trim ruffles too much: Use 3 dc instead of 3 hdc for flatter scallops.
- Border waves: Your sc is looser than the gauge, so drop to a 4.0 mm hook for the border.
- Head cups: Add 1 extra sc between increases on Rnd 9 only. Keep the extra out of the count by finishing with sl st.
Care
Hand wash in cool water and lay flat to dry. Don’t wring the organizer or put it in the dryer, because the post-stitch panel can stretch out of shape.
Final Notes
The measurement chain runs like this:
- The 16 x 8 basketweave gauge gives a 10.5 in x 13 in (26.7 cm x 33.0 cm) body.
- The 0.5 in (1.3 cm) border brings it to 11.5 in x 14 in (29.2 cm x 35.6 cm).
- The six 14-stitch pockets fill the 42-stitch width exactly.
- The 4.5 in (11.4 cm) head finishes the organizer at 17.75 in (45.1 cm) tall.
Check each link as you go and your gingerbread will hug your armrest perfectly. Happy crocheting!