

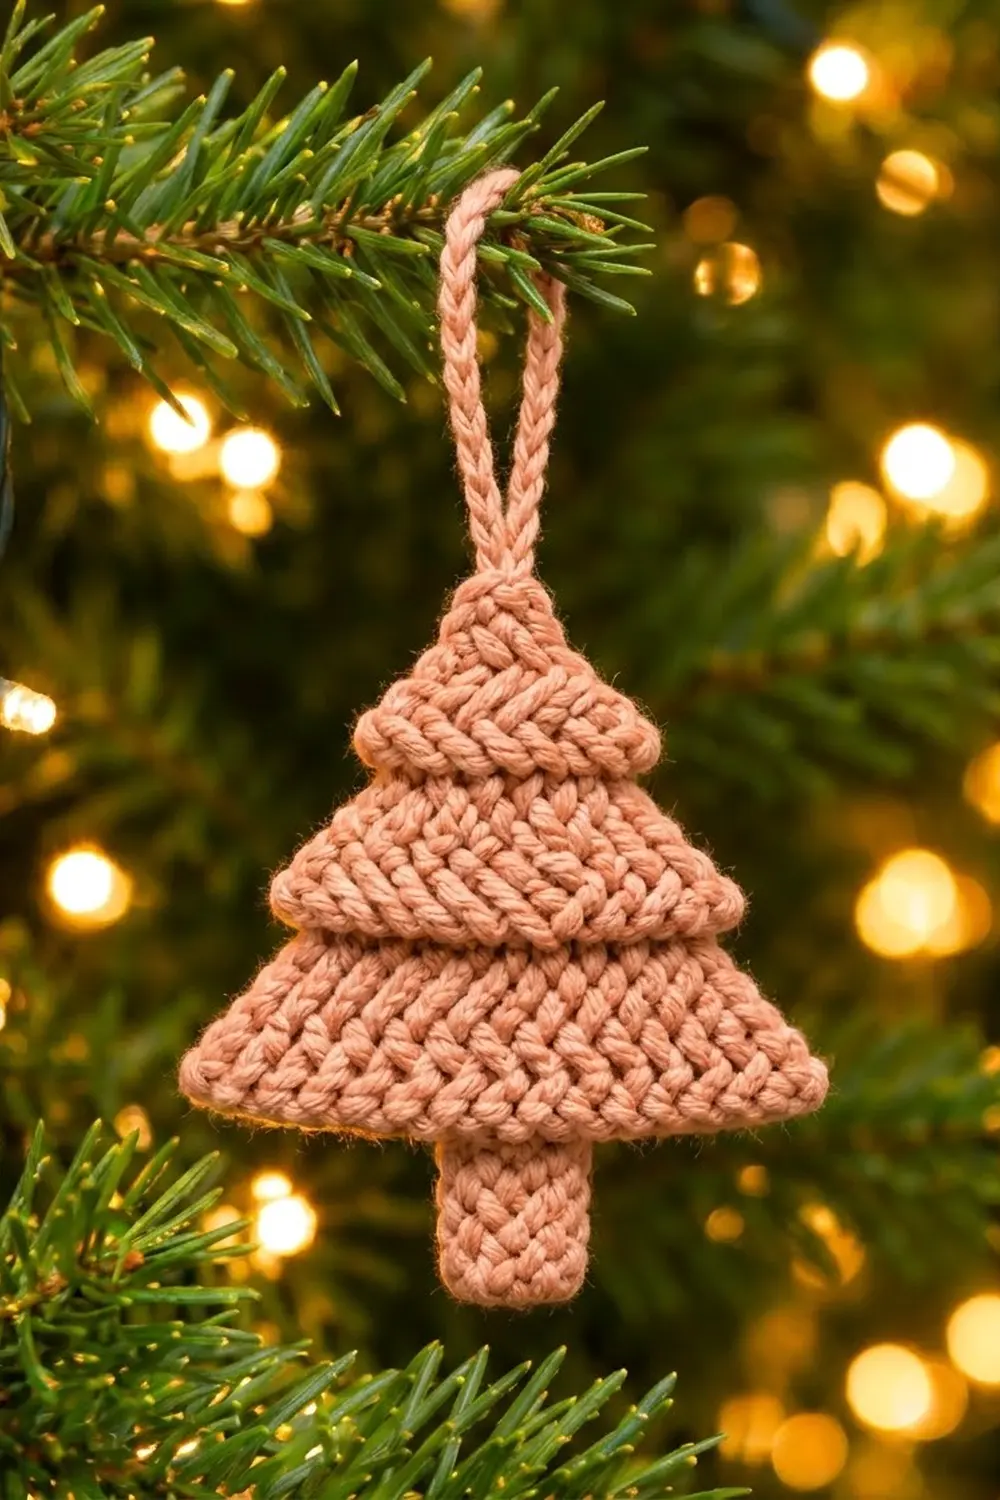
This little tree is a flat Christmas ornament worked in one soft dusty peach shade. The tiers use herringbone half double crochet, which gives a slanted, woven texture that looks a bit like knitted cables from a distance. A braided-look ridge tops each tier, so the tree reads clearly as three stacked layers even though it is one solid piece.
The style is calm and modern. The single color keeps it minimal, and the texture adds the interest. It looks good on a real tree, tied to a gift, or hung in a window.
This pattern uses US crochet terms. The finished ornament measures about 4 1/8 in (10.5 cm) wide by 4 5/8 in (11.7 cm) tall after the edging, plus a hanging loop that adds about 2 in (5.1 cm).
The construction is simple. You crochet the trunk in rows from the bottom up. Then you extend the row on both sides to make the widest tier and keep working upward. Each tier is two herringbone rows and one ridge row. After a short single crochet cap, a slip-stitch edging goes around the outline, and a braided-look loop finishes the top.
Finished Size and Construction
- Finished size: about 4 1/8 in (10.5 cm) wide × 4 5/8 in (11.7 cm) tall, plus a 2 in (5.1 cm) loop
- Skill level: Easy+ (a few shaping rows and one special stitch)
- Terminology: US crochet terms
- Yarn weight: Worsted (#4)
- Hook: 4.0 mm (US G-6)
- Number of pieces: 1
- Layout: single flat motif: trunk, three stacked tiers, cap, loop
- Piece size before border: 4 in (10.2 cm) wide × 4.5 in (11.4 cm) tall
- Border depth: about 1/16 in (0.2 cm) per edge (slip-stitch edging)
Materials
Yarn: Use a smooth worsted-weight yarn with good stitch definition. A cotton blend or a soft acrylic works well. Fuzzy or very splitty yarns hide the herringbone slant and the ridges.
- Dusty peach (main and only color): 12 g / about 24 m (26 yd)
The quantity includes a margin for your gauge swatch and the weaving-in tails. The ornament itself uses about 8 g.
Tools:
– 4.0 mm (US G-6) crochet hook
– Tapestry needle
– Scissors
– Stitch markers (2)
– Ruler or tape measure
– Pins and a blocking surface (a foam mat or folded towel)
– Spray bottle with water
Abbreviations (US Terms)
- ch – chain
- st(s) – stitch(es)
- sl st – slip stitch
- sc – single crochet
- hdc – half double crochet
- fhdc – foundation half double crochet
- BLO / FLO – back loop only / front loop only
- sc2tog – single crochet 2 together
- hdc2tog – half double crochet 2 together
- RS / WS – right side / wrong side
Special stitch – Herringbone half double crochet (HBhdc): Yarn over, insert hook into the stitch, yarn over and pull up a loop. Then pull that loop straight through the first loop on your hook (the yarn-over), leaving 2 loops on the hook. Yarn over and pull through both loops. Each HBhdc counts as 1 stitch.
Foundation half double crochet (fhdc), worked off the end of a row: Yarn over, insert hook into the base of the last stitch made, yarn over and pull up a loop, yarn over and pull through 1 loop (this is the “chain”), yarn over and pull through all 3 loops. For each following fhdc, insert the hook into that “chain” at the base of the stitch you just made.
Ridge rows: You always work the ridge into the loop that lies away from the RS. That means FLO on WS rows and BLO on RS rows. The free loop left behind sits on the RS as a raised, braided-looking line.
Turning chains: Ch 1 at the start of each row does not count as a stitch.
Gauge and Checkpoints
Gauge: In HBhdc, 16 sts and 12 rows = 4 in (10.2 cm). In sc, 16 sts and 16 rows = 4 in (10.2 cm).
That works out to 4 sts per inch, 3 HBhdc rows per inch, and 4 sc rows per inch.
Make one test ornament before making a batch. It takes less than an hour and works as your gauge swatch.
Checkpoints:
– After Row 3 (trunk): 1 in (2.5 cm) wide × 1 in (2.5 cm) tall
– After Row 4: 4 in (10.2 cm) wide
– After Row 6 (tier 1 done): about 1.9 in (4.8 cm) total height
– After Row 9 (tier 2 done): about 2.8 in (7.1 cm) total height
– After Row 12 (tier 3 done): about 3.75 in (9.5 cm) total height
– After Row 15 (cap): 4.5 in (11.4 cm) total height
If your piece is too big, go down one hook size (3.75 mm). If it is too small, go up one size (4.5 mm). Getting the width right matters more than the height. Check the 16-stitch Row 4 against the 4 in (10.2 cm) target before you go on.
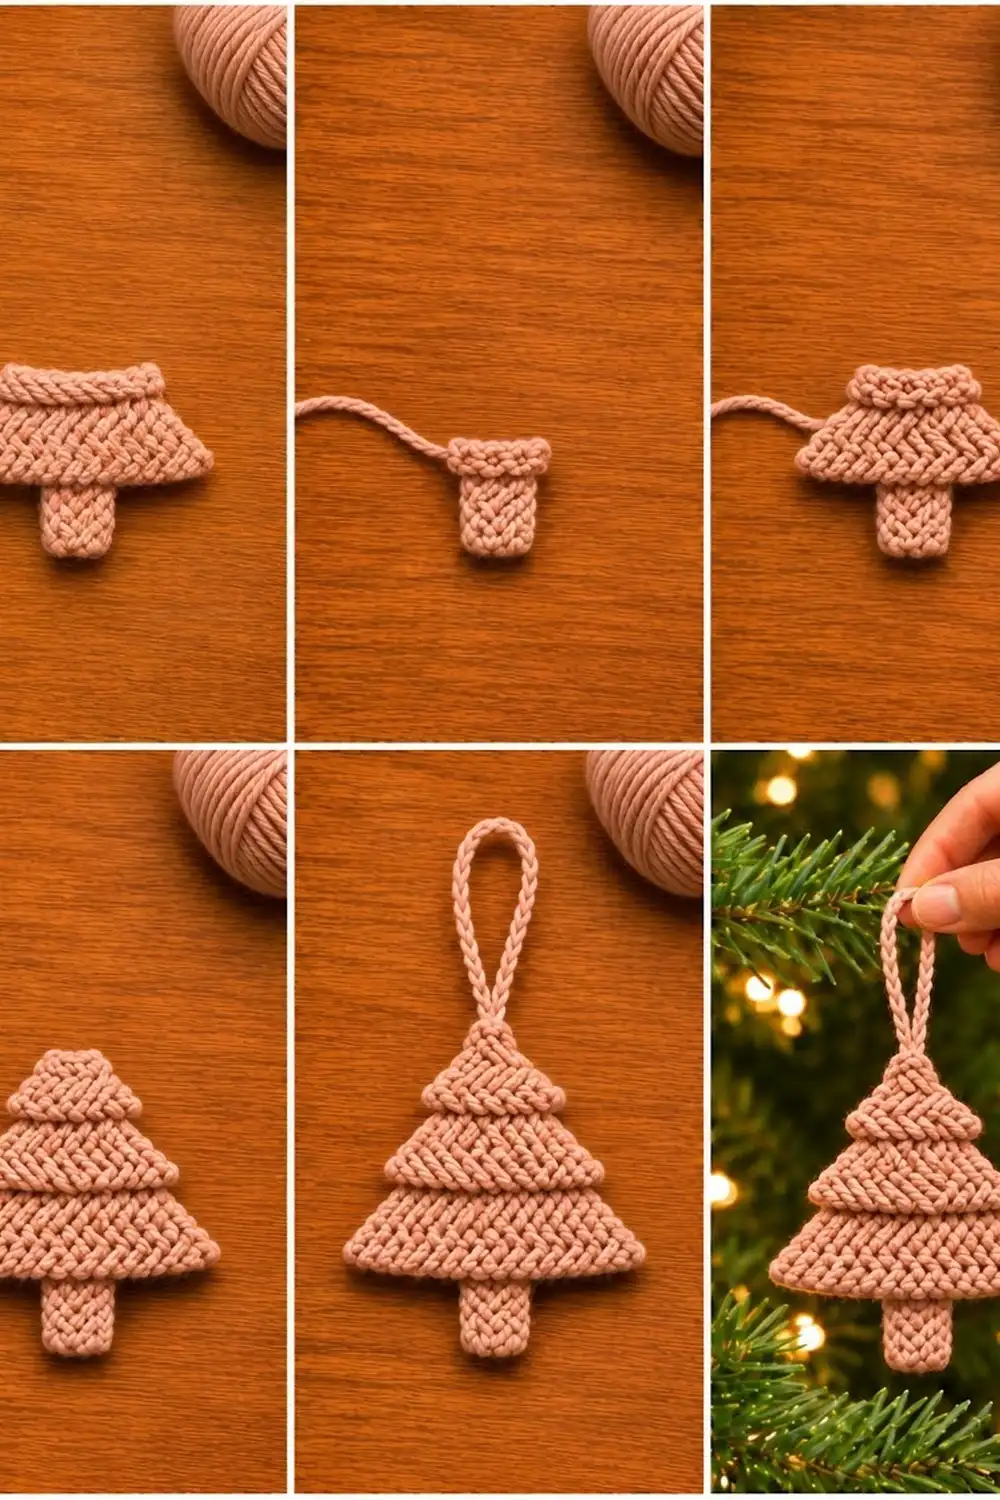
Pattern
Trunk
Foundation: Ch 6.
Row 1 (RS): Hdc in 3rd ch from hook and in each of next 3 ch. The skipped 2 ch do not count. (4 sts)
Row 2 (WS): Ch 1, turn. HBhdc in each st across. (4 sts)
Row 3 (RS): Ch 1, turn. HBhdc in each st across. (4 sts)
Checkpoint: 1 in (2.5 cm) wide × 1 in (2.5 cm) tall. Place a marker on the RS.
Tier 1 (Bottom Tier)
At the end of Row 3, ch 8 for the left extension. Do not turn yet.
Row 4 (WS): Hdc in 3rd ch from hook and in each of next 5 ch (6 sts). HBhdc in each of the 4 trunk sts (4 sts). Then work 6 fhdc off the end of the row (6 sts). (16 sts total: 6 + 4 + 6)
The trunk is now centered under the tier, with 6 sts overhanging on each side. Checkpoint: 4 in (10.2 cm) wide.
Row 5 (RS): Ch 1, turn. Hdc2tog, HBhdc in next 12 sts, hdc2tog. (14 sts)
Row 6 (WS, ridge): Ch 1, turn. Working in FLO: sc2tog, sc in next 10 sts, sc2tog. (12 sts)
Turn the piece to the RS. You should see a row of free loops running along the top of the herringbone. That is your first ridge.
Tier 2 (Middle Tier)
Row 7 (RS): Ch 1, turn. 2 hdc in first st, HBhdc in next 10 sts, 2 hdc in last st. (14 sts)
The increases make the tier step out past the ridge below, so the ridge sits like a ledge under it. Checkpoint: 3.5 in (8.9 cm) wide.
Row 8 (WS): Ch 1, turn. Hdc2tog, HBhdc in next 10 sts, hdc2tog. (12 sts)
Row 9 (RS, ridge): Ch 1, turn. Working in BLO: sc2tog, sc in next 8 sts, sc2tog. (10 sts)
Checkpoint: about 2.8 in (7.1 cm) total height.
Tier 3 (Top Tier)
Row 10 (WS): Ch 1, turn. 2 hdc in first st, HBhdc in next 8 sts, 2 hdc in last st. (12 sts)
Checkpoint: 3 in (7.6 cm) wide.
Row 11 (RS): Ch 1, turn. Hdc2tog, HBhdc in next 8 sts, hdc2tog. (10 sts)
Row 12 (WS, ridge): Ch 1, turn. Working in FLO: sc2tog, sc in next 6 sts, sc2tog. (8 sts)
Checkpoint: 2 in (5.1 cm) wide, about 3.75 in (9.5 cm) total height.
Cap
Row 13 (RS): Ch 1, turn. Sc2tog, sc in next 4 sts, sc2tog. (6 sts)
Row 14 (WS): Ch 1, turn. Sc2tog, sc in next 2 sts, sc2tog. (4 sts)
Row 15 (RS): Ch 1, turn. Sc2tog twice. (2 sts)
Checkpoint: 0.5 in (1.3 cm) across the top, 4.5 in (11.4 cm) total height. Do not fasten off.
Height check: 3 trunk rows (1 in) + 6 HBhdc/hdc tier rows (2 in) + 3 ridge rows and 3 cap rows (6 sc rows at 1/4 in each = 1.5 in) = 4.5 in (11.4 cm).
Border: Slip-Stitch Edging
The edging tidies the stepped outline and firms up the row ends. It adds very little size.
Border gauge: Work 1 sl st per sc row end, 2 sl st per hdc or HBhdc row end, and 1 sl st per stitch or foundation chain. Keep the slip stitches as loose as the fabric. They should lie flat and should not pull the edge in.
Round 1 (RS facing): Keep the RS facing you and work down the left side of the tree, through the row ends:
– Left side, top to bottom: 1 sl st in each of Rows 15, 14 and 13 (3). 1 sl st in Row 12 (1). 2 sl st in each of Rows 11 and 10 (4). 1 sl st in Row 9 (1). 2 sl st in each of Rows 8 and 7 (4). 1 sl st in Row 6 (1). 2 sl st in each of Rows 5 and 4 (4). (18 sl sts)
– Left underside of tier 1: 1 sl st in each of the 6 foundation chains. (6 sl sts)
– Left side of trunk: 2 sl st in each of the 3 trunk row ends. (6 sl sts)
– Trunk bottom: 1 sl st in each of the 4 foundation chains. (4 sl sts)
– Right side of trunk: 2 sl st in each of the 3 row ends. (6 sl sts)
– Right underside of tier 1: 1 sl st in the base of each of the 6 fhdc. (6 sl sts)
– Right side, bottom to top: the same as the left side, in reverse. (18 sl sts)
– Top: 1 sl st in each of the 2 sts of Row 15. (2 sl sts)
Total: 18 + 6 + 6 + 4 + 6 + 6 + 18 + 2 = 66 sl sts. Do not fasten off.
Why the math works: Each sl st matches the height or width of the fabric it covers. One HBhdc row is about 1/3 in tall, so 2 sl sts fill it. One sc row is about 1/4 in tall, so 1 sl st fills it. Along the top and the foundation edges, 1 sl st per stitch matches the 4-sts-per-inch gauge. The edging adds about 1/16 in (0.2 cm) per edge. That turns the 4 × 4.5 in (10.2 × 11.4 cm) piece into a finished size of about 4 1/8 × 4 5/8 in (10.5 × 11.7 cm).
The stepped corners need no extra stitches. The 2-hdc increases at the start of Rows 7 and 10 already form those little ledges, and the 2 sl sts in those row ends cover them.
Hanging Loop
Ch 26 loosely, which is about 4 1/3 in (11.0 cm). Without twisting the chain, sl st into the stitch at the base of the chain to form a ring. Turn. Sl st in the back bump of each of the 26 ch around the ring. Sl st into the base stitch again.
The slip stitches turn the plain chain into a firm, braided-looking cord that rises about 2 in (5.1 cm) above the tree. Fasten off and weave in all ends on the WS.
Final Blocking
- Lightly mist the ornament with water until it is damp but not wet.
- Lay it RS up on your blocking surface.
- Pin the bottom of tier 1 straight at 4 1/8 in (10.5 cm) wide.
- Pin the trunk straight and square, about 1 in (2.5 cm) wide.
- Pin the outer point of each tier so the sides slope evenly and match left to right.
- Check the total height of 4 5/8 in (11.7 cm), not counting the loop.
- Gently push each ridge up with a fingertip so it stands proud of the herringbone.
- Lay the loop straight up from the center top.
- Let it dry completely, then remove the pins.
Final Quality-Control Checklist
- Width at the bottom tier is 4 1/8 in (10.5 cm), within 1/8 in (0.3 cm)
- Height without the loop is 4 5/8 in (11.7 cm)
- Trunk is centered, with an equal overhang of 6 sts on each side
- Three ridges are visible on the RS as raised, braided lines
- Tiers 2 and 3 step out slightly past the ridge below
- The herringbone slant is consistent across each row
- Edging lies flat with no ruffling or puckering
- Loop is centered and firm, and all ends are woven in securely
Troubleshooting
The ridges show on the back instead of the front. You worked the wrong loop. Use FLO on WS rows (6 and 12) and BLO on RS row 9.
The trunk is off-center. Count both extensions. You need 6 hdc from the chain and 6 fhdc, not 5 or 7.
The edges ripple. Your edging sl sts are too tight or too many. Use 2 per HBhdc row end, not 3, and loosen up.
The edges cup inward. Your slip stitches are too tight. Go up a hook size for the edging only.
The herringbone looks like plain hdc. Make sure you pull the loop through the first loop on the hook, not just up through the stitch.
The tiers look the same width. Check the 2-hdc increases at the start and end of Rows 7 and 10.
The loop twists. Untwist the chain before you join it into a ring.
Care
Hand wash in cool water and lay flat to dry, reshaping while damp. Store flat or hang it by its loop so the tiers keep their shape.
Final Notes
Everything in this ornament follows one measurement chain. At 4 sts per inch, the 4-st trunk is 1 in (2.5 cm) wide and the 16-st bottom row is 4 in (10.2 cm) wide. The tiers start at 14 and 12 sts, which gives 3.5 in (8.9 cm) and 3 in (7.6 cm). The top ridge is 8 sts, or 2 in (5.1 cm). Three HBhdc rows per inch and four sc rows per inch give a height of 4.5 in (11.4 cm). The 66-stitch slip-stitch edging brings the tree to 4 1/8 × 4 5/8 in (10.5 × 11.7 cm), and the cord loop adds 2 in (5.1 cm), so the ornament hangs about 6 5/8 in (16.8 cm) tall.
Check your gauge on Row 4 and the rest will follow. Once the first tree is right, the next ones go quickly.
Happy crocheting!