

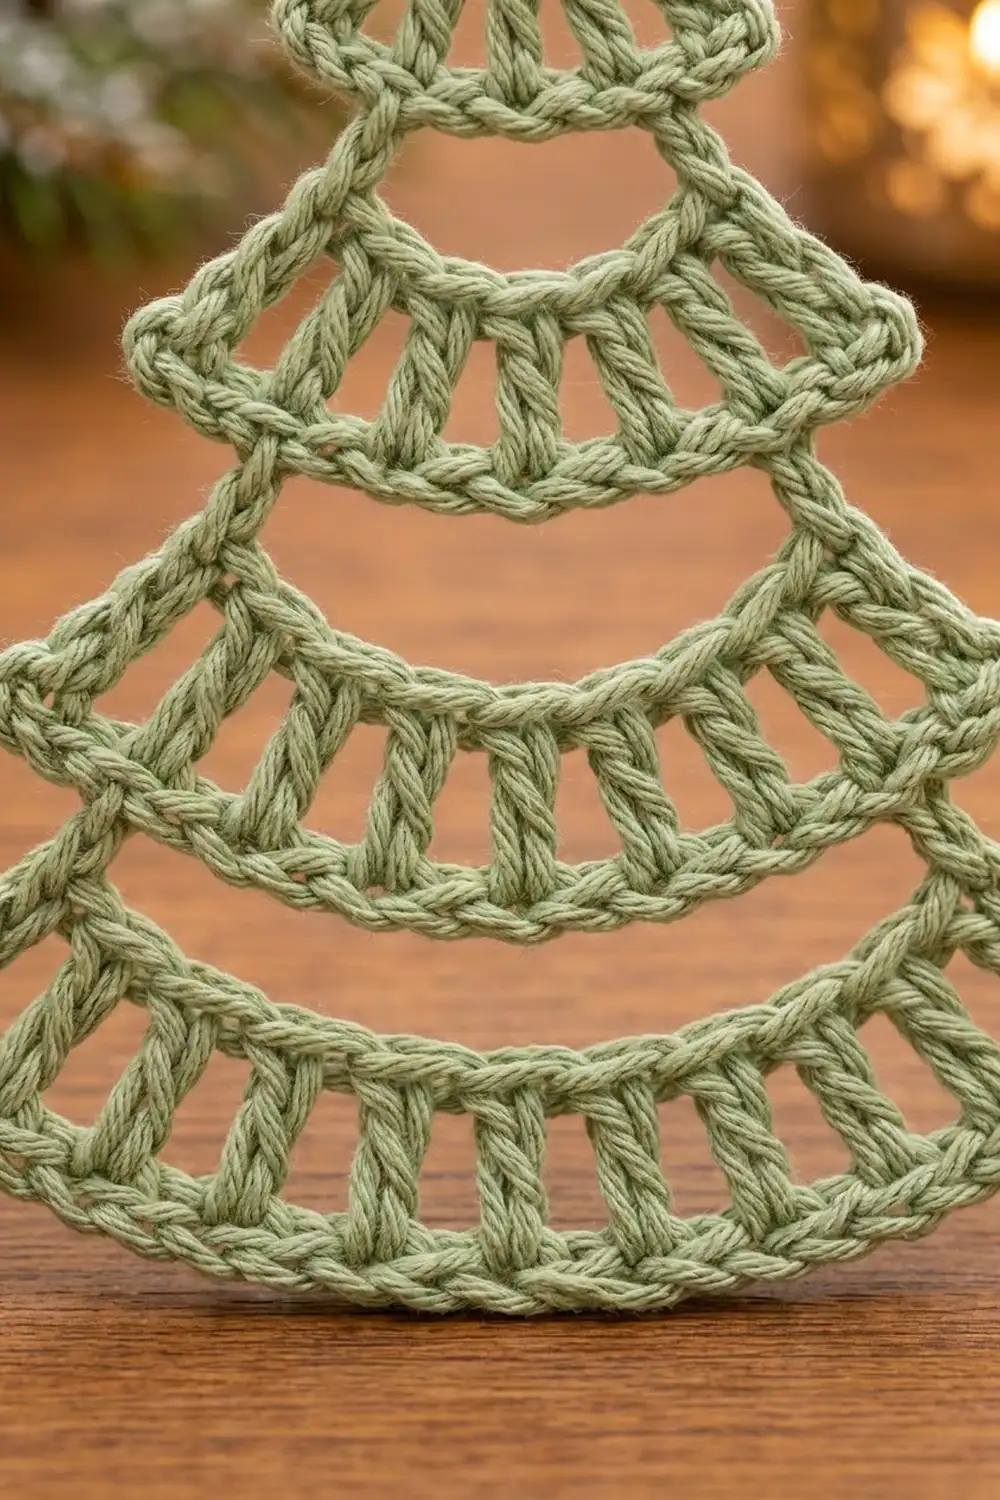
This little tree is all about open space. Four stacked tiers of airy double-crochet spokes hang one below the other. A rounded window opens between each tier, so the ornament looks light and lacy against the branches of a real tree.
The sample is made in a soft sage green cotton, which gives a calm, Scandinavian holiday look. It also works well in cream, blush pink and lavender, and a mixed set of four makes a lovely gift. The pattern uses US crochet terms throughout.
The finished ornament is 4.5 in (11.4 cm) wide and 4.5 in (11.4 cm) tall, plus a 1.5 in (3.8 cm) hanging loop, for a total length of 6 in (15.2 cm).
The whole tree is worked in one piece from the top down, with nothing to sew. You start with the hanging loop, fan the top tier out from its base, and then build each lower tier in four parts. First a chain hangs below the tier above, then you single crochet along that chain. Next comes a row of spaced double-crochet spokes, and last a single-crochet bottom edge. A one-round border tidies the outline.
Finished Size and Construction
- Finished size: 4.5 in (11.4 cm) wide × 4.5 in (11.4 cm) tall, plus a 1.5 in (3.8 cm) loop
- Skill level: Easy / advanced beginner
- Terminology: US crochet terms
- Yarn weight: DK (light, #3) cotton
- Hook: 3.25 mm (US D-3)
- Number of pieces: 1
- Layout: Single ornament, four tiers stacked vertically
- Piece size before border: 4.25 in (10.8 cm) wide × 4.375 in (11.1 cm) tall
- Border depth: 0.125 in (0.3 cm) along the sides and bottom
Materials
Yarn: Use a smooth, mercerized or matte DK cotton or cotton blend. Cotton shows each spoke clearly and holds its shape after blocking. Avoid fuzzy or very stretchy yarn, because the open windows will sag.
- Main color (sage green): 10 g, about 21 m (23 yd)
- Optional colorways: cream, soft pink or lavender, 10 g, about 21 m (23 yd) for each ornament
These quantities include a margin for your gauge swatch and the yarn tails.
Tools:
– 3.25 mm (US D-3) crochet hook
– Tapestry needle
– Scissors
– Rust-proof pins and a blocking mat or folded towel
– Spray bottle with clean water
– Optional: stitch marker
Abbreviations (US Terms)
- ch – chain
- sl st – slip stitch
- sc – single crochet
- dc – double crochet
- sp – space
- st(s) – stitch(es)
- RS / WS – right side / wrong side
- [ ] – repeat the instructions inside the brackets the stated number of times
Special stitch: spoke group. In this pattern, a “spoke” is 1 dc followed by ch 1, worked so it skips 1 st. Spokes stand slightly apart and leave the open ladder look of each tier.
Gauge and Checkpoints
Gauge: 22 sc = 4 in (10.2 cm). One dc row with its sc edge measures about 0.75 in (1.9 cm) tall.
Make one complete ornament before you make a set. It is small enough to work as its own gauge swatch. Measure at each checkpoint below, laying the work flat without stretching it. Widths are measured straight across (the chord), not along the curve.
- After Tier 1: about 1.25 in (3.2 cm) wide
- After Tier 2: about 2.25 in (5.7 cm) wide; the window is about 0.5 in (1.3 cm) deep at the center
- After Tier 3: about 3.25 in (8.3 cm) wide
- After Tier 4: about 4.25 in (10.8 cm) wide
- After the border: 4.5 in (11.4 cm) wide
If your tree is too big, change to a 3 mm hook. If it is too small or stiff, change to a 3.5 mm hook. Do not change any stitch counts. The tiers depend on the exact counts to stack correctly.
Pattern
Hanging Loop
Ch 20, then sl st in the first ch to form a ring. The ring folds into a loop about 1.5 in (3.8 cm) long. The sl st join is the base of the tree.
Tier 1 (Top Fan)
Row 1 (RS): Work every stitch into the sl st join. Ch 4 (counts as dc and ch 1), [dc, ch 1] 2 times, then 1 dc. (4 dc, 3 ch-1 sp = 7 sts)
The dc fan out from the loop base like the top of a cone.
Row 2 (WS): Ch 1, turn. Sc in each dc and each ch-1 sp across, ending in the 3rd ch of the ch-4. (7 sc)
Checkpoint: Tier 1 should measure about 1.25 in (3.2 cm) wide.
Tier 2
Row 3 (window chain): Do not turn. Ch 11. Bring the chain under Tier 1 and sl st in the first sc of Row 2, at the opposite end. The chain now hangs in a U shape below Tier 1.
Row 4 (band top): Ch 1, turn. Sc in each of the 11 ch, then sl st in the last sc of Row 2, the corner where Row 3 began. (11 sc)
Work into the chain so that the sc tops face outward and downward, away from the window. The Row 5 spokes then hang down.
Row 5 (spokes): Turn. Ch 4 (counts as dc and ch 1), skip next sc, [dc in next sc, ch 1, skip next sc] 4 times, dc in last sc. (6 dc, 5 ch-1 sp = 11 sts)
To check the count: 1 st for the ch-4, 1 skipped, 8 used in the repeats and 1 last sc makes all 11 sc.
Row 6 (bottom edge): Ch 1, turn. Work 2 sc in the first dc, then sc in each ch-1 sp and each dc across to the turning ch. Work 2 sc in the 3rd ch of the ch-4.
This is a trim round: 11 sts worked once each, plus 2 extra sc at the ends, for 13 sc. (13 sc)
Checkpoint: About 2.25 in (5.7 cm) wide. The window between Tier 1 and Tier 2 should be about 0.5 in (1.3 cm) deep at the center.
Tier 3
Row 7 (window chain): Do not turn. Ch 17, bring the chain under Tier 2, and sl st in the first sc of Row 6.
Row 8 (band top): Ch 1, turn. Sc in each of the 17 ch, then sl st in the last sc of Row 6. (17 sc)
Row 9 (spokes): Turn. Ch 4 (counts as dc and ch 1), skip next sc, [dc in next sc, ch 1, skip next sc] 7 times, dc in last sc. (9 dc, 8 ch-1 sp = 17 sts)
Row 10 (bottom edge): Ch 1, turn. Work 2 sc in the first dc, sc in each ch-1 sp and each dc across, then 2 sc in the 3rd ch of the ch-4. This is 17 sts worked once each, plus 2 extra sc. (19 sc)
Checkpoint: About 3.25 in (8.3 cm) wide.
Tier 4
Row 11 (window chain): Do not turn. Ch 23, bring the chain under Tier 3, and sl st in the first sc of Row 10.
Row 12 (band top): Ch 1, turn. Sc in each of the 23 ch, then sl st in the last sc of Row 10. (23 sc)
Row 13 (spokes): Turn. Ch 4 (counts as dc and ch 1), skip next sc, [dc in next sc, ch 1, skip next sc] 10 times, dc in last sc. (12 dc, 11 ch-1 sp = 23 sts)
Row 14 (bottom edge): Ch 1, turn. Work 2 sc in the first dc, sc in each ch-1 sp and each dc across, then 2 sc in the 3rd ch of the ch-4. This is 23 sts worked once each, plus 2 extra sc. (25 sc)
Checkpoint: About 4.25 in (10.8 cm) wide and 4.375 in (11.1 cm) tall, not including the loop.
Do not fasten off. Continue straight into the border.
How the Tiers Grow
Each window chain is the previous bottom edge plus 4. This gives the U shape enough slack to open a window: 7 + 4 = 11, 13 + 4 = 17 and 19 + 4 = 23.
Each bottom edge is its band count plus 2: 11 + 2 = 13, 17 + 2 = 19 and 23 + 2 = 25. The 2 extra sc give the slight outward flare at the tier points.
Border
Border gauge: Same as the body, 22 sc = 4 in (10.2 cm). The border adds 0.125 in (0.3 cm) to each side and to the bottom.
How the stitches are counted:
– Each side count covers row ends only.
– The 2 corner stitches belong to the bottom count.
– At the end of each tier, put 1 sc in the end of each sc row and 2 sc in the end of each dc row.
Border Round (RS): Ch 1, turn so the RS faces you. You are now at a bottom corner.
- Bottom: Sc in each of the 25 sts of Row 14. The first and last of these are the corner stitches. (25 sc)
- First side, working upward: In Tier 4, put 1 sc in the end of Row 14, 2 sc in the end of Row 13 and 1 sc in the end of Row 12. Repeat for Tier 3 (Rows 10, 9 and 8) and Tier 2 (Rows 6, 5 and 4). For Tier 1, put 1 sc in the end of Row 2 and 2 sc in the end of Row 1. (15 sc)
- At the loop: Sl st in the loop base.
- Second side, working downward: Work the same row-end stitches in reverse order: Tier 1, then Tiers 2, 3 and 4. (15 sc)
- Finish: Sl st in the first sc of the round. (55 sc in total: 25 + 15 + 15)
Fasten off and weave in the ends along the back of the sc edges.
Why the math works: Each side has the same row ends:
– Tier 1 has 1 sc row and 1 dc row, for 3 sc.
– Tiers 2, 3 and 4 each have 2 sc rows and 1 dc row, for 4 sc each.
So each side gets 3 + (3 × 4) = 15 sc. A dc row is about twice as tall as an sc row, so 2 sc per dc row end keeps the sides flat. The bottom border works exactly 1 sc in each of the 25 edge sts, so the bottom keeps its width.
Final Blocking
- Lightly mist the ornament with water until it is damp but not dripping.
- Lay it RS up on the blocking mat.
- Pin the loop base and the two bottom corners first. Check that the bottom corners are 4.5 in (11.4 cm) apart.
- Pin each tier’s two side points so they line up on a straight diagonal on each side.
- Gently pull the center of each window chain downward until each window is open and evenly rounded.
- Ease each spoke so it points straight down or fans slightly outward. Keep the spacing even.
- Pin the loop straight up so it measures 1.5 in (3.8 cm).
- Let it dry completely before you unpin it. For a crisper finish, mist it lightly with fabric stiffener.
Final Quality-Control Checklist
- Stitch counts: Tier 1 has 4 dc, Tier 2 has 6, Tier 3 has 9 and Tier 4 has 12.
- Bottom edges are 7, 13, 19 and 25 sc.
- All three windows are open and similar in shape.
- The spokes all hang downward, with none flipped up into a window.
- The side points line up on both sides.
- The border has 25 sc along the bottom and 15 sc on each side.
- The finished size is 4.5 in (11.4 cm) wide, 4.5 in (11.4 cm) tall and 6 in (15.2 cm) including the loop.
- The ends are woven in invisibly and the loop join is secure.
Troubleshooting
- The windows are closed or puckered: The window chain is too tight. Work the chain loosely, or go up one hook size for the chain rows only.
- The spokes point up into the window: The band-top sc were worked with their tops facing inward. Rip back to the window chain and rework it with the stitches facing outward.
- The tier points curl: The 2 extra sc at the edge ends are missing, or the work is too tight. Recount the bottom edge.
- The sides wave: Too many row-end stitches went into the border. Use exactly 15 per side.
- The ornament is lopsided: The window chain was joined to the wrong stitch. Make sure it ends in the first sc of the previous edge.
Care
Hand wash in cool water with mild soap, press out the water in a towel, and re-pin the ornament to dry flat. Store it flat or hanging so the windows keep their shape.

Final Notes
The measurement chain is simple. A gauge of 22 sc = 4 in (10.2 cm) gives:
– tier widths of 1.25 in (3.2 cm), 2.25 in (5.7 cm), 3.25 in (8.3 cm) and 4.25 in (10.8 cm);
– a body of 4.25 in (10.8 cm) wide × 4.375 in (11.1 cm) tall before the border;
– a border that adds 0.125 in (0.3 cm), for a finished tree of 4.5 in (11.4 cm) square;
– a total length of 6 in (15.2 cm) with the loop.
Keep the counts exact, keep the window chains relaxed, and block each one open. Your tree will match every time, in any color you choose.
Happy crocheting!