
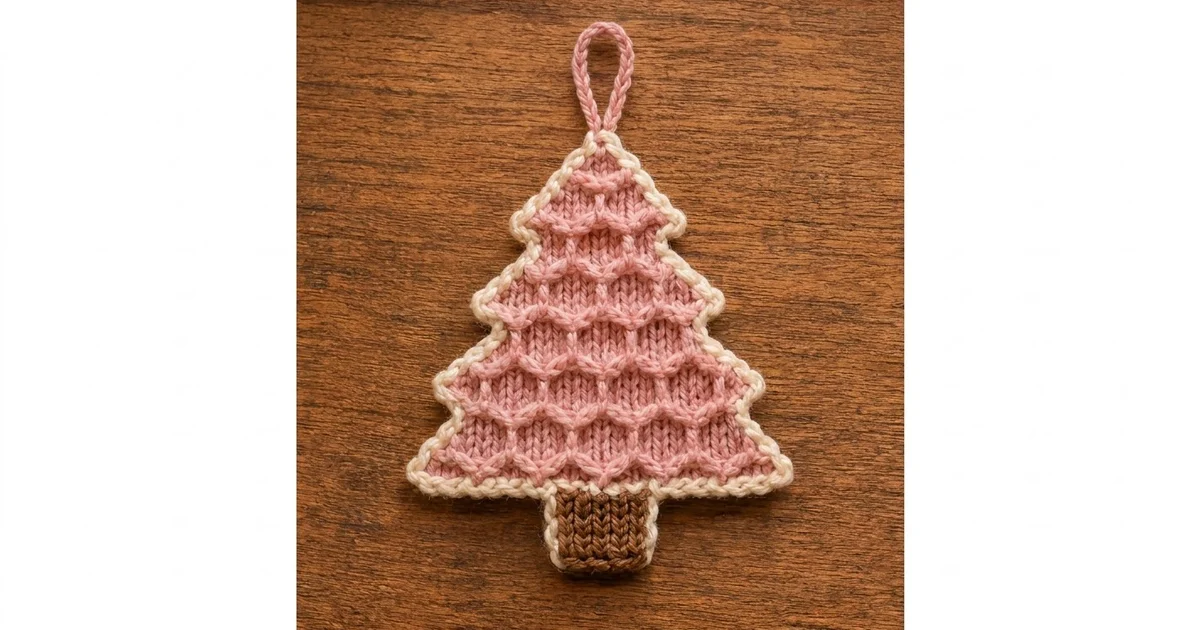
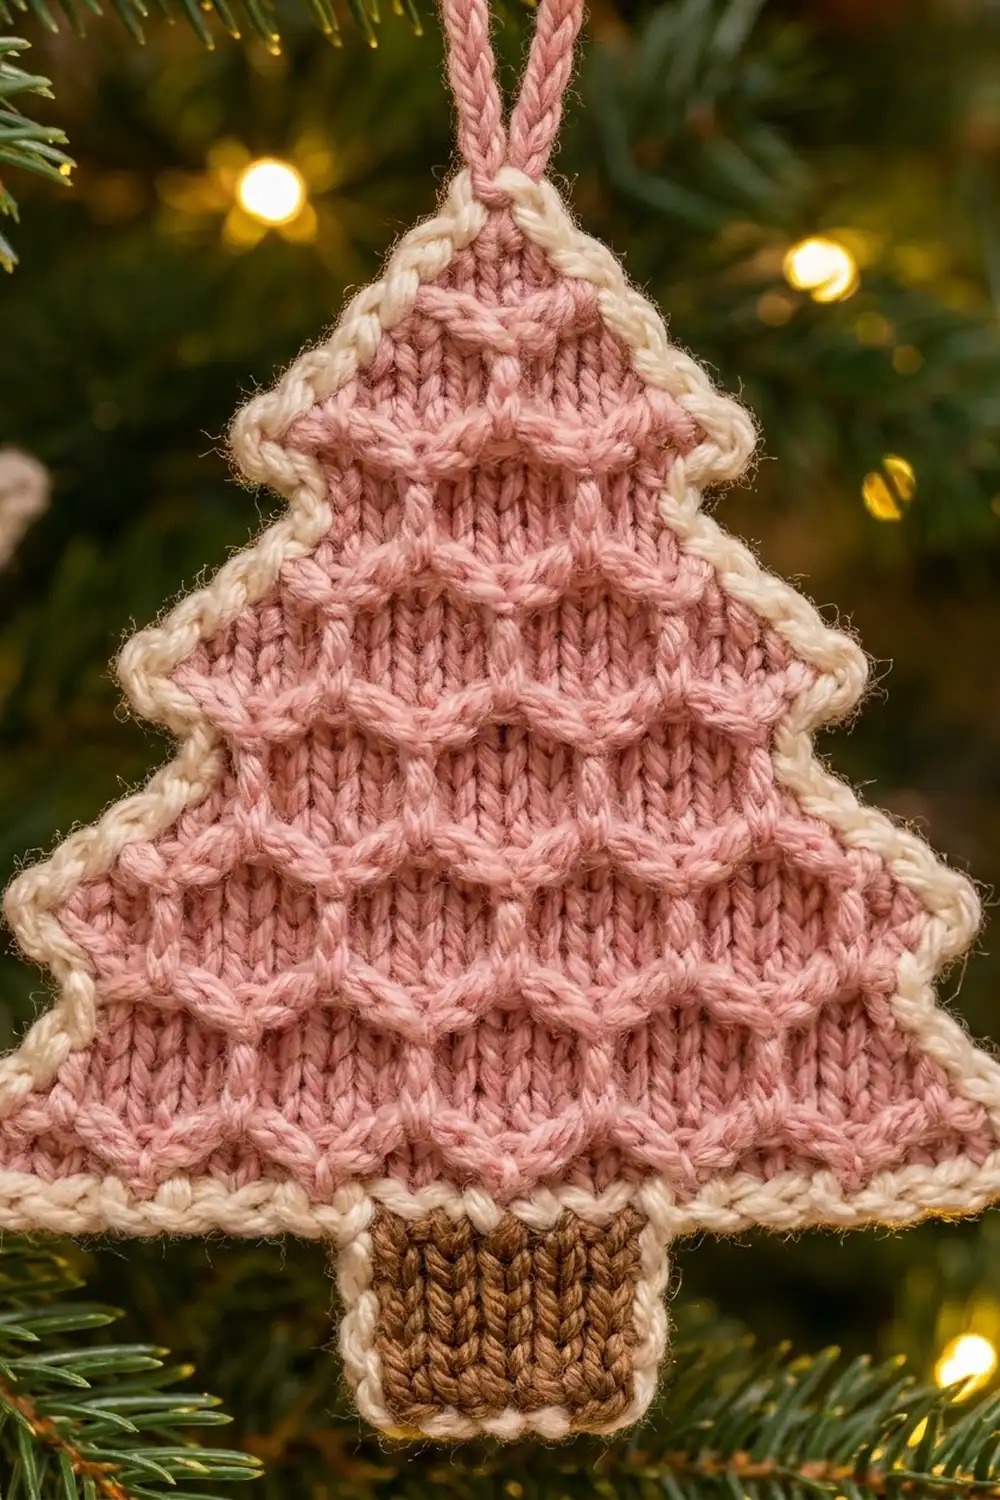
This little tree ornament is warm and cozy. The body is dusty pink and covered in raised arches that stack like honeycomb cells. A small chocolate-brown trunk sits at the bottom, and a cream crab-stitch outline follows every step of the tiered edge, so it looks a bit like a frosted gingerbread cookie.
The look comes from three simple pieces of texture. Split single crochet rows make the knit-look “V” columns. Front-post clusters make the arches. The tree’s stepped outline comes from small notches at the start of each tier. All three are easy once you have tried them on one tier.
The pattern uses US crochet terms. The finished ornament measures about 4.7 in (11.9 cm) wide and 5.6 in (14.2 cm) tall, not counting the hanging loop. With the loop, it is about 7.1 in (18.0 cm) tall.
You work the tree body flat from the bottom up, in rows. Next you add the trunk to the free loops of the foundation chain. Then you work a two-round cream border all the way around the piece, and finish with a covered hanging loop.
Finished Size and Construction
- Finished size: 4.7 in (11.9 cm) wide × 5.6 in (14.2 cm) tall; 7.1 in (18.0 cm) tall with the loop
- Skill level: Advanced beginner / intermediate
- Terminology: US
- Yarn weight: DK (light worsted), category 3
- Hook: 4.0 mm (US G-6)
- Number of pieces: 1 (one-piece ornament)
- Layout: Single tree with five stepped tiers and a centered trunk
- Tree body before border: 4.2 in (10.7 cm) wide at the base × 4.2 in (10.7 cm) tall
- Trunk before border: 1 in (2.5 cm) wide × 0.9 in (2.3 cm) tall
- Border depth: 0.25 in (0.6 cm) on every edge
Materials
Use a smooth DK yarn with good stitch definition. Wool blends and soft acrylics both work well. Avoid fuzzy or very splitty yarns, because the arches and split stitches need clean, visible loops.
- Color A, dusty pink (tree body): 10 g, about 23 m
- Color B, chocolate brown (trunk): 2 g, about 5 m
- Color C, cream (border and hanging loop): 5 g, about 11 m
These amounts include a margin for your gauge swatch and small tension differences.
Tools:
– 4.0 mm (US G-6) crochet hook
– Tapestry needle
– Scissors
– Stitch markers (2–3)
– Ruler or tape measure
– Blocking mat and rust-proof pins
– Spray bottle or steamer
Abbreviations (US Terms)
- ch: chain
- sl st: slip stitch
- sc: single crochet
- sc2tog: single crochet 2 together
- sc3tog: single crochet 3 together
- split sc: split single crochet (see below)
- rev sc: reverse single crochet (crab stitch)
- st(s): stitch(es)
- RS / WS: right side / wrong side
- rep: repeat
Special stitches
Split sc (knit-look sc): Insert your hook between the two vertical legs of the sc below, right through the center of its “V”, not under the top loops. Yo, pull up a loop, yo, and pull through both loops on the hook. Use this stitch on plain RS rows to get the knit-look columns.
Arch: First skip the next st of the current row. Yo. Working 2 rows below, insert your hook from front to back to front around the post of the stitch directly under the sc you just made. Yo, pull up a loop, yo, and pull through 2 loops. Yo again. Still working 2 rows below, insert your hook around the post of the stitch that sits under the st after the skipped st. Yo, pull up a loop, yo, and pull through 2 loops. Yo and pull through all 3 loops on the hook.
The two legs spread apart at the bottom and meet at the top, which makes a raised arch on the RS. Each arch counts as 1 stitch and replaces the skipped stitch.
Gauge and Checkpoints
Gauge: 20 sts and 22 rows = 4 in (10.2 cm) in sc, alternating plain sc rows with split sc rows.
The tree is small, so it can be your gauge test. Work through Row 6, then measure before you go on.
- After Row 6: 21 sts measure 4.2 in (10.7 cm) wide, and the piece is about 1.1 in (2.8 cm) tall.
- After Row 14: the piece is about 2.5 in (6.4 cm) tall from the foundation.
- After Row 23: the tree body is 4.2 in (10.7 cm) tall and 4.2 in (10.7 cm) wide at the base.
- After the trunk: the trunk measures 1 in (2.5 cm) × 0.9 in (2.3 cm).
- After the border: 4.7 in (11.9 cm) × 5.6 in (14.2 cm).
A difference of up to 1/8 in (0.3 cm) is fine.
If your Row 6 is wider than 4.3 in (10.9 cm), go down to a 3.75 mm hook. If it is narrower than 4.1 in (10.4 cm), go up to a 4.5 mm hook. Arches tighten the fabric slightly, so measure after an arch row, not before one.
Tree Body (Color A)
Work back and forth in rows. Ch 1 at the start of each row does not count as a stitch. Place a marker on the RS of Row 1 so you can always tell the sides apart.
Foundation: With Color A, ch 22.
Row 1 (RS): Sc in 2nd ch from hook and in each ch across. Turn. (21 sts)
Row 2 (WS): Ch 1, sc in each st across. Turn. (21 sts)
Tier 1
Row 3 (RS, arch row): Ch 1, sc in first st, sc in next st, Arch, sc in next 2 sts; rep from * 4 more times. Turn. (21 sts: 16 sc + 5 Arches)*
For the legs of the Arches in this row, work around the posts of Row 1 stitches.
Row 4 (WS): Ch 1, sc in each st across. Turn. (21 sts)
Row 5 (RS): Ch 1, split sc in each st across. Turn. (21 sts)
Row 6 (WS): Ch 1, sc2tog, sc in next 17 sts, sc2tog. Turn. (19 sts)
Tier 2
Each new tier begins with a notch. You leave 1 stitch unworked at each end, which makes the step in the outline.
Row 7 (RS, notch + arch row): Sl st in first 2 sts, ch 1, sc in same st as last sl st. Sc in next st, Arch, sc in next 2 sts; rep from * 3 more times. Leave the last st unworked. Turn. (17 sts: 13 sc + 4 Arches)*
The Arch legs go around Row 5 posts. You have worked into stitches 2 through 18 of the 19 available, so 1 stitch is left at each edge.
Row 8 (WS): Ch 1, sc in each st across. Turn. (17 sts)
Row 9 (RS): Ch 1, split sc in each st across. Turn. (17 sts)
Row 10 (WS): Ch 1, sc2tog, sc in next 13 sts, sc2tog. Turn. (15 sts)
Tier 3
Row 11 (RS): Sl st in first 2 sts, ch 1, sc in same st. Sc in next st, Arch, sc in next 2 sts; rep from * 2 more times. Leave the last st unworked. Turn. (13 sts: 10 sc + 3 Arches)*
Row 12 (WS): Ch 1, sc across. Turn. (13 sts)
Row 13 (RS): Ch 1, split sc across. Turn. (13 sts)
Row 14 (WS): Ch 1, sc2tog, sc in next 9 sts, sc2tog. Turn. (11 sts)
Tier 4
Row 15 (RS): Sl st in first 2 sts, ch 1, sc in same st. Sc in next st, Arch, sc in next 2 sts; rep from * once more. Leave the last st unworked. Turn. (9 sts: 7 sc + 2 Arches)*
Row 16 (WS): Ch 1, sc across. Turn. (9 sts)
Row 17 (RS): Ch 1, split sc across. Turn. (9 sts)
Row 18 (WS): Ch 1, sc2tog, sc in next 5 sts, sc2tog. Turn. (7 sts)
Tier 5
Row 19 (RS): Sl st in first 2 sts, ch 1, sc in same st, sc in next st, Arch, sc in next 2 sts. Leave the last st unworked. Turn. (5 sts: 4 sc + 1 Arch)
Row 20 (WS): Ch 1, sc across. Turn. (5 sts)
Row 21 (RS): Ch 1, split sc across. Turn. (5 sts)
Row 22 (WS): Ch 1, sc2tog, sc in next st, sc2tog. Turn. (3 sts)
Row 23 (RS): Ch 1, sc3tog. (1 st) Fasten off and weave in the ends.
Why the arches offset: Every arch row has a stitch count of 4k + 1 (21, 17, 13, 9, 5), so the repeat always fits exactly. Between one arch row and the next, the tree loses 2 stitches on the left edge: 1 from the decrease and 1 from the notch. That shifts each new row of arches by 2 stitches, which is half a repeat. The result is the brick-set honeycomb look.
Trunk (Color B)
Hold the tree upside down with the RS facing you. The free loops of the foundation chain are now along the top. Count 8 loops in from the right edge.
Row 1 (RS): Join Color B with a sc in the 9th loop, then sc in the next 4 loops. Turn. (5 sts)
This leaves 8 unworked loops on each side of the trunk, so it is exactly centered: 8 + 5 + 8 = 21.
Row 2 (WS): Ch 1, sc across. Turn. (5 sts)
Row 3 (RS): Ch 1, split sc across. Turn. (5 sts)
Row 4 (WS): Ch 1, sc across. Turn. (5 sts)
Row 5 (RS): Ch 1, split sc across. (5 sts) Fasten off and weave in the ends.
Checkpoint: The trunk should be 1 in (2.5 cm) wide and 0.9 in (2.3 cm) tall.
Border (Color C)
Border gauge: about 5 sc per 1 in (2.5 cm) of edge, the same as the main stitch gauge. Work with the RS facing.
Round 1: Join Color C with a sc in the single st of Row 23 (the top point). Work 2 more sc in the same st, so the top corner has 3 sc. Then work around the tree as follows.
- First side, from Row 22 down to Row 2: 1 sc in each row end (21 sc). Add 1 sc in the unworked notch stitch at each of the 4 notches (4 sc). That makes 25 sc for the side.
- First bottom corner: 3 sc in the first foundation loop.
- First ledge: 1 sc in each of the next 7 foundation loops. (7 sc)
- Trunk side: 1 sc in each trunk row end. (5 sc)
- Trunk bottom: 3 sc in the first st, sc in the next 3 sts, then 3 sc in the last st. (9 sc)
- Second trunk side: 5 sc
- Second ledge: 7 sc
- Second bottom corner: 3 sc
- Second side: 25 sc
Sl st to the first sc. (92 sts)
Count check: 3 + 25 + 3 + 7 + 5 + 9 + 5 + 7 + 3 + 25 = 92. Each side count of 25 does not include the 3-sc corners at either end, because those are counted separately.
Round 2: Ch 1. Working from left to right (right to left if you are left-handed), rev sc in each st around. Sl st to the first rev sc. (92 sts) Fasten off.
Why the math works: Each stepped side of the tree is about 4.7 in (11.9 cm) long once you follow the slope and the notch ledges. At 5 sc per inch, that edge needs about 23–24 sc. The 25 sc include the 4 notch stitches, which have to wrap around the step corners, so the edge lies flat instead of rippling.
The 3-sc corners let the border turn sharp points without pulling. The ledges are 8 loops (1.6 in, 4.1 cm) each, and they take 3 corner sc plus 7 sc. Those 2 extra stitches cover the corner turn.
Crab stitch adds no extra stitches, so Round 2 stays at 92. It adds the raised, cord-like edge.
Hanging Loop
Join Color C in the center rev sc at the top point. Ch 14, then sl st in the same st to form a loop. Work 20 sc into the loop, covering the chain completely, and sl st into the base. Fasten off and weave the end down into the border.
The loop is about 1.5 in (3.8 cm) tall.
Final Blocking
- Lightly mist the ornament until it is damp, or hover a steamer about 1 in (2.5 cm) above it. Do not press the iron down, because that flattens the arches.
- Lay the ornament RS up on the blocking mat.
- Pin the top point and both bottom corners so the base measures 4.7 in (11.9 cm) across.
- Pin the bottom of the trunk so the total height is 5.6 in (14.2 cm).
- Pin each notch corner so the steps look crisp and match on both sides.
- Lift any flattened arches gently with a fingertip.
- Let it dry completely, at least 4 hours, before removing the pins.
Final Quality-Control Checklist
- [ ] The tree body has 23 rows, and the stitch counts match each checkpoint.
- [ ] There are 15 arches in total (5 + 4 + 3 + 2 + 1), offset in a honeycomb pattern.
- [ ] Every tier has a matching notch on both sides.
- [ ] The trunk is centered, with 8 loops on each side.
- [ ] Border Round 1 has 92 sts, with 3 sc at the top point and at each corner.
- [ ] The crab-stitch edge is even and does not ruffle.
- [ ] The finished size is 4.7 in × 5.6 in (11.9 cm × 14.2 cm), within 1/8 in (0.3 cm).
- [ ] The hanging loop is firmly anchored and all ends are hidden.
Troubleshooting
Arches look flat: Make sure you are going around the post from the front, two rows below. If that is correct, work the yo’s a little looser.
The fabric puckers above the arches: Check that you skipped the stitch behind each Arch. If you skip it and the fabric still puckers, the post legs are too short. Pull up longer loops.
Stitch count is off on an arch row: Count the repeat as 4 stitches: sc, Arch, sc, sc. Check that the first sc and the notch are correct.
The border ripples: Skip the notch sc on one side, then match it on the other side. If it still ripples, use a 3.75 mm hook for Round 2.
The border cups or pulls: Add 1 sc on each side near the middle tier, and recount so both sides still match.
The trunk is off-center: Pull out the trunk and recount 8 loops in from each edge.
Care
Hand wash in cool water, roll the ornament in a towel to remove excess water, and dry it flat. Store it flat or hanging, away from damp and direct sunlight.

Final Notes
Each stage depends on the one before it. Gauge of 20 sts × 22 rows = 4 in (10.2 cm) gives a 21-stitch base of 4.2 in (10.7 cm). Twenty-three rows give a body 4.2 in (10.7 cm) tall. Five trunk rows add 0.9 in (2.3 cm). A 92-stitch border adds 0.25 in (0.6 cm) on every edge, for a finished ornament of 4.7 in × 5.6 in (11.9 cm × 14.2 cm). If you check each checkpoint, your tree will come out right. Happy crocheting!