

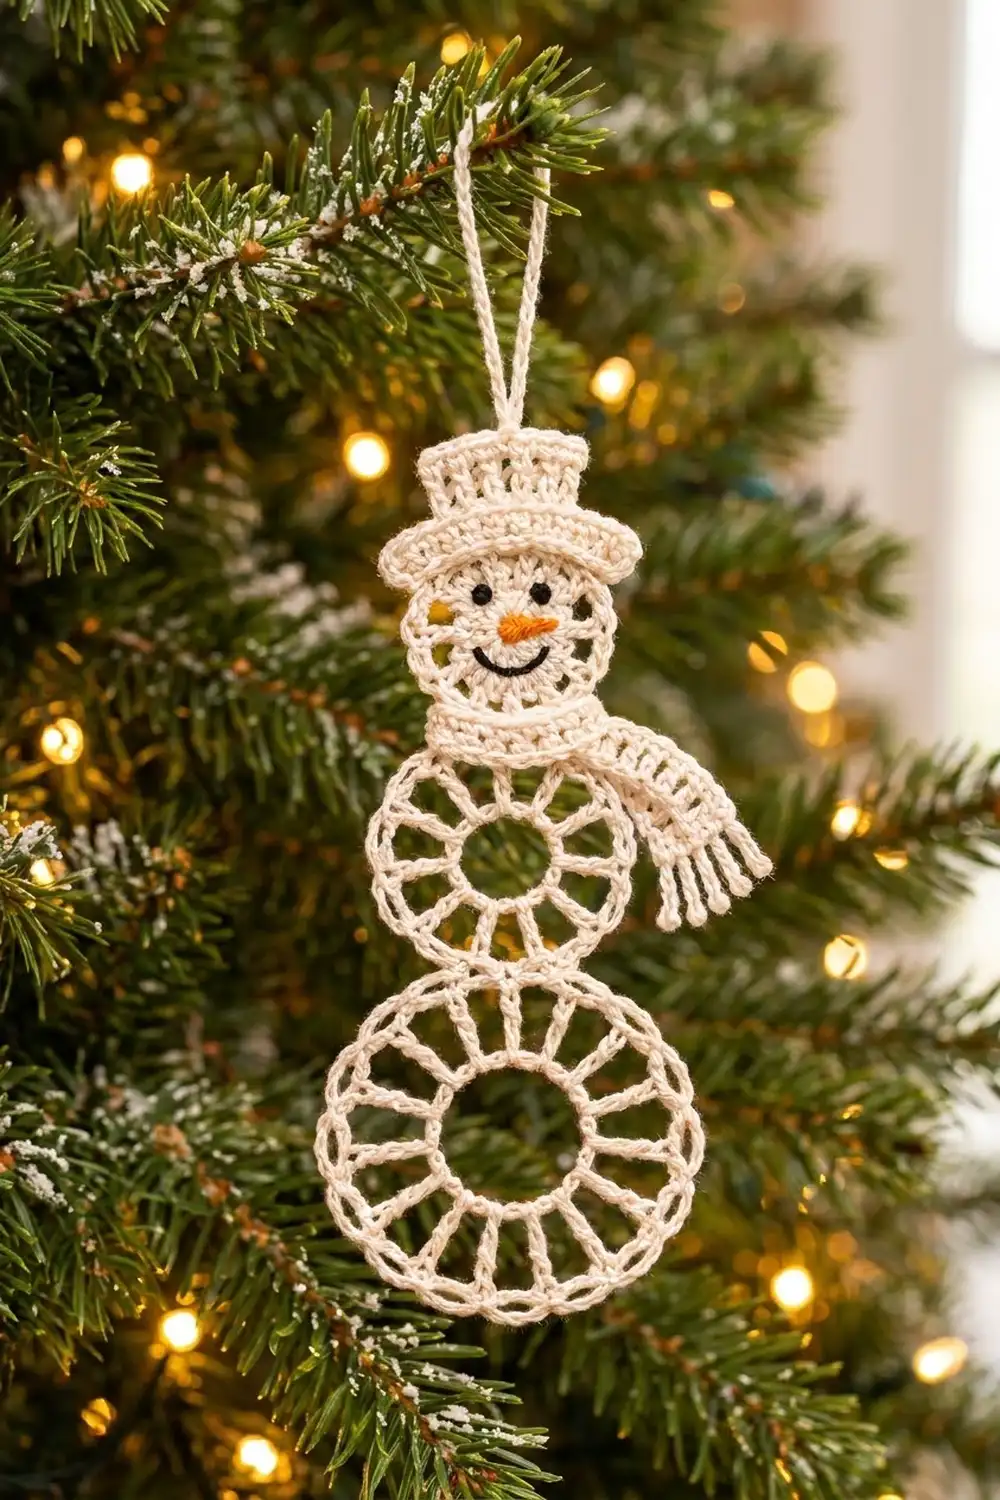
This lace snowman is built from three open rings stacked from small to large, like a snowman made of snowflakes. The head has a solid center for the face. The body and base keep their open centers so the tree lights shine through. A small top hat, a ribbed scarf with fringe, and a hanging loop finish him off.
The sample is cream cotton with a black embroidered face and an orange carrot nose. It works just as well in pale blue, lavender, or soft pink. Use one color for the whole snowman and keep the face colors the same.
This pattern uses US crochet terms. The finished ornament is 7.5 in (19.1 cm) tall from the bottom of the base to the top of the hat, and 2.75 in (7.0 cm) wide at the base. With the loop, it hangs 10 in (25.4 cm) long.
Construction is simple. You crochet the three rings up to their spoke rounds. Then you work each ring’s single crochet rim, joining the rings together as you go. Last, you make the hat, scarf, and loop, sew them on, and embroider the face.
Finished Size and Construction
- Finished size: 7.5 in (19.1 cm) tall x 2.75 in (7.0 cm) wide; 10 in (25.4 cm) including the hanging loop
- Skill level: Easy to Intermediate
- Terminology: US crochet terms
- Yarn weight: #1 Super Fine (fingering-weight mercerized cotton or size 3 crochet thread)
- Hook: 2.25 mm (B/1)
- Number of pieces: 6 crocheted pieces (head ring, body ring, base ring, hat, scarf, loop) making one ornament
- Layout: 3 rings stacked vertically, 1 column
- Ring sizes: head 1.75 in (4.4 cm), body 2.25 in (5.7 cm), base 2.75 in (7.0 cm)
- Size before border: head 1.5 in (3.8 cm), body 2 in (5.1 cm), base 2.5 in (6.4 cm)
- Border depth: 1 round of single crochet, about 0.125 in (0.3 cm)
Materials
Choose a smooth, mercerized cotton. It gives crisp spokes, blocks flat, and holds its shape on the tree. Avoid fuzzy or very stretchy yarn because the open lace will lose definition.
- Main color (cream, or pale blue, lavender, or pink): 10 g (about 36 m)
- Black embroidery floss: less than 1 g (about 1 m), for eyes and smile
- Orange embroidery floss: less than 1 g (about 1 m), for the nose
All quantities include a margin for tails and a gauge swatch.
Tools:
- 2.25 mm (B/1) crochet hook
- Tapestry needle
- Sharp embroidery needle
- 4 stitch markers
- Scissors
- Blocking mat, rustproof pins, and a spray bottle
- Optional: fabric stiffener or starch
Abbreviations (US Terms)
- ch – chain
- sl st – slip stitch
- sc – single crochet
- dc – double crochet
- tr – treble crochet (yarn over twice)
- dtr – double treble crochet (yarn over 3 times)
- MR – magic ring
- sp(s) – space(s)
- st(s) – stitch(es)
Special stitch – sc-join: Insert the hook into the stitch or space of the ring you are working on, as usual. Then insert it through the matching rim sc of the finished ring, from front to back. Yarn over, pull up a loop through everything, and complete the sc. The two rims are now linked by one stitch.
Gauge and Checkpoints
Gauge: 28 sc and 28 rows = 4 in (10.2 cm), which is 7 sc and 7 rows = 1 in (2.5 cm).
Test with the base ring first. It is the largest piece and shows any gauge problem quickly. Measure each ring flat and lightly pressed, without stretching.
| Piece | After round | Diameter |
|---|---|---|
| Base | Rnd 2 | 1.2 in (3.0 cm) |
| Base | Rnd 3 | 2.5 in (6.4 cm) |
| Body | Rnd 2 | 1 in (2.5 cm) |
| Body | Rnd 3 | 2 in (5.1 cm) |
| Head | Rnd 3 | 0.8 in (2.0 cm) |
| Head | Rnd 4 | 1.5 in (3.8 cm) |
If your ring is too big: go down to a 2.0 mm hook, or pull up the loops of the long spoke stitches a little less.
If your ring is too small: go up to a 2.5 mm hook. If the ring cups, your spokes are too short; pull up each loop a little taller.
A difference of 0.125 in (0.3 cm) is fine. Blocking will even it out.
Head Ring
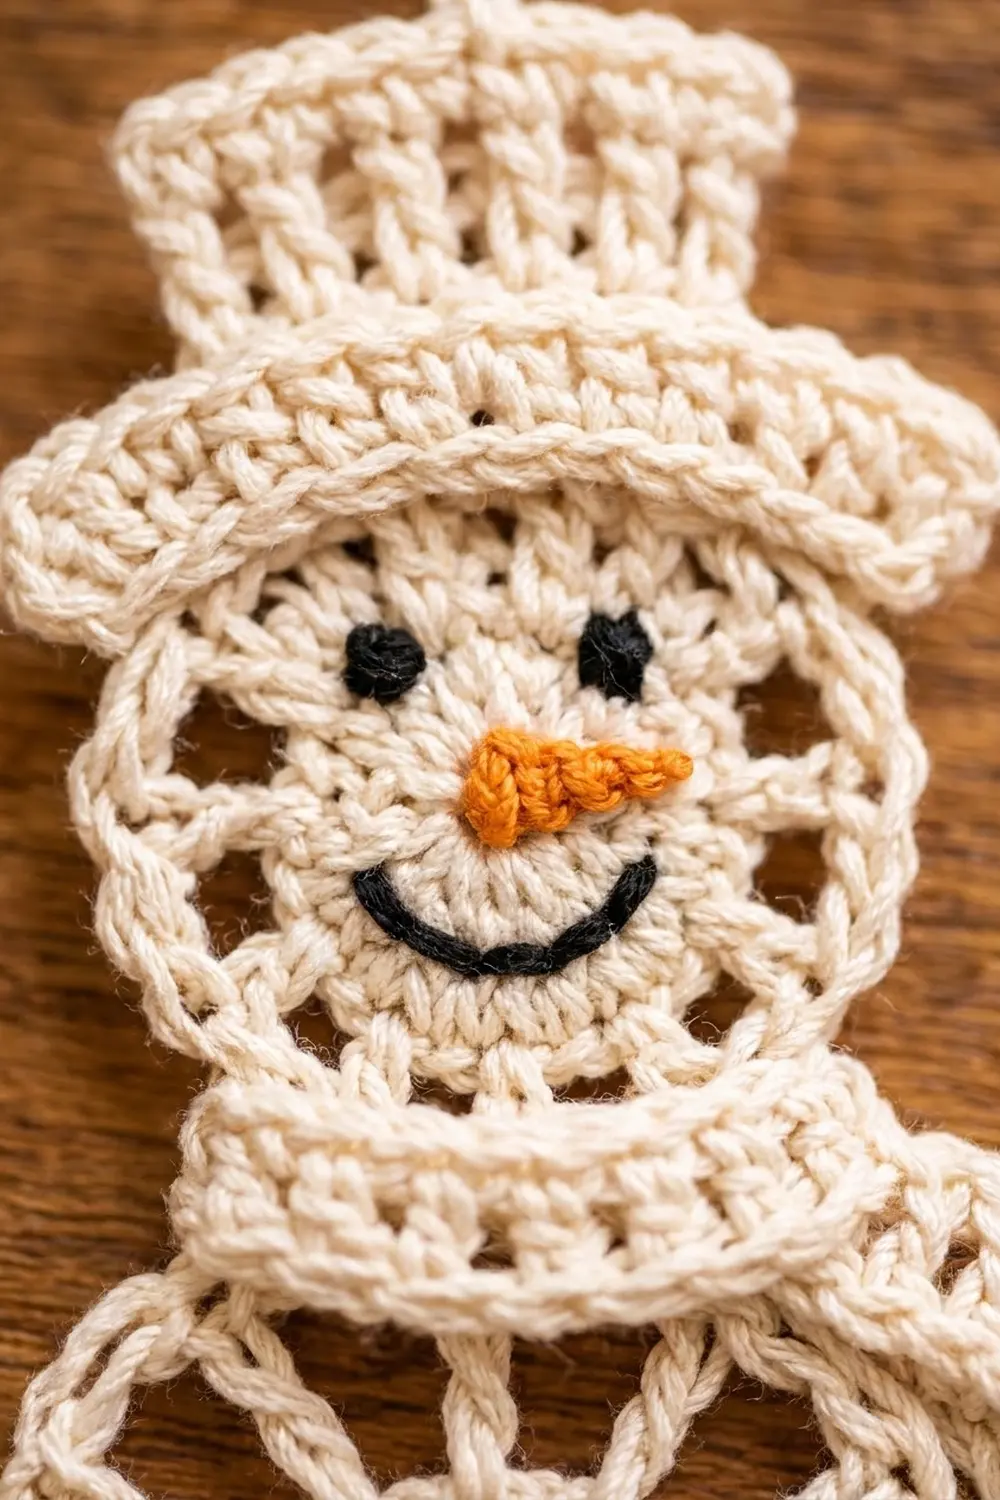
The head has a solid center so the face has a place to sit.
Rnd 1: MR, ch 1, 6 sc in ring, sl st to first sc to join. (6 sc)
Rnd 2: Ch 1, 2 sc in each st around, join. (12 sc)
Rnd 3: Ch 1, [sc in next st, 2 sc in next st] 6 times, join. (18 sc)
Checkpoint: 0.8 in (2.0 cm) across.
Rnd 4: Ch 4 (counts as dc + ch 1), [dc in next sc, ch 1] 17 times, sl st to 3rd ch of beginning ch-4. (18 dc, 18 ch-1 sps)
Checkpoint: 1.5 in (3.8 cm) across. Do not fasten off. Place the live loop on a marker and set the head aside.
Body Ring
Rnd 1: Ch 16, sl st to first ch to form a ring. (16 ch)
Rnd 2: Ch 1, sc in each ch around (into the chain, not around it), join. (16 sc)
Rnd 3: Ch 6 (counts as tr + ch 2), [tr in next sc, ch 2] 15 times, sl st to 4th ch of beginning ch-6. (16 tr, 16 ch-2 sps)
Checkpoint: 2 in (5.1 cm) across. Place the live loop on a marker.
Base Ring
Rnd 1: Ch 20, sl st to first ch to form a ring. (20 ch)
Rnd 2: Ch 1, sc in each ch around, join. (20 sc)
Rnd 3: Ch 7 (counts as dtr + ch 2), [dtr in next sc, ch 2] 19 times, sl st to 5th ch of beginning ch-7. (20 dtr, 20 ch-2 sps)
Checkpoint: 2.5 in (6.4 cm) across. Keep the live loop on a marker.
Hat
Row 1: Ch 15, sc in 2nd ch from hook and in each ch across. (14 sc)
Row 2: Ch 1, turn, sc in each st across. (14 sc)
The brim is now 2 in (5.1 cm) wide and about 0.3 in (0.8 cm) tall.
Row 3: Turn, sl st in each of next 4 sc, ch 3 (counts as dc), dc in next 7 sc. Leave the last 3 sc unworked. (8 dc)
The ch-3 sits on the 4th sc, so 3 brim stitches stay free on each side of the crown.
Row 4: Ch 3, turn, dc in next 7 sts. (8 dc)
Row 5: Ch 1, turn, sc in each st across. (8 sc)
Fasten off, leaving a 12 in (30.5 cm) tail for sewing. Checkpoint: 2 in (5.1 cm) wide at the brim, 1.14 in (2.9 cm) wide at the crown, about 1.1 in (2.8 cm) tall.
Scarf
Row 1: Ch 36, sc in 2nd ch from hook and in each ch across. (35 sc)
Row 2: Ch 3 (counts as dc), turn, dc in each st across. (35 dc)
Row 3: Ch 1, turn, sc in each st across. (35 sc)
Do not fasten off. You are now at one short end.
Fringe: Work 4 fringes along this short end. For each one: ch 8, sl st in 2nd ch from hook and in next 6 ch (7 sl sts), then sl st into the edge to anchor it. Anchor 1 fringe at the end of Row 3, 2 in the end of the Row 2 dc, and 1 at the end of Row 1. Fasten off and leave a 12 in (30.5 cm) tail.
Checkpoint: 5 in (12.7 cm) long, about 0.6 in (1.5 cm) wide, with 1 in (2.5 cm) fringe.
Hanging Loop
Row 1: Ch 36, sc in 2nd ch from hook and in each ch across. (35 sc)
Fasten off, leaving an 8 in (20.3 cm) tail. The strip is 5 in (12.7 cm) long and makes a 2.5 in (6.4 cm) loop when folded.
Make All Pieces
Make one of each piece in your main color:
- Head ring: 1 (Rnds 1–4)
- Body ring: 1 (Rnds 1–3)
- Base ring: 1 (Rnds 1–3)
- Hat: 1
- Scarf: 1
- Hanging loop: 1
The black and orange floss are only used for embroidery.
Layout (one vertical column, top to bottom):
[ loop ]
[ hat  ]
[ HEAD ]  1.75 in
[ BODY ]  2.25 in   <- scarf across HEAD/BODY join
[ BASE ]  2.75 in
Joining
You join the rings with the sc-join while you work each ring’s rim round (see Border, below). Each join links 3 rim stitches to 3 rim stitches, 1 to 1. No stitches are added or skipped, so each rim keeps its full count.
Order: Finish the base rim first with no joins. Work the body rim and join it to the base. Then work the head rim and join it to the body.
Matching the stitches: Lay the finished ring below the ring you are working, both right side up. The first 3 sts of the working ring go to the 3 top-center sts of the finished ring, in mirrored order: 1st st to the highest-numbered st, 3rd st to the lowest. Mark the 3 top-center sts before you start.
Tension: Keep the sc-joins at the same tension as the other rim stitches. If you pull them tight, the rings will overlap and pucker. If they are loose, the snowman will wobble at the neck and waist.
Size checkpoint: After all three rims are worked, the stacked rings measure 6.75 in (17.1 cm) tall: 1.75 + 2.25 + 2.75 in (4.4 + 5.7 + 7.0 cm).
Border (Rim Rounds)
Border gauge: 7 sc = 1 in (2.5 cm) along the outer curve.
Each rim is one round of sc: 1 sc in each spoke, plus a set number of sc in each chain space. Counts are given per half (the top half and the bottom half of each ring).
Base Rim (Rnd 4): Pick up the base’s live loop. Ch 1, [sc in next dtr, 2 sc in next ch-2 sp] 20 times, join to first sc. (60 sc: 30 per half)
Count from the first sc. Sts 31, 32, and 33 sit at the top center, across from st 2. Mark them. Fasten off.
Body Rim (Rnd 4): Pick up the body’s live loop. Place the body above the base. Ch 1, sc-join in the first tr to base st 33, sc-join in the next ch-2 sp to base st 32, sc-join in the same sp to base st 31. Then continue normally: [sc in next tr, 2 sc in next ch-2 sp] 15 times, join to first sc. (48 sc: 24 per half; sts 1–3 joined)
Mark body sts 25, 26, and 27 at the top center, across from st 2. Fasten off.
Head Rim (Rnd 5): Pick up the head’s live loop. Place the head above the body. Ch 1, sc-join in the first dc to body st 27, sc-join in the next ch-1 sp to body st 26, sc-join in the next dc to body st 25. Then continue normally: sc in next ch-1 sp, [sc in next dc, sc in next ch-1 sp] 16 times, join to first sc. (36 sc: 18 per half; sts 1–3 joined)
The head count is 3 joined + 1 + (16 x 2) = 36. Fasten off.
Why the math works: A flat ring needs about 3.14 times its mid-rim diameter in stitches. The head’s mid-rim is about 1.65 in (4.2 cm) across, which needs about 36 sts at 7 per inch. The body (about 2.15 in / 5.5 cm) needs 47, and the base (about 2.6 in / 6.6 cm) needs 57. The rims have 36, 48, and 60 sts. That small extra lets the spokes fan out without cupping or ruffling.
Assembly and Face
- Hat: Center the hat on top of the head. The brim (Rows 1–2) overlaps the head rim by about 0.35 in (0.9 cm). Whipstitch the brim edge and sides to the head. The hat adds 0.75 in (1.9 cm) of height.
- Loop: Fold the loop strip in half. Sew both ends to the center of the hat’s Row 5.
- Scarf: Lay the plain end of the scarf across the head/body join, covering the seam. The horizontal part is 2.25 in (5.7 cm) long. At the right edge, fold the scarf down at an angle so the 2.75 in (7.0 cm) tail and fringe hang along the right side of the body. Tack it along both long edges.
- Eyes: With black floss, work a French knot (3 wraps) on each side of Rnd 3 of the head, 0.5 in (1.3 cm) apart.
- Nose: With orange floss, satin-stitch a small triangle from the center of the head out toward the right, about 0.3 in (0.8 cm) long.
- Smile: With black floss, backstitch a curved line of 5 short stitches across the lower part of Rnd 3.
Weave in all ends through solid stitches, not through the spokes.
Final Blocking
- Spray the ornament until it is damp but not dripping.
- Pin it flat on the blocking mat, face up.
- Pin each ring at the end of every spoke so the spokes are straight and evenly spaced.
- Check the sizes: head 1.75 in (4.4 cm), body 2.25 in (5.7 cm), base 2.75 in (7.0 cm).
- Straighten the hat brim and pin the scarf fringe so it hangs straight.
- If you want a stiffer ornament, brush on a light layer of fabric stiffener.
- Let it dry completely before you unpin it.
Final Quality-Control Checklist
- Head has 36 rim sts, body has 48, base has 60
- Each join links exactly 3 sts to 3 sts
- Total height is 7.5 in (19.1 cm) to the top of the hat
- Base width is 2.75 in (7.0 cm)
- All spokes are straight and evenly spaced
- Hat is centered and the brim covers the head rim
- Scarf covers the head/body seam and the tail hangs on the right
- The 4 fringes are each 1 in (2.5 cm) long
- Eyes are level and the smile is centered
- The loop is secure and centered
- No loose ends show on the front
Troubleshooting
Ring cups like a bowl: Spokes are too short. Pull up the loops taller, or go up a hook size for the spoke round only.
Ring ruffles: Spokes are too long, or the rim is too loose. Go down a hook size for the rim.
Rings overlap at the joins: Your sc-joins are too tight. Redo them with a more relaxed tension.
Snowman leans to one side: The joins are not at the top center. Count again from st 1 and re-mark the 3 center sts.
Hat looks crooked: Check that 3 brim sts are free on each side of the crown. Then re-center it before sewing.
Face pulls the head out of shape: The embroidery is too tight. Loosen the stitches and block again.
Care
Hand wash in cool water with mild soap and lay flat to dry. If the ornament goes soft over time, block it again with a light spray of starch.
Final Notes
Here is how the measurements build up. At 7 sc per 1 in (2.5 cm), the rings measure 1.5, 2, and 2.5 in (3.8, 5.1, and 6.4 cm) before the border. The rims bring them to 1.75, 2.25, and 2.75 in (4.4, 5.7, and 7.0 cm). Joined, they stack to 6.75 in (17.1 cm). The hat adds 0.75 in (1.9 cm) for a total of 7.5 in (19.1 cm), and the loop brings the hanging length to 10 in (25.4 cm).
Make one in cream, then try a whole family in pastels for the tree.
Happy crocheting!