

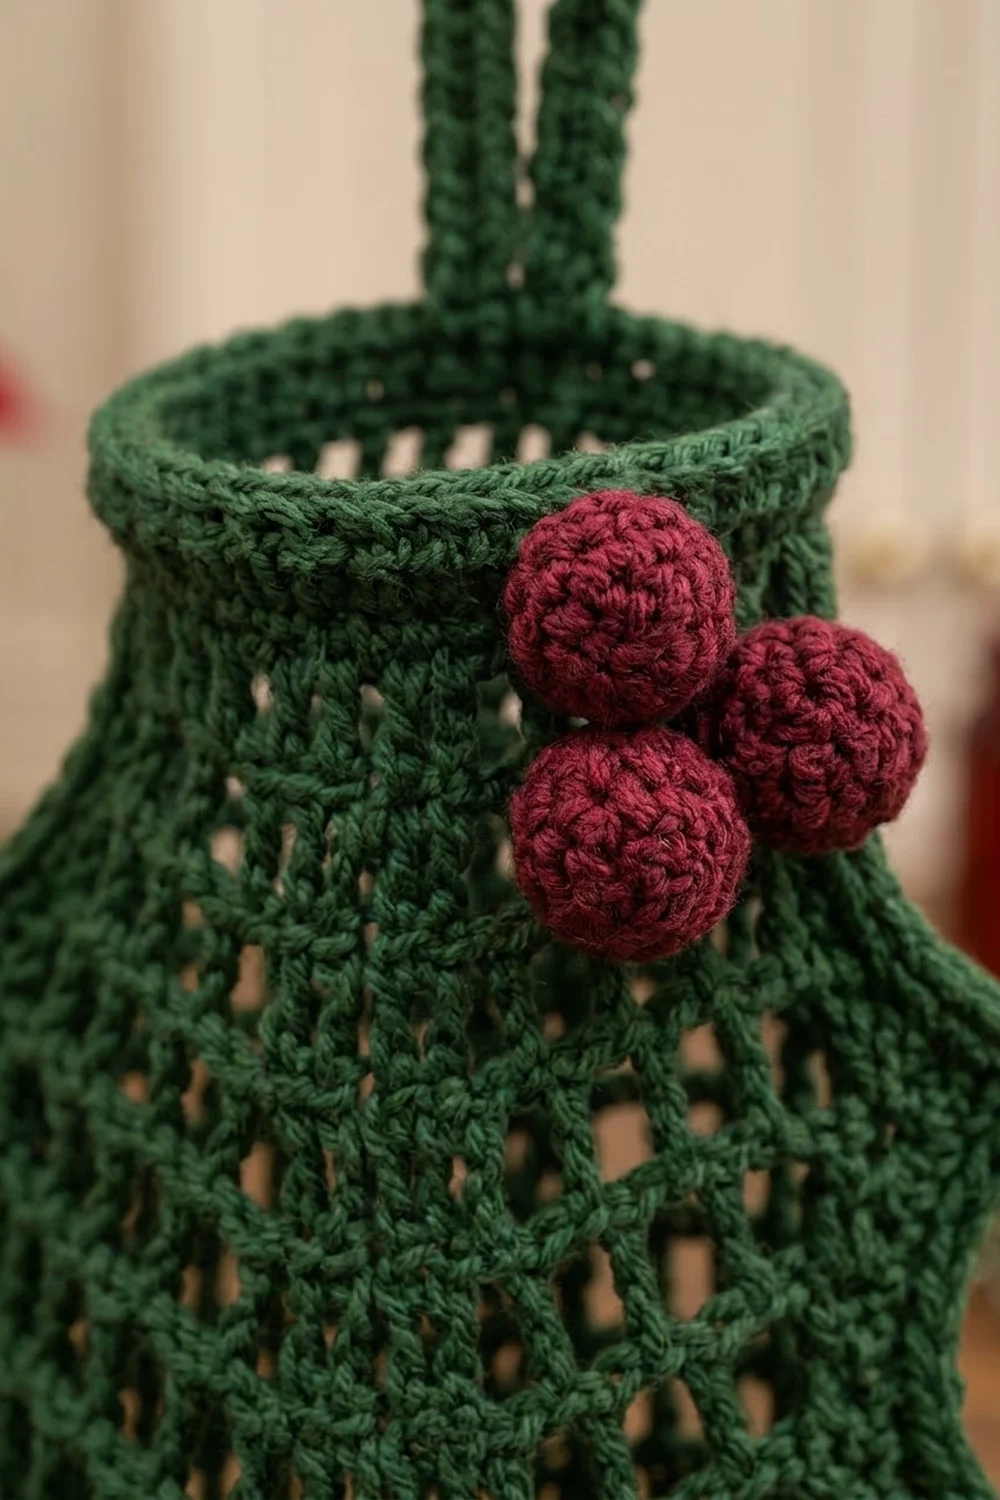
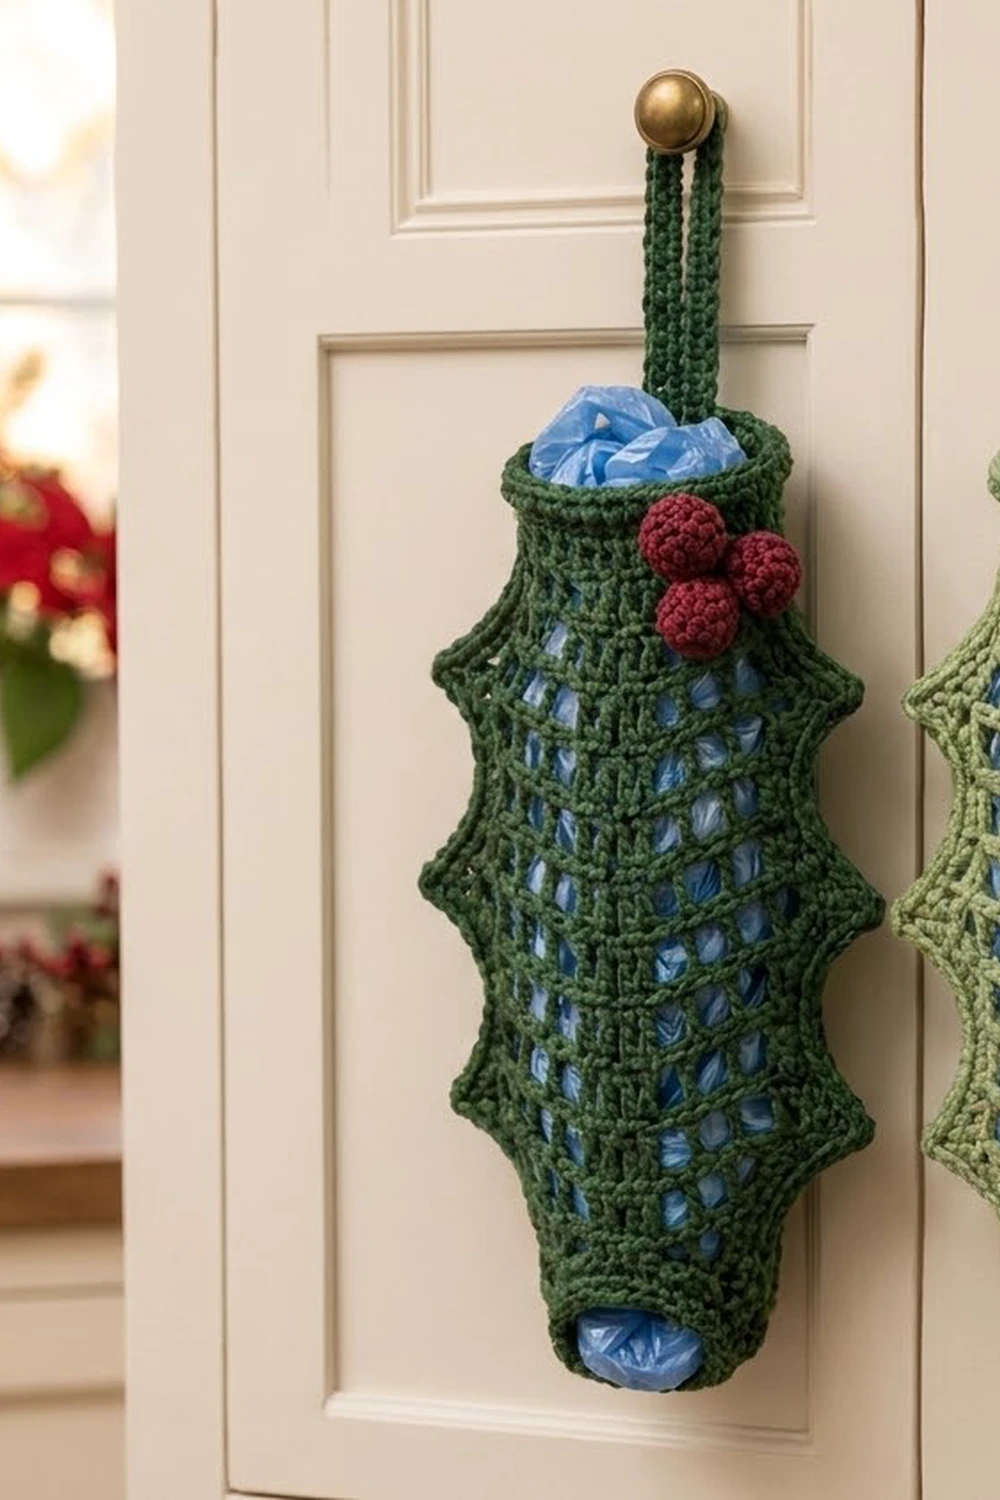
The Hollyberry Leaf Bag Holder is a hanging plastic-bag dispenser shaped like a big holly leaf. The body is an open mesh tube with a solid midrib down the front and sharp holly points along both side edges. It has firm single crochet bands at the top and bottom, a sturdy hanging loop, and a cluster of three plump berries near the top.
The sample is made in deep forest green with burgundy berries. It also looks lovely in soft sage green with the same berries. The style is cozy, practical holiday decor: you stuff bags in the top and pull them out through the bottom opening.
All instructions use US crochet terms. The finished holder is about 6 in (15.2 cm) wide across the flattened body and 7.5 in (19.1 cm) wide including the holly points. The body is 14 in (35.6 cm) tall, and the 3 in (7.6 cm) hanging loop brings it to 17 in (43.2 cm) overall.
Construction is simple:
1. Start at the bottom opening with a chain ring and work single crochet rounds.
2. Switch to mesh rounds that increase and then decrease at the two side folds.
3. Finish the body with single crochet rounds at the top.
4. Work a holly-point edging along each side fold, add the loop and sew on the berries.
Finished Size and Construction
- Finished size: 6 in (15.2 cm) wide flat, 7.5 in (19.1 cm) with points, 14 in (35.6 cm) tall body, 17 in (43.2 cm) with loop
- Skill level: Easy-intermediate
- Terminology: US
- Yarn weight: Worsted (#4), cotton or cotton blend
- Hook: 5.0 mm (US H-8)
- Number of pieces: 1 body (worked in one piece with its edging and loop) plus 3 small berries
- Layout: single standalone holder, no assembly of multiple panels
- Body size before edging: 6 in (15.2 cm) wide flat at the widest point, 14 in (35.6 cm) tall
- Edging depth: points stand out about 0.75 in (1.9 cm) from each side fold
- Openings: top and bottom are each 4 in (10.2 cm) wide flat
Materials
Choose a smooth worsted-weight cotton. Cotton holds the holly points crisply and doesn’t stretch out of shape when the holder is full. Acrylic also works, but the points will be softer.
- Main color (forest green or sage green): 110 g, about 190 m (208 yd)
- Berry color (burgundy): 10 g, about 17 m (19 yd)
- 5.0 mm (US H-8) crochet hook
- 3 stitch markers (2 for the side folds, 1 for the midrib)
- A small amount of fiberfill or green yarn scraps for stuffing the berries
- Yarn needle
- Scissors
- Measuring tape
Quantities include a margin of about 15 percent for your gauge swatch and small differences in tension.
Abbreviations (US Terms)
- ch – chain
- sl st – slip stitch
- sc – single crochet
- hdc – half double crochet
- dc – double crochet
- tr – treble crochet
- dc2tog – double crochet 2 together
- sc2tog – single crochet 2 together
- sk – skip
- sp – space
- MR – magic ring
- rep – repeat
Special stitches
- Mesh unit: (dc, ch 1). One mesh unit counts as 2 stitches.
- V-inc (increase): (dc, ch 1, dc, ch 1) in the marked side dc. Adds 1 mesh unit (2 sts).
- Mesh dec (decrease): dc2tog over the marked side dc and the next dc, skipping the ch-1 sp between them, then ch 1. Removes 1 mesh unit (2 sts).
- Picot: ch 3, sl st in 3rd ch from hook.
Gauge and Checkpoints
- Single crochet: 16 sc and 16 rounds = 4 in (10.2 cm)
- Mesh: 8 mesh units (16 sts) = 4 in (10.2 cm) around; 6 mesh rounds = 4.25 in (10.8 cm) tall
Test the bottom section first. Work Rounds 1–5, flatten the tube and measure it. It should be 4 in (10.2 cm) wide flat, which is 8 in (20.3 cm) around, and about 1.7 in (4.3 cm) tall.
Checkpoints (measured flat):
- After Round 4: 4 in (10.2 cm) wide, 1 in (2.5 cm) tall
- After Round 9: 6 in (15.2 cm) wide, about 4.5 in (11.4 cm) tall
- After Round 16: 6 in (15.2 cm) wide, about 9.5 in (24.1 cm) tall
- After Round 21: 4 in (10.2 cm) wide, 13 in (33.0 cm) tall
- After Round 25: 4 in (10.2 cm) wide, 14 in (35.6 cm) tall
If your swatch is too big, go down half a hook size. If it’s too small, go up half a hook size. If only the mesh height is off, change how tall you pull up your dc loops instead of changing hooks.
Body
Work in joined rounds with the right side facing, and don’t turn. The beginning ch-1 doesn’t count as a stitch. In mesh rounds, the beginning ch 4 counts as 1 dc plus ch 1, and the beginning ch 2 of a decrease round counts as part of the first mesh dec.
Bottom Band
Round 1: Ch 32. Sl st in the first ch to form a ring, taking care not to twist. Ch 1, sc in each ch around, sl st in first sc. (32 sc)
Rounds 2–4: Ch 1, sc in each sc around, sl st in first sc. (32 sc)
The foundation edge becomes the bottom dispensing opening.
Mesh Section
Round 5 (conversion round): Ch 4, sk next sc, dc in next sc, ch 1, sk next sc; rep from * 15 times, sl st in 3rd ch of beg ch-4.
Count: 16 dc (one in every other sc) + 16 ch-1 sps (replacing the skipped sc) = 32 sts (16 mesh units).
Place side marker A in the beg ch-4 column (dc 1) and side marker B in dc 9. Each half now has 8 mesh units. Flatten the tube so that A and B sit on the folds.
Midrib: On the front half, place the midrib marker in the ch-1 sp after dc 5. From Round 6 on, work a dc into the midrib position instead of ch 1 on every mesh round, directly above the midrib dc below. This makes a solid 2-dc column up the center front. The count doesn’t change, because one dc simply replaces one ch.
Round 6 (growth): Ch 4, dc in same st, ch 1 (V-inc made at A), dc in next dc, ch 1; rep to marker B, V-inc in B, dc in next dc, ch 1; rep to end, sl st in 3rd ch of beg ch-4. Move each side marker to the first dc of its V. (18 mesh units, 36 sts)
Round 7 (growth): Rep Round 6. (20 mesh units, 40 sts)
Round 8 (growth): Rep Round 6. (22 mesh units, 44 sts)
Round 9 (growth): Rep Round 6. (24 mesh units, 48 sts)
Checkpoint: 48 sts = 12 in (30.5 cm) around, so the body is 6 in (15.2 cm) wide flat.
Rounds 10–16 (even): Ch 4, dc in next dc, ch 1; rep around, keeping the midrib dc and side markers stacked, sl st in 3rd ch of beg ch-4. (24 mesh units, 48 sts)
Round 17 (decrease): Ch 2, sk ch-1 sp, dc in next dc (the beg ch-2 + dc count as the first mesh dec), ch 1, dc in next dc, ch 1; rep to marker B, mesh dec at B, dc in next dc, ch 1; rep to end, sl st in first dc. Move the markers up to the decreased stitches. (22 mesh units, 44 sts)
Round 18 (decrease): Rep Round 17. (20 mesh units, 40 sts)
Round 19 (decrease): Rep Round 17. (18 mesh units, 36 sts)
Round 20 (decrease): Rep Round 17. (16 mesh units, 32 sts)
Round 21 (even): Rep Round 10. (16 mesh units, 32 sts)
You now have 17 mesh rounds (Rounds 5–21), each with one dc sitting on each side fold.
Top Band
Round 22 (conversion round): Ch 1, sc in each dc and each ch-1 sp around (work 1 sc in each midrib dc), sl st in first sc.
Count: 16 sc (one per dc) + 16 sc (one per ch-1 sp or midrib position) = 32 sc.
Rounds 23–25: Ch 1, sc in each sc around, sl st in first sc. (32 sc) Fasten off.
Hanging Loop
Find the 4 center sts on the back half of Round 25. Join yarn in the first of them.
Row 1: Ch 1, sc in same st and next 3 sts, turn. (4 sc)
Rows 2–24: Ch 1, sc in each sc across, turn. (4 sc)
The strap is 1 in (2.5 cm) wide and 6 in (15.2 cm) long. Fold it in half toward the inside and sew the last row to the inside of the top band, just below Row 1. This forms a 3 in (7.6 cm) loop.
Berries (make 3)
Use burgundy.
Round 1: 6 sc in MR. (6 sc)
Round 2: 2 sc in each sc around. (12 sc)
Round 3: Sc in each sc around. (12 sc)
Round 4: Sc2tog 6 times. (6 sc)
Stuff firmly, fasten off with a long tail and close the hole. Each berry is about 1 in (2.5 cm) across.
Border: Holly-Point Edging
Work the edging separately along each side fold. Every mesh round has one dc on the fold, so each side has 17 fold posts (Rounds 5–21) to work around.
Border gauge: 3 sc worked around one fold dc post cover about 0.7 in (1.8 cm). That matches the height of one mesh round, so the edge stays flat between the points.
Point: Work (hdc, dc, picot, dc, hdc) around one fold post. (4 sts + 1 picot)
Scallop post: Work 3 sc around one fold post. (3 sc)
Edging (each side): Flatten the holder with the side fold facing you. Join green with a sl st into the fold sc at the top of Round 4.
- Post 1 (Round 5): point
- Posts 2–4: scallop posts
- Post 5 (Round 9): point
- Posts 6–8: scallop posts
- Post 9 (Round 13): point
- Posts 10–12: scallop posts
- Post 13 (Round 17): point
- Posts 14–16: scallop posts
- Post 17 (Round 21): point
Sl st into the fold sc of Round 22 and fasten off. Repeat on the second side fold.
Count per side: 5 points × 4 sts = 20 sts, plus 12 scallop posts × 3 sc = 36 sts, for a total of 56 sts and 5 picots. Both sides together have 112 sts and 10 picots.
Why the math works: The 17 fold posts are 5 point posts plus 12 scallop posts. That gives 4 scallops of exactly 3 posts each, with a point at both ends of the mesh section. The extra stitches packed into each point post make it flare out about 0.75 in (1.9 cm). The shorter sc between the points create the curved inner edge of a holly leaf.
Final Blocking
- Weave in all ends except the berry tails.
- Soak the holder in cool water, then press out the excess water in a towel.
- Slip a rolled towel inside so the body lies flat at 6 in (15.2 cm) wide.
- Pin through each picot to hold each point 0.75 in (1.9 cm) out from the fold.
- Check the length: 14 in (35.6 cm) from the bottom edge to the top edge.
- Let the holder dry completely, then remove the pins.
- Sew the three berries in an overlapping cluster on the front, just below the top band and about 1 in (2.5 cm) in from the right fold.
Final Quality-Control Checklist
- The bottom and top bands each have 32 sc and lie 4 in (10.2 cm) wide flat.
- The widest point is 6 in (15.2 cm) flat and 7.5 in (19.1 cm) across the points.
- The body is 14 in (35.6 cm) tall, and the loop adds 3 in (7.6 cm).
- The midrib runs in a straight line up the center front.
- Each side has 5 points and 4 even scallops.
- The side folds line up with the edging, with no twist.
- The loop is sewn securely through both layers of the strap.
- The berries are firm and tightly stitched on.
Troubleshooting
The tube spirals or twists. Your side markers drifted. Keep each marker on the fold dc and move it up every round.
The midrib wanders. Always place the midrib dc into the midrib dc below, never just by counting stitches.
The mesh holes look uneven. Keep each ch-1 the same size as your dc tops, and don’t pull it tight.
The points flop over. Use cotton and block with pins through the picots. You can also work the point dc as tr for extra height.
The edging ruffles between points. Work 2 sc instead of 3 around each scallop post.
The edging puckers the fold. Loosen your tension, or go up half a hook size for the edging only.
Bags fall out of the bottom. Work one extra round of sc on the foundation edge, with a few sc2tog spaced evenly, to tighten it slightly.
Care
Hand wash in cool water and lay flat to dry, reshaping the points while damp. Avoid tumble drying, which can soften the holly edge.
Final Notes
The measurement chain is simple:
– 32 sc make a base 4 in (10.2 cm) wide flat.
– Four growth rounds take the mesh to 48 sts, or 6 in (15.2 cm) flat, and seven even rounds hold that width.
– Four decrease rounds bring it back to 32 sts.
– Four sc rounds close the body at 14 in (35.6 cm).
– The 17 fold posts on each side carry 5 points and 4 scallops.
– A 3 in (7.6 cm) loop and three berries finish the holder at 17 in (43.2 cm) overall.
Happy crocheting!