

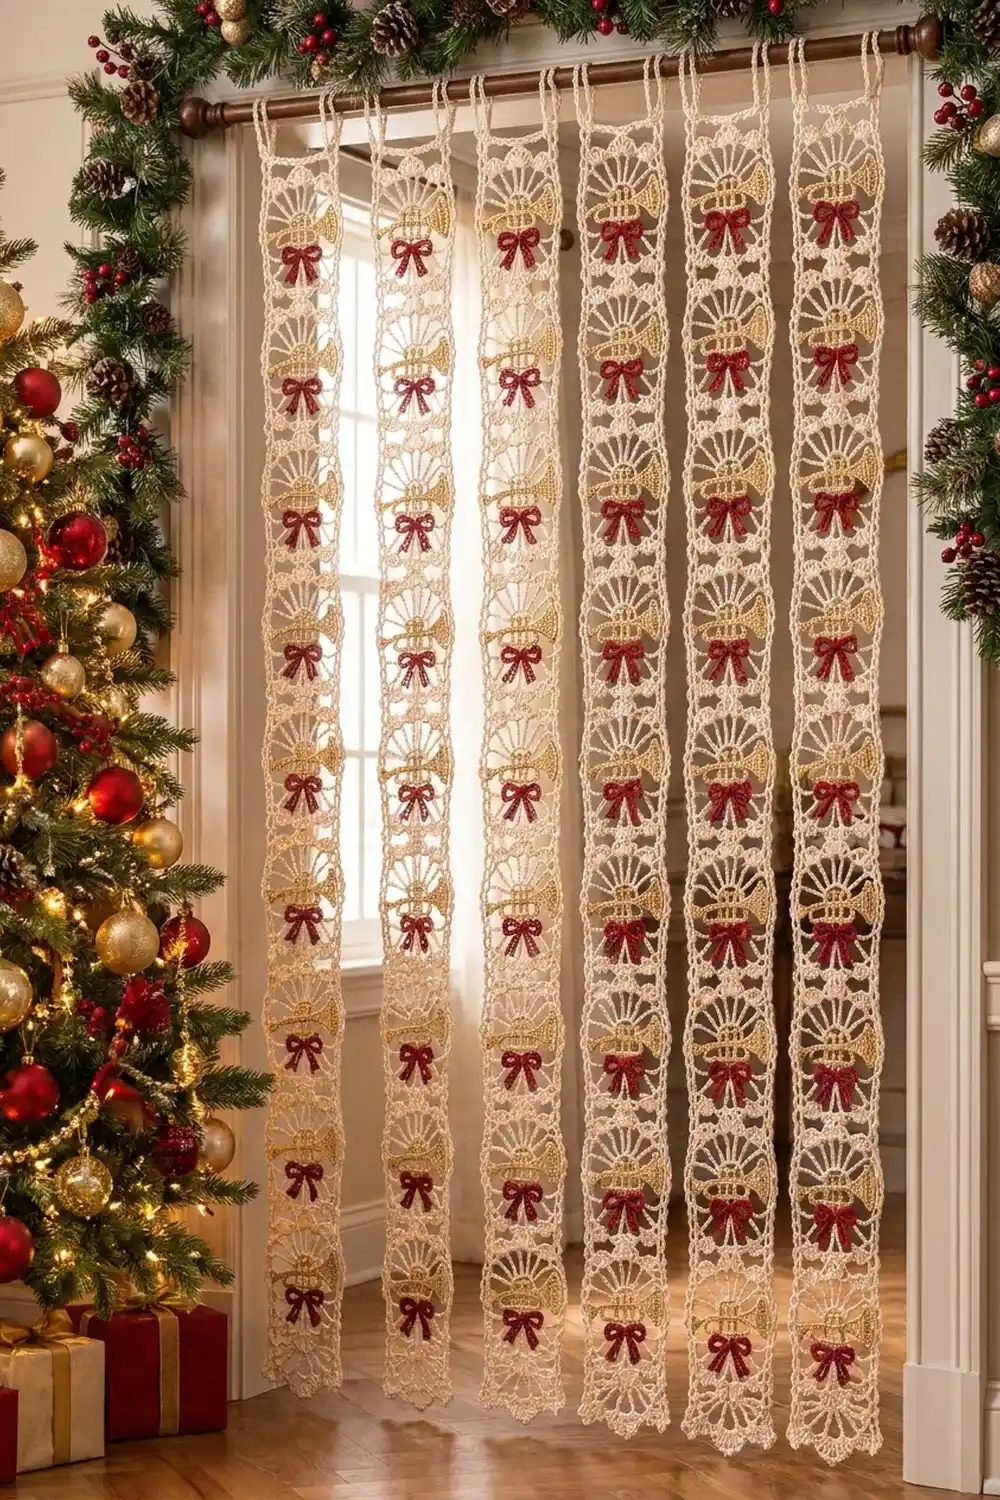
The Golden Fanfare Lace Strip is a long hanging panel of five airy lace motifs, each one carrying a small gold trumpet with a red bow tied beneath it. It works as a door decoration, a window hanging, or one strand of a festive bead-style curtain.
The palette is cream, gold, and deep red. The cream lace stays light and open: each motif is a sunburst of long spokes framed by chain loops, with tiny shell scallops where the motifs meet. The trumpets and bows add solid color and texture against the openwork.
This pattern uses US crochet terms. The finished strip measures 4.5 in (11.4 cm) wide and 21 in (53.3 cm) long, or 22.5 in (57.2 cm) including the hanging loops.
You will make five lace motifs, joining each one to the one before it on its last round. Then you’ll work a two-round chain-mesh border around the whole strip, crochet five trumpets and five bows, and sew them on.
Finished Size and Construction
- Finished size: 4.5 x 21 in (11.4 x 53.3 cm); 22.5 in (57.2 cm) long with hanging loops
- Skill level: Intermediate
- Terminology: US crochet terms
- Yarn weight: Fingering / #1 super fine cotton
- Hook: 2.25 mm (US B-1)
- Number of pieces: 5 lace motifs, 5 trumpets, 5 bows
- Layout: 1 motif wide x 5 motifs tall
- Motif size: 3.5 x 4 in (8.9 x 10.2 cm), blocked
- Size before border: 3.5 x 20 in (8.9 x 50.8 cm)
- Border depth: 0.5 in (1.3 cm) per side
Materials
Choose a mercerized cotton in fingering weight, about 170 m per 50 g. Mercerized cotton gives crisp spokes and holds its shape well after blocking. Avoid fuzzy or very stretchy fibers, because the lace will sag when it hangs.
- Cream: 35 g (approx. 120 m) for motifs and border
- Gold: 10 g (approx. 34 m) for trumpets
- Red: 8 g (approx. 27 m) for bows
These quantities include a margin of about 15 percent for swatching and joining.
Tools:
– 2.25 mm (US B-1) crochet hook
– Tapestry needle
– Sewing pins and scissors
– Blocking mat and rust-proof pins
– Spray bottle and light spray starch (optional)
Abbreviations (US Terms)
- ch – chain
- sl st – slip stitch
- sc – single crochet
- hdc – half double crochet
- dc – double crochet
- tr – treble crochet (yo twice)
- dtr – double treble crochet (yo 3 times)
- sp(s) – space(s)
- st(s) – stitch(es)
- beg – beginning
Special stitch – Shell: (2 dc, ch 2, 2 dc) all in the same space.
Corner fan: (3 dc, ch 3, 3 dc) all in the same corner loop.
Gauge and Checkpoints
Make one complete motif first and measure it before you commit to the full strip. Lace gauge is checked by size at each round:
- After Round 1: 1.25 in (3.2 cm) across
- After Round 2: 2.75 in (7.0 cm) across
- After Round 3: about 3 in (7.6 cm) square
- After Round 4, pinned flat: 3.5 x 4 in (8.9 x 10.2 cm)
If your motif is more than 0.25 in (0.6 cm) too big, go down to a 2 mm hook. If it is more than 0.25 in (0.6 cm) too small, go up to a 2.5 mm hook. Keep the dtr spokes upright and even. Loose spokes are the most common cause of oversized motifs.
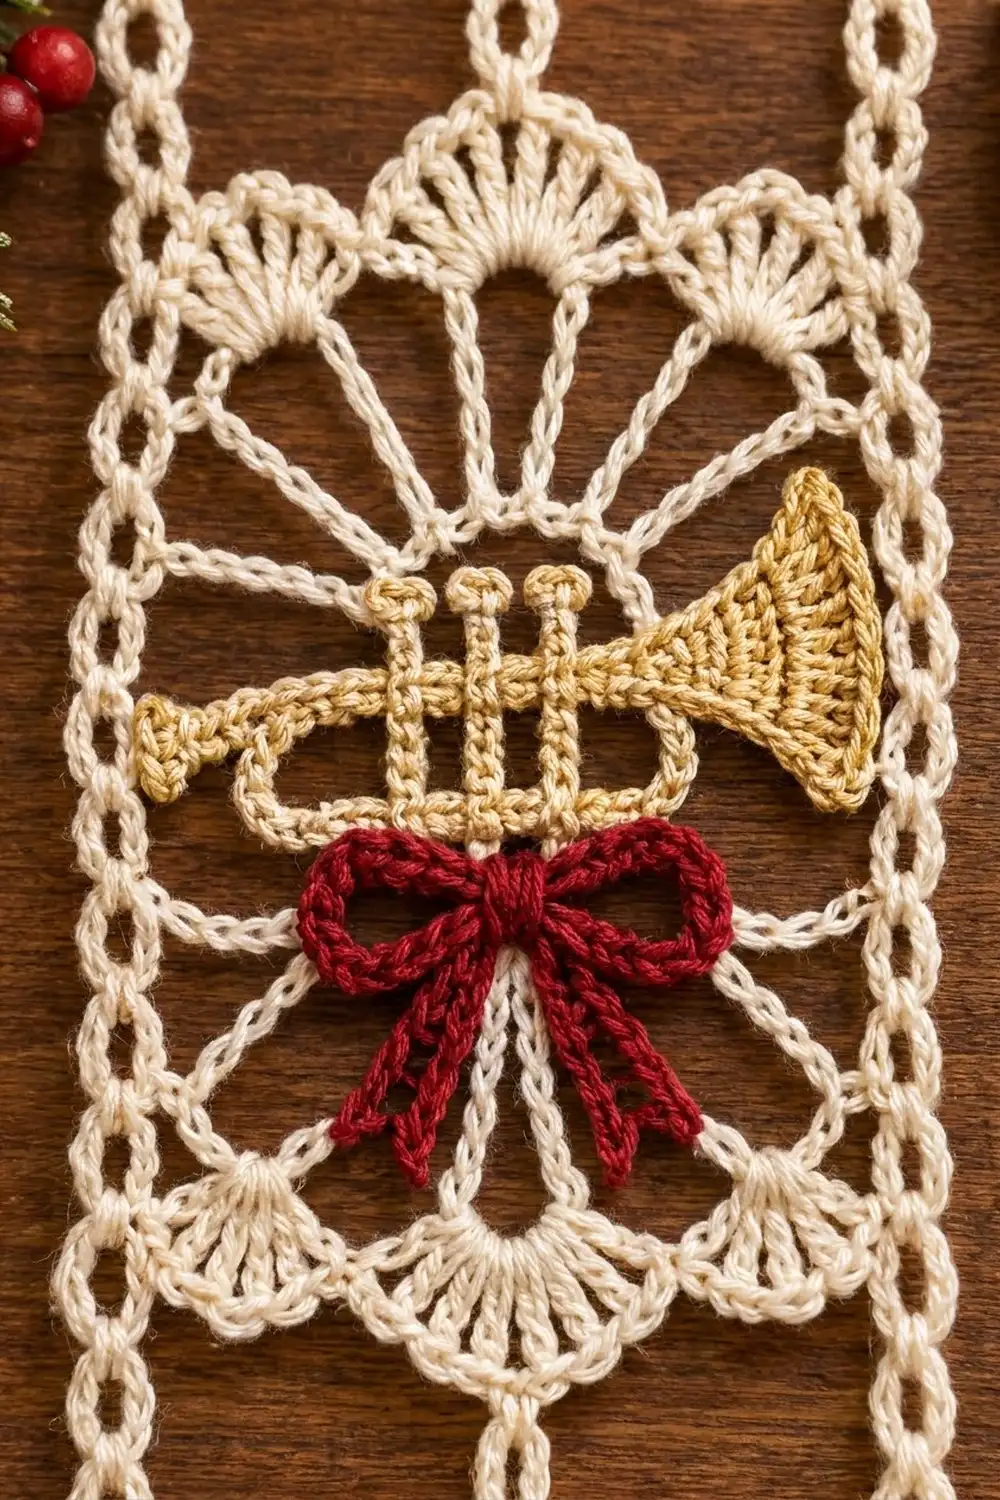
Lace Motif (Make 5)
Use cream throughout.
Round 1: Ch 6, sl st in first ch to form a ring. Ch 4 (counts as tr), 23 tr in ring, join with sl st to top of beg ch-4. (24 tr)
Round 2: Ch 5 (counts as dtr), ch 2, dtr in next tr, ch 2 23 times, join with sl st to 3rd ch of beg ch-5. (24 dtr, 24 ch-2 sps)
These are the sunburst spokes. Each spoke should be straight and about 0.75 in (1.9 cm) long.
Round 3 (squaring round): Sl st in next ch-2 sp; this is your first corner sp. Ch 1, (sc, ch 7, sc) in corner sp, [ch 4, sc in next ch-2 sp] 5 times, ch 4; the next ch-2 sp is the next corner sp. Repeat from * 3 more times. Join with sl st to first sc.
The 24 spaces split into 4 corner sps and 4 groups of 5. (28 sc, 4 ch-7 corner loops, 24 ch-4 loops: 6 per edge)
Round 4 for Motif 1 (edging round): Sl st in first 3 ch of the next ch-7 loop. Ch 3 (counts as dc), (2 dc, ch 3, 3 dc) in same loop: first corner fan made.
- Shell edge: Shell in each of next 6 ch-4 loops.
- Corner: Corner fan in next ch-7 loop.
- Mesh side: Ch 5, sc in next ch-4 loop, ch 5 6 times.
- Corner: Corner fan in next ch-7 loop.
- Shell edge: Shell in each of next 6 ch-4 loops.
- Corner: Corner fan in next ch-7 loop.
- Mesh side: Ch 5, sc in next ch-4 loop, ch 5 6 times.
Join with sl st to top of beg ch-3. Fasten off.
Round 4 totals: 72 dc (24 in corner fans + 24 in each shell edge), 12 sc, 4 ch-3 corner sps, 12 ch-2 shell sps, 14 ch-5 loops (7 per side).
The two shell edges become the top and bottom of the motif. The two mesh sides become the long sides of the strip.
Per-side count for the border: each mesh side has 7 ch-5 loops plus its 2 corner ch-3 sps, so 9 spaces per side, corners included.
Make All Pieces
- Cream: 5 lace motifs (1 complete, 4 joined as you go)
- Gold: 5 trumpets
- Red: 5 bows
Layout, top to bottom:
[ Motif 1 ]
[ Motif 2 ]
[ Motif 3 ]
[ Motif 4 ]
[ Motif 5 ]
Joining (Join-As-You-Go)
Motifs 2 to 5 are joined to the bottom shell edge of the previous motif while you work their own Round 4. Work Rounds 1 to 3 as for Motif 1. Then work Round 4 as written, joining along the first corner, shell edge, and second corner:
- Joined corner fan: 3 dc, ch 1, sl st in the matching corner ch-3 sp of the previous motif, ch 1, 3 dc.
- Joined shell: 2 dc, ch 1, sl st in the matching ch-2 shell sp of the previous motif, ch 1, 2 dc. Repeat in each of the 6 shells.
- Finish the rest of the round unjoined.
Each seam has 8 join points: 2 corners and 6 shells. The ch 1, sl st, ch 1 sequence replaces the ch-2 or ch-3 and adds no stitches, so all motif counts stay as written.
Stitch-to-stitch logic: shell 1 joins to shell 6 of the previous motif’s edge as you look across it, so the scallops line up point to point. Lay the motifs right side up and check this before each join.
Tension: keep the joining sl st snug but not tight. A tight join puckers the seam, and a loose one lets the motifs drift apart when the strip hangs.
Checkpoint: the joined strip measures 3.5 x 20 in (8.9 x 50.8 cm) when pinned flat, which is 5 motifs x 4 in (10.2 cm).
Border
Border gauge: each long side has 45 ch-5 loops over 20 in (50.8 cm), about 1 loop every 0.44 in (1.1 cm), or 9 loops per 4 in (10.2 cm) motif.
Round 1: With right side facing, join cream in the top corner ch-3 sp of Motif 1 at the start of a long side. Ch 1.
- Long side: sc in sp, ch 5 in every space down the side: in each motif, the top corner sp, the 7 ch-5 loops, and the bottom corner sp. At each seam, work into each motif’s own corner sp on its own side of the join. (5 motifs x 9 = 45 sc and 45 ch-5 loops)
- Bottom short edge: sc in next ch-2 shell sp, ch 5 6 times. (6 sc, 6 ch-5 loops)
- Second long side: work as for the first long side. (45 sc, 45 ch-5 loops)
- Top short edge: sc in next ch-2 shell sp, ch 5 6 times. (6 sc, 6 ch-5 loops)
Join with sl st to first sc. (102 sc, 102 ch-5 loops)
Each ch-5 belongs to the sc before it, so the last loop of each edge turns the corner by itself. No extra corner stitches are added.
Round 2: Sl st in first 3 ch of next loop. Ch 1, sc in same loop, ch 5. Then sc in next loop, ch 5 in every loop around, except in the first and last loops of the top short edge, where you work (sc, ch 18, sc, ch 5) to make a hanging loop. Join with sl st to first sc. Fasten off.
Round 2 totals:
– Long sides: 45 sc, 45 ch-5 loops each
– Bottom edge: 6 sc, 6 ch-5 loops
– Top edge: 8 sc, 6 ch-5 loops, 2 ch-18 hanging loops
– Total: 104 sc, 102 ch-5 loops, 2 hanging loops
Why the math works: the border’s long-side count comes straight from the motif: 9 spaces per side, corners included, x 5 motifs = 45. No seam stitches are added. The short edges use the 6 shell spaces already on Motif 1 and Motif 5. Two mesh rounds add 0.5 in (1.3 cm) per side, so the strip grows from 3.5 x 20 in (8.9 x 50.8 cm) to 4.5 x 21 in (11.4 x 53.3 cm). Each ch-18 loop hangs about 1.5 in (3.8 cm), for a total length of 22.5 in (57.2 cm).
Trumpet Appliqué (Make 5)
Use gold. Finished trumpet: about 2.75 in (7.0 cm) long, with a 1 in (2.5 cm) bell.
Row 1 (tube and bell): Ch 25. Sc in 2nd ch from hook and next 15 ch, hdc in next 2 ch, dc in next 2 ch, 2 tr in each of last 4 ch. (16 sc, 2 hdc, 2 dc, 8 tr = 28 sts)
Row 2 (bell rim): Ch 3 (counts as dc), turn, dc in first tr, 2 dc in each of next 7 tr. (16 dc) Sl st in next dc of Row 1. Do not turn.
The rim fans the bell open into the flared shape.
Lead pipe: Ch 14, sl st in the first sc of Row 1 (mouthpiece end). The chain hangs in a shallow curve under the tube.
Mouthpiece: In same st, (sc, ch 2, sl st). Fasten off.
Valves: Join gold with sl st in the 7th sc of Row 1, counting from the mouthpiece. Ch 4, sc in 2nd ch from hook, sl st in next 2 ch, sl st in same tube st, sl st in next 2 sc. Repeat twice more for 3 valves (on the 7th, 9th, and 11th sc). Fasten off and leave a 12 in (30.5 cm) tail for sewing.
Bow Appliqué (Make 5)
Use red. Finished bow: about 1.5 in (3.8 cm) wide and 1.75 in (4.4 cm) tall, including tails.
Loop 1: Ch 16, sl st in first ch to form a loop. Ch 1, sc in each of the 15 ch around the loop, sl st in center (the first ch).
Loop 2: Work as for Loop 1 from the same center ch, pointing the other way.
Tail 1: Ch 13, sc in 2nd ch from hook and next 11 ch (12 sc), sl st in center.
Tail 2: Work as for Tail 1, angled away from Tail 1.
Knot: Wrap the yarn 4 times around the center, pull it tight, and secure it on the back. Leave a 10 in (25.4 cm) tail.
Attaching the Appliqués
Pin each trumpet horizontally across the center of its motif, bell to the right, so it covers the sunburst ring. Pin a bow directly under the middle of the trumpet, with its loops just touching the lead pipe. Whipstitch both pieces to the spokes using the matching tails, catching only the back loops so the stitches stay hidden. Sew through the spokes only, not across open spaces, so the lace still lies flat.
Final Blocking
- Wet the strip and press out the water in a towel. Do not wring it.
- Lay it right side up on the blocking mat.
- Pin the width to 4.5 in (11.4 cm) and the length to 21 in (53.3 cm).
- Pin each motif seam so the motifs are evenly 4 in (10.2 cm) apart.
- Pin out every ch-5 border loop and each bottom scallop.
- Straighten the spokes so they radiate evenly.
- Shape each trumpet bell open with your fingers.
- Spray lightly with starch if you want crisper lace.
- Let it dry completely before you unpin.
Final Quality-Control Checklist
- Each motif has 24 spokes, 6 shells per shell edge, and 7 ch-5 loops per side.
- All 4 seams have 8 join points.
- Each long side of the border has 45 loops.
- The strip measures 4.5 x 21 in (11.4 x 53.3 cm).
- Both hanging loops are the same size.
- All trumpets face the same way and all bows are centered.
- All ends are woven in securely.
Troubleshooting
- Motif cups: Round 2 is too tight. Loosen your dtr spokes or go up a hook size.
- Motif ruffles: your chains are too loose. Go down a hook size for Rounds 3 and 4.
- Seams gap: the joining sl sts are loose. Redo them with snug tension.
- Border waves: check that you have 45 loops per side, not extra loops at the seams.
- Bell won’t flare: you are missing increases in Row 2. Recount to 16 dc.
- Strip twists when hung: block again and pin both long edges straight.
Care
Hand wash in cool water with mild soap, then reshape and dry flat. Store it rolled or laid flat rather than folded, so the spokes don’t crease.
Final Notes
The measurement chain is simple. Each motif blocks to 3.5 x 4 in (8.9 x 10.2 cm), and five of them make 3.5 x 20 in (8.9 x 50.8 cm). The border’s 9 spaces per side x 5 motifs give 45 loops per long side. Two mesh rounds bring the strip to 4.5 x 21 in (11.4 x 53.3 cm), and the hanging loops bring it to 22.5 in (57.2 cm). If one motif measures right, the whole strip will too.
To fill a doorway, make several strips and hang them side by side from a rod.
Happy crocheting!