

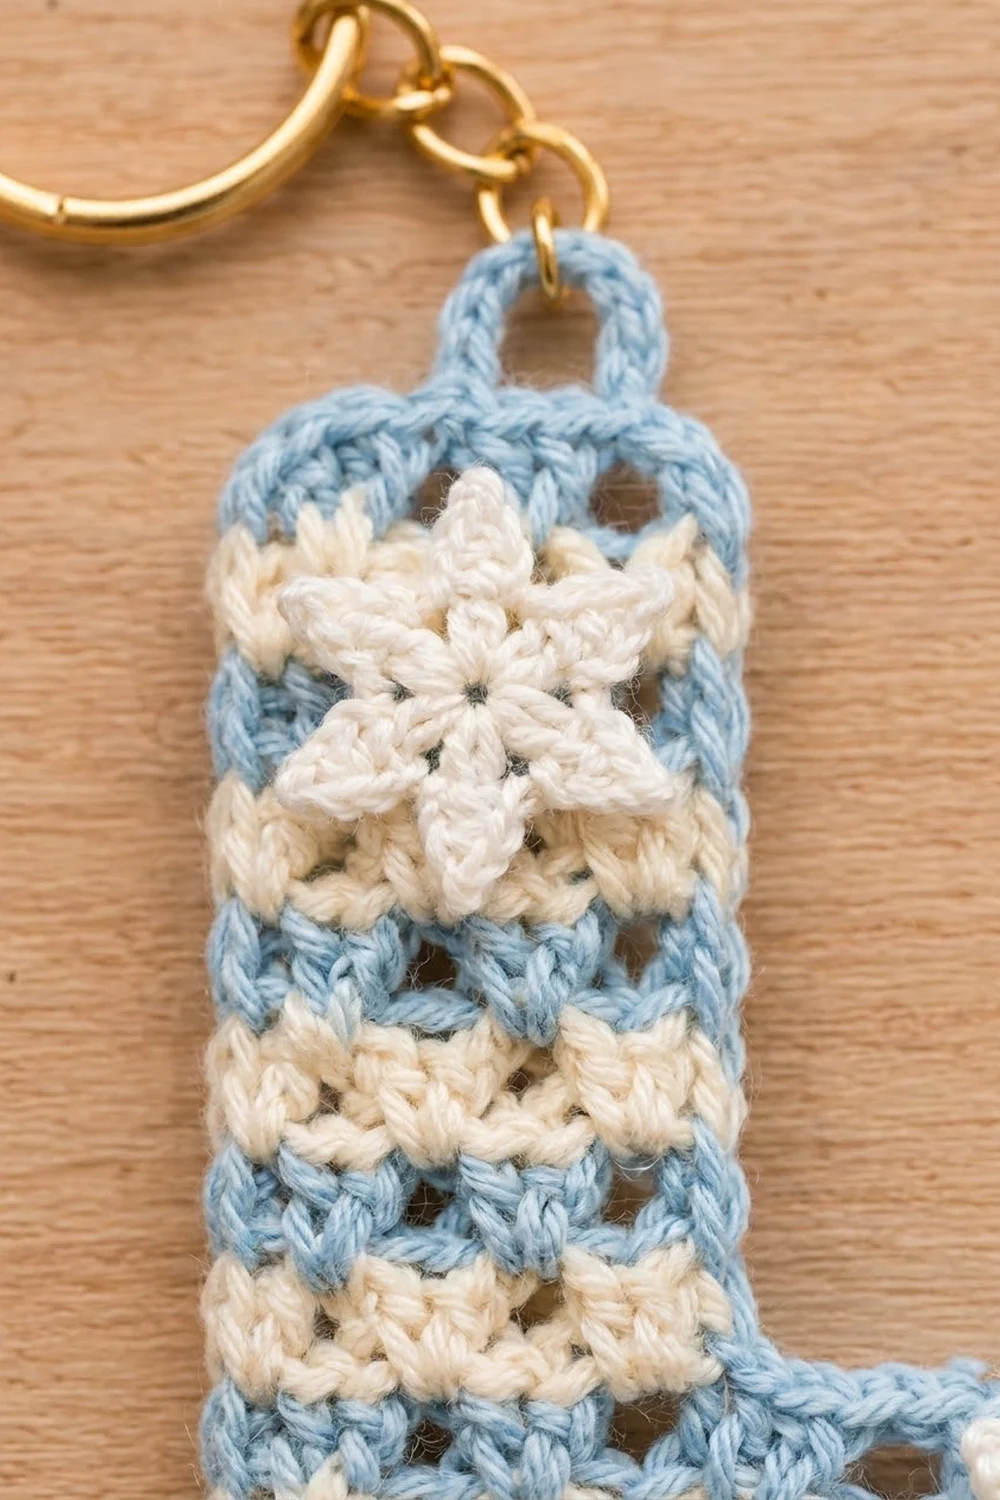
This little letter L is a cheerful, wintry keychain made from one flat piece. Rows of cream and soft sky blue alternate up the whole letter, and the V-stitch texture gives each stripe small open gaps that look a bit like frost on glass. A neat light blue single crochet edge outlines the L, and a small blue loop at the top holds a gold split ring.
Two tiny white snowflakes finish the design. One sits near the top of the stem and the other near the end of the foot, so the letter reads as festive without getting busy. It makes a quick personalized gift, a bag charm, or a stocking stuffer.
The pattern uses US crochet terms. The finished keychain measures 3 in (7.6 cm) wide by 4 in (10.2 cm) tall, not counting the hanging loop.
Construction is simple. You work the foot of the L in rows across the full width, then continue the stem in rows over the left-hand stitches only. One round of single crochet borders the whole outline, the hanging loop is worked straight off that border, and the snowflakes are made separately and sewn on.
Finished Size and Construction
- Finished size: 3 in (7.6 cm) wide x 4 in (10.2 cm) tall, plus a 0.5 in (1.3 cm) hanging loop
- Skill level: Easy / advanced beginner
- Terminology: US crochet terms
- Yarn weight: Fingering (super fine, #1) cotton
- Hook: 2.5 mm (US B/1)
- Number of pieces: 1 letter, plus 2 small sewn-on snowflakes
- Layout: One L shape. The foot is 7 V-stitches wide and 4 rows tall, and the stem is 3 V-stitches wide and rises 6 more rows from the left side of the foot
- Piece size: foot 2.75 in (7.0 cm) wide; stem 1.25 in (3.2 cm) wide
- Size before border: 2.75 in (7.0 cm) x 3.75 in (9.5 cm)
- Border depth: 0.125 in (0.3 cm) on every edge (1 round of sc)
Materials
Choose a smooth mercerized cotton or cotton blend in fingering weight. Cotton keeps the V-stitch gaps crisp and wears well on a keychain. Avoid fuzzy yarns, because they blur the stripes.
- Cream (Color A): 5 g, about 17 m
- Light blue (Color B): 6 g, about 20 m (body stripes, border and loop)
- White (Color C): 1 g, about 4 m (snowflakes)
These quantities include a margin for swatching and weaving in ends.
Tools:
- 2.5 mm (US B/1) crochet hook
- Gold split ring, 1 in (2.5 cm), with a short chain and jump ring
- Tapestry needle
- Small scissors
- 2 stitch markers
- Pins and a blocking surface
Abbreviations (US Terms)
- ch: chain
- sl st: slip stitch
- sc: single crochet
- sc2tog: single crochet 2 together
- dc: double crochet
- sp: space
- st(s): stitch(es)
- tch: turning chain
- RS / WS: right side / wrong side
- rep: repeat
Special stitches:
- V-st (V-stitch): (dc, ch 1, dc) all in the same st or space.
- Standing dc: start with a slip knot on the hook, yarn over, insert the hook in the st, and finish a dc as usual.
- Color change: work the last dc of the row until 2 loops remain, then pull the new color through to finish it. Cut the old color, leaving a 3 in (7.6 cm) tail.
Gauge and Checkpoints
Gauge: 8 V-sts and 8 rows = 3 in (7.6 cm) in the V-stitch pattern. One V-st is 0.375 in (1.0 cm) wide and one row is 0.375 in (1.0 cm) tall. The two edge dc together add 0.125 in (0.3 cm) to the width of each row.
The piece is small, so test with the letter itself. Work Rows 1 and 2 and measure before going on.
- After Row 1: 2.75 in (7.0 cm) wide (7 V-sts + 2 edge dc).
- After Row 4: 2.75 in (7.0 cm) x 1.5 in (3.8 cm).
- After Row 10: the stem is 1.25 in (3.2 cm) wide and the total height is 3.75 in (9.5 cm).
- After the border: 3 in (7.6 cm) x 4 in (10.2 cm).
Too big? Go down to a 2.25 mm hook. Too small? Go up to a 2.75 mm hook. Row height matters as much as width here. If your rows are taller than 0.375 in (1.0 cm), pull up a shorter loop on each dc or go down a hook size.
Letter L Body
Change color on every row. All odd rows are cream (A) and all even rows are blue (B). Row 1 is the RS.
Foot (Rows 1-4)
Foundation: With A, ch 25.
Row 1 (RS, A): V-st in the 5th ch from hook (the skipped 4 ch count as a dc plus 1 skipped ch). *Skip 2 ch, V-st in next ch; rep from * 5 more times. Skip 1 ch, dc in last ch, changing to B. (7 V-sts + 2 edge dc = 16 dc and 7 ch-1 sps)
Check the chain math: 5 ch for the first V-st + 18 ch for 6 more V-sts + 2 ch at the end = 25 ch.
Row 2 (WS, B): Turn. Ch 3 (counts as dc throughout). V-st in the ch-1 sp of each V-st across. Dc in the top of the beginning skipped chains, changing to A. (7 V-sts + 2 edge dc)
Row 3 (A): Turn. Ch 3, V-st in each ch-1 sp across, dc in the 3rd ch of the tch, changing to B. (7 V-sts + 2 edge dc)
Row 4 (B): Turn. Ch 3, V-st in each ch-1 sp across, dc in the 3rd ch of the tch. Do not change color. Fasten off B. (7 V-sts + 2 edge dc)
Checkpoint: 2.75 in (7.0 cm) wide x 1.5 in (3.8 cm) tall.
Stem (Rows 5-10)
With the RS facing, Row 4 ends at the right-hand edge and its ch-3 tch sits at the left-hand edge. Count Row 4’s V-sts from the left edge and place a marker in the space between the 3rd and 4th V-sts.
Row 5 (RS, A): Make a standing dc in the marked space. V-st in the ch-1 sp of each of the next 3 V-sts. Dc in the 3rd ch of Row 4’s tch, changing to B. (3 V-sts + 2 edge dc = 8 dc and 3 ch-1 sps)
The 4 V-sts of Row 4 to the right of the stem stay unworked. They become the top edge of the foot.
Row 6 (B): Turn. Ch 3, V-st in each of the 3 ch-1 sps, dc in the top of the standing dc, changing to A. (3 V-sts + 2 edge dc)
Rows 7-9: Turn. Ch 3, V-st in each of the 3 ch-1 sps, dc in the 3rd ch of the tch, changing color. Row 7 is A, Row 8 is B and Row 9 is A. (3 V-sts + 2 edge dc each)
Row 10 (B): Turn. Ch 3, V-st in each ch-1 sp, dc in the 3rd ch of the tch. Fasten off. (3 V-sts + 2 edge dc)
Checkpoint: the stem is 1.25 in (3.2 cm) wide and the total height is 3.75 in (9.5 cm). You now have 5 cream stripes and 5 blue stripes.
Tails: Trim every color-change tail to 1 in (2.5 cm) and lay it along the edge it hangs from. The border will cover them, so you don’t have to sew in 20 short ends.
Border
Border gauge: 2 sc per V-st along the top and bottom edges, and 2 sc around the post of each edge dc along the sides. A V-st and a row are both 0.375 in (1.0 cm), so both directions get 2 sc per 0.375 in (1.0 cm) and the edge stays flat.
The side counts below do not include corner stitches. Each of the 5 outer corners gets its own 3-sc group, counted separately.
Round 1 (RS, B): With the RS facing, join B with a sl st in the top of the edge st at the top-right corner of the stem. Ch 1 (does not count). Work counterclockwise:
- Corner 1 (stem top right): 3 sc in the same st.
- Stem top: 2 sc in the ch-1 sp of each of the 3 V-sts. (6 sc)
- Corner 2 (stem top left): 3 sc in the top of the edge st.
- Left side: 2 sc around the post of each edge st, Rows 10 to 1. (20 sc)
- Corner 3 (bottom left): 3 sc in the free loop of the first foundation ch.
- Bottom: working in the free loops of the foundation ch, *sc in next 2 ch, skip 1 ch; rep from * 6 more times, then sc in next ch and skip next ch. (15 sc over 23 ch)
- Corner 4 (bottom right): 3 sc in the last foundation ch.
- Foot right side: 2 sc around the post of each edge st, Rows 1 to 4. (8 sc)
- Corner 5 (foot top right): 3 sc in the top of Row 4’s last st.
- Foot top: 2 sc in the ch-1 sp of each of the next 3 V-sts, then 1 sc in the ch-1 sp of the 4th V-st. (7 sc)
- Inside corner: sc2tog, inserting the hook first in the same ch-1 sp and then around the post of the Row 5 standing dc. (1 st)
- Stem right side: 1 more sc around the same Row 5 post, then 2 sc around the post of each edge st, Rows 6 to 10. (11 sc)
Sl st in the first sc to join. Work over the tails as you pass them.
Round 1 total: 15 corner sc + 6 + 20 + 15 + 8 + 7 + 1 + 11 = 84 sts.
Why the math works:
- Left side: 10 rows x 2 sc = 20 sc over 3.75 in (9.5 cm).
- Bottom: 7 V-sts x 2 sc, plus 1 sc for the turning-chain gap, gives 15 sc over 2.75 in (7.0 cm).
- Stem top: 3 V-sts x 2 = 6 sc. The edge sts there are used by the corners.
- Foot top and stem right side: 7 + 1 + 11 = 19 sts. Counting 2 per unit for 4 V-sts and 6 rows would give 20, so this is 1 fewer, because the sc2tog pulls the inside corner in.
- Outer corners: 3 sc each, so they turn without cupping.
Checkpoint: 3 in (7.6 cm) x 4 in (10.2 cm). The stem is 1.5 in (3.8 cm) wide and the foot is 1.75 in (4.4 cm) tall.
Hanging Loop
Don’t fasten off after Round 1. You are in the first sc of Corner 1.
- Sl st in the next 2 sc to finish the corner, then sl st in the first 2 sc of the stem top.
- Ch 10, skip the next 2 sc (the 2 center sc) and sl st in the next sc. One sc of the stem top is left free on each side, so the loop is centered.
- Work 14 sc into the ch-10 loop, then sl st in the same sc as the last sl st.
- Fasten off and weave in.
The loop stands 0.5 in (1.3 cm) above the border.
Snowflakes (Make 2)
Round 1: With C, make a magic ring. Ch 1, then work 6 sc in the ring. Pull the ring closed and sl st in the first sc. (6 sc)
Round 2: *Ch 5, sl st in the 3rd ch from hook to make the picot tip, sl st in the next 2 ch, sl st in the next sc; rep from * 5 more times. The last sl st lands in the joining st. (6 points)
Fasten off, leaving a 6 in (15.2 cm) tail for sewing. Each snowflake is about 0.75 in (1.9 cm) across.
Placement:
- Snowflake 1: centered on the stem over Rows 8 and 9.
- Snowflake 2: on the foot over Rows 2 and 3, with its center 0.6 in (1.5 cm) in from the right border.
Sew each snowflake down with small stitches around Round 1 and at the base of each point, so all 6 points lie flat. Knot the tails on the WS.
Final Blocking
- Weave in any remaining ends on the WS.
- Lightly mist the keychain with water until it is evenly damp.
- Pin it RS up to 3 in (7.6 cm) x 4 in (10.2 cm). Put one pin at each of the 5 outer corners and one at the inside corner.
- Square up the stem so it stays 1.5 in (3.8 cm) wide from top to bottom.
- Gently open each V-st gap with a fingertip so the stripes look even.
- Leave it to dry completely, then unpin it.
- Thread the jump ring and chain through the hanging loop, then add the split ring.
Final Quality-Control Checklist
- 10 body rows, alternating cream and blue, with cream at the bottom and blue at the top
- 7 V-sts on every foot row and 3 V-sts on every stem row, each row with 2 edge dc
- Border Round 1 has 84 sts, with five 3-sc corners and 1 sc2tog at the inside corner
- No tails showing through the border
- Finished size 3 in (7.6 cm) x 4 in (10.2 cm), within 0.125 in (0.3 cm)
- Hanging loop centered on the stem top
- Snowflakes flat, centered and firmly stitched
- Split ring and jump ring fully closed
Troubleshooting
- The foot slants or gets wider: the last dc is probably going into the wrong st. Always finish in the tch, and count 7 V-sts on every foot row.
- The stem drifts to the right: check that the Row 5 standing dc sits between V-sts 3 and 4, counting from the left edge with the RS facing.
- The border ruffles: work 2 sc on one row end, then 1 sc on the next, alternating, or use a hook one size smaller for the border only.
- The border pulls in or cups: check that every outer corner has 3 sc and that you worked 2 sc around every edge post.
- The inside corner gapes: keep the sc2tog snug and make sure its second leg goes around the Row 5 post.
- The snowflake points curl: steam them lightly and pin each point before sewing.
- The stripes look blurry: use a smooth mercerized cotton and keep your tension even.
Care
Remove the metal ring, then hand wash in cool water with mild soap. Press the water out in a towel and dry flat.

Final Notes
The measurement chain is short and easy to check:
- Row 1 measures 2.75 in (7.0 cm).
- The foot is 1.5 in (3.8 cm) tall after Row 4.
- The body is 3.75 in (9.5 cm) tall after Row 10, with a 1.25 in (3.2 cm) stem.
- One round of border adds 0.125 in (0.3 cm) on every edge, giving a letter 3 in (7.6 cm) x 4 in (10.2 cm).
If each checkpoint matches, the letter, border and loop will all finish true. Once you know the method, you can work the same V-stitch stripe into other letters to make a full set of initials.
Happy crocheting!