

The Holly Bow Grocery Bag Holder is a festive hanging dispenser for plastic shopping bags. It has a long, rounded triangle-mesh body, a solid top band and a big bow with cream trim. A flat strap at the back hangs it from a cabinet knob. You push bags in at the top and pull them out one at a time through the small opening at the bottom.
The sample is deep burgundy with creamy off-white corded edges. Forest green with cream looks just as good. The style is a cozy holiday kitchen: practical and bright.
All instructions use US crochet terms. The body is 6 in (15.2 cm) wide laid flat and 14.5 in (36.8 cm) tall. Hanging, it measures about 20.9 in (53.1 cm) including the strap. The bow spans 10 in (25.4 cm).
You work the body from the bottom opening upward in joined rounds: a solid base, a mesh section, a solid band and a cream rim. Then you make the bow band, two tails, a knot and a strap, edge them in cream and sew everything together.
Finished Size and Construction
- Finished size: body 6 in (15.2 cm) wide flat x 14.5 in (36.8 cm) tall; about 20.9 in (53.1 cm) hanging length
- Skill level: Intermediate
- Terminology: US
- Yarn weight: Worsted (#4)
- Hook: 4.5 mm (US 7)
- Number of pieces: 1 finished holder made from 6 parts (body, bow band, 2 tails, knot, strap)
- Layout: vertical tube, with the bow on the front of the top band and the strap inside the back
- Body circumference: 48 sts = 12 in (30.5 cm)
- Body height before rim: 14 in (35.6 cm)
- Border depth: 0.5 in (1.3 cm) on the body rim; 0.25 in (0.6 cm) on the flat parts
Materials
Use a smooth worsted-weight acrylic or cotton blend. Cotton keeps the mesh crisp, and acrylic is lighter and stretchier. Avoid fuzzy yarns, which blur the mesh and the rope edges.
- Burgundy (Color A): 200 g / about 360 m
- Cream (Color B): 50 g / about 90 m
- 4.5 mm (US 7) crochet hook
- Tapestry needle
- Locking stitch markers
- Straight pins, scissors and a measuring tape
The quantities include a margin of about 15% for swatching and differences in tension.
Abbreviations (US Terms)
- ch: chain
- sl st: slip stitch
- sc: single crochet
- dc: double crochet
- sc2tog: single crochet 2 together
- dc2tog: double crochet 2 together
- sk: skip
- sp: space
- st(s): stitch(es)
- rnd(s): round(s)
- rep: repeat
Special stitches
- V-st: (dc, ch 1, dc) in the same st or sp.
- 3-dc cl (cluster): *Yarn over, insert the hook in the sp, pull up a loop, yarn over, pull through 2 loops; rep from * 2 more times in the same sp. Yarn over and pull through all 4 loops.
- Beg cl (beginning cluster): Ch 2, then dc2tog in the same sp. Counts as one 3-dc cl.
- Reverse sc (crab stitch): Without turning, work from left to right. Insert the hook in the next st to the right, pull up a loop, yarn over and pull through both loops. This makes the cream rope edge.
Gauge and Checkpoints
Sc gauge: 16 sc x 18 rows = 4 in (10.2 cm).
Mesh gauge: one 4-st repeat is 1 in (2.5 cm) wide. Two mesh rnds (one V-st rnd plus one cluster rnd) are 1.25 in (3.2 cm) tall.
Make the strap first as your test piece. Its 40 rows should measure 8.9 in (22.6 cm).
Checkpoints:
- After Rnd 1: the ring is 4 in (10.2 cm) around, or 2 in (5.1 cm) wide laid flat.
- After Rnd 9: the base is 6 in (15.2 cm) wide laid flat.
- After Rnd 25: the body is 12 in (30.5 cm) tall.
- After Rnd 34: the body is 14 in (35.6 cm) tall.
If your pieces come out too big, change to a 4 mm (US G-6) hook. If they’re too small, change to a 5 mm (US H-8) hook. Settle the hook size before you start the mesh, because mesh exaggerates gauge differences.
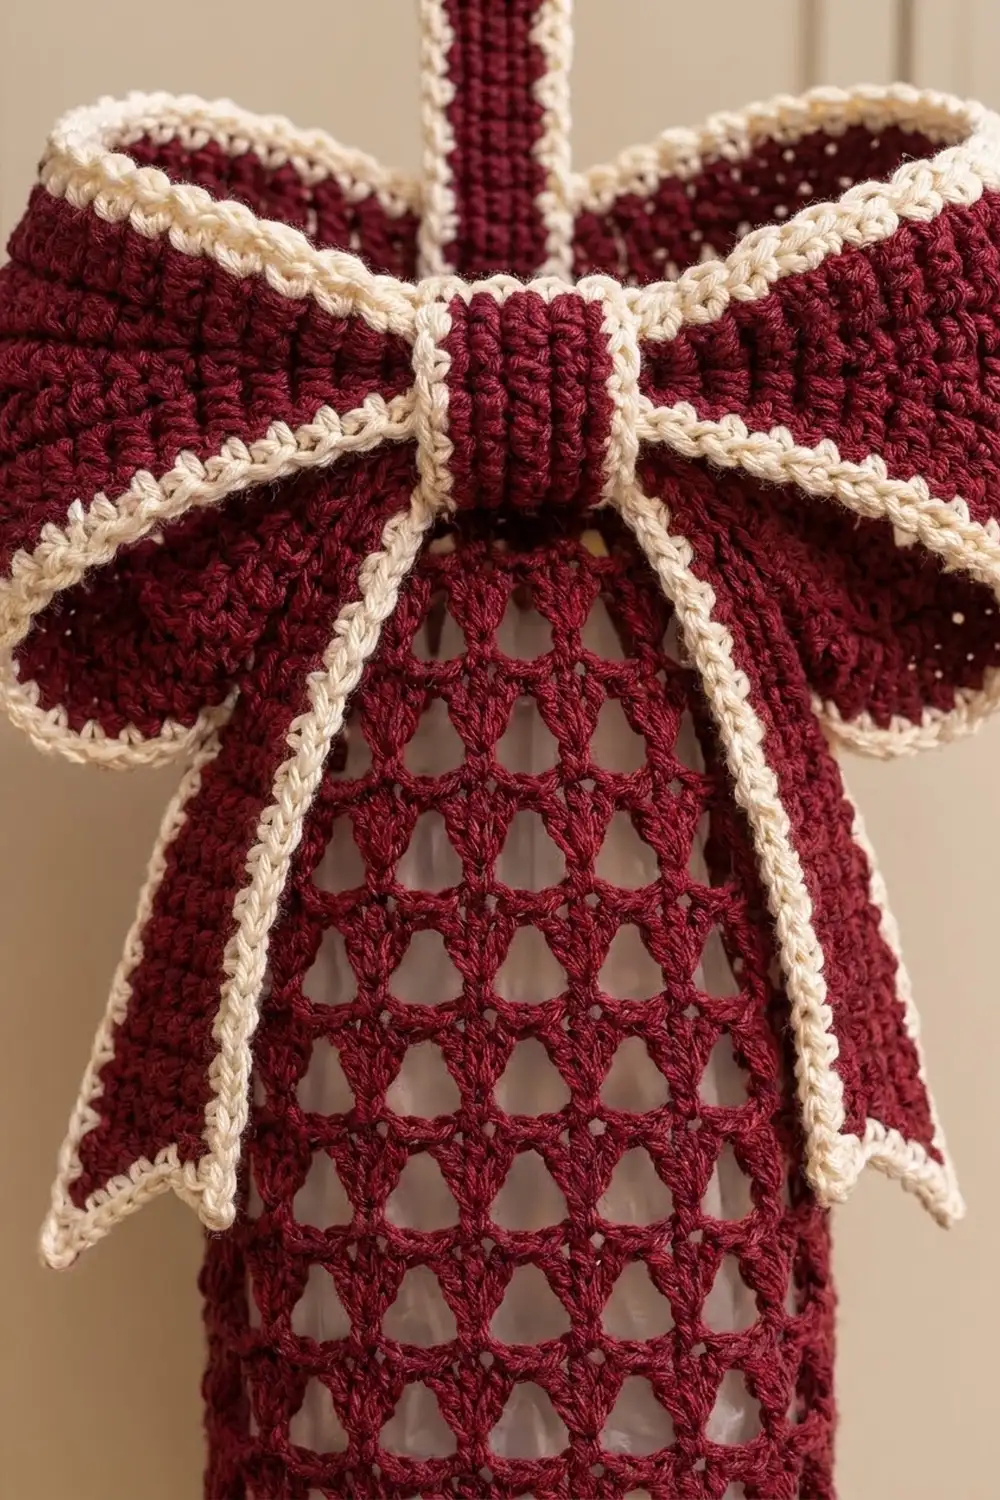
Body
Work in joined rnds with the right side facing. The ch 1 at the start of a rnd does not count as a stitch. Join each rnd with a sl st to the first st.
Rnd 1 (bottom rim): With Color B, ch 16. Sl st to the first ch to form a ring without twisting it. Ch 1, sc in each ch around and join. Change to Color A. (16 sc)
Rnd 2: Ch 1, *sc in next st, 2 sc in next st; rep from * 7 more times, join. (24 sc)
Rnd 3: Ch 1, *sc in next 2 sts, 2 sc in next st; rep from * 7 more times, join. (32 sc)
Rnd 4: Ch 1, *sc in next 3 sts, 2 sc in next st; rep from * 7 more times, join. (40 sc)
Rnd 5: Ch 1, *sc in next 4 sts, 2 sc in next st; rep from * 7 more times, join. (48 sc)
These increases curve the bottom inward around the small opening.
Rnds 6–9: Ch 1, sc in each st around, join. (48 sc)
Checkpoint: the base should be 6 in (15.2 cm) wide flat and 2 in (5.1 cm) tall.
Mesh Section
Rnd 10 (V-st rnd): Ch 4 (counts as dc + ch 1), dc in the same st as the join. *Sk 3 sts, V-st in next st; rep from * 10 more times. Sk the last 3 sts and join to the 3rd ch of the beg ch-4. (12 V-sts)
Rnd 11 (cluster rnd): Sl st in the first ch-1 sp. Work a beg cl in the same sp, ch 3. *3-dc cl in the ch-1 sp of the next V-st, ch 3; rep from * 10 more times. Join to the top of the beg cl. (12 clusters, 12 ch-3 sps)
Rnd 12 (V-st rnd): Sl st in the first ch-3 sp. Ch 4 (counts as dc + ch 1), dc in the same sp. *V-st in next ch-3 sp; rep from * 10 more times. Join to the 3rd ch of the beg ch-4. (12 V-sts)
Each V-st sits between two clusters of the rnd below. This half-repeat shift creates the alternating triangle openings.
Rnds 13–25: Rep Rnds 11 and 12 alternately, ending with Rnd 11 on Rnd 25. (12 clusters, 12 ch-3 sps)
That’s 16 mesh rnds (8 V-st rnds and 8 cluster rnds), 10 in (25.4 cm) tall. Checkpoint: the body is 12 in (30.5 cm) tall.
Top Band
Rnd 26 (conversion rnd): Ch 1, *sc in top of next cl, 3 sc in next ch-3 sp; rep from * around, join. That is 12 sc in the clusters + 36 sc in the ch-3 sps = 48 sc.
Rnds 27–34: Ch 1, sc in each st around, join. (48 sc)
The band is 9 rnds, or 2 in (5.1 cm) tall. Checkpoint: the body is 14 in (35.6 cm) tall. Fasten off.
Bow Band
With Color A, ch 15.
Row 1: Sc in the 2nd ch from the hook and in each ch across. (14 sc)
Rows 2–90: Ch 1, turn, sc in each st across. (14 sc)
Fasten off. The band measures 3.5 in (8.9 cm) x 20 in (50.8 cm).
Tails (Make 2)
With Color A, ch 9.
Row 1: Sc in the 2nd ch from the hook and in each ch across. (8 sc)
Rows 2–28: Ch 1, turn, sc in each st across. (8 sc)
The next rows shape the slanted tip. Every decrease falls on the same edge:
Row 29: Ch 1, turn, sc2tog, sc to the end. (7 sc)
Row 30: Ch 1, turn, sc to the last 2 sts, sc2tog. (6 sc)
Rows 31–34: Rep Rows 29–30 twice. (5, 4, 3, 2 sc)
Row 35: Ch 1, turn, sc2tog. (1 sc)
Fasten off. Each tail is 2 in (5.1 cm) wide and 7.8 in (19.8 cm) long along its straight edge.
Center Knot
With Color A, ch 7.
Row 1: Sc in the 2nd ch from the hook and in each ch across. (6 sc)
Rows 2–14: Ch 1, turn, sc across. (6 sc)
Fasten off, leaving a 10 in (25.4 cm) tail for sewing. The knot measures 1.5 in (3.8 cm) x 3.1 in (7.9 cm).
Hanging Strap
With Color A, ch 7.
Row 1: Sc in the 2nd ch from the hook and in each ch across. (6 sc)
Rows 2–36: Ch 1, turn, sc across. (6 sc)
Row 37 (slot row): Ch 1, turn, sc in next 2 sts, ch 2, sk 2 sts, sc in last 2 sts. (4 sc + ch-2 sp)
Row 38: Ch 1, turn, sc in next 2 sts, 2 sc in the ch-2 sp, sc in last 2 sts. (6 sc)
Rows 39–40: Ch 1, turn, sc across. (6 sc)
Fasten off. The strap measures 1.5 in (3.8 cm) x 8.9 in (22.6 cm), and the slot fits over a cabinet knob.
Border (Cream Corded Edges)
Border gauge: Work 1 sc per stitch along stitch tops and 1 sc per row end along row edges. The row gauge of 18 rows per 4 in (10.2 cm) is close to the stitch gauge, so 1 sc per row lies flat.
Every reverse sc pass is worked 1-to-1 into the sc you just made. It adds depth but no length, so every edge keeps its measurement.
Body Rim
Rnd 35: With the right side facing, join Color B in any st of Rnd 34. Ch 1, sc in each st around, join. (48 sc, or 24 per side when laid flat)
Rnd 36: Ch 1, reverse sc in each st around, join. (48 reverse sc, or 24 per side)
The rim adds 0.5 in (1.3 cm), so the body is now 14.5 in (36.8 cm) tall. Because 48 sc match the 48 sts of Rnd 34, the top stays 12 in (30.5 cm) around.
Bottom rim: Join Color B in a free loop of the Rnd 1 foundation chain. Ch 1, then work a reverse sc in each of the 16 loops and join. (16 reverse sc) The opening stays 4 in (10.2 cm) around.
Bow Band Edges
Edge only the long sides. The short ends are hidden at the center of the bow.
Row 1: Join Color B at one corner of a long edge. Ch 1 and work 90 sc along the row ends, 1 per row. (90 sc)
Row 2: Do not turn. Ch 1, reverse sc in each sc back across. (90 reverse sc)
Repeat on the other long edge. The band is now 4 in (10.2 cm) wide.
Tail Edges
Leave the top foundation edge unworked. Join Color B at the top of the straight edge and ch 1. Then work:
- 35 sc down the straight edge (1 per row)
- 3 sc in the point
- 9 sc up the diagonal
- 28 sc up the short edge (Rows 28 to 1)
That is 35 + 3 + 9 + 28 = 75 sc. Do not turn. Ch 1 and work a reverse sc in each sc back. (75 reverse sc)
Edge the second tail with the opposite side facing so the two tails mirror each other. Each tail is now 2.5 in (6.4 cm) wide.
Strap Edges
Join Color B at one end of a long edge, ch 1 and work 40 sc (1 per row). Do not turn. Ch 1 and work a reverse sc in each sc back. (40 sc + 40 reverse sc) Repeat on the other long edge. The strap is now 2 in (5.1 cm) wide. Leave the knot plain burgundy.
Assembly
- Bow loops: With the right side down, fold both short ends of the bow band to the center so they meet. Whipstitch them together, then turn the bow right side up.
- Pinch: Weave a strand of Color A up and down through the center and pull until the center gathers to 1.25 in (3.2 cm). Tie it off.
- Tails: Overlap the straight tops of the tails behind the pinch in an inverted V, with the slanted tips pointing outward. Sew them in place.
- Knot: Wrap the knot around the pinch and the tops of the tails, then sew its ends together at the back.
- Strap: Center the strap inside the back of the band with the slot end up, overlapping the band by 2.5 in (6.4 cm). Sew it to the band only. This leaves 6.4 in (16.3 cm) of strap showing.
- Bow: Center the bow on the front with its top edge level with the rim. Sew it to the band only, not to the mesh.
Final Blocking
- Lightly mist the holder and the bow with water.
- Put a rolled towel inside the body so it flattens evenly to 6 in (15.2 cm) wide.
- Pin the bow loops open and round so the bow spans 10 in (25.4 cm).
- Pin the tails straight, with crisp tips.
- Smooth the cream edges so the rope rolls outward evenly.
- Let it dry completely, then remove the pins and the towel.
Final Quality-Control Checklist
- The body is 6 in (15.2 cm) wide flat and 14.5 in (36.8 cm) tall.
- Every mesh rnd has 12 even triangle openings, and the mesh does not twist.
- Both rims lie flat.
- The bow loops match and the bow spans 10 in (25.4 cm).
- The tails mirror each other.
- The strap hangs straight and the slot fits over the knob.
- All yarn ends are woven in.
Troubleshooting
- Mesh leans: Start each rnd in the first sp and join to the beginning chain.
- Triangles don’t alternate: Work V-sts only into ch-3 sps and clusters only into ch-1 sps.
- Band flares: Recount Rnd 26. It must be exactly 48 sc.
- Rim ruffles: Rework Rnd 35 with exactly 1 sc per st.
- Bow droops: Tighten the center gathering strand.
- Bags fall out the bottom: Rework Rnd 1 with a smaller hook.
Care
Hand wash in cool water and lay flat to dry, reshaping the bow while it’s damp. Don’t put it in the dryer.

Final Notes
With 16 sts = 4 in (10.2 cm), the 48-st body is 12 in (30.5 cm) around and 6 in (15.2 cm) wide flat. Its height builds like this:
- base: 2 in (5.1 cm)
- mesh: 10 in (25.4 cm)
- band: 2 in (5.1 cm)
- rim: 0.5 in (1.3 cm)
That adds up to 14.5 in (36.8 cm). The 6.4 in (16.3 cm) of exposed strap brings the hanging length to 20.9 in (53.1 cm). If you check each step as you go, the bow, tails and strap will fit as planned.
Happy crocheting!