
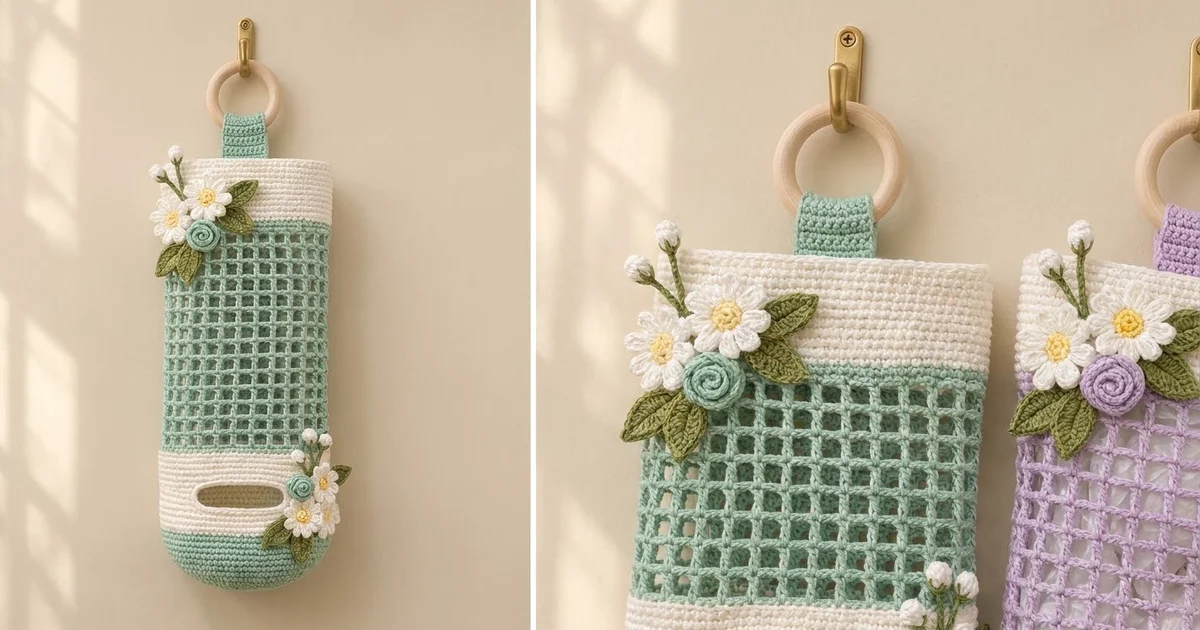
This hanging bag holder keeps plastic grocery bags tidy, visible and easy to grab. You stuff bags in through the open top and pull them out one at a time through an oval slot near the bottom. The open sage mesh in the middle lets you see at a glance when it’s time to refill.
The palette is soft and fresh. Sage green is used for the base, mesh and tab, and cream for the two solid bands. Olive green, white and yellow make the little daisy clusters. The style is cottage kitchen: clean blocks of color with one floral accent near the top and one beside the slot. For a lilac version, swap the sage for lilac.
The pattern uses US crochet terms. The finished holder measures 7.5 in (19.1 cm) wide when flattened and 19 in (48.3 cm) tall, not counting the hanging tab and ring.
You work the body in one piece from the bottom up. It starts with a flat circle, then rises through a sage band, a cream band with a built-in slot, a filet-mesh section and a cream top band. The tab and the flowers are made separately and sewn on.
Finished Size and Construction
- Finished size: 7.5 in (19.1 cm) wide flat × 19 in (48.3 cm) tall
- Skill level: Easy–Intermediate
- Terminology: US
- Yarn weight: Worsted (#4) cotton
- Hook: 4.5 mm (US 7)
- Number of pieces: 1 body (single piece), 1 tab and 19 small appliqué pieces
- Layout: One tube; the slot is centered on the front, with flower clusters at the upper left and lower right
- Circumference: 60 sts = 15 in (38.1 cm)
- Size before top band: 17 in (43.2 cm) of wall above the base
- Top band (border) depth: 2 in (5.1 cm)
Materials
Use a smooth worsted-weight cotton or cotton blend. Cotton holds its shape, doesn’t stretch much under the weight of the bags and gives crisp mesh squares. The quantities below assume about 1.7 m per gram.
- Sage green (MC): 90 g, about 153 m
- Cream (CC): 70 g, about 119 m
- Olive green: 15 g, about 26 m
- Yellow: 5 g, about 9 m
All quantities include about 20% extra for swatching and tails.
Tools:
– 4.5 mm (US 7) crochet hook
– 1 wooden ring, 3 in (7.6 cm) outer diameter
– Stitch markers
– Tapestry needle
– Scissors
– Measuring tape
– Rustproof pins for blocking
Abbreviations (US Terms)
- ch – chain
- sl st – slip stitch
- sc – single crochet
- hdc – half double crochet
- dc – double crochet
- BLO – back loop only
- MR – magic ring
- sp – space
- st(s) – stitch(es)
- RS / WS – right side / wrong side
Special stitch – bobble bud: Make a MR, ch 2 and work 4 dc into the ring. Pull the ring closed tightly, then sl st to the top of the ch-2. This makes a small round bud about 0.5 in (1.3 cm) across.
Standing sc: Start with a slipknot on your hook. Insert the hook into the st, yarn over and pull up a loop, then yarn over and pull through both loops.
Gauge and Checkpoints
Sc gauge: 16 sts × 18 rounds = 4 in (10.2 cm)
Mesh gauge: 4 mesh squares (8 sts) = 2 in (5.1 cm) wide; 4 mesh rounds = 2 in (5.1 cm) tall
Make the base (Rounds 1–10) first as your test piece. It should measure 4.75 in (12.1 cm) across. If it’s bigger, go down a hook size; if it’s smaller, go up one. A circle that cups means your tension is tight, and one that ruffles means it’s loose.
Checkpoints:
– After Round 10, the base is 4.75 in (12.1 cm) across.
– After Round 19, the sage wall is 2 in (5.1 cm) tall.
– After Round 37, the cream band is 4 in (10.2 cm) tall and the wall totals 6 in (15.2 cm).
– After Round 59, the mesh is 11 in (27.9 cm) tall and the wall totals 17 in (43.2 cm).
– After Round 69, the wall totals 19 in (48.3 cm).
– At every stage, the tube flattens to 7.5 in (19.1 cm) wide.
If the mesh grows too tall, go down a hook size for the mesh only. If the mesh pulls narrower than the sc bands, go up a hook size for the mesh.

Body
Work in joined rounds. Join each round with a sl st to its first st, then ch 1 to begin the next round, unless the pattern says otherwise. The ch-1 does not count as a stitch.
Base (Sage)
Round 1: MR, 6 sc in ring. (6)
Round 2: 2 sc in each st. (12)
Round 3: sc 1, 2 sc in next 6 times. (18)
Round 4: sc 2, 2 sc in next 6 times. (24)
Round 5: sc 3, 2 sc in next 6 times. (30)
Round 6: sc 4, 2 sc in next 6 times. (36)
Round 7: sc 5, 2 sc in next 6 times. (42)
Round 8: sc 6, 2 sc in next 6 times. (48)
Round 9: sc 7, 2 sc in next 6 times. (54)
Round 10: sc 8, 2 sc in next 6 times. (60)
Checkpoint: the base lies flat and measures 4.75 in (12.1 cm) across.
Sage Wall
Round 11: sc in the BLO of each st. (60) This turns the edge up into the bottom fold.
Rounds 12–19: sc in each st. (60)
Change to cream on the final yarn-over of Round 19.
Cream Band with Slot
Rounds 20–25: sc in each st. (60) Fasten off after Round 25.
Counting from the join, mark sts 1–14. These slot stitches stay unworked for the next 6 rows.
Row 26 (RS): Join cream with a standing sc in st 15, then sc in sts 16–60. Turn. (46)
Rows 27–31: ch 1, sc in each st. Turn. (46)
Row 31 is a WS row, so it ends at the st-15 edge.
Round 32 (RS): Turn, ch 1 and sc in each of the 46 sts. Ch 14, then sl st to the first sc. This is a conversion round: 46 sc + 14 ch = 60.
Round 33: sc in each of the 46 sc and each of the 14 ch. (60)
Rounds 34–37: sc in each st. (60)
The slot is 14 sts wide, or 3.5 in (8.9 cm), and 6 rows tall, about 1.33 in (3.4 cm). When you flatten the tube, center the slot on the front. Change to sage on the final yarn-over of Round 37.
Filet Mesh (Sage)
Round 38: Ch 4 (counts as dc + ch 1) and skip the next st. Dc in next st, ch 1, skip next st 29 times. Sl st to the 3rd ch of the ch-4. This is a conversion round: 30 dc + 30 ch-1 sps = 60, making 30 mesh squares.
Rounds 39–59: Ch 4 (counts as dc + ch 1), then dc in next dc, ch 1 29 times. Sl st to the 3rd ch of the ch-4. (30 dc + 30 ch-1 sps)
That’s 22 mesh rounds, 11 in (27.9 cm) tall. Stack each dc directly on top of the dc below so the holes form straight columns. Change to cream on the final sl st.
Top Band (Border)
The top band acts as the border. It closes off the mesh with a firm, solid edge that anchors the tab and keeps the opening round.
Border gauge: 16 sc × 18 rounds = 4 in (10.2 cm), the same as the rest of the body.
Round 60: ch 1, sc in each dc and each ch-1 sp. This is a conversion round: 30 sc in dc + 30 sc in sps = 60. Flattened, that gives 30 sts per side (front and back). There are no corner stitches, because a tube has no corners.
Rounds 61–68: sc in each st. (60; 30 per side)
Round 69 (rim): sl st loosely in each st. (60) Fasten off.
Why the math works: Each mesh round is 60 sts wide (30 dc + 30 ch). One sc in each of those gives back exactly 60, the same count as the base and both cream bands. With no increases or decreases, the band sits flush and the tube stays 15 in (38.1 cm) around, or 7.5 in (19.1 cm) flat. Rounds 60–68 are nine rounds; at 4.5 rounds per inch, that’s 2 in (5.1 cm). The sl st rim adds almost no height.
Slot Edging
With cream and the RS facing, sl st evenly around the slot: 14 along the bottom, 6 up one side, 14 across the chain edge and 6 down the other side. (40) Join and fasten off. This edging keeps the slot from stretching.
Hanging Tab (Sage)
Ch 7.
Row 1: sc in the 2nd ch from the hook and in each ch across. Turn. (6)
Rows 2–27: ch 1, sc in each st. Turn. (6)
The tab is 1.5 in (3.8 cm) wide and 6 in (15.2 cm) long. Fold it in half over the wooden ring and center it on the back of the tube. Sew the bottom 1.5 in (3.8 cm), through both layers, to the inside of the top band. About 1.5 in (3.8 cm) of tab will show above the rim.
Appliqués
Daisy (make 5): With yellow, make a MR, ch 1, work 8 sc into the ring and join. Fasten off. Join white in any sc. Ch 5, sc in 2nd ch from hook, hdc in each of next 2 ch, sc in next ch, sl st in next center sc 8 times. (8 petals) Each daisy is about 1.75 in (4.4 cm) across.
Rose (make 2, sage): Ch 25.
Row 1: sc in the 2nd ch from the hook and in each ch across. (24)
Row 2: 5 dc in next st, sl st in next st 12 times. (12 petals)
Roll the strip up from the starting end, then stitch through the base to hold it. Each rose is about 1.25 in (3.2 cm) across.
Leaf (make 5, olive): Ch 9. Starting in the 2nd ch from the hook, work sl st, sc, hdc, dc, dc, hdc, sc, then 3 sc in the last ch. Working along the other side of the chain, work sc, hdc, dc, dc, hdc, sc, sl st. (17 sts) To make the tip, ch 2 and sl st in the same st. Each leaf is about 2 in (5.1 cm) long.
Bud (make 5, cream): Make one bobble bud for each.
Sprig A (make 1, olive, 2 buds): Ch 13. Sl st in the 2nd ch from the hook and in the next 5 ch. For the branch, ch 6, then sl st in the 2nd ch from the hook and in the next 4 ch. Sl st in the remaining 6 ch of the main stem. (12 sl st on the stem)
Sprig B (make 1, olive, 3 buds): Ch 13. Sl st in the 2nd ch from the hook and in the next 3 ch. Ch 5, sl st in the 2nd ch from the hook and in the next 3 ch, then sl st in the next 4 ch of the main stem twice. (12 sl st on the stem)
Sew a bud to each stem tip.
Placing the Clusters
Top cluster (upper left): Use Sprig A, 2 daisies, 1 rose and 3 leaves. Place it over the left side of the line where the top band meets the mesh, so the flowers overlap the first mesh rounds. Put the sprig at the top, the daisies in the middle and the rose just below them. Fan the leaves out to the left, right and bottom.
Bottom cluster (lower right): Use Sprig B, 3 daisies, 1 rose and 2 leaves. Place it to the right of the slot, centered over the line where the cream band meets the sage wall. Stack the daisies diagonally, tuck the rose between them and put the leaves at the bottom.
Pin all the pieces first. Then whipstitch each one around its center with matching yarn, catching only the front layer of the tube.
Final Blocking
- Lightly mist the body, or wet it fully and roll it in a towel to remove excess water.
- Slide a rolled towel or cardboard tube inside to hold it open.
- Flatten it to 7.5 in (19.1 cm) wide and 19 in (48.3 cm) tall.
- Use your fingers to square up the mesh holes so the dc columns run straight.
- Pin the slot into a smooth oval.
- Pin the petals and leaves flat and open.
- Let it dry completely before hanging.
Final Quality-Control Checklist
- [ ] Every solid round has 60 sts, and every mesh round has 30 squares.
- [ ] The base lies flat at 4.75 in (12.1 cm).
- [ ] The slot is 3.5 in (8.9 cm) wide and centered on the front.
- [ ] The mesh columns run straight up, with no twisted rounds.
- [ ] The body is 19 in (48.3 cm) tall and 7.5 in (19.1 cm) wide flat.
- [ ] The tab is sewn through both layers and centered on the back.
- [ ] All tails are woven in, and the appliqués lie flat and secure.
Troubleshooting
Base cups or ruffles: Re-check the increase counts, or change hook size for the base.
Mesh leans or spirals: You may be working into the ch-sps instead of the dc. Work each dc into the top of the dc below.
Slot gapes: Work the slot edging more tightly, or block the slot smaller.
Top band flares: Round 60 may have extra stitches. Re-count to 60.
Tab stretches: Sew through both tab layers and the full depth of the band.
Join line shows: Joined rounds drift slightly over many rounds. Keep the join toward the back side fold.
Care
Hand wash in cool water and lay flat to dry. Reshape the mesh while it’s still damp.

Final Notes
The 60-st base sets a 15 in (38.1 cm) circumference, or 7.5 in (19.1 cm) when flattened, and every section keeps that same 60. The height builds in this order:
- 2 in (5.1 cm) of sage
- 4 in (10.2 cm) of cream with the slot
- 11 in (27.9 cm) of mesh
- a 2 in (5.1 cm) top band
That adds up to 19 in (48.3 cm). If you check each stage against these numbers, the holder will hang straight and dispense smoothly.
Happy crocheting!