

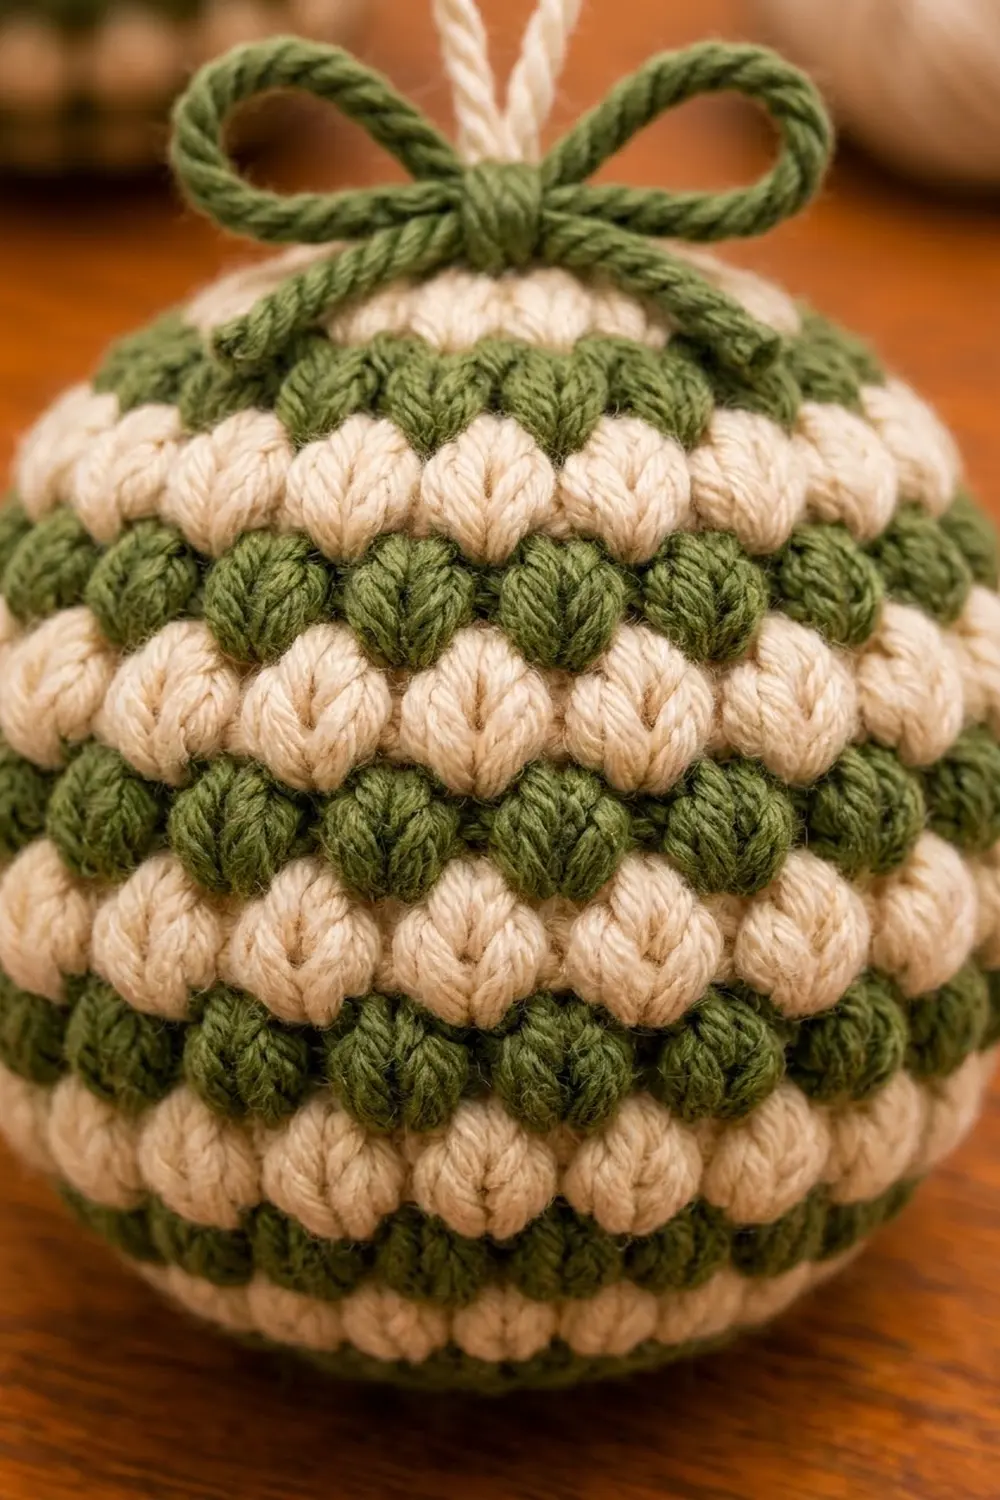
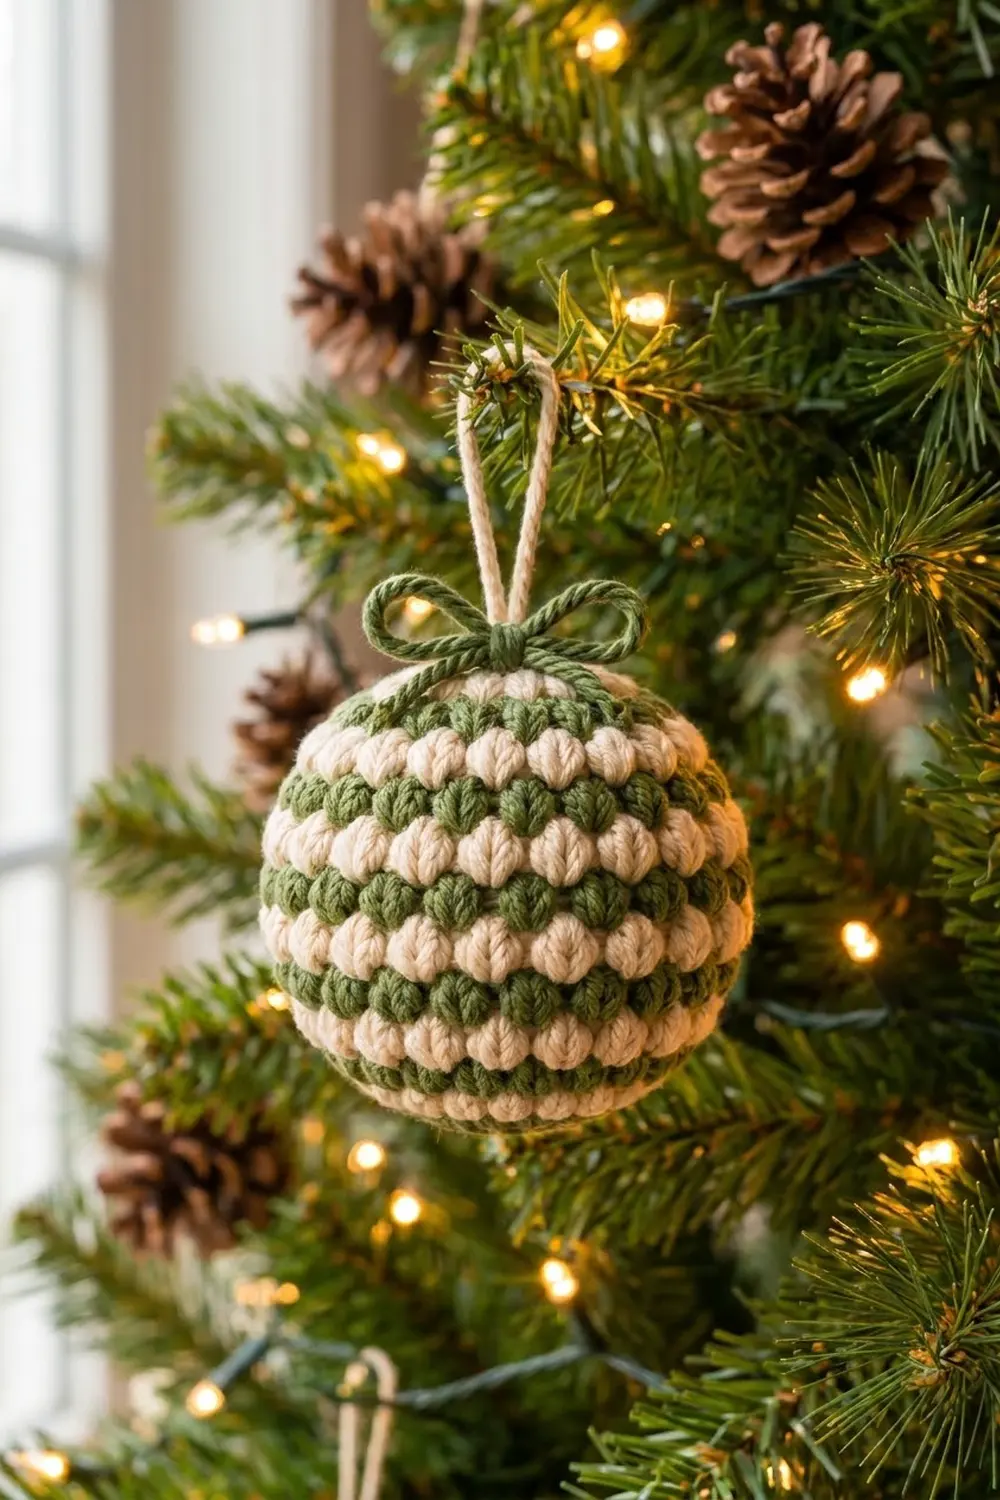
The Evergreen Puff Bauble is a small, stuffed Christmas ball ornament covered in plump puff stitches. Stripes of cream and moss green puffs are offset from each other, so every puff nests between the two below it. The surface looks soft and bumpy, a bit like a pinecone.
The colors are classic and calm: warm cream and muted evergreen. A cream twisted-cord loop rises from the top, with a green yarn bow tied at its base. The style is cozy and rustic, and it looks just as good on a real tree as tied to a gift.
This pattern uses US crochet terms. The finished ornament is about 3 in (7.6 cm) wide and 3 in (7.6 cm) tall, not counting the loop.
The construction is simple. You crochet two small flower discs with a cream puff-stitch center and a green edge. One disc becomes the base, and you work the striped body straight up from its edge in joined rounds. After you stuff the body, the second disc closes the top. A green joining round and a reverse single crochet rim finish the ornament.
Finished Size and Construction
- Finished size: 3 in (7.6 cm) wide x 3 in (7.6 cm) tall, not counting the loop
- Skill level: Easy (advanced beginner)
- Terminology: US crochet terms
- Yarn weight: Worsted (medium #4), cotton or cotton blend
- Hook: 4.0 mm (US G-6)
- Number of pieces: 2 (Piece A: base disc and body, worked as one; Piece B: top disc)
- Layout: Piece B sits on top of Piece A’s opening and is joined stitch to stitch
- Disc size: 2.25 in (5.7 cm) across, 32 sts around the edge
- Size before border: 3 in (7.6 cm) wide, about 2.75 in (7.0 cm) tall
- Border depth: 1 round of reverse single crochet, adding about 0.2 in (0.5 cm) of height
Materials
Choose a smooth worsted-weight cotton, either mercerized or combed. Cotton gives crisp, well-defined puffs that keep their shape when the ball is stuffed. Acrylic also works, but the puffs will look softer and a little rounder. Avoid fuzzy or brushed yarns, which blur the stripes.
- Cream (Color A): 12 g, about 20 m
- Moss green (Color B): 18 g, about 30 m
These amounts include about 25 percent extra for your gauge test, the hanging loop and the bow.
Tools:
- 4.0 mm (US G-6) crochet hook
- Polyester fiberfill, about 8 g
- 1 stitch marker
- Tapestry needle
- Scissors
- Measuring tape
Abbreviations (US Terms)
- ch – chain
- sl st – slip stitch
- sc – single crochet
- sc2tog – single crochet 2 together
- rev sc – reverse single crochet (crab stitch)
- sp – space
- st(s) – stitch(es)
- rnd(s) – round(s)
- rep – repeat
- MR – magic ring
Puff stitch (puff): (Yarn over, insert hook in the indicated st or sp, yarn over and pull up a loop about 0.5 in / 1.3 cm tall) 3 times, so you have 7 loops on the hook. Yarn over and draw through all 7 loops. The puff counts as 1 stitch. It has no closing chain; any ch-1 that follows is written separately in the pattern.
Reverse single crochet (rev sc): Work from left to right (right to left if you are left-handed). Insert the hook in the next st to the right, pull up a loop, yarn over and draw through both loops.
Gauge and Checkpoints
Gauge: 18 sc and 20 rows = 4 in (10.2 cm) in single crochet worked flat. Exact gauge doesn’t matter much for an ornament, but it does decide how well the top disc fits the body opening.
The best test is to make one full disc first (Piece B, Rnds 1–4). It takes about ten minutes and tells you everything you need to know.
Checkpoints:
- After disc Rnd 2: the flower is about 1.5 in (3.8 cm) across.
- After disc Rnd 4: the disc is 2.25 in (5.7 cm) across and lies flat.
- After body Rnd 5: the base is about 2.75 in (7.0 cm) across and starts to curve upward.
- After body Rnd 13: the body is about 2.75 in (7.0 cm) tall and 3 in (7.6 cm) wide when slightly flattened.
- After joining and border: the ornament is 3 in (7.6 cm) wide and 3 in (7.6 cm) tall.
If your disc is too big (over 2.4 in / 6.1 cm), switch to a 3.75 mm (US F-5) hook. If it is too small (under 2 in / 5.1 cm), switch to a 4.5 mm (US 7) hook. If the disc ruffles, your puffs are too tall, so pull the loops up a little shorter.
Piece B: Top Disc
Make this piece first as your gauge test.
Rnd 1 (Color A): Make a MR. Ch 1 (does not count as a st), work 8 sc in the ring. Pull the ring closed. Join with sl st to first sc. (8 sc)
Rnd 2 (Color A): Ch 1, puff in same st as join, ch 2, puff in next st, ch 2; rep from * 6 more times. Join with sl st to top of first puff. (8 puffs, 8 ch-2 sps)
These 8 puffs are the flower petals. Fasten off Color A.
Rnd 3 (Color B): Join Color B with sl st in any ch-2 sp. Ch 1, 3 sc in same sp, then 3 sc in each remaining ch-2 sp around, working behind the puffs. Join with sl st to first sc. (24 sc)
Rnd 4 (Color B): Ch 1, sc in next 2 sts, 2 sc in next st; rep from * 7 more times. Join with sl st to first sc. (32 sc)
Check: 8 repeats x 3 sts used = 24 sts, and 8 repeats x 4 sts made = 32 sts.
Fasten off, leaving a 6 in (15.2 cm) tail. The disc should be 2.25 in (5.7 cm) across.
Piece A: Base Disc and Body
Rnds 1–4: Work exactly as for Piece B. (32 sc) Do not fasten off Color B.
Rnd 5 (Color B): Ch 1, sc in next 3 sts, 2 sc in next st; rep from * 7 more times. Join with sl st to first sc. (40 sc)
Check: 8 repeats x 4 sts used = 32 sts, and 8 repeats x 5 sts made = 40 sts. The edge starts to curve upward, and the disc becomes your flat base.
Do not cut Color B. From here on you switch colors every round. Carry the color you are not using loosely up the inside of the body, where the stuffing will hide it.
Rnd 6 (Color A): Join Color A with sl st in any st. Ch 1, puff in same st, ch 1, skip next st, puff in next st, ch 1, skip next st; rep from * 18 more times. Join with sl st to top of first puff. (20 puffs, 20 ch-1 sps = 40 sts)
Rnd 7 (Color B): Pick up Color B and sl st into the nearest ch-1 sp. Ch 1, puff in same sp, ch 1, skip next puff, puff in next ch-1 sp, ch 1, skip next puff; rep from * 18 more times. Join with sl st to top of first puff. (20 puffs, 20 ch-1 sps = 40 sts)
Each puff goes into a ch-1 space from the round below, so the stripes are offset. That is what gives the staggered, nested look.
Rnds 8, 10, 12 (Color A): Work as Rnd 7, using Color A. (20 puffs, 20 ch-1 sps = 40 sts)
Rnds 9, 11, 13 (Color B): Work as Rnd 7, using Color B. (20 puffs, 20 ch-1 sps = 40 sts)
You now have 4 cream stripes (Rnds 6, 8, 10, 12) and 4 green stripes (Rnds 7, 9, 11, 13). Fasten off Color A, leaving a short tail to weave in.
Checkpoint: the body is about 2.75 in (7.0 cm) tall and 3 in (7.6 cm) wide.
Rnd 14 (Color B): Ch 1. Work 1 sc in each puff and each ch-1 sp, decreasing as you go: sc in next 3 sts, sc2tog; rep from * 7 more times. Join with sl st to first sc. (32 sc)
Check: 8 repeats x 5 sts used = 40 sts, and 8 repeats x 4 sts made = 32 sts. The opening now matches the top disc exactly. Do not fasten off.
Make All Pieces
For one ornament you need:
- Piece A (base and body): 1. Use Color A for disc Rnds 1–2 and body Rnds 6, 8, 10 and 12. Use Color B for disc Rnds 3–4 and body Rnds 5, 7, 9, 11, 13 and 14.
- Piece B (top disc): 1. Use Color A for Rnds 1–2 and Color B for Rnds 3–4.
Stacking layout (side view, top to bottom):
      [ loop + bow ]
   [ Piece B: top disc ]   32 sts
   [ Rnd 14 rim        ]   32 sts
   [ Rnds 6-13 puffs   ]   40 sts
   [ Rnd 5 increase    ]   40 sts
   [ Piece A: base disc]   32 sts
Joining
Stuff the body firmly with fiberfill. Push it into the base first so the bottom rounds out. Fill up to the level of the Rnd 14 opening.
Place Piece B on top, right side facing up, so its 32 edge sts line up with the 32 sts of Rnd 14. Use your marker to line up the first stitch of each.
Rnd 15 (joining, Color B): Ch 1. Work through both loops of the disc’s Rnd 4 and both loops of the body’s Rnd 14 together, and sc in each pair of sts around. (32 sc)
The join is one to one: 32 disc sts meet 32 body sts, and each pair gets exactly 1 sc. No sts are added or skipped.
After about 24 sts, stop and add more stuffing through the gap so the ball is firm and round. Then finish the round and join with sl st to first sc.
Keep your tension even and moderate. Pulling too tight will pucker the disc, and working too loosely will leave gaps where the stuffing shows.
Size checkpoint: the closed ball is 3 in (7.6 cm) wide and about 2.75 in (7.0 cm) tall.
Border
Border gauge: the rev sc round works at the same 18 sts per 4 in (10.2 cm) as the sc base. That means 32 sts sit flat around the 32-st rim without ruffling or pulling in.
Rnd 16 (border, Color B): Ch 1, rev sc in each st around. Join with sl st to first rev sc. (32 rev sc)
Split into quarters, that is 8 rev sc per quarter of the rim: 4 quarters x 8 = 32.
Why the math works: Rnd 14 brought the body down from 40 to 32 sts to match the disc. The joining round kept 32. The border puts 1 rev sc into each of those 32 sts, so the rope-like rim follows the edge exactly with no extra fullness.
Fasten off and weave the tail into the stuffing.
Hanging loop: Cut a 20 in (50.8 cm) length of Color A. Fold it in half and twist it until it kinks back on itself to form a twisted cord, then knot the ends. Thread the knotted end down through the center of the top disc and back up 2 sts away. Knot it securely so the loop stands 3 in (7.6 cm) tall.
Bow: Cut a 14 in (35.6 cm) length of Color B. Wrap it around the base of the loop and tie a bow about 2 in (5.1 cm) wide. Trim the tails evenly.
Final Blocking
- Roll the ornament between your palms to even out the stuffing.
- Press lumpy spots in gently with your thumbs. Use the tip of a tapestry needle through the stitches to move the fiberfill around.
- Lightly mist the surface with water, or hold a steam iron 1 in (2.5 cm) above it without touching.
- Shape the puffs with your fingertips so each one sits round and upright.
- Fluff the bow loops and straighten the hanging loop.
- Let the ornament dry completely, sitting loop-up, for a few hours.
Never press an iron onto the puffs. They will flatten for good, especially in acrylic.
Final Quality-Control Checklist
- Disc Rnd 4 has 32 sts, and the flower has 8 even petals.
- Body Rnds 6–13 each have 20 puffs and 20 ch-1 sps.
- The stripes alternate cream and green, with the puffs offset in every round.
- Rnd 14 has 32 sts and matches the top disc.
- The joining round has 32 sc with no gaps.
- The border has 32 rev sc.
- The ornament is 3 in (7.6 cm) wide and 3 in (7.6 cm) tall.
- No carried yarn shows on the outside.
- The loop is secure and the bow is centered.
Troubleshooting
Puffs look flat or uneven: pull every loop up to the same height before you close the puff, and count 7 loops each time.
Stripes stack instead of staggering: you are working puffs into puffs. Each puff goes into the ch-1 sp of the round below.
Disc cups or ruffles: cupping means you are working tightly, so go up a hook size. Ruffling means the puffs are too tall or the increases are too loose.
Top disc doesn’t fit the opening: recount Rnd 14. It must have 32 sts.
Carried yarn shows through: carry it on the inside and keep it slack, not tight.
Stuffing peeks out: use a little less fiberfill or tighten your joining round.
Care
Spot clean with mild soap and cool water, then reshape and let it air dry. Store it in a box with tissue paper so the puffs and bow keep their shape.
Final Notes
The whole ornament follows one simple chain of measurements. Each disc grows from 8 to 32 sts and is 2.25 in (5.7 cm) across. The body increases to 40 sts and keeps 20 puffs per round for 8 striped rounds, reaching 3 in (7.6 cm) wide. Rnd 14 decreases back to 32 sts, and the joining round meets the top disc one to one. The 32-st border finishes a ball that is 3 in (7.6 cm) wide and tall.
Once you know the rhythm, try other color pairs. Deep burgundy, plum or an all-cream version look lovely grouped together on the tree.
Happy crocheting!