

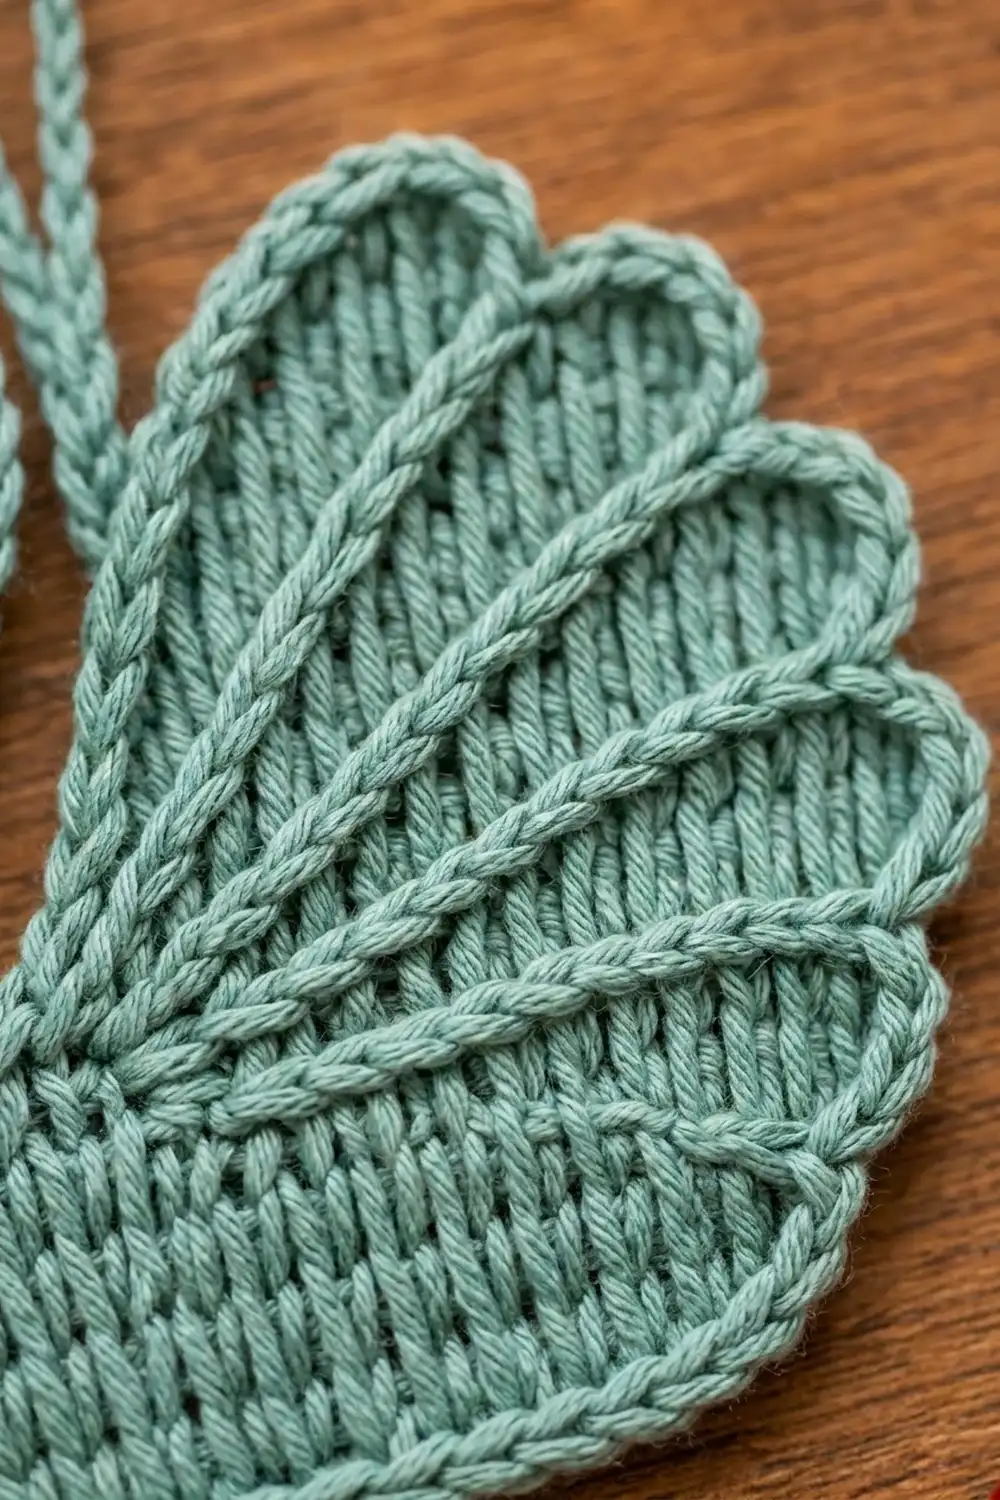
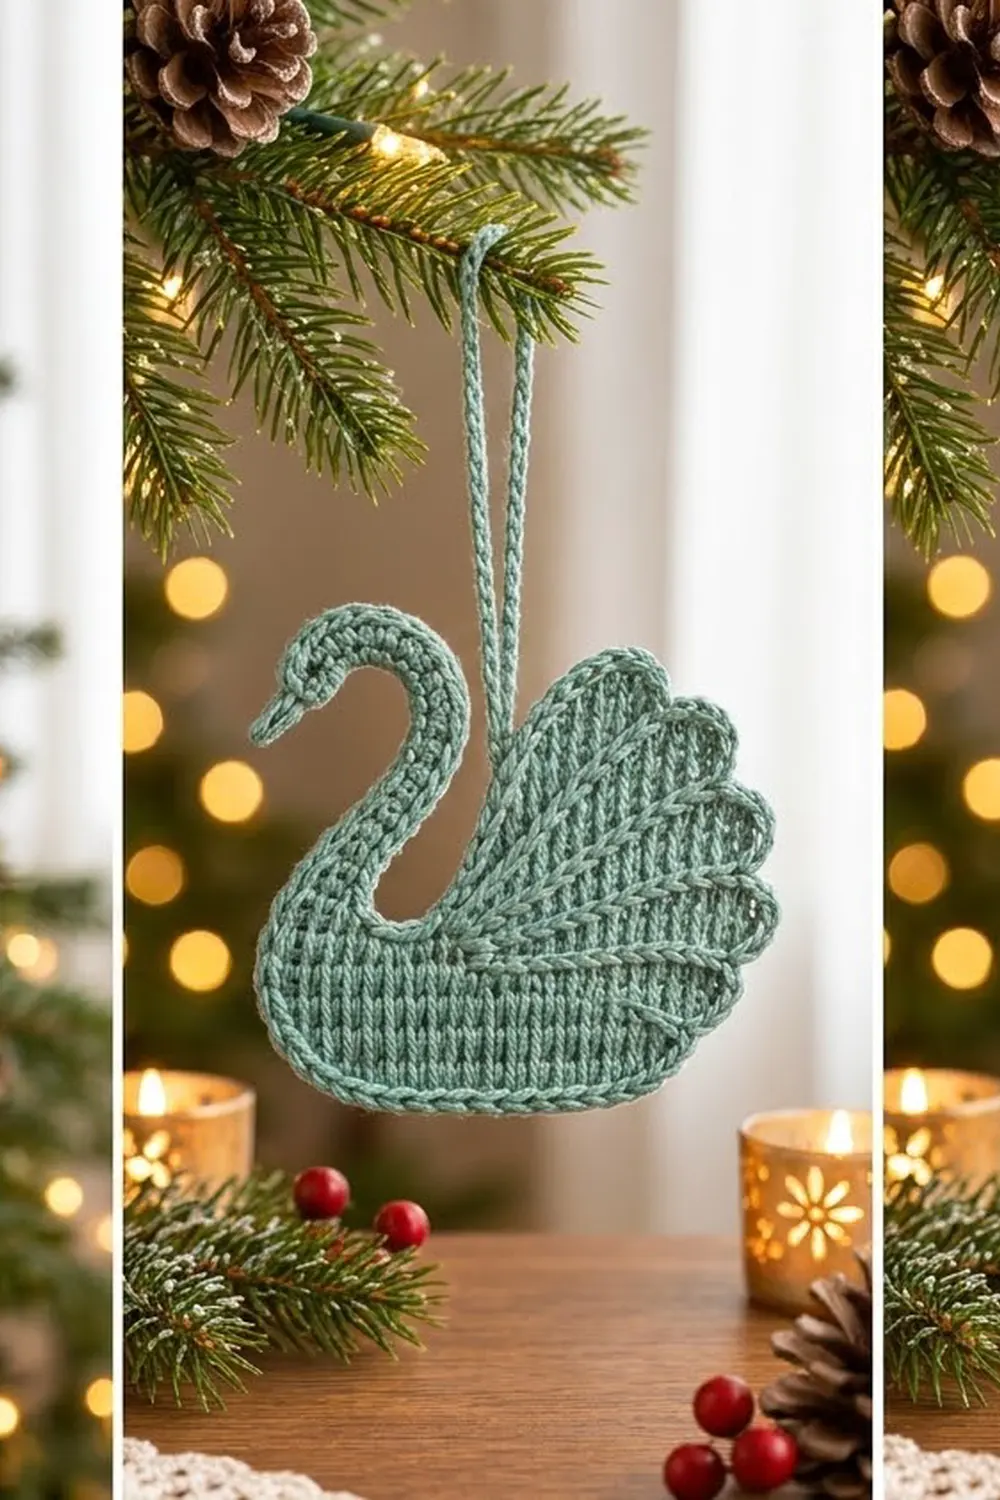
This little swan is a flat Christmas ornament in one soft sage green, the color of sea glass. The body has a knit-look texture of stacked V stitches. Above it, a five-feather wing fans out, and each feather is outlined with a raised slip-stitch line.
The style is calm and simple: one color, crisp outlines, and a curved neck that gives the swan its shape. Hang it on the tree, tie it to a gift, or make several.
The pattern uses US crochet terms. The finished swan is about 5.4 in (13.7 cm) wide and 5.4 in (13.7 cm) tall, not counting the hanging loop, which adds 2.5 in (6.4 cm).
The whole swan is one piece. You work the body in rows from the bottom up. The neck is a curved strip worked from the front corner of the body. The wing is a fan worked in rows on the back half of the body and joined to it as you go. Then you add a two-round border, surface slip-stitch feather lines, and a chain loop.
Finished Size and Construction
- Finished size: 5.4 in × 5.4 in (13.7 cm × 13.7 cm), not counting the loop
- Skill level: Intermediate
- Terminology: US crochet terms
- Yarn weight: DK (light, #3)
- Hook: 3.5 mm (E-4)
- Number of pieces: 1 (the neck and wing are worked directly onto the body)
- Layout: Swan in profile facing left, with the neck at the front and the wing over the back of the body
- Piece size (body after Row 6): 4.9 in × 1.7 in (12.4 cm × 4.3 cm)
- Size before border: 4.9 in × 4.9 in (12.4 cm × 12.4 cm)
- Border depth: about 0.25 in (0.6 cm)
Materials
Yarn: Use a smooth DK cotton or cotton blend. Cotton keeps the stitches and outlines crisp and holds its shape after blocking. Fuzzy yarns blur the feather lines.
- Sage / sea glass green: 15 g, about 35 m (38 yd)
This amount includes about a 30 percent margin for testing gauge, joins and weaving in ends. One ornament uses about 11 g.
Tools:
- 3.5 mm (E-4) crochet hook
- Tapestry needle
- 4 locking stitch markers
- Scissors
- Blocking mat, rustproof pins and a spray bottle
- Optional: light fabric stiffener or starch spray
Abbreviations (US Terms)
- ch – chain
- sl st – slip stitch
- sc – single crochet
- hdc – half double crochet
- dc – double crochet
- sc2tog – single crochet 2 together
- rev sc – reverse single crochet (crab stitch)
- st(s) – stitch(es)
- RS / WS – right side / wrong side
Special stitches:
- hdc3L (third-loop hdc, also called camel stitch): Yarn over, insert the hook into the horizontal bar just below the top two loops (on the side facing you), and finish a normal hdc. When you work it every row, the top loops roll forward into stacked Vs that look like fine vertical ribs.
- Surface slip stitch: Hold the yarn behind the piece. Insert the hook from front to back between stitches, pull up a loop, and draw it through the loop on the hook. This makes a raised chain line on the RS.
- Rev sc: Single crochet worked from left to right (for right-handers). It makes a rope-like edge.
Gauge and Checkpoints
The body is your test piece. Crochet Rows 1–6 and measure before you start the neck and wing.
- hdc3L: 18 sts and 14 rows = 4 in (10.2 cm)
- dc (wing): 18 sts and 10 rows = 4 in (10.2 cm)
- sc (neck and border): 20 sts = 4 in (10.2 cm)
Checkpoints:
- Body Row 1 (14 hdc): 3.1 in (7.9 cm) wide.
- Body Row 4 (20 sts): 4.4 in (11.2 cm) wide.
- Body Row 6 (22 sts): 4.9 in (12.4 cm) wide and 1.7 in (4.3 cm) tall.
- Neck Row 1 (21 sc): 4.2 in (10.7 cm) long before it curls.
- Wing after Row 7: 2.8 in (7.1 cm) from the wing base.
- Wing after Row 8: 3.2 in (8.1 cm) from the wing base.
- Before border: 4.9 in × 4.9 in (12.4 cm × 12.4 cm).
If your body is too big, change to a 3.25 mm (D-3) hook. If it is too small, change to a 3.75 mm (F-5) hook. Being off by up to 0.1 in (0.3 cm) is fine. If you’re off by more, the wing won’t fit neatly over its 16 body stitches.
Body
With the RS facing you, the swan faces left. Row 1 runs from the back (right) to the front (left), and the front is the neck end.
Foundation: Ch 16.
Row 1 (RS): Hdc in 3rd ch from hook and in each ch across, turn. (14 hdc) Put a marker at the end of this row to mark the front.
From Row 2 on, start every row with ch 2, which does not count as a stitch. Work every stitch as hdc3L.
Row 2 (WS, front to back): 2 hdc3L in first st, hdc3L in next 12 sts, 2 hdc3L in last st, turn. (16 sts)
Row 3 (RS): 2 hdc3L in first st, hdc3L in next 14 sts, 2 hdc3L in last st, turn. (18 sts)
Row 4 (WS): 2 hdc3L in first st, hdc3L in next 16 sts, 2 hdc3L in last st, turn. (20 sts)
Row 5 (RS, starts at back): 2 hdc3L in first st, hdc3L in each st across, turn. (21 sts) This row increases only at the back, which lifts the tail end.
Row 6 (WS, starts at front): Hdc3L in each st to last st, 2 hdc3L in last st. (22 sts) Fasten off.
The increases at both ends of Rows 2–4 round off the bottom corners. The extra stitches at the back in Rows 5–6 complete the boat shape.
Number the top edge: Count the Row 6 stitches starting at the front corner, so st 1 is the front corner and st 22 is the back corner.
- Sts 1–4: neck base
- Sts 5–6: the dip between the neck and the wing (these only get border stitches)
- St 7: wing center
- Sts 8–22: wing join (15 sts)
Put markers in sts 1, 5, 7 and 22.
Neck and Head
The neck is a strip two rows of sc wide. Its back edge has more stitches along one section, so the strip bends forward into a hook.
Row 1: With RS facing, join yarn in st 1. Ch 22. Sc in 2nd ch from hook and in each ch back down to the body. Sl st in body sts 2 and 3, turn. (21 sc)
The chain edge is the front of the neck, and the first sc you made is the tip of the head.
Row 2 (back edge, working up from the base): Ch 1, sc in next 10 sts (stem), 2 sc in each of next 7 sts (curve), sc in last 4 sts (head). (10 + 14 + 4 = 28 sc) Fasten off.
Along the curve, the back edge has 14 sts and the front edge has 7, so the strip turns about 180 degrees. Lay it flat over the front of the body with the head pointing forward and down. Checkpoint: the top of the curve sits about 2.9 in (7.4 cm) above the top of the body.
Wing
The wing is a quarter-circle fan centered on st 7. Each row is an arc. One end of each row sits on the top of the body. The other end builds the straight front edge of the wing, which rises straight up beside the neck.
Rows that end at the body are joined to it with slip stitches. Each of the 5 stitches in Row 1 starts one feather. The increases are placed so that each feather’s stitches stay together in their own wedge.
Row 1 (WS): With WS facing, join yarn in st 7. Ch 3 (counts as dc), 4 dc in st 7. Sl st in body sts 8 and 9, turn. (5 dc)
Row 2 (RS): Skip the sl sts. Ch 3 (counts as dc), dc in same st, 2 dc in each remaining st, ending in the top of the ch-3, turn. (10 sts; 2 per feather)
Row 3 (WS): Ch 3 (counts as dc), dc in each st across. Sl st in body sts 10, 11 and 12, turn. (10 sts)
Row 4 (RS): Skip the sl sts. Ch 3, 2 dc in next st, [dc in next st, 2 dc in next st] 4 times, turn. (15 sts; 3 per feather)
Row 5 (WS): Ch 3, dc in each st across. Sl st in body sts 13, 14, 15 and 16, turn. (15 sts)
Row 6 (RS): Skip the sl sts. Ch 3, dc in next st, 2 dc in next st, [dc in next 2 sts, 2 dc in next st] 4 times, turn. (20 sts; 4 per feather)
Row 7 (WS): Ch 3, dc in each st across. Sl st in body sts 17 through 22, turn. (20 sts) Checkpoint: 2.8 in (7.1 cm) from the wing base.
The joins use 2 + 3 + 4 + 6 = 15 body stitches, which covers sts 8–22 exactly.
Row 8 (RS, scallops): Skip the sl sts. [Hdc in next st, 2 dc in next st, 2 dc in next st, hdc in next st] 5 times. (30 sts; 6 per lobe) Fasten off.
Each lobe sits on one 4-stitch feather wedge. The short hdc at each end and the taller dc in the middle make a rounded top with a clear dip between lobes.
Checkpoint: 3.2 in (8.1 cm) from the wing base. The whole piece now measures 4.9 in × 4.9 in (12.4 cm × 12.4 cm).
Border
Border gauge: 5 sc per inch (about 2 sc per cm) along straight edges.
- An hdc row is about 0.29 in (0.7 cm) tall, so 2 rows = 0.57 in (1.4 cm), or about 3 sc.
- A dc row is 0.4 in (1.0 cm) tall, so each row end takes 2 sc.
Using these numbers keeps the edges flat, without waves or pulling.
Rnd 1: With RS facing, join yarn in the first foundation ch at the front bottom corner. Work counterclockwise in this order:
- Bottom: 3 sc in first ch, sc in next 12 ch, 3 sc in last ch. (18)
- Back body edge (Rows 1–6): 3 sc per 2 rows. (9)
- Tail corner: 2 sc where the body meets the first lobe. (2)
- Scallops: On each lobe, sc in hdc, sc in dc, 2 sc in each of next 2 dc, sc in dc, sc in hdc. (8 per lobe × 5 = 40)
- Wing front edge (Rows 7–1): 2 sc per row end. (14)
- Dip: Sc in body sts 6 and 5. (2)
- Neck back edge (Row 2): Sc in next 10 sts, [sc in next 2 sts, 2 sc in next st] 4 times, sc in next 2 sts, sc in last 4 sts. (10 + 18 + 4 = 32)
- Head end: 2 sc across the 2 row ends. (2)
- Beak: Ch 4, sl st in 2nd ch from hook, sc in next ch, hdc in next ch. (3)
- Neck front edge (chain loops, head to base): Sc in next 4 ch, sc in next ch, sc2tog, sc in next ch, sc2tog, sc in next ch, sc in last 10 ch. (4 + 5 + 10 = 19)
- Front body edge (Rows 6–1): 3 sc per 2 rows. (9)
Sl st to the first sc to join. (150 sts)
Why the math works:
- Bottom: one sc per chain (14), plus 2 extra at each corner to turn it (18).
- Sides: the row-end rates from the border gauge.
- Scallops: 2 extra sc per lobe to get around the rounded tops.
- Neck: 4 increases on the outer curve and 2 decreases on the inner curve, because the border runs along a longer line outside the curve and a shorter one inside.
Total: 18 + 9 + 2 + 40 + 14 + 2 + 32 + 2 + 3 + 19 + 9 = 150.
Rnd 2: Ch 1. Rev sc in each st around, except the 3 beak sts: work those as loose sl sts so the tip stays sharp. Sl st to the first st. (147 rev sc + 3 sl st = 150 sts) Fasten off.
Feather Lines
With RS facing, work surface slip stitch lines out from the wing center (st 7).
- Wing seam line: 1 surface sl st in each of body sts 8–22, along the seam between the wing and the body. (15)
- 4 feather lines: Work along the borders between the 4-stitch wedges. Make 2 surface sl sts per dc row for Rows 1–7, then 1 in the dip between lobes. (14 + 1 = 15 each)
Total: 5 lines × 15 = 75 surface sl sts. Keep them loose so the wing stays flat.
Hanging Loop
Number the lobes from the tail: lobe 1 is next to the tail and lobe 5 is at the top front. Join yarn in the border at the dip between lobes 4 and 5. Ch 30, then sl st in the same st. Sl st in the back bump of each ch around. (30 sl st) Sl st at the base and fasten off. Loop height: 2.5 in (6.4 cm).
This spot is about 2.4 in (6.1 cm) from the front edge, close to the swan’s balance point.
Final Blocking
- Weave in all ends through nearby stitches, but don’t cut them yet.
- Mist the ornament until it is damp but not soaked.
- Pin it RS up. Set the body to 4.9 in (12.4 cm) across the top, not counting the border.
- Pin the neck into a smooth curve, with the head tip about 2.9 in (7.4 cm) above the body (border not included).
- Pin each lobe into an even, rounded shape. Line up the feather lines so they meet at the wing base.
- Check the full size: 5.4 in × 5.4 in (13.7 cm × 13.7 cm).
- Add stiffener if you like, let it dry completely, then trim the ends.
Final Quality-Control Checklist
- Body Row 6 has 22 sts and measures 4.9 in (12.4 cm).
- Neck Row 2 has 28 sc, and the curve lies flat with no twist.
- Wing Rows 1–8 have 5, 10, 10, 15, 15, 20, 20 and 30 sts.
- The wing joins use body sts 8–22, with none skipped.
- Border Rnds 1 and 2 have 150 sts each.
- Each of the 5 feather lines has 15 sl sts, and all meet near st 7.
- The ornament hangs level.
Troubleshooting
- Wing cups or ruffles: Your dc are loose compared with the body. Go down one hook size for the wing only.
- Wing doesn’t reach st 22: Your dc rows are too short. Make your dc a little taller, or add 1 dc to the first lobe in Row 8.
- Neck curls too much or too little: Use 6 or 8 increases in Row 2 instead of 7. Change the outer-curve increases in Rnd 1 to match: 3 or 5 instead of 4.
- Border ripples: Work fewer stitches along the row ends: 1 sc per hdc row and 3 sc per 2 dc rows.
- Feather lines pucker: Pull them out and redo them with a larger hook.
- Ornament tilts: Move the loop one stitch toward the side that hangs higher.
Care
Hand wash in cool water, roll in a towel to press out the water, and dry flat. Pin the lobes again if they lose their shape.
Final Notes
The size checks build on each other:
- Body Row 1 measures 3.1 in (7.9 cm).
- Body Row 6 measures 4.9 in × 1.7 in (12.4 cm × 4.3 cm).
- The neck curve rises 2.9 in (7.4 cm) above the body.
- The wing reaches 3.2 in (8.1 cm) from its base.
- Before the border, the piece is 4.9 in (12.4 cm) square.
- The border adds 0.25 in (0.6 cm) on each side.
- The finished ornament is 5.4 in (13.7 cm) square, with a 2.5 in (6.4 cm) loop.
If each checkpoint matches, the swan will come out right. Make one for every branch, or a pair to give away.
Happy crocheting!