

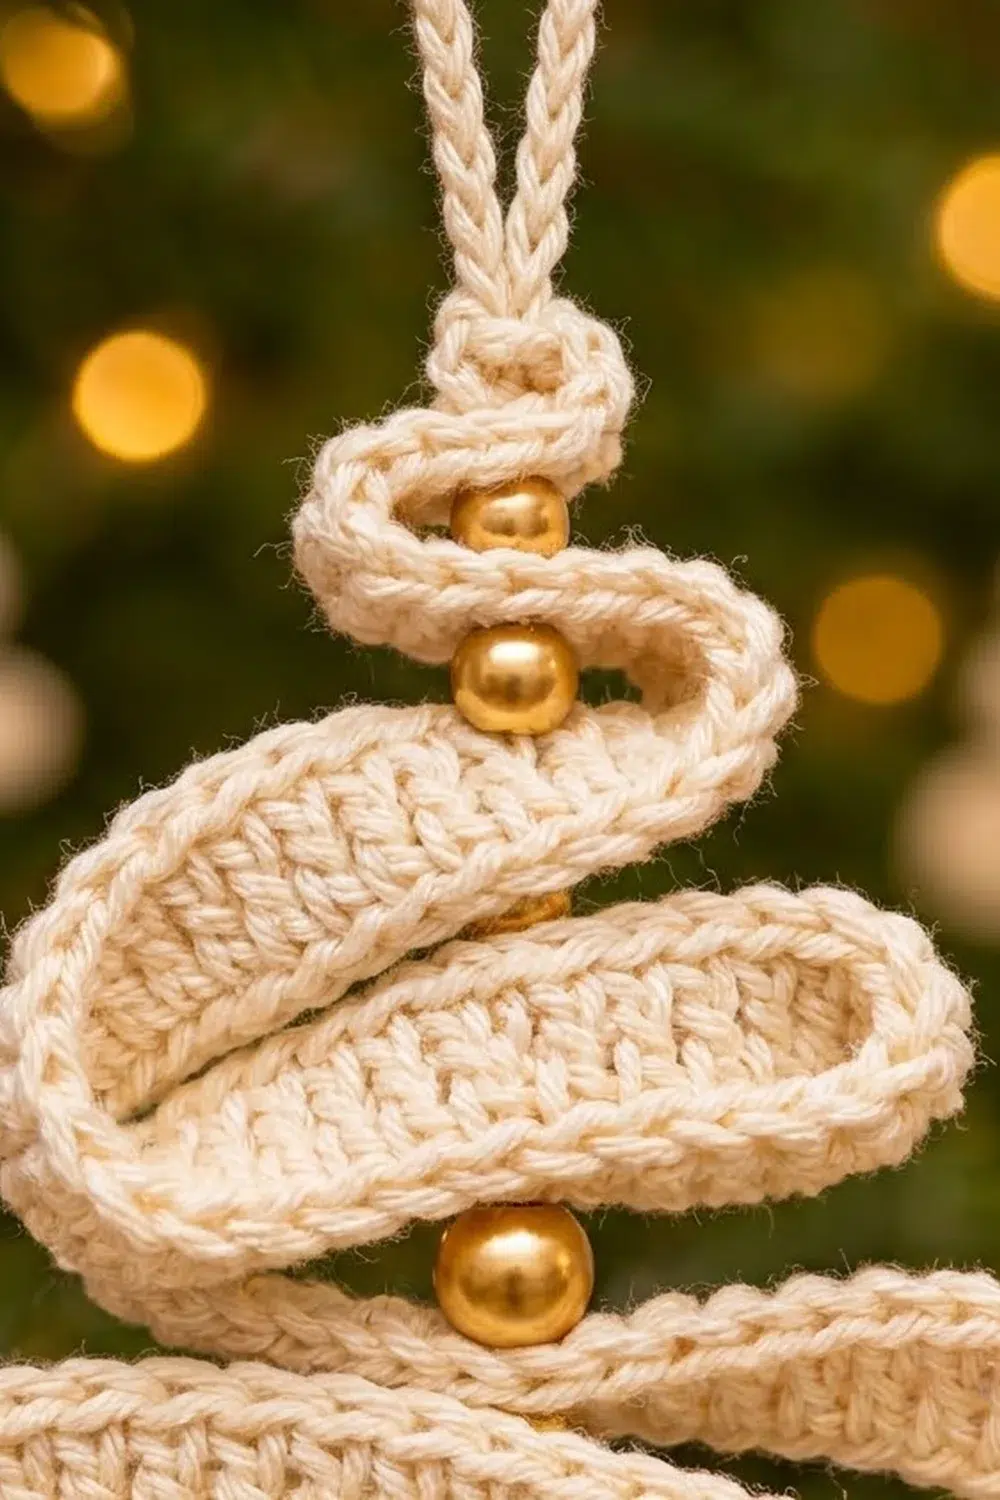
This ornament is a single long, narrow crochet ribbon folded back and forth into a tree. Each fold gets a little shorter as the tree climbs, and a gold bead sits in each gap between the tiers. A small brown trunk sits below and a cream loop for hanging sits on top.
The palette is warm and simple: cream cotton for the ribbon and loop, brown for the trunk, and seven gold beads. The ribbon has a firm, corded edge on both long sides and a column of upright double crochet stitches down the middle. The whole tree looks soft and handmade but still neat, and it suits a natural, Scandinavian-style tree as well as a gift topper.
The pattern uses US crochet terms. The finished tree is 4 in (10.2 cm) wide and 5 in (12.7 cm) tall without the trunk. With the trunk it is 5.75 in (14.6 cm) tall, plus a 2 in (5.1 cm) hanging loop.
The construction is simple. You crochet a straight strip 100 stitches long in three rows, then add a slip stitch border. Next you make a small trunk and a chain loop. Last, you fold the strip into eight tiers and stitch them together through the center, adding beads as you go. One ornament takes about an hour once your gauge is set.
Finished Size and Construction
- Finished tree: 4 in (10.2 cm) wide x 5 in (12.7 cm) tall, not counting trunk and loop
- Height with trunk: 5.75 in (14.6 cm); loop adds 2 in (5.1 cm)
- Skill level: Easy
- Terminology: US crochet terms
- Yarn weight: DK / light worsted (#3) cotton
- Hook: 3.5 mm (E-4)
- Number of pieces: 1 ornament made from 1 main strip, 1 trunk, and 1 hanging loop
- Layout: strip folded into 8 tiers that stack and narrow toward the top
- Strip size before border: 20 in x 5/8 in (50.8 x 1.6 cm)
- Border depth: about 1/16 in (0.2 cm) on each edge
- Strip size after border: about 20 1/8 in x 3/4 in (51.1 x 1.9 cm)
- Trunk: 0.8 in x 0.8 in (2.0 x 2.0 cm)
Materials
Use a smooth mercerized or combed cotton in DK weight. Cotton holds its folds well and shows the stitches clearly. Acrylic also works, but it is springier and the tiers may not hold their shape as well. Avoid fuzzy or brushed yarns, because the halo hides the upright double crochet texture.
- Cream (strip, border, loop, sewing): 10 g, about 22 m
- Brown (trunk): 2 g, about 4 m
- 7 gold beads, 6 mm, with holes at least 1.5 mm wide
- 3.5 mm (E-4) crochet hook
- Tapestry needle with a narrow eye, or a beading needle for the bead step
- 7 locking stitch markers
- Scissors
- Ruler or tape measure
- Pins and a blocking surface
All yarn amounts include a generous margin. The ornament uses less than this, so leftovers from other projects work well. Check that your beads fit over a single strand of your cream yarn before you start.
Abbreviations (US Terms)
- ch – chain
- sl st – slip stitch
- sc – single crochet
- dc – double crochet
- BLO – back loop only
- st(s) – stitch(es)
- RS – right side
Special technique – row-end slip stitch: insert the hook under the outer strand at the side of a row, yarn over, and pull through the work and the loop on the hook. Use this along the short ends of the strip.
Gauge and Checkpoints
Gauge matters here because the fold plan is measured in stitches. If your strip is too long or too short, the tiers will not stack into a neat triangle.
Gauge: 20 sts and 3 rows (sc, dc, sc) = 4 in x 5/8 in (10.2 x 1.6 cm).
Test piece first: Ch 21. Work Rows 1–3 of the strip below over 20 sts. The swatch should measure 4 in (10.2 cm) long and 5/8 in (1.6 cm) wide. Keep it as a reference or unravel it.
Checkpoints:
- After Row 1, the strip is 20 in (50.8 cm) long.
- After Row 3, the strip is 20 in x 5/8 in (50.8 x 1.6 cm).
- After the border, it is about 20 1/8 in x 3/4 in (51.1 x 1.9 cm).
- The trunk is 0.8 in (2.0 cm) square after Row 4.
Too big? Go down a quarter size to a 3.25 mm hook. Too small? Go up to a 3.75 mm hook. Length matters most. Width can be off by 1/16 in (0.2 cm) and the tree will still look right.
The Ribbon Strip
With cream, ch 101.
Row 1 (RS): Sc in the 2nd ch from hook and in each ch across. Turn. (100 sc)
Check: 20 in (50.8 cm).
Row 2: Ch 3 (counts as first dc), dc in each of the next 99 sts. Turn. (100 dc)
The dc row makes the column of upright stitches you see down the middle of the ribbon.
Row 3: Ch 1 (does not count as a st), sc in each st across, working the last sc into the top of the turning ch-3. (100 sc)
Do not fasten off. Go straight to the Border below.
Check: 20 in x 5/8 in (50.8 x 1.6 cm). Count again before moving on. You should have exactly 100 sts on both long edges: 100 sc on Row 3, and 100 free loops on the foundation chain.
The Trunk
With brown, ch 5.
Row 1: Sc in the 2nd ch from hook and in each ch across. Turn. (4 sc)
Rows 2–4: Ch 1, sc in BLO of each st across. Turn. (4 sc)
The back-loop rows make the soft horizontal ridges on the trunk.
Check: 0.8 in x 0.8 in (2.0 x 2.0 cm). Fasten off and leave an 8 in (20.3 cm) tail for sewing.
The Hanging Loop
With cream, leave a 6 in (15.2 cm) tail and ch 21.
Row 1: Sl st in the back bump of the 2nd ch from hook and in each back bump across. (20 sl st)
This makes a firm, cord-like strand about 4 in (10.2 cm) long. Fold it in half and it becomes a 2 in (5.1 cm) loop. Fasten off and leave a 6 in (15.2 cm) tail. You now have a tail at each end to sew with.
Border
The border is one round of slip stitches around the whole strip. It gives the ribbon a firm, rolled edge and helps it hold a fold.
Border gauge: 5 sl st = 1 in (2.5 cm) along the long edges. This matches the body gauge, so the border will not ruffle or pull in.
How the corners are counted: On each long side, the first and last sl st are the corner sts, and they are part of that side’s count. The short-end counts include only the row-end sts between the corners.
Border round: Keep going from the end of Row 3. Do not turn.
- Long side 1 (top of Row 3): Ch 1 and sl st loosely in each sc of Row 3. (100 sl st)
- Short end 1: Sl st in the side of the sc row, 2 sl st in the side of the dc row, sl st in the side of the next sc row. (4 sl st)
- Long side 2 (foundation chain): Sl st in each free loop of the foundation ch. (100 sl st)
- Short end 2: Work as Short end 1. (4 sl st)
Join with a sl st to the first sl st. Round total: 100 + 4 + 100 + 4 = 208 sl st.
Fasten off and leave a 12 in (30.5 cm) cream tail; you will use it to sew the tree together. Weave in the beginning tail of the foundation chain.
Why the math works: Each long side has one sl st per existing st, so it stays at 100 sts, or 20 in (50.8 cm). The short ends get one sl st per sc row and two per dc row, since the dc row is about twice as tall. That keeps the ends flat. Slip stitches add very little depth, about 1/16 in (0.2 cm) per edge, which takes the strip from 5/8 in (1.6 cm) to about 3/4 in (1.9 cm) wide.
Final Blocking
Block the strip straight first. Fold and assemble only after it is dry.
- Wet block the strip. Soak it in cool water for 5 minutes and press out the water in a towel. Do not wring it.
- Pin it straight. Pin it to 20 in x 3/4 in (50.8 x 1.9 cm). Keep the long edges parallel. Let it dry completely.
- Place the fold markers. Count along the long edge from the end with the 12 in (30.5 cm) tail. That is the bottom of the tree. Mark the sts that end each segment: st 22, 42, 59, 73, 84, 92, and 97.
- Read the segment plan. This gives 8 segments:
- Segment 1 (bottom tier): 22 sts, 4.4 in (11.2 cm)
- Segment 2: 20 sts, 4 in (10.2 cm)
- Segment 3: 17 sts, 3.4 in (8.6 cm)
- Segment 4: 14 sts, 2.8 in (7.1 cm)
- Segment 5: 11 sts, 2.2 in (5.6 cm)
- Segment 6: 8 sts, 1.6 in (4.1 cm)
- Segment 7: 5 sts, 1 in (2.5 cm)
- Segment 8 (top curl): 3 sts, 0.6 in (1.5 cm)
- Check: 22 + 20 + 17 + 14 + 11 + 8 + 5 + 3 = 100 sts.
- Fold the tiers. Lay Segment 1 flat with the tail at the right. At each marker, curve the ribbon up and back the other way so it makes a soft rounded fold, not a sharp crease. Each fold uses part of the segment, so the bottom tier lies about 4 in (10.2 cm) wide and the top curl about 1/2 in (1.3 cm) wide. Line up the middle of each segment on one vertical center line.
- Pin the shape. Check the tree: 4 in (10.2 cm) wide at the base and 5 in (12.7 cm) tall. Both sides should slope evenly from base to tip.
- Bead and stitch the center. Thread the 12 in (30.5 cm) cream tail onto the beading needle. Bring it up through the middle of Segment 1. Add one bead, then go through the middle of Segment 2. Do the same for every gap: 7 beads for 7 gaps between 8 tiers. Pull just tight enough that the beads sit snug and the tiers do not slide. Secure the tail at the top curl.
- Attach the trunk. Center the trunk under the bottom tier so about 1/4 in (0.6 cm) sits behind the ribbon. Whipstitch it to the back with the brown tail.
- Attach the hanging loop. Fold the loop in half. Sew both ends to the back of the top curl with the loop tails. Weave in all ends on the back.
- Set the shape. Mist the folded tree lightly and leave it flat to dry for a few hours.
Final Quality-Control Checklist
- Strip count is 100 sts on each long edge, and the border total is 208 sl st.
- Strip measures 20 in x 3/4 in (50.8 x 1.9 cm) after blocking.
- Fold markers sit at sts 22, 42, 59, 73, 84, 92, and 97.
- There are 8 tiers, each narrower than the one below.
- 7 beads sit in a straight vertical line down the center.
- The tree is 4 in (10.2 cm) wide and 5 in (12.7 cm) tall.
- Trunk is centered and 0.8 in (2.0 cm) square.
- Loop stands straight up, 2 in (5.1 cm) tall.
- No loose ends show on the front.
Troubleshooting
The strip twists like a corkscrew. The foundation chain is too tight. Chain it again with a hook one size larger, then switch back for Row 1.
The border makes the edges wavy. Your slip stitches are too loose, or you added stitches. Keep exactly 100 sl st per long side.
The border pulls the strip into a curve. Your slip stitches are too tight. Pull up each loop a little before you finish the stitch.
The tiers are lopsided. The segment centers are not lined up. Unpin the tree, find the middle stitch of each segment, and line them up on a ruler.
The beads slip into the ribbon. The bead holes are too big for the yarn. Make a small knot or a backstitch before each bead.
The folds spring open. Use cotton instead of acrylic, mist the tree again, and pin it until it is fully dry.
The tree is too short or too tall. Measure the strip. If it is 1 in (2.5 cm) off, the tiers will be noticeably off too, so fix your gauge and make the strip again.
Care
Spot clean with a damp cloth and cool water, then reshape and dry flat. Store the ornament flat in tissue paper so the folds do not get crushed.

Final Notes
The measurement chain is simple. Gauge is 5 sts = 1 in (2.5 cm). That gives a 100-st strip that is 20 in (50.8 cm) long and 5/8 in (1.6 cm) wide. The slip stitch border brings it to about 3/4 in (1.9 cm) wide while adding only about 1/8 in (0.3 cm) to the length. The 100 sts split into 8 segments from 22 down to 3. Folded and beaded, they make a tree that is 4 in (10.2 cm) wide and 5 in (12.7 cm) tall. Add the 0.8 in (2.0 cm) trunk and the 2 in (5.1 cm) loop, and the ornament is ready for the tree.
If your strip is right, the rest will be too. Check your gauge, count to 100, and fold slowly.
Happy crocheting!